Introduction
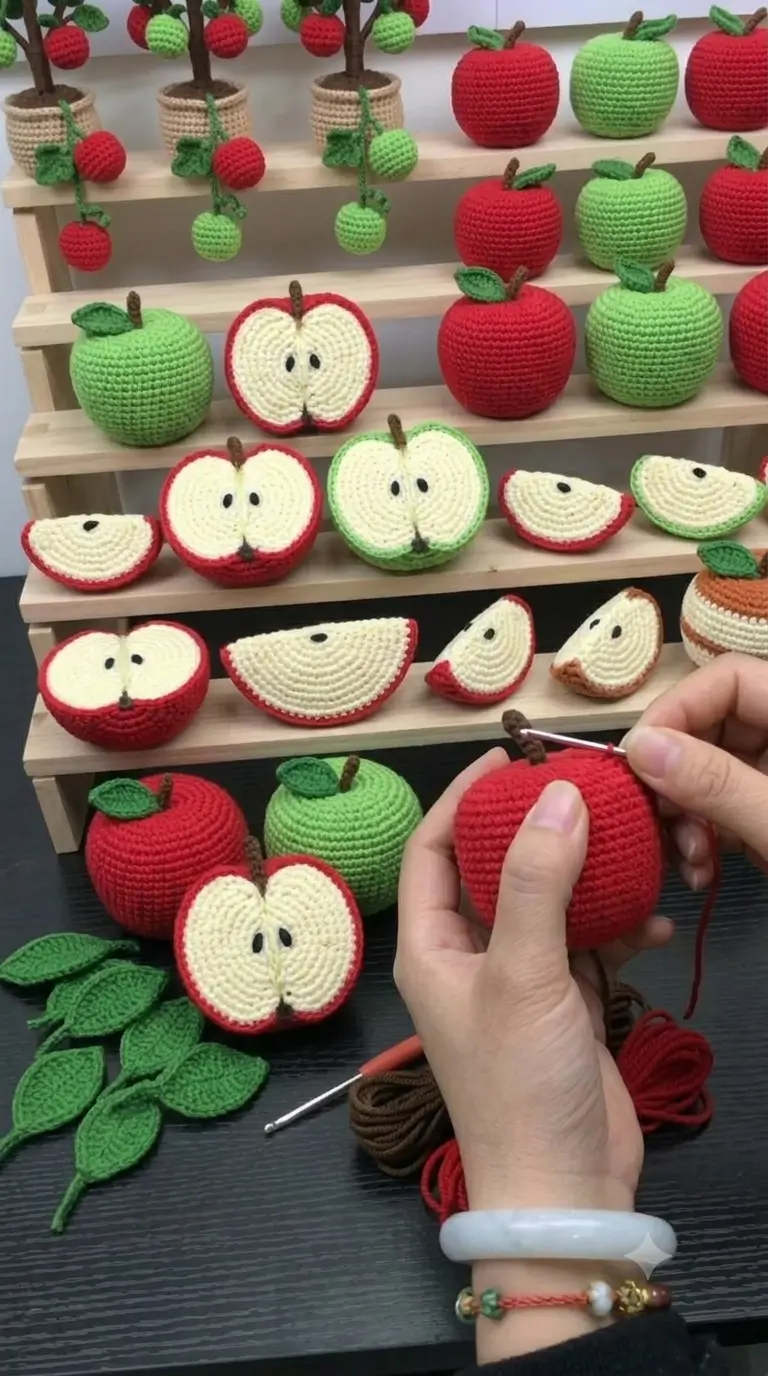
An apple’s top and bottom both cave inward, so a crochet sphere fails before the leaf is even attached. This apple amigurumi crochet pattern builds that indentation into a 7–8 cm DK-cotton fruit, then adds matching halves and wedges with a 3 mm hook. The project is suitable for basic amigurumi skills and produces a coordinated play-food or display set rather than a single generic ball.
The Design: What Makes This Apple Different
Three structural decisions control the result. First, the whole fruit stops at a 36-stitch plateau instead of expanding into a large sphere; you get the compact proportions visible in the reference photo. Second, a long finishing strand passes through the vertical centre to pull both poles inward. The finished fruit therefore reads as an apple rather than a red or green ball. Third, the crochet apple slice pattern uses cream panels edged with the same peel yarn as the whole fruit, so every cut piece belongs to one set.
The crochet apple half pattern adds paired flesh lobes and embroidered black seeds instead of plastic eyes. A frequent error is overstuffing before sculpting. The maker then has to pull hard enough to distort stitches, while a moderately firm body compresses cleanly around the centre line.
Project Info at a Glance
| Skill Level | Time | Finished Size | Hook | Best For |
|---|---|---|---|---|
| Easy | About 2 hours for one detailed whole apple | About 7.6 cm | 3.0 mm | Play food, teaching props, fruit displays |
The 7.6 cm DK benchmark and 3 mm hook are consistent with published apple-amigurumi project data, while comparable detailed apples can take about two hours of active crochet time.
Materials and Tools
Yarn
A DK apple of this scale generally requires only a small amount of yarn. Keep the color allowances below available so the whole fruit, cut pieces and accessories can be made in matching shades.
- Apple red — DK/light worsted cotton — reserve 25–30 g.
- Apple green — DK/light worsted cotton — reserve 25–30 g if making a second colorway.
- Cream — DK cotton — reserve 8–10 g for flesh panels and wedges.
- Leaf green — DK cotton — reserve 3–5 g.
- Dark brown — DK cotton — reserve 2–3 g for stems, soil and tree details.
- Black — DK or embroidery cotton — approximately 1 m for seeds.
- Beige — DK cotton — approximately 10–15 g if making the optional display pot.
Tools
- 3.0 mm crochet hook
- Polyester stuffing
- Tapestry needle
- Long doll or upholstery needle, approximately 12–15 cm
- Locking stitch marker
- Scissors
- Pins
- Safety eyes: none for the photo-matched version
Abbreviations
- MR — magic ring
- sc — single crochet
- inc — 2 sc in one stitch
- dec — decrease over 2 stitches
- sl st — slip stitch
- ch — chain
- BLO — back loop only
- hdc — half double crochet
- dc — double crochet
- FO — fasten off
An invisible decrease is worked through the front loops of the next two stitches before completing one sc, reducing the visible gap left by a standard decrease.
Pattern — Step by Step
Work the three-dimensional pieces in a continuous spiral unless a section states that rows are used. This pattern uses a 6-stitch amigurumi progression and a 36-stitch medium plateau to create a compact apple close to the scale shown in the reference image.
Whole Apple Body — Make 1
Yarn: red or apple green
R1: 6 sc in MR (6)
R2: inc ×6 (12)
R3: (sc, inc) ×6 (18)
R4: (2 sc, inc) ×6 (24)
R5: (3 sc, inc) ×6 (30)
R6: (4 sc, inc) ×6 (36)
R7: sc around (36)
R8: sc around (36)
R9: sc around (36)
R10: sc around (36)
R11: sc around (36)
R12: sc around (36)
R13: sc around (36)
R14: sc around (36)
R15: (4 sc, dec) ×6 (30)
R16: (3 sc, dec) ×6 (24)
R17: (2 sc, dec) ×6 (18)
Stuff to medium-firm density. The surface should resist a fingertip but still compress by roughly 5 mm at the centre.
R18: (sc, dec) ×6 (12)
R19: dec ×6 (6)
Fasten off. Leave a 45 cm tail.
Pass the tail through the six final stitches and close the opening. Send the needle from the bottom centre to the centre of R1, take a small anchor stitch beside the magic ring, then return to the bottom. Pull until the top sinks approximately 8–10 mm. Repeat once to define the bottom indentation.
Stem — Make 1
Yarn: dark brown
R1: 6 sc in MR (6)
R2: sc around (6)
R3: sc around (6)
R4: sc around (6)
R5: sc around (6)
Do not stuff.
Fasten off. Leave a 15 cm tail.
The finished stem should measure close to 2 cm before attachment.
Leaf — Make 1
Yarn: leaf green
Ch 8.
Row 1: Starting in the second ch from hook, sl st, sc, hdc, dc in next 2 ch, hdc, sc (7).
Ch 1 at the tip. Continue along the unused loops on the opposite side of the starting chain.
Row 2: sc, hdc, dc in next 2 loops, hdc, sc, sl st (7).
Fasten off. Leave a 20 cm tail.
Pin the broad end beside the stem rather than directly underneath it. Positioning the leaf at an angle keeps the brown stem visible.
Vertical Half Apple — Make 1
Yarn: red or green peel plus cream flesh
The cut apple uses two cream lobes separated by a narrow central seam. Making the lobes independently gives more control over the characteristic apple-core silhouette.
Peel Backing Lobes — Make 2
With peel color:
R1: 6 sc in MR (6)
R2: inc ×6 (12)
R3: (sc, inc) ×6 (18)
R4: (2 sc, inc) ×6 (24)
R5: (3 sc, inc) ×6 (30)
Fasten off each lobe, leaving 25 cm on the second.
Overlap the two circles by approximately 8 mm. Sew through six to eight adjacent stitches to create one wide apple-shaped backing.
Cream Flesh Patches — Make 2
With cream:
R1: 6 sc in MR (6)
R2: inc ×6 (12)
R3: (sc, inc) ×6 (18)
R4: (2 sc, inc) ×6 (24)
Fasten off, leaving 25 cm tails.
Place one cream patch on each peel lobe. Keep approximately 4–5 mm of peel visible around the outer border. Sew the cream circles down around their edges, then pull the two upper inner edges slightly toward the central seam.
Add one stem at the top using the stem instructions above. A leaf is optional on the cut pieces.
Apple Wedge — Make 1 or More
Yarn: cream plus red or green peel
Make 2 cream panels.
Ch 2.
Row 1: 2 sc in second ch from hook (2)
Row 2: ch 1, turn, inc ×2 (4)
Row 3: ch 1, turn, sc, inc, sc, inc (6)
Row 4: ch 1, turn, (2 sc, inc) ×2 (8)
Row 5: ch 1, turn, (3 sc, inc) ×2 (10)
Row 6: ch 1, turn, (4 sc, inc) ×2 (12)
Row 7: ch 1, turn, (5 sc, inc) ×2 (14)
Row 8: ch 1, turn, (6 sc, inc) ×2 (16)
Fasten off the first panel. Do not cut the second panel.
Place both panels together. Switch to red or green yarn.
Join the long lower edge with evenly spaced sc through both layers, placing approximately 16 sc across the peel edge. Continue around the two short cream sides with sl sts, leaving the point thin rather than stuffed.
Fasten off. Leave a 12 cm tail and hide it between the panels.
Repeat the same construction in both red and green to match the photographed apple-slice display.
Seeds — Make 2 Per Cut Face
Yarn: black
Do not use safety eyes for the photo-matched version.
Thread approximately 25 cm of black yarn. Make three or four satin stitches over a 5–6 mm vertical span, allowing the lower end to taper to a point.
Place the pair approximately 10–14 mm apart on a full half apple. For a wedge, use one seed approximately one-third of the way in from the peel.
Secure each yarn end on the back of the cream panel before the pieces are fully closed.
Optional Potted Apple Tree Display
Yarn: beige, brown, green and red
The background of the reference includes small apple trees in cylindrical crochet pots. This accessory can be omitted without changing the main apple pattern.
Pot
With beige:
R1: 6 sc in MR (6)
R2: inc ×6 (12)
R3: (sc, inc) ×6 (18)
R4: BLO sc around (18)
R5: sc around (18)
R6: sc around (18)
R7: sc around (18)
R8: sc around (18)
R9: (2 sc, inc) ×6 (24)
R10: sc around (24)
R11: sc around (24)
Fasten off.
Soil Disc
With dark brown:
R1: 6 sc in MR (6)
R2: inc ×6 (12)
R3: (sc, inc) ×6 (18)
R4: (2 sc, inc) ×6 (24)
Fasten off, leaving 25 cm for sewing.
Trunk
With dark brown:
R1: 6 sc in MR (6)
R2–R14: sc around (6) each round.
Stuff lightly with short fibre pieces or leave unstuffed if the stitches are firm. Do not add floral wire when the finished object is intended for play.
Mini Apples
Make several in red and green.
R1: 6 sc in MR (6)
R2: inc ×6 (12)
R3: (sc, inc) ×6 (18)
R4: sc around (18)
R5: sc around (18)
R6: (sc, dec) ×6 (12)
R7: dec ×6 (6)
Stuff before R7.
Fasten off with a 15 cm tail, pull through the centre once to form a small top hollow, then hang the fruit from chained green stems.
Assembly
- Shape the whole apple first. Pull the long body tail through the vertical centre until the top dimple measures about 8–10 mm deep; secure the sculpting strand at the bottom.
- Attach the brown stem. Centre it over R1 and sew through all six base stitches so the stem cannot rotate independently.
- Position the leaf. Pin it beside the stem at roughly a 30-degree angle, then sew the lower third of the leaf to the apple while leaving the tip free.
- Join the vertical half. Overlap the two peel lobes by about 8 mm and sew the central backing seam before adding the cream flesh patches.
- Finish the cut face. Stitch both cream circles in place with a 4–5 mm peel border, then embroider two tapered black seeds close to the central seam.
- Build each wedge. Put two cream triangular panels together and crochet the colored peel edge through both layers.
- Add wedge seed detail. Place one black seed away from the pointed end; a seed too close to the point visually shortens the slice.
- Assemble the optional pot. Seat the 24-stitch soil disc inside the 24-stitch pot rim and sew through both layers around the circumference.
- Mount the display tree. Pass the trunk through the soil centre and stitch its lower 2 cm to the inside base; add branches, leaves and miniature apples after the trunk stands vertically.
- Finish all pieces. Weave each tail through at least 3 cm of dense crochet before cutting it inside the work.
The completed set contains whole fruit, cut halves and wedges with matching peel, stem, leaf and seed proportions.
7 Technical Tips
- Marker drift: Moving the round marker one stitch late shifts every decrease and can create a diagonal ridge. Place the marker through the first stitch immediately after completing each round, not after beginning the next one.
- Overstuffing: A body that compresses less than about 5 mm under a fingertip is too rigid for the central sculpting pass. Remove a small quantity of fibre before R18 rather than forcing the needle through a packed core.
- Visible decrease gaps: Standard sc2tog can leave six small holes around R15–R19. Work each decrease through the front loops only, keeping the decrease legs directly above the previous round.
- Optional eye timing: If converting the fruit into a character, place 5 mm safety eyes before the opening becomes smaller than 18 stitches. The photo-matched seed-only version does not require this step.
- Velvet substitution: Velvet or chenille can hide the top loops and cause accidental 35- or 37-stitch plateau rounds. Count every sixth stitch with a temporary marker and consider a hook roughly 0.5 mm smaller than the yarn label’s normal recommendation.
- Leaf pinning: Sewing the whole leaf flat removes the raised profile visible in the reference. Pin only the lower 10–12 mm to the apple and keep the remaining tip unsupported.
- Tail weaving: A 4 cm tail can work back out after repeated squeezing. Leave at least 12 cm on small attachments, weave it in three directions through dense stitches, then cut the yarn inside the body.
Conclusion
Finish one red whole apple before batch-making the green version, because that first piece establishes the stuffing density and 8–10 mm centre pull for the rest of the set. Next, crochet a cut half and one wedge in the same yarn so the scale can be checked side by side. Photograph the finished group from above for Pinterest, then post a front-facing view on Instagram so the cream flesh and seed placement remain visible. Tag the project #AppleAmigurumiSet and link back to this apple amigurumi crochet pattern when sharing the instructions. For the vertical half, will you show the two central seeds visible in the reference or add a full four-seed apple core?









