Introduction
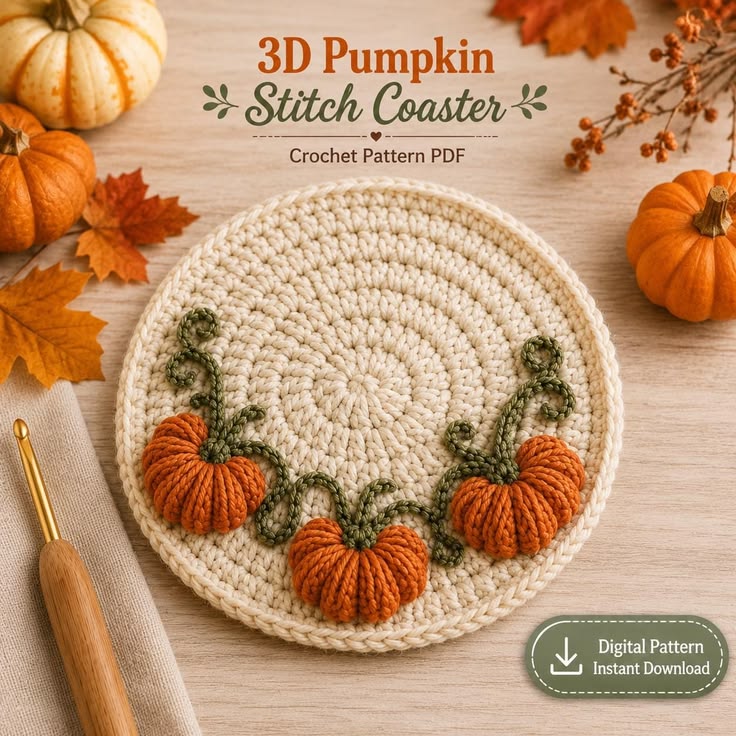
Three pumpkins can occupy the edge of a coaster only if the mug still has a flat place to land. This 3D pumpkin stitch coaster crochet pattern uses worsted yarn and a 3.75 mm hook to make an approximately 20–24 cm coaster. The intermediate project combines a cream circular base, three raised orange pumpkins, green stems and curling vines for structured fall table decor.
The Design: What Makes This Pumpkin Coaster Different
The composition treats the pumpkins as edge decoration rather than placing one large motif under the cup. That structural choice preserves a broad cream area through the upper half of the coaster while giving the lower edge substantial three-dimensional texture. Each pumpkin is made as a small stuffed form, sculpted into six lobes, then anchored across only part of its underside. The vines are separate spirals, which lets their curls cross the cream background without dragging the pumpkins out of position.
A raised cream rim provides another useful boundary. It visually frames the 3D pumpkin crochet coaster and gives the circular base more resistance to stretching. The main construction error occurs when all three pumpkins are sewn tightly through the full base fabric. Concentrated stitches contract the lower edge and turn a flat coaster into a shallow bowl.
Project Info at a Glance
| Skill Level | Time | Finished Size | Hook | Best For |
|---|---|---|---|---|
| Intermediate | 4–6 hours | Approx. 20–24 cm diameter | 3.75 mm | Fall mugs, Thanksgiving tables and small serving displays |
Materials and Tools
Yarn
- Warm cream — medium / worsted #4 — approximately 55–70 g — circular base and raised rim.
- Burnt orange — medium / worsted #4 — approximately 30–40 g — three dimensional pumpkins.
- Olive green — medium / worsted #4 — approximately 15–20 g — stems and curling vines.
Use a firm medium-weight yarn that holds shape without becoming rigid. Cotton gives crisp stitch definition, while smooth acrylic produces a slightly softer coaster surface.
Tools
- 3.75 mm crochet hook
- Polyester fiberfill
- Yarn needle
- Scissors
- Stitch markers
- Dressmaking pins
- Measuring tape
- Blocking mat
Abbreviations
- MR — magic ring
- sc — single crochet
- hdc — half double crochet
- inc — two stitches in one stitch
- dec — decrease
- sl st — slip stitch
- ch — chain
- BLO — back loop only
An invisible decrease passes through the front loops of the next two stitches before one single crochet is completed through both loops.
Pattern — Step by Step
Cream Circular Base
Yarn: warm cream.
R1: 6 hdc in MR (6)
R2: inc ×6 (12)
R3: (hdc, inc) ×6 (18)
R4: (2 hdc, inc) ×6 (24)
R5: (3 hdc, inc) ×6 (30)
R6: (4 hdc, inc) ×6 (36)
R7: (5 hdc, inc) ×6 (42)
R8: (6 hdc, inc) ×6 (48)
R9: (7 hdc, inc) ×6 (54)
R10: (8 hdc, inc) ×6 (60)
R11: (9 hdc, inc) ×6 (66)
R12: (10 hdc, inc) ×6 (72)
Join with sl st.
Lay the circle on a hard flat surface. If the outer section starts to ripple before R12, replace several increases in the final round with plain hdc stitches.
Raised Cream Rim
Yarn: warm cream.
R1: BLO sc around (72)
R2: sl st loosely around (72)
Fasten off and weave the tail toward the center.
The rim should form a visible edge without pulling the circular base upward.
Mini Pumpkin — Make 3
Yarn: burnt orange.
R1: 6 sc in MR (6)
R2: inc ×6 (12)
R3: (sc, inc) ×6 (18)
R4: sc around (18)
R5: sc around (18)
R6: sc around (18)
R7: (sc, dec) ×6 (12)
R8: dec ×6 (6)
R9: sc around (6)
Stuff lightly before fully closing the pumpkin.
Fasten off. Leave approximately 70 cm of orange yarn for sculpting.
Sculpt Each Pumpkin into Six Lobes
Thread the long orange tail through a yarn needle.
Pass from the bottom center to the top center.
Bring the yarn around the outside and return through both centers.
Repeat at approximately 60-degree intervals until six grooves divide the pumpkin.
Pull each shaping strand only until the groove is clearly visible.
Secure the tail underneath.
Target approximately 4.5–5.5 cm across after sculpting.
Green Stem — Make 3
Yarn: olive green.
R1: 6 sc in MR (6)
R2: sc around (6)
R3: sc around (6)
R4: sc around (6)
Do not stuff.
Flatten the final round slightly.
Fasten off with a 20 cm sewing tail.
Each stem should measure approximately 15–20 mm long.
Long Curly Vine
Yarn: olive green.
Ch 28.
Starting in the second chain from the hook, work 3 sc into every chain.
Fasten off with a 20 cm sewing tail.
Target approximately 8–10 cm of relaxed spiral length.
Medium Curly Vine
Yarn: olive green.
Ch 22.
Starting in the second chain, work 3 sc in each chain.
Fasten off with a 20 cm tail.
Target approximately 6–8 cm after the spiral contracts.
Short Curly Vine
Yarn: olive green.
Ch 16.
Starting in the second chain, work 3 sc into every chain.
Fasten off with a sewing tail.
Target approximately 4–6 cm of visible curl.
Stem-to-Vine Connection
Place one end of each vine immediately beside a pumpkin stem.
Sew only the first 10–15 mm of the spiral to the stem area.
Leave the remaining curl free.
Direct the longest vine toward the upper-left section of the coaster, the medium vine toward the upper-right and the shortest vine through the space between the pumpkins.
Optional Green Connector Cord
Yarn: olive green.
Ch 18.
Sl st back through every chain.
Fasten off.
Use this cord behind the pumpkin stems only if the lower cluster needs more visual continuity.
Pumpkin Placement
Mark the vertical center of the coaster.
Place the middle pumpkin near the six-o’clock position, approximately 15–20 mm inside the raised cream rim.
Position the left and right pumpkins around seven-thirty and four-thirty.
Keep the upper half of the coaster relatively clear.
Reserve at least a 9–10 cm diameter flat area for a mug.
Pin all three pumpkins before sewing any one permanently.
Attaching the 3D Pumpkins
Sew each pumpkin through a crescent-shaped section along its lower rear surface rather than stitching completely around the motif.
Use an attachment width of approximately 25–30 mm.
Pass the yarn through the upper loops of the cream base whenever possible so orange stitches remain less visible on the reverse.
After each pumpkin is attached, set the coaster on a flat surface and check the rim.
If the base starts to cup, loosen the most recent attachment before moving to the next pumpkin.
Vine Placement
The vines should cross open cream areas without reducing the flat mug zone.
Pin the long vine first and let two or three coils rise from the left pumpkin.
Position the medium vine above the right pumpkin and curve one section inward.
Use the shortest vine near the center pumpkin.
Sew only occasional contact points approximately 25–35 mm apart so most of each spiral remains dimensional.
Assembly
- Finish and block the cream circular base before adding any dimensional pieces.
- Work the raised BLO rim and confirm that the coaster still lies flat at approximately 20–24 cm across.
- Crochet all three orange pumpkins, stuff them lightly and sculpt each into six lobes.
- Sew one short olive stem to the top center of every pumpkin using two attachment passes across the stem base.
- Pin the middle pumpkin at six o’clock, then position the left and right pumpkins around it.
- Test the remaining flat drinking area with a mug or a 9–10 cm paper circle before sewing the pumpkins.
- Attach each pumpkin through only a 25–30 mm rear crescent so the cream circle does not contract.
- Sew the three vines beside their stem bases and arrange the curls through the open cream sections.
- Add sparse concealed anchor stitches approximately 25–35 mm apart while leaving most vine sections raised.
- Set the finished coaster on a hard surface, correct any cupping and weave all tails toward the center of the reverse side.
The completed piece should have a broad flat cream drinking area, three raised six-lobed pumpkins and freely curling olive vines distributed through the lower half.
7 Technical Tips
- Base develops waves: Six increases per round can exceed the needs of an individual hdc gauge. If the outer edge rises and falls by more than about 5 mm, replace some increases in the following round with plain stitches.
- Coaster turns into a bowl: Tight sewing around the stuffed pumpkins shortens the lower circumference. Attach each motif through only a 25–30 mm crescent and place the coaster flat after every pumpkin.
- Pumpkins remain spherical: Too much filling prevents the sculpting strands from compressing the fabric. Stuff each 18-stitch pumpkin only until it holds shape, then create six grooves at approximately 60-degree intervals.
- Mug touches a pumpkin: The raised motifs have moved too far into the center. Reserve at least a 9–10 cm flat circle through the upper-middle section before sewing.
- Vines become loose waves: Too few stitches per foundation chain produce weak curling. Work 3 sc into every chain and avoid stretching the spiral during attachment.
- Raised rim curls upward: A tight slip-stitch finishing round reduces the outer circumference. Work the slip stitches loosely or change to a hook approximately 0.5 mm larger for that round.
- Pumpkin stems collapse sideways: A stem attached at one point behaves like a hinge. Catch approximately 8–12 mm of the lower stem edge with two sewing passes so it remains upright.
Conclusion
Keep the drinking area clear when pinning the three pumpkins because that measurement determines whether the finished piece functions as a coaster or only as decoration. Block the cream circle first, reserve a 9–10 cm flat mug zone and test all three pumpkin positions before sewing. Add the vines last because their anchor points can be shifted without changing the main structure. Share the finished 3D pumpkin stitch coaster crochet pattern project on Pinterest with an overhead photograph, then post a side view of the raised pumpkin texture on Instagram using #3DPumpkinCoaster. For this design specifically, would you keep all three pumpkins orange or make the middle pumpkin cream?









