Introduction
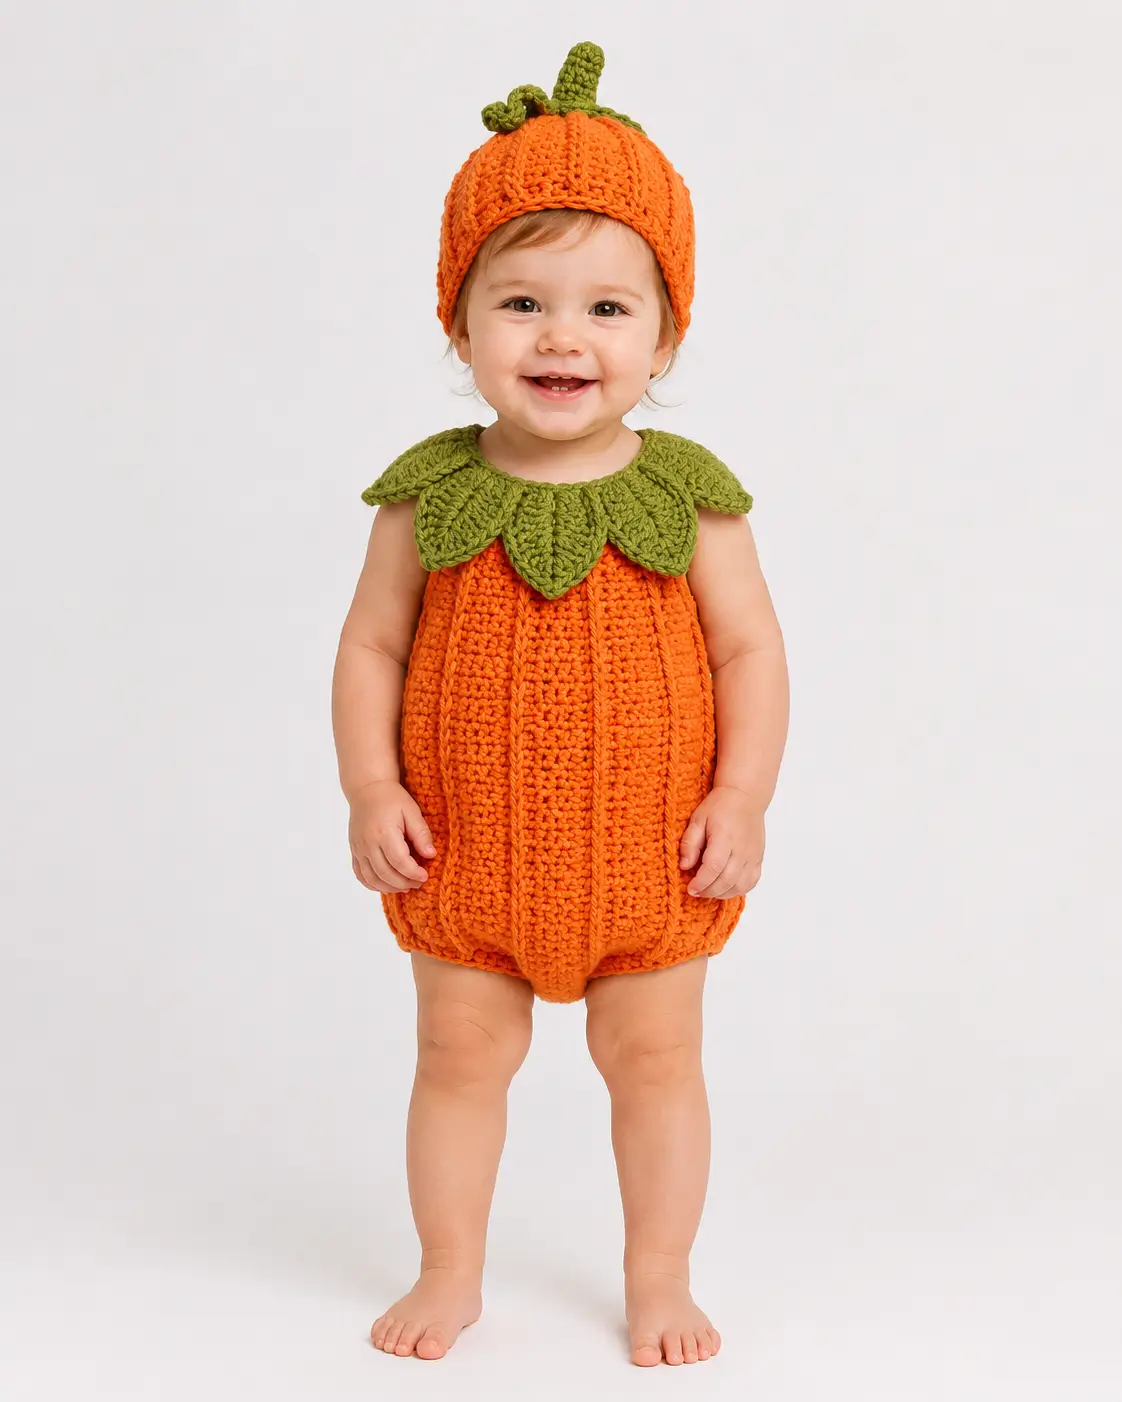
Pumpkins are segmented, but a pumpkin-costume doll has to keep those ribs readable without turning the torso into a ball. This pumpkin doll amigurumi crochet pattern translates the photo’s orange ribbing, green leaf collar, stemmed cap, bare arms, and bare legs into a 15 cm DK-yarn toy worked with a 2 mm hook. The skill level is intermediate. Its compact format suits seasonal shelf displays and coordinated market sets.
The Design: What Makes Patch Different
Patch is built around three structural decisions. First, the torso reaches a 36-stitch plateau, giving the Halloween crochet doll enough width for six vertical pumpkin ribs while keeping the limbs proportionally small. Second, the green collar is assembled from individual leaves rather than one flat ruffle; this keeps each point visible against the rounded orange body. Third, the pumpkin cap is a separate shell over a shallow brown hair cap, so a fringe remains visible beneath the orange edge just as it does in the photo.
The mini pumpkin amigurumi silhouette can fail when makers overstuff the torso. Excess filling erases the groove lines and makes the body spherical. Moderate stuffing plus evenly spaced surface slip stitches produces a clearer segmented structure. Published pumpkin dolls commonly sit between roughly 12 and 21 cm, making the 15 cm target a practical midpoint.
Project Info at a Glance
| Skill Level | Time | Finished Size | Hook | Best For |
|---|---|---|---|---|
| Intermediate | Not specified | 15 cm | 2.0 mm | Fall décor, Halloween display, handmade seasonal toy |
The 15 cm size, 2 mm hook, and comparable material specification come from published pumpkin-toy benchmarks. The pattern below is an original photo-based reconstruction. External patterns were used for scale, materials, eye size, and construction comparison rather than copied pattern instructions.
Materials and Tools
Yarn
- Pumpkin orange — sport/DK-light — allow 20–30 g — YarnArt Jeans 85 or a similar smooth cotton-acrylic yarn.
- Light skin/peach — sport/DK-light — up to 30 g — YarnArt Jeans or equivalent.
- Leaf green — sport/DK-light — about 10 g — choose a muted olive or moss tone.
- Medium brown — sport/DK-light — about 5 g for hair.
- Pale pink — scrap quantity for cheek patches.
- Black or dark brown — small quantity for embroidered mouth details.
A comparable 15 cm pumpkin project records 20 g orange, 30 g light pink, 10 g green, and 5 g black yarn, so one 50 g skein of each major color provides enough working margin.
Tools
- 2.0 mm crochet hook
- 6 mm safety eyes
- Polyester stuffing
- Tapestry needle
- Long doll needle, approximately 8–10 cm
- Locking stitch marker
- Straight pins
- Scissors
If the finished toy is intended for a child under three years old, replace plastic safety eyes with firmly embroidered eyes.
Abbreviations
- MR — magic ring
- sc — single crochet
- inc — two single crochets in one stitch
- dec — single-crochet decrease
- sl st — slip stitch
- ch — chain
- hdc — half double crochet
- dc — double crochet
- BLO — back loop only
For an invisible decrease, insert the hook through the front loops of the next two stitches, draw up the working yarn, then complete one single crochet through the gathered loops.
Pattern — Step by Step
Work amigurumi rounds in a continuous spiral unless a section states otherwise. Place the stitch marker in the first stitch of every new round.
Head
Yarn: light skin/peach — Standard amigurumi math
R1: 6 sc in MR (6)
R2: inc ×6 (12)
R3: [1 sc, inc] ×6 (18)
R4: [2 sc, inc] ×6 (24)
R5: [3 sc, inc] ×6 (30)
R6: [4 sc, inc] ×6 (36)
R7–R14: sc around (36)
R15: [4 sc, dec] ×6 (30)
R16: [3 sc, dec] ×6 (24)
R17: [2 sc, dec] ×6 (18)
R18: [1 sc, dec] ×6 (12)
R19: dec ×6 (6)
Insert 6 mm eyes between R10 and R11, seven visible stitches apart. Begin stuffing after R14 and add small pieces until the head is firm without stretching the stitches.
Fasten off. Leave a 25 cm tail for closing and assembly.
Ears — Make 2
Yarn: light skin/peach — Standard amigurumi math
R1: 6 sc in MR (6)
R2: inc ×6 (12)
Fold the small circle in half without stuffing.
Fasten off. Leave a 12 cm sewing tail.
Hair Cap and Fringe
Yarn: medium brown — Standard amigurumi math
R1: 6 sc in MR (6)
R2: inc ×6 (12)
R3: [1 sc, inc] ×6 (18)
R4: [2 sc, inc] ×6 (24)
R5: [3 sc, inc] ×6 (30)
R6: [4 sc, inc] ×6 (36)
R7–R8: sc around (36)
Do not stuff.
For the front fringe, place six evenly spaced locks across approximately one-third of the cap edge. For each lock, ch 4, sl st back through the next three chains, then sl st into the next cap stitch.
Fasten off. Leave a 20 cm tail.
Pumpkin Body
Yarn: pumpkin orange — Standard amigurumi math
R1: 6 sc in MR (6)
R2: inc ×6 (12)
R3: [1 sc, inc] ×6 (18)
R4: [2 sc, inc] ×6 (24)
R5: [3 sc, inc] ×6 (30)
R6: [4 sc, inc] ×6 (36)
R7–R16: sc around (36)
R17: [4 sc, dec] ×6 (30)
R18: [3 sc, dec] ×6 (24)
R19: [2 sc, dec] ×6 (18)
R20: [1 sc, dec] ×6 (12)
R21: dec ×6 (6)
Begin stuffing around R15. Keep the center firm enough to hold its shape while leaving the outer fabric slightly compressible for rib definition.
Fasten off. Leave a 30 cm tail and close the opening.
Pumpkin Rib Lines — Make 6
Yarn: pumpkin orange — Original surface-crochet detail
Mark six vertical paths around the body, spaced approximately 6 stitches apart at the 36-stitch center section.
Join orange yarn close to R4. Surface sl st upward along one stitch column to approximately R17, making about 13 surface slip stitches.
Fasten off after each line rather than carrying yarn across the interior. Repeat until six equally spaced ribs run around the torso.
Arms — Make 2
Yarn: light skin/peach — Standard amigurumi math
R1: 6 sc in MR (6)
R2: inc ×6 (12)
R3–R4: sc around (12)
R5: dec ×6 (6)
R6–R11: sc around (6)
Stuff only the rounded hand and the first 1 cm of the arm. Leave the upper section unstuffed so it lies against the pumpkin body.
Fasten off. Leave a 20 cm tail.
Legs — Make 2
Yarn: light skin/peach — Standard amigurumi math
R1: 6 sc in MR (6)
R2: inc ×6 (12)
R3–R5: sc around (12)
R6: dec ×6 (6)
R7–R11: sc around (6)
Stuff the foot firmly, then add only a narrow column of filling through the lower leg.
Fasten off. Leave a 20 cm tail.
Cheek Patches — Make 2
Yarn: pale pink — Standard amigurumi math
R1: 6 sc in MR (6)
R2: inc ×6 (12)
Do not stuff.
Fasten off. Leave a 10 cm tail. Each circle should measure approximately 12–15 mm across with the recommended yarn and hook.
Pumpkin Hat
Yarn: pumpkin orange — Standard amigurumi math
R1: 6 sc in MR (6)
R2: inc ×6 (12)
R3: [1 sc, inc] ×6 (18)
R4: [2 sc, inc] ×6 (24)
R5: [3 sc, inc] ×6 (30)
R6: [4 sc, inc] ×6 (36)
R7–R11: sc around (36)
R12: BLO sc around (36)
Do not stuff.
Test the cap over the hair layer before cutting the yarn. The edge should rest just above the ears while leaving the brown fringe visible.
Fasten off. Leave a 20 cm tail if the hat will be fixed permanently. Weave in the tail if making a removable hat.
Stem
Yarn: leaf green
R1: 6 sc in MR (6)
R2–R6: sc around (6)
Add a small amount of stuffing only if the stem collapses.
Fasten off. Leave a 15 cm tail for sewing to the center of the hat.
Curled Vine
Yarn: leaf green
Ch 16.
Row 1: starting in the second ch from hook, work 2 sc in each chain across (30).
The doubled stitches cause the strip to curl into a spiral.
Fasten off. Leave a 12 cm tail.
Leaf Collar — Make 6 Leaves
Yarn: leaf green — Original leaf construction based on the photographed collar
Ch 8.
Round 1: starting in the second ch from hook, sl st, sc, hdc, dc, hdc, sc, 3 sc in final ch; continue along the opposite side of the foundation chain with sc, hdc, dc, hdc, sc, sl st (15).
Fasten off. Leave a 15 cm tail on every leaf.
Flatten each leaf before assembly. Six points create a balanced collar around the head and body join while matching the broad green pieces visible in the reference photo.
Assembly
- Close the head first. Draw the R19 tail through all six remaining front loops, pull the opening closed, knot inside the fabric, and bury the tail through the stuffing.
- Shape the body next. Pin six rib lines so each groove stays about one-sixth of the body circumference from the next. Adjust any surface stitches that twist away from the vertical axis.
- Join head to body. Center the head over the upper body opening and sew through one full stitch from each piece on every pass, keeping the neck axis vertical.
- Build the face. Place the cheek circles about one round below the eyes and slightly outside each eye center. Embroider a short nose and a shallow mouth between them.
- Add the hair and ears. Sew the hair cap to the upper head through its final round, then attach each folded ear between approximately R10 and R13 so the lower ear edge aligns near eye level.
- Attach the arms. Pin them at the upper third of the body with the hands pointing downward, then sew across approximately four attachment stitches per arm.
- Position the legs. Place them near the lower front of the pumpkin body, separated by about six body stitches. Pin the doll upright before sewing.
- Construct the collar. Overlap the six green leaves around the neck seam by approximately 3–4 mm and sew each leaf at its narrow top only, leaving the pointed ends free.
- Finish the hat details. Sew the green stem at the center of the orange cap, attach one end of the curled vine beside it, and arrange the spiral toward one side.
- Complete the surface work. Weave every yarn tail through at least 3 cm of stuffed fabric, trim only after the end has changed direction inside the piece, and check that the six body ribs remain evenly spaced.
The finished doll should stand approximately 15 cm tall with a rounded pumpkin torso, six visible ribs, a six-leaf collar, brown fringe, and a stemmed orange cap.
7 Technical Tips
- Marker drift: a misplaced round marker can move a limb or facial feature one or two stitches every round. Transfer the marker immediately after making the first stitch of each round rather than waiting until the round is complete.
- Overstuffing: a torso packed until rigid can flatten the six vertical grooves. Stop adding fiberfill when thumb pressure creates a temporary indentation of about 5 mm without exposing gaps between stitches.
- Visible decreases: ordinary decreases can form horizontal bars that stand out on the head and body. Work shaping decreases through the two front loops so the 36→30→24 sequence remains cleaner.
- Eye placement: adding eyes after the head has closed can force the backing washer against compressed stuffing. Install the 6 mm eyes between R10 and R11 while the head opening is still wide enough for finger access.
- Tension variation: changing from a 2 mm hook to a hook just 0.5 mm larger can noticeably enlarge a 36-stitch circumference. Crochet the head and body with the same hook and yarn family before judging final proportions.
- Pinning error: arms sewn even one round apart can make the doll look tilted despite equal limb lengths. Count from the same body round on both sides and use two pins per limb before placing the first sewing stitch.
- Tail escape: clipping a yarn end directly beside a knot can allow the end to work back through the fabric. Run each tail at least 3 cm through the stuffed piece, reverse direction once, then cut it flush after the fabric relaxes.
Conclusion
Check the six rib lines before the final yarn tails are trimmed; they control the pumpkin silhouette more than additional stuffing does. The next concrete step is to crochet one 36-stitch body and mark its six rib positions before making the smaller components. Photograph the finished Patch doll from the front and side so the collar spacing and cap profile are visible. Save the project to Pinterest, then share the finished version on Instagram with #PatchPumpkinDoll. This pumpkin doll amigurumi crochet pattern can also be scaled with heavier yarn while keeping the same stitch counts. Would you keep the six pumpkin ribs, or add two extra grooves for a more deeply segmented torso?









