Introduction
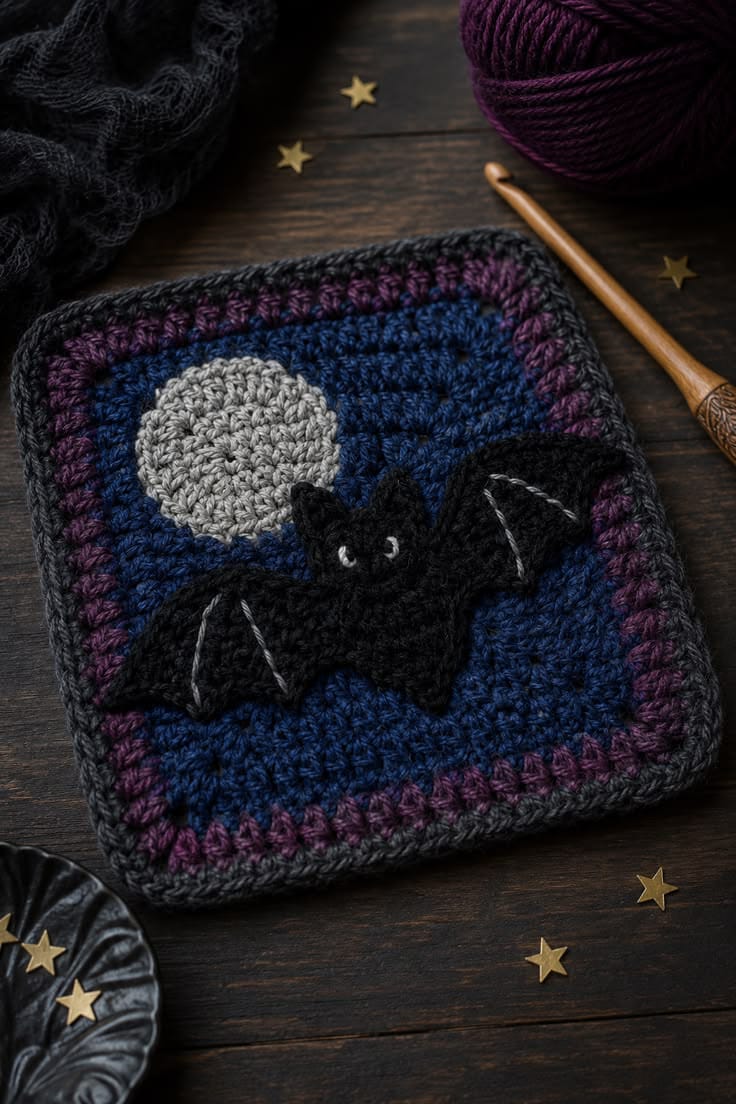
A bat crossing a full moon fails visually if one wing sits even a centimeter lower than the other. This crochet bat granny square pattern uses worsted yarn and a 5 mm hook to make an approximately 19 cm Halloween block. A midnight-blue field, gray moon, dimensional black bat, plum border and charcoal edging create the intermediate design shown in the reference, suitable for blankets, cushions or framed seasonal panels.
The Design: What Makes This Bat Square Different
The square is deliberately plain behind the appliqués. A dense navy single-crochet field keeps the night background visually quiet while the gray circular moon establishes one strong focal point. The bat is then built separately and attached over the lower-right portion of the moon, giving its wings genuine depth rather than reproducing them through flat color changes. Small pointed ears and embroidered eyes define the head without plastic components. Pale gray stitches trace the lower wing folds, making the black silhouette readable against the dark blue background. A narrow plum round adds color without weakening the night palette, while charcoal finishes the outside edge. The main failure mode is asymmetric wing placement. If one tip sits more than approximately 8 mm higher than its opposite, the entire bat appears rotated even when the body itself is centered correctly.
Project Info at a Glance
| Skill Level | Time | Finished Size | Hook | Best For |
|---|---|---|---|---|
| Intermediate | 4–6 hours | Approx. 19 cm square | 5.0 mm | Halloween blankets, cushions, wall panels and bags |
Materials and Tools
Yarn
- Midnight navy — worsted / medium #4 — approximately 35–40 g — main square.
- Black — worsted / medium #4 — approximately 18–25 g — bat body, head, ears and wings.
- Moon gray — worsted / medium #4 — approximately 10–12 g — full moon.
- Deep plum — worsted / medium #4 — approximately 8–10 g — inner border.
- Charcoal gray — worsted / medium #4 — approximately 8–10 g — outside border.
- Pale gray or white — scrap yarn — eyes and wing-vein embroidery.
Use smooth yarn for the appliqués. Heavy halo around black yarn can blur the small ear points and wing notches that identify the bat silhouette.
Tools
- 5.0 mm crochet hook
- 4.0 mm crochet hook for firmer bat pieces if required
- Tapestry needle
- Stitch markers
- Dressmaking pins
- Scissors
- Measuring tape
- Blocking mat and rust-resistant pins
Abbreviations
- MR — magic ring
- sc — single crochet
- inc — two single crochets in one stitch
- dec — decrease
- sl st — slip stitch
- ch — chain
- hdc — half double crochet
- dc — double crochet
- tr — treble crochet
- BLO — back loop only
For the small three-dimensional bat body, work an invisible decrease through the front loops of the next two stitches before completing one single crochet.
Pattern — Step by Step
Midnight Blue Square
Yarn: midnight navy.
Ch 31.
Row 1: sc in second ch from hook and across (30)
Rows 2–30: ch 1, turn, sc across (30)
Fasten off.
The unbordered panel should measure approximately 15.5–16.5 cm square. If the height differs from the width by more than 5 mm, add or remove one row before beginning the border.
Plum Border
Yarn: deep plum.
Join at one corner.
Round 1: sc evenly around the square, working 30 sc across the top, 30 sc down the side, 30 sc across the bottom and 30 sc up the final side; place (sc, ch 2, sc) in each corner.
Join with sl st.
Fasten off.
Keep the side stitches evenly distributed. More than 30–31 stitches on one side can make the border flare.
Charcoal Outer Border
Yarn: charcoal gray.
Join in any corner ch-2 space.
Round 1: sc in each stitch around, working (sc, ch 2, sc) in every corner space.
Join and fasten off.
Block the finished background to approximately 19 cm square before adding the appliqués.
Full Moon
Yarn: moon gray.
R1: 6 sc in MR (6)
R2: inc ×6 (12)
R3: (sc, inc) ×6 (18)
R4: (2 sc, inc) ×6 (24)
R5: (3 sc, inc) ×6 (30)
Sl st to first sc.
Fasten off with a 40 cm sewing tail.
Target approximately 6.5–7.5 cm diameter. Flatten the circle before sewing rather than stretching it into shape on the navy background.
Bat Body
Yarn: black.
R1: 6 sc in MR (6)
R2: inc ×6 (12)
R3: (sc, inc) ×6 (18)
R4: sc around (18)
R5: sc around (18)
R6: sc around (18)
R7: (sc, dec) ×6 (12)
R8: sc around (12)
R9: dec ×6 (6)
R10: sc around (6)
R11: dec ×3 (3)
Fasten off with a 30 cm tail.
Stuff only R2–R7 very lightly. The body needs enough volume to rise from the background by approximately 8–10 mm without becoming a round amigurumi toy.
Bat Head
Yarn: black.
R1: 6 sc in MR (6)
R2: inc ×6 (12)
R3: (sc, inc) ×6 (18)
R4: sc around (18)
R5: (sc, dec) ×6 (12)
R6: dec ×6 (6)
Stuff minimally.
Fasten off with a 25 cm tail.
Flatten the rear of the head slightly before attaching it to the body.
Left Ear
Yarn: black.
Ch 5.
Row 1: sc in second ch, hdc, dc, tr (4)
Fasten off with a 15 cm tail.
Right Ear
Repeat the left ear.
Reverse its orientation when sewing so both points angle slightly outward.
Left Wing
Yarn: black.
Ch 16.
Row 1: sc in second ch, sc in next 2, hdc in next 3, dc in next 4, hdc in next 3, sc in next 2 (15)
Row 2: ch 1, turn, sc in next 3, hdc in next 3, dc in next 3, hdc in next 3, sc in next 3 (15)
Row 3: ch 1, turn, sl st in next 2, sc in next 2, hdc in next 2, dc in next 3, hdc in next 2, sc in next 2, sl st in next 2 (15)
Do not fasten off.
Work the scalloped lower wing edge:
Ch 3, sl st into the side approximately 2 cm farther along; repeat three times toward the wing tip.
Finish with sl st at the tip.
Fasten off with a 35 cm sewing tail.
The finished wing should measure approximately 7–8 cm from body edge to tip.
Right Wing
Repeat the left-wing instructions.
Before fastening off, flip the piece so the scalloped edge mirrors the first wing rather than duplicating its orientation.
Wing Veins
Yarn: pale gray.
Thread approximately 40 cm of yarn onto a tapestry needle.
On the left wing, make three long surface stitches from the upper inner edge toward the three lower scallop valleys.
Repeat on the right wing.
Keep each vein approximately 1–1.5 mm loose rather than pulling it into the black fabric.
The embroidery should remain subtle. Thick white lines can make the bat resemble webbed wings rather than the muted stitched details visible in the reference.
Bat Eyes
Yarn: pale gray or white.
Make one short vertical stitch for each eye.
Each eye should measure approximately 4–5 mm.
Place the eyes approximately 10–12 mm apart.
For a darker expression, add a single black stitch at the inside edge of each pale eye.
Optional Tiny Nose
Yarn: charcoal or black.
Make one horizontal stitch approximately 4 mm wide between and below the eyes.
Skip this detail if the face becomes crowded.
Place the Moon
Lay the blocked square flat with one edge parallel to the table.
Position the gray moon in the upper-left half of the navy field.
The moon center should sit approximately 6–6.5 cm from the left edge and 6–6.5 cm from the upper edge of the completed square.
Sew around the circumference with gray yarn, taking small stitches approximately 5–7 mm apart.
Keep the moon completely flat.
Position the Bat
Place the body diagonally across the lower-right portion of the moon.
The head should overlap the moon edge slightly while most of the right wing extends into the navy field.
Pin the body first.
Spread the wing tips until the complete wingspan measures approximately 13–15 cm.
Compare the two wing tips with the upper edge of the square. Their vertical positions should differ by no more than approximately 5–8 mm unless a deliberately angled pose is wanted.
Assembly
- Block the navy, plum and charcoal square to approximately 19 cm before attaching any appliqué pieces.
- Sew the gray moon to the upper-left section, keeping its circumference flat and approximately 5–7 mm attachment stitches apart.
- Join the bat head to the broad end of the body and position the two ears approximately 12–15 mm apart.
- Pin the left and right wings to the body before sewing either one, keeping the complete wingspan near 13–15 cm.
- Sew only the inner 2–3 cm of each wing firmly to the body; leave much of the outer wing free so the motif retains dimensional lift.
- Embroider three pale vein lines on each wing before mounting the completed bat on the background.
- Add both embroidered eyes and check their alignment while the head remains easy to handle.
- Position the bat partly over the lower-right moon edge and attach the body through its center line rather than stitching around the entire perimeter.
- Add one concealed anchor stitch approximately 2–3 cm from each wing tip if the wings curl excessively, but leave the remaining edges free.
- Lay the completed square flat, correct any border distortion and weave every yarn tail through at least 4 cm of matching stitches.
The finished block should show a dimensional black bat crossing a gray full moon on a midnight-blue background, framed by a narrow plum band and charcoal outer edge.
7 Technical Tips
- Bat appearing tilted: A wing-tip height difference greater than approximately 8 mm can make the body look rotated. Pin both complete wings before attaching either one permanently.
- Square border ruffling: Too many stitches along one side add excess perimeter length. Keep each background side close to 30 evenly spaced stitches and add corner stitches only inside the corner spaces.
- Moon becoming oval: Tight attachment stitches can shorten one side of the 30-stitch circle. Sew approximately every 5–7 mm and check the diameter after every quarter section.
- Wing edge losing its scallops: Sewing around the entire perimeter flattens the three lower notches. Anchor primarily at the inner wing and add no more than one concealed stitch near an outer tip.
- Black bat disappearing into navy: Placing the whole body away from the moon reduces contrast. Keep approximately one-third of the bat overlapping the gray moon so the head and inner wings remain readable.
- Wing veins puckering: Pale embroidery pulled tightly contracts the black panels. Leave each 4–6 cm vein slightly relaxed and secure its ends without drawing the wing edges inward.
- Ears folding backward: A single attachment stitch produces a hinge at the ear base. Sew across approximately 8–10 mm of each lower ear edge while leaving the triangular tip free.
Conclusion
Check the two wing tips before fixing the bat to the square because their symmetry controls the entire silhouette. The next practical step is to block the navy background, sew the gray moon flat and assemble the bat separately so its proportions can be corrected before mounting. Keep most of each wing edge unattached to preserve the raised effect visible in the reference. Share the finished crochet bat granny square pattern project on Pinterest with an overhead photograph, then post a close view of the embroidered wing veins on Instagram using #MidnightBatCrochetSquare. For this bat specifically, would you keep the gray full moon or change it to muted gold?









