Introduction
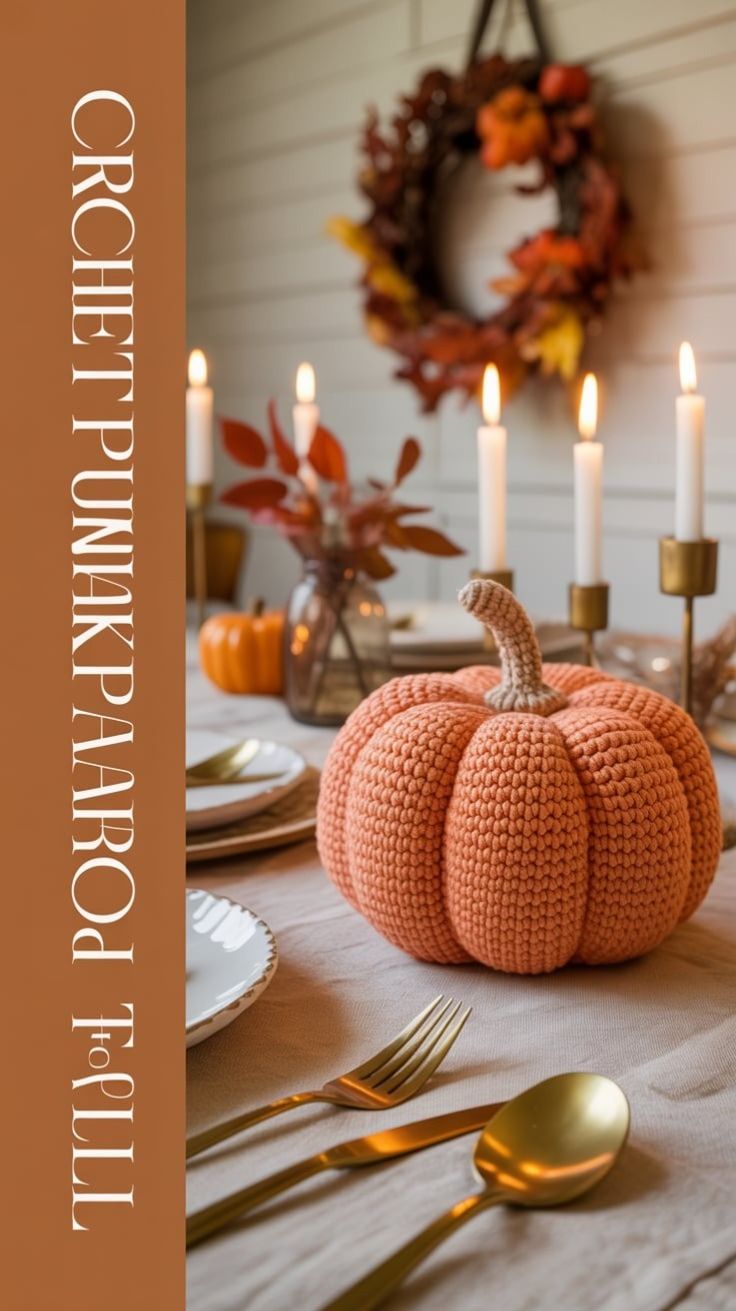
Eight pumpkin lobes leave the crown only a small margin for uneven shaping. This crochet pumpkin pattern uses worsted or Aran yarn and a 4.5 mm hook to make an approximately 19–21 cm tabletop pumpkin. A muted terracotta body, deep exterior channels and a narrow taupe stem create the low rounded profile in the reference. The project suits intermediate makers who need a stable centerpiece rather than a character-style pumpkin.
The Design: What Makes This Pumpkin Different
The body is crocheted as one continuous stuffed form before any exterior ribs are added. This separates volume from sculpting: the 42-stitch plateau establishes a smooth rounded shell, while eight later tension lines pull that shell into individual lobes. A vertical compression strand shortens the body before segmentation so the pumpkin spreads sideways rather than remaining spherical. The stem is deliberately narrow and slightly curved, with a broad lower section that hides the crown closure. No leaves, flowers or facial pieces compete with the rib structure. The result is a realistic crochet pumpkin built mainly through proportion and tension. One common maker error is tightening all eight grooves clockwise. Stuffing shifts toward the last unfinished section, leaving several full lobes on one side and narrow compressed lobes on the other.
Project Info at a Glance
| Skill Level | Time | Finished Size | Hook | Best For |
|---|---|---|---|---|
| Intermediate | 5–7 hours | Approx. 19–21 cm wide × 20–22 cm high including stem | 4.5 mm | Table centerpieces, shelf decor and fall displays |
Materials and Tools
Yarn
- Muted terracotta / burnt peach — worsted / Aran #4 — approximately 120–150 g — pumpkin body and structural sculpting strands.
- Warm taupe / oatmeal — worsted / Aran #4 — approximately 10–15 g — curved stem.
Use a firm plied yarn with limited halo for the body. Fuzzy yarn hides the narrow valleys between neighboring lobes and makes the smooth stitch texture less distinct.
Tools
- 4.5 mm crochet hook
- Polyester fiberfill — approximately 160–210 g
- Long tapestry or doll needle
- Standard yarn needle
- Eight locking stitch markers
- Scissors
- Measuring tape
Abbreviations
- MR — magic ring
- sc — single crochet
- inc — two single crochets in one stitch
- dec — invisible decrease
- sl st — slip stitch
- ch — chain
An invisible decrease is worked through the front loops of the next two stitches before completing one single crochet through both loops.
Pattern — Step by Step
Work the pumpkin body in a continuous spiral. Keep a removable marker in the first stitch and move it after every completed round.
Pumpkin Body
Yarn: muted terracotta — standard six-stitch amigurumi shaping adapted to a low sculpted pumpkin.
R1: 6 sc in MR (6)
R2: inc ×6 (12)
R3: (sc, inc) ×6 (18)
R4: (2 sc, inc) ×6 (24)
R5: (3 sc, inc) ×6 (30)
R6: (4 sc, inc) ×6 (36)
R7: (5 sc, inc) ×6 (42)
R8: sc around (42)
R9: sc around (42)
R10: sc around (42)
R11: sc around (42)
R12: sc around (42)
R13: sc around (42)
R14: sc around (42)
R15: sc around (42)
R16: sc around (42)
R17: sc around (42)
R18: sc around (42)
R19: (5 sc, dec) ×6 (36)
R20: sc around (36)
R21: (4 sc, dec) ×6 (30)
R22: sc around (30)
R23: (3 sc, dec) ×6 (24)
R24: sc around (24)
R25: (2 sc, dec) ×6 (18)
R26: sc around (18)
R27: (sc, dec) ×6 (12)
R28: sc around (12)
R29: dec ×6 (6)
Begin stuffing after R19. Place fiberfill against the outside wall first. Keep the vertical center approximately 15 percent softer than the outer circumference so the later sculpting strands can pass through and compress the pumpkin.
Fasten off. Leave a 50 cm tail.
Close the Body
Thread the remaining terracotta tail through the front loops of the final six stitches.
Pull the hole closed.
Pass the needle through the center once and bury the yarn inside the stuffing.
The piece should now resemble a broad sphere without distinct lobes.
Vertical Compression
Yarn: matching terracotta.
Cut approximately 130 cm of yarn.
Thread a long needle and enter through the exact bottom center.
Exit through the crown center.
Return through the same vertical axis.
Pull gradually until the pumpkin loses approximately 2–2.5 cm of body height.
The circumference should become slightly wider as the top and bottom flatten. Do not pull until the crown closes into a narrow hole.
Secure the yarn temporarily.
Mark Eight Lobes
Set the pumpkin on a level surface.
View it directly from above.
Place eight markers around the widest circumference at approximately 45-degree intervals.
Pair the positions as exact opposites.
Marker 1 pairs with Marker 5.
Marker 2 pairs with Marker 6.
Marker 3 pairs with Marker 7.
Marker 4 pairs with Marker 8.
If the distance between two neighboring marks differs by more than approximately 10 mm from the opposite pair, adjust the markers before sculpting.
Sculpting Groove 1
Yarn: matching terracotta.
Cut approximately 170 cm of yarn.
Anchor the strand at the lower center.
Bring it over the outside of the pumpkin through the first marked valley.
Insert the needle through the crown center and pass it through the full pumpkin.
Exit through the lower center.
Pull gradually until the yarn sits approximately 12–16 mm below the fullest neighboring lobe surfaces.
Do not permanently knot the strand.
Sculpting Groove 2
Work the groove directly opposite Groove 1.
Match the depth rather than matching yarn tension by feel.
Set the pumpkin down and compare both developing sides.
The opposite-pair method prevents the filling from being pushed continuously toward one side.
Sculpting Grooves 3 and 4
Move to the second pair of markers.
Work Groove 3 from the bottom center to crown and back through the body.
Then form the exact opposite groove.
Adjust both channels until the neighboring lobes have similar widths.
Sculpting Grooves 5 and 6
Repeat the process with the third opposite pair.
Rotate the pumpkin through 180 degrees after tightening.
Push stuffing gently through the outside fabric toward any lobe that appears flatter than its opposite.
Sculpting Grooves 7 and 8
Complete the last opposite pair.
View all eight lobes from above.
Adjust the groove tension until their widths differ by no more than approximately 10–12 mm.
Inspect the pumpkin at eye level.
Each groove should run from the crown to the lower center without drifting sideways.
Secure the shaping strands beneath the pumpkin and bury every tail through the stuffed body.
Refine the Crown
Cut approximately 70 cm of terracotta yarn.
Pass from the crown center to the bottom center and back.
Pull until the upper recess measures approximately 10–15 mm deep.
The stem base needs a shallow mounting area, not a sharply cinched crater.
Knot securely and bury the yarn.
Taupe Stem
Yarn: warm taupe / oatmeal.
R1: 6 sc in MR (6)
R2: sc around (6)
R3: sc around (6)
R4: sc around (6)
R5: sc around (6)
R6: sc around (6)
R7: sc around (6)
R8: sc around (6)
R9: (2 sc, inc) ×2 (8)
R10: sc around (8)
R11: (3 sc, inc) ×2 (10)
R12: sc around (10)
R13: (4 sc, inc) ×2 (12)
R14: sc around (12)
R15: (sc, inc) ×6 (18)
Stuff R10–R15 lightly. Leave most of R1–R8 unstuffed so the narrow section can bend gradually.
Fasten off. Leave a 40 cm sewing tail.
Shape the Stem
Hold the 18-stitch base in one hand.
Bend the upper stem gradually across approximately 4–5 cm.
The tip should move about 15–20 mm away from the vertical center line.
Do not fold one round sharply.
If the stem returns upright, make one concealed taupe stitch along the inside of the curve.
Optional Stem Base Disc
Yarn: warm taupe.
R1: 6 sc in MR (6)
R2: inc ×6 (12)
R3: (sc, inc) ×6 (18)
Fasten off with a 25 cm tail.
Use the disc only when the pumpkin crown closure remains visible around the stem base.
Check the Pumpkin Shape
Measure the widest point after sculpting. Target approximately 19–21 cm.
The body should measure approximately 14–16 cm from the table to the crown before the stem is attached.
Each of the eight lobes should curve outward from the crown, reach maximum width around the center and return smoothly toward the base.
The lower center should remain slightly recessed. If it projects beneath the surrounding lobes, push the center upward by approximately 5 mm and redistribute the stuffing before finishing.
Assembly
- Complete the terracotta pumpkin body through R29 and close the final six stitches before beginning any external shaping.
- Compress the body vertically by approximately 2–2.5 cm so it develops the low, wide proportions shown in the reference.
- Mark eight positions at roughly 45-degree intervals and pair every position with its exact opposite.
- Sculpt the eight grooves as four opposite pairs, targeting approximately 12–16 mm of depth between neighboring lobes.
- Rotate the pumpkin after each pair and redistribute stuffing whenever one lobe becomes more than approximately 10–12 mm narrower than its opposite.
- Refine the crown recess to approximately 10–15 mm after all eight grooves have been balanced.
- Lightly stuff the wide lower stem rounds while leaving most of the narrow upper section flexible.
- Bend the stem gradually across approximately 4–5 cm before placing it on the crown.
- Sew the 18-stitch stem base around the recessed center, catching several neighboring pumpkin stitches rather than sewing only through the closure point.
- Set the finished pumpkin on a level surface, correct any rocking, then weave all structural tails through at least 4–5 cm of matching crochet.
The completed pumpkin should show eight balanced terracotta lobes, a low recessed crown and one narrow taupe stem with a gradual natural curve.
7 Technical Tips
- Pumpkin remaining spherical: A fully packed center prevents vertical compression. Keep the central core approximately 15 percent softer than the outside wall before closing R29.
- Lobes finishing unevenly: Tightening every groove clockwise moves the stuffing toward the final section. Work each groove followed immediately by its opposite and keep the eight markers approximately 45 degrees apart.
- Shaping yarn cutting into the crochet: Excess tension can bury the structural strand between single crochets. Stop around 12–16 mm of groove depth and use additional passes rather than one extremely tight strand if stronger shaping is needed.
- Crown becoming too narrow: Strong vertical compression can create a deep central hole that the stem cannot cover. Keep the finished top recess around 10–15 mm deep.
- Stem developing a visible hinge: Stuffing the six-stitch section firmly forces the bend into one round. Leave R1–R8 mostly empty and distribute the curve across approximately 4–5 cm.
- Pumpkin rocking on the table: A projecting bottom closure becomes an unintended central foot. Push the lower center upward approximately 5 mm until at least three neighboring lobes share contact with the surface.
- One groove drifting sideways: Even a 5–8 mm diagonal shift becomes visible on the smooth body. Mark the crown-to-base route before pulling each strand and realign the yarn before final tightening.
Conclusion
Check the eight groove widths before sewing the stem because the plain terracotta surface exposes asymmetry more clearly than a multicolor pumpkin. The next practical step is to set the sculpted body on a flat table, compare all four opposite lobe pairs and correct the tension while the shaping strands are still accessible. Attach the stem only after the crown remains centered over the base. Share the finished crochet pumpkin pattern project on Pinterest with a three-quarter photograph that shows several grooves, then post a close view of the curved stem on Instagram using #TerracottaCrochetPumpkin. For this pumpkin specifically, would you keep the taupe stem or change it to dark brown?









