Introduction
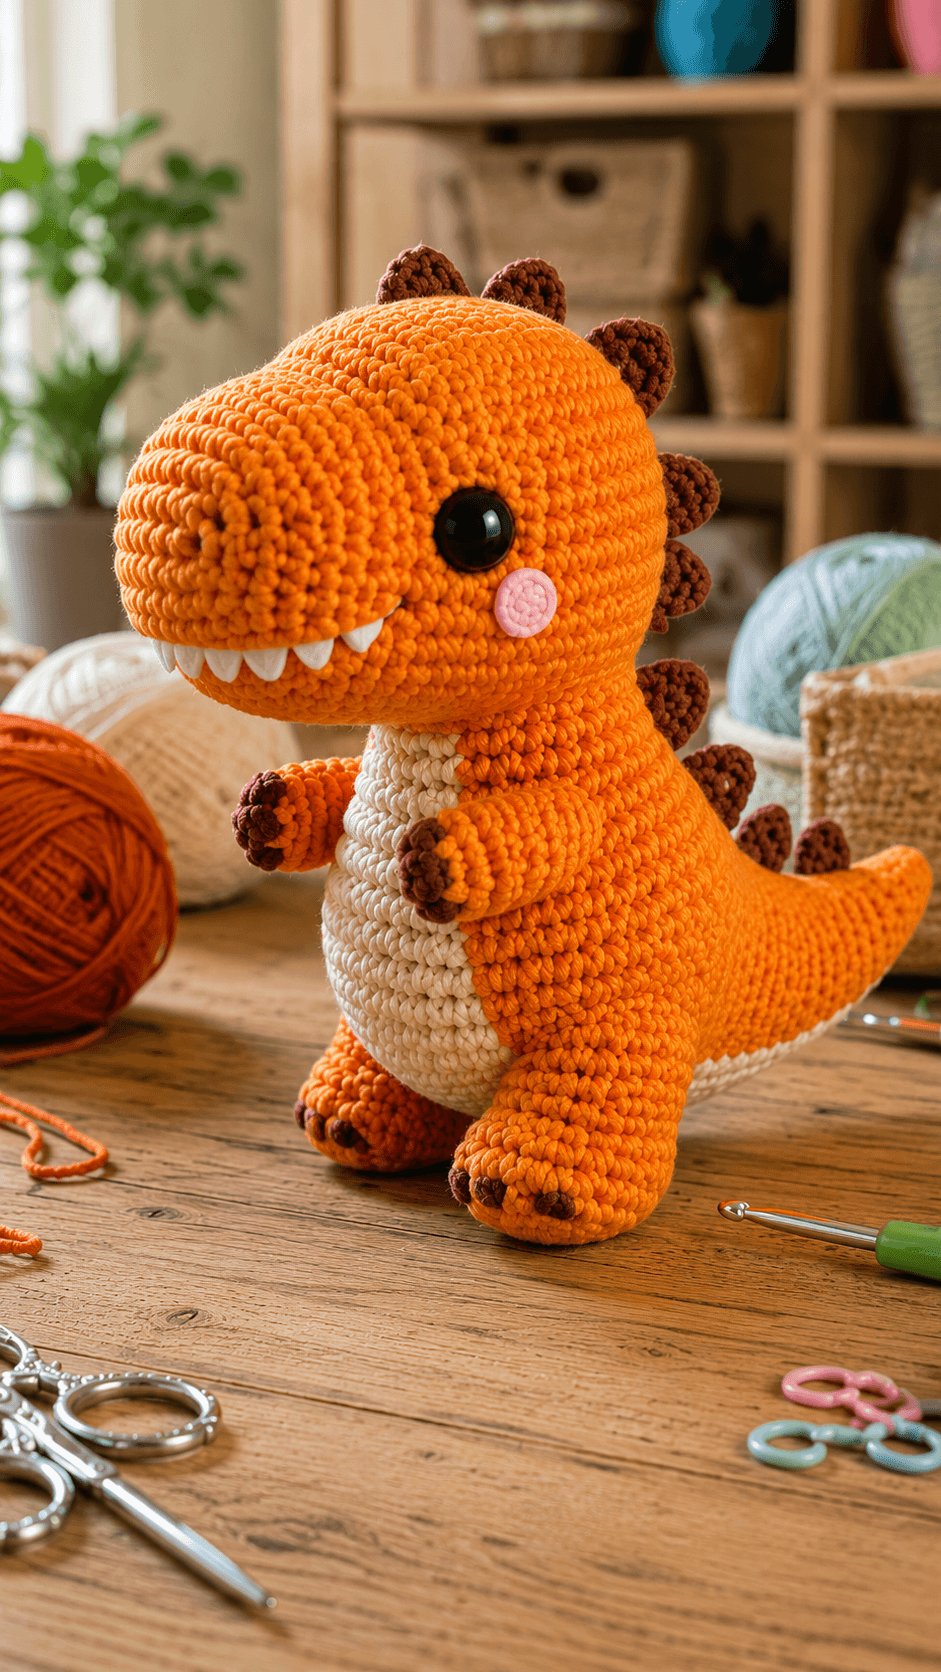
A T-Rex with arms this small needs its hind legs and tail to carry nearly the entire silhouette. This T-Rex amigurumi crochet pattern uses bulky yarn, a 5 mm hook and 14–16 mm eyes to make a dinosaur approximately 30–35 cm tall. An oversized orange head, cream belly, white teeth, brown dorsal spikes and heavy feet create the intermediate plush construction shown in the reference.
The Design: What Makes This T-Rex Different
The head is deliberately oversized and projects well in front of the body, creating the heavy skull shape associated with a cartoon T-Rex. Two tiny forearms sit high on the chest, while substantially larger hind legs provide the support required for the forward-loaded head. The long tail begins broad at the body and tapers gradually so it acts as a counterweight rather than a decorative appendage. Cream yarn is limited to the belly and underside, keeping the bright orange body visually dominant. Rounded brown dorsal spikes continue from the crown down the spine and onto the tail. Visible white teeth provide another identifying detail. One common failure with an orange T-Rex crochet pattern is making the hind legs too narrow; when their bases are smaller than the lower body, the dinosaur pitches forward despite a properly stuffed tail.
Project Info at a Glance
| Skill Level | Time | Finished Size | Hook | Best For |
|---|---|---|---|---|
| Intermediate | 10–13 hours | Approx. 30–35 cm tall × 38–43 cm long | 5.0 mm | Dinosaur collections, display plushies and nursery decor |
Materials and Tools
Yarn
- Bright pumpkin orange — bulky / chunky yarn — approximately 250–320 g — head, muzzle, body, arms, hind legs and tail.
- Warm cream — matching bulky yarn — approximately 50–70 g — belly and underside details.
- Chocolate brown — matching bulky yarn — approximately 35–50 g — dorsal spikes and claws.
- White — matching or slightly thinner yarn — approximately 10–15 g — teeth.
- Blush pink — scrap yarn — cheek patches.
- Black — smooth yarn — mouth embroidery if needed.
Use a firm bulky yarn that creates closed stitches at the selected hook size. The head carries significant stuffing, so a loose gauge around the decreases can expose fiberfill.
Tools
- 5.0 mm crochet hook
- 14–16 mm safety eyes — 2
- Polyester fiberfill — approximately 350–450 g
- Long tapestry needle
- Standard yarn needle
- Locking stitch markers
- Dressmaking pins
- Scissors
- Measuring tape
For a dinosaur intended for a small child, embroidered eyes and teeth remove detachable plastic components.
Abbreviations
- MR — magic ring
- sc — single crochet
- inc — two single crochets in one stitch
- dec — invisible decrease
- sl st — slip stitch
- ch — chain
- hdc — half double crochet
- dc — double crochet
- BLO — back loop only
An invisible decrease is worked through the front loops of the next two stitches before completing one single crochet through both loops.
Pattern — Step by Step
Work all stuffed parts in a continuous spiral unless stated otherwise. Move the marker to the first stitch of each new round.
Head
Yarn: bright pumpkin orange — standard large amigurumi shaping.
R1: 6 sc in MR (6)
R2: inc ×6 (12)
R3: (sc, inc) ×6 (18)
R4: (2 sc, inc) ×6 (24)
R5: (3 sc, inc) ×6 (30)
R6: (4 sc, inc) ×6 (36)
R7: (5 sc, inc) ×6 (42)
R8: sc around (42)
R9: sc around (42)
R10: sc around (42)
R11: sc around (42)
R12: sc around (42)
R13: sc around (42)
R14: sc around (42)
R15: (5 sc, dec) ×6 (36)
R16: sc around (36)
R17: (4 sc, dec) ×6 (30)
R18: (3 sc, dec) ×6 (24)
R19: sc around (24)
R20: (2 sc, dec) ×6 (18)
R21: (sc, dec) ×6 (12)
R22: dec ×6 (6)
Insert the eyes between R10 and R11, approximately 9–10 stitches apart. Begin stuffing after R15. Pack the back and upper head firmly but leave the lower front slightly softer for the muzzle attachment.
Fasten off. Leave a 50 cm tail if the head will be sewn to the neck.
Large Muzzle
Yarn: bright pumpkin orange.
R1: 6 sc in MR (6)
R2: inc ×6 (12)
R3: (sc, inc) ×6 (18)
R4: (2 sc, inc) ×6 (24)
R5: (3 sc, inc) ×6 (30)
R6: sc around (30)
R7: sc around (30)
R8: (3 sc, dec) ×6 (24)
Stuff moderately.
Flatten the attachment edge slightly.
Fasten off with a 45 cm sewing tail.
Target approximately 10–12 cm wide. The muzzle should extend well in front of the eye line without becoming narrower than the head.
Cheek Patches — Make 2
Yarn: blush pink.
R1: 6 sc in MR (6)
R2: inc ×6 (12)
Fasten off with a 15 cm sewing tail.
Flatten completely.
Target approximately 18–22 mm diameter.
Body
Yarn: bright pumpkin orange.
R1: 6 sc in MR (6)
R2: inc ×6 (12)
R3: (sc, inc) ×6 (18)
R4: (2 sc, inc) ×6 (24)
R5: (3 sc, inc) ×6 (30)
R6: (4 sc, inc) ×6 (36)
R7: (5 sc, inc) ×6 (42)
R8: sc around (42)
R9: sc around (42)
R10: sc around (42)
R11: sc around (42)
R12: sc around (42)
R13: sc around (42)
R14: sc around (42)
R15: sc around (42)
R16: sc around (42)
R17: sc around (42)
R18: sc around (42)
R19: (5 sc, dec) ×6 (36)
R20: sc around (36)
R21: (4 sc, dec) ×6 (30)
R22: sc around (30)
R23: (3 sc, dec) ×6 (24)
R24: sc around (24)
R25: (2 sc, dec) ×6 (18)
R26: sc around (18)
R27: (sc, dec) ×6 (12)
R28: dec ×6 (6)
Begin stuffing after R19. Pack the lower half more firmly than the upper chest because the hind legs need a stable attachment surface.
Fasten off and close the opening.
Cream Belly Patch
Yarn: warm cream.
Ch 20.
Starting in the second chain from hook:
sc in next 18 ch, 3 sc in final chain.
Continue down the opposite side.
Sc in next 17 ch, inc in final chain.
Work two additional rounds of sc, placing three evenly spaced increases around each curved end.
Fasten off with a 45 cm sewing tail.
Target approximately 14–16 cm long × 6–7 cm wide. Position most of the patch across the front belly rather than wrapping it far onto the sides.
Front Arms — Make 2
Yarn: bright pumpkin orange.
R1: 6 sc in MR (6)
R2: inc ×6 (12)
R3: sc around (12)
R4: sc around (12)
R5: sc around (12)
R6: sc around (12)
R7: (sc, dec) ×4 (8)
R8: sc around (8)
Stuff only the rounded hand and lower half.
Leave the upper section unstuffed.
Flatten and fasten off with a 25 cm tail.
Brown Arm Claws
Yarn: chocolate brown.
Embroider two short claw stitches at the end of each arm.
Each claw should measure approximately 7–9 mm.
Use two passes if the brown yarn disappears between orange stitches.
Back Legs — Make 2
Yarn: bright pumpkin orange.
R1: 6 sc in MR (6)
R2: inc ×6 (12)
R3: (sc, inc) ×6 (18)
R4: (2 sc, inc) ×6 (24)
R5: sc around (24)
R6: sc around (24)
R7: sc around (24)
R8: sc around (24)
R9: (2 sc, dec) ×6 (18)
R10: sc around (18)
R11: sc around (18)
R12: (sc, dec) ×6 (12)
R13: sc around (12)
Stuff the feet densely and the upper leg moderately. The 24-stitch lower section supplies the broad support needed for the oversized head.
Fasten off with a 45 cm sewing tail.
Brown Foot Claws
Yarn: chocolate brown.
Embroider three rounded claw marks on the front of each foot.
Space them approximately 8–10 mm apart.
Each claw should sit within the lower quarter of the foot.
Tail
Yarn: bright pumpkin orange.
R1: 6 sc in MR (6)
R2: sc around (6)
R3: sc around (6)
R4: inc ×6 (12)
R5: sc around (12)
R6: sc around (12)
R7: (sc, inc) ×6 (18)
R8: sc around (18)
R9: sc around (18)
R10: sc around (18)
R11: (2 sc, inc) ×6 (24)
R12: sc around (24)
R13: sc around (24)
R14: sc around (24)
R15: (3 sc, inc) ×6 (30)
R16: sc around (30)
R17: sc around (30)
Stuff the 30-stitch base firmly. Reduce the amount steadily toward the 6-stitch tip so the tail can rise gently instead of forming a rigid straight cone.
Fasten off with a 60 cm sewing tail.
Large Brown Dorsal Spike — Make 3
Yarn: chocolate brown.
R1: 6 sc in MR (6)
R2: inc ×6 (12)
R3: sc around (12)
R4: (sc, dec) ×4 (8)
R5: sc around (8)
R6: dec ×4 (4)
Do not stuff heavily.
Flatten slightly and leave a 20 cm sewing tail.
Target approximately 3.5–4 cm high.
Medium Brown Dorsal Spike — Make 3
R1: 6 sc in MR (6)
R2: inc ×6 (12)
R3: sc around (12)
R4: dec ×6 (6)
Fasten off with a sewing tail.
Target approximately 3 cm high.
Small Brown Tail Spike — Make 3
R1: 6 sc in MR (6)
R2: sc around (6)
R3: dec ×3 (3)
Fasten off.
Target approximately 2–2.5 cm high.
Upper Teeth — Make 5
Yarn: white.
R1: 6 sc in MR (6)
R2: sc around (6)
R3: dec ×3 (3)
Fasten off with a 15 cm tail.
Do not stuff.
Lower Teeth — Make 3
Repeat the upper tooth construction.
For a slightly smaller lower tooth, omit R2 and close after the first decrease round.
Mouth Line
Yarn: black or dark brown smooth yarn.
Pin all teeth before making the mouth line.
Embroider a shallow curve extending approximately 1 cm beyond the outside teeth at both ends.
Keep the line immediately behind the tooth bases so the teeth appear to emerge from the mouth rather than float on the muzzle.
Dorsal Spike Placement
Pin all nine spikes before sewing. Place the three largest pieces from the rear crown through the upper neck. Continue with three medium spikes down the center back, then use the three smallest spikes on the tail.
The first spike should begin approximately 3–4 cm behind the top of the head. Leave approximately 2–3 cm between neighboring bases. Reduce the spacing slightly on the tail as its circumference becomes smaller.
From the side, all spikes should follow one smooth line from crown to tail. From the front, they should remain centered rather than drifting toward either side of the body.
Assembly
- Sew the large muzzle to the lower front of the head, keeping its upper edge approximately 2–3 rounds below the safety eyes.
- Pin the upper and lower teeth along the muzzle before stitching them permanently; leave approximately 8–12 mm between neighboring tooth centers.
- Attach the head to the body with a broad neck seam approximately 5–6 cm across so the oversized skull cannot rotate forward.
- Sew the cream belly patch down the front of the body before adding the arms and hind legs.
- Attach the two tiny arms high on the chest, approximately 3–4 cm apart, and angle their clawed ends slightly inward.
- Pin both 24-stitch hind feet on a level surface and sew them to the lower body only after the dinosaur can balance without being held.
- Attach the 30-stitch tail base across the rear body, angling the tail slightly upward so it acts as a counterweight to the head.
- Pin the nine brown spikes from crown to tail and confirm their center line from both front and rear views before sewing.
- Sew both pink cheeks beside the eyes and embroider the mouth line after the teeth and muzzle positions are permanent.
- Add the brown arm and foot claws, then weave every structural yarn tail through at least 4–5 cm of matching fabric before trimming.
The completed T-Rex should stand with its oversized head forward, two small arms held near the cream chest, two broad supporting legs, a counterbalancing tail and nine centered brown spikes.
7 Technical Tips
- Head dropping forward: A narrow neck seam acts like a hinge under a 42-stitch head. Spread the attachment across approximately 5–6 cm and add two concealed stabilizing stitches from the lower head into the upper chest.
- Hind feet rolling inward: Understuffed 24-stitch feet cannot carry the front-heavy body. Pack the lower two-thirds firmly and keep the left and right foot centers at least 8–10 cm apart at this scale.
- Tiny arms disappearing against the belly: Arms sewn directly beside the cream patch lose their orange outline. Position their bases approximately 10–15 mm outside the cream edge and angle the hands inward.
- Teeth forming an uneven mouth: A spacing error of 5 mm is visible across the short jaw. Pin all eight teeth first and maintain approximately 8–12 mm between neighboring centers before sewing.
- Back spikes drifting sideways: Sewing each spike without a guide gradually moves the row off the spine. Mark one center line from the rear crown to the tail base and keep every spike attachment within approximately 5 mm of it.
- Tail failing to counterbalance the head: A lightly stuffed 30-stitch tail base collapses under the body’s weight. Pack the first 5–7 cm firmly, then reduce stuffing toward the narrow tip.
- Safety eyes visually sinking into bulky yarn: Eyes smaller than about 12 mm can disappear between dense stitches on a large head. Use approximately 14–16 mm eyes for this reconstruction and keep the surrounding stitches free from pulled fibers.
Conclusion
Check the hind-leg position before permanently attaching the head because this T-Rex depends on those two broad feet to carry a heavily forward-loaded skull. Next, pin the legs and tail, set the body on a flat surface and correct the balance before adding the dorsal row. Sew the teeth only after the muzzle sits symmetrically beneath both eyes, then align the brown spikes from crown to tail. Share the finished T-Rex amigurumi crochet pattern project on Pinterest with a full side view that shows the tail counterbalance, then post a close view of the teeth and spikes on Instagram using #OrangeTRexCrochet. For this T-Rex specifically, would you keep the brown dorsal spikes or make them cream to match the belly?









