Introduction
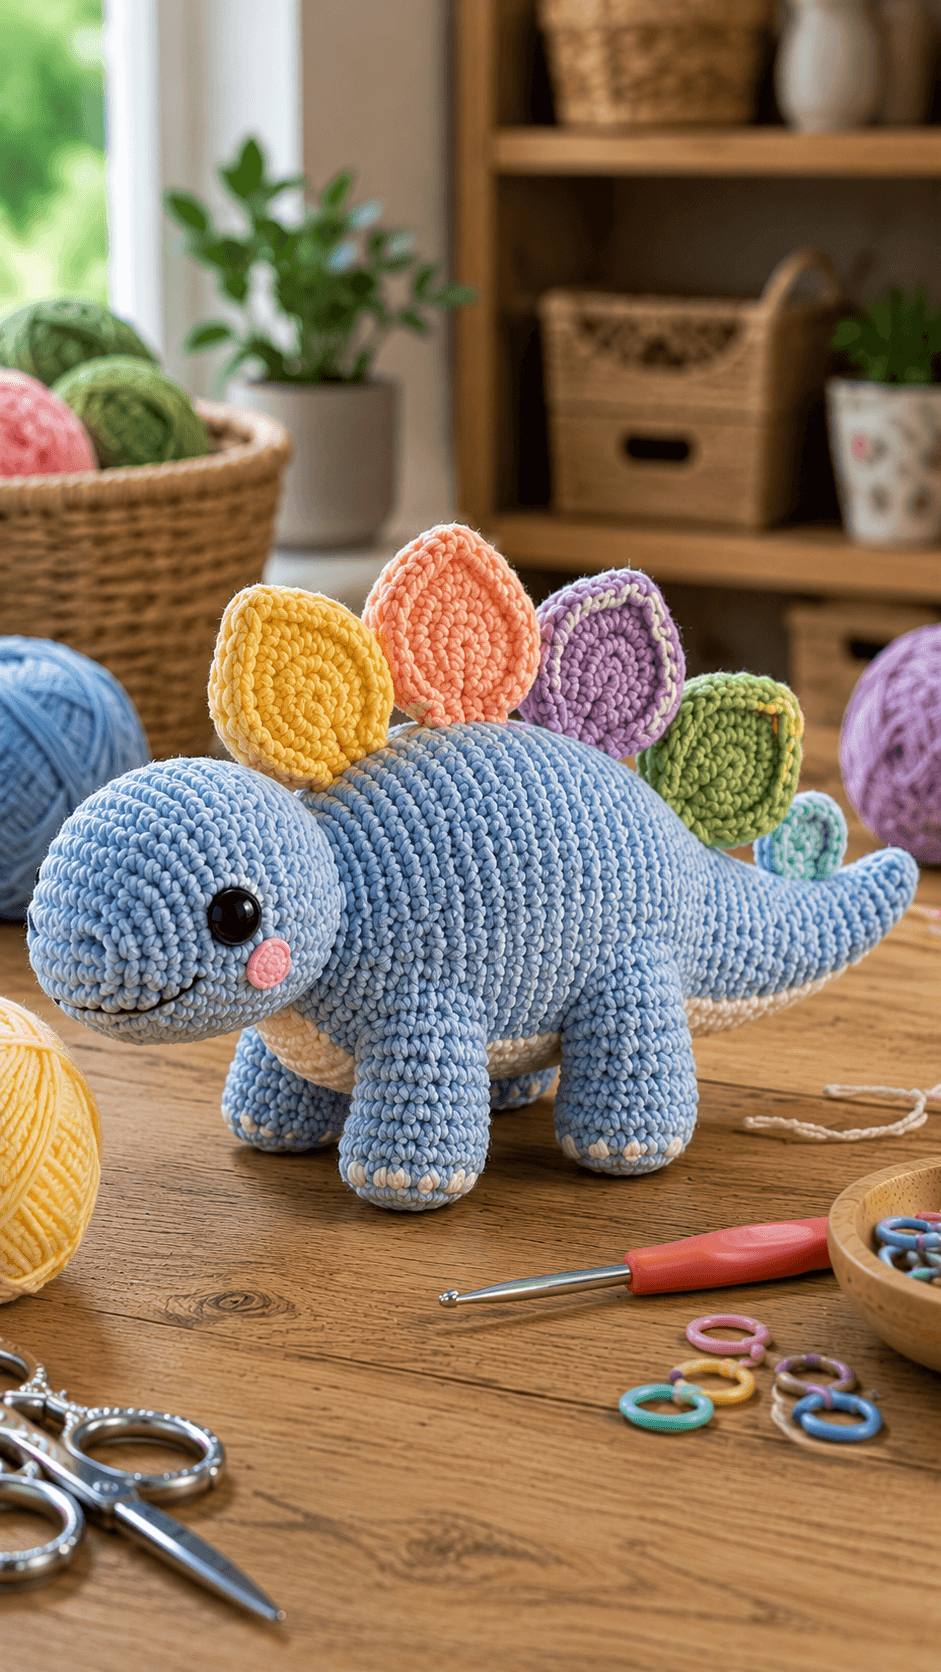
A stegosaurus stops reading correctly when its largest plate sits over the tail instead of the shoulders. This stegosaurus amigurumi crochet pattern uses chunky chenille yarn, a 4.5 mm hook and 12 mm eyes to make a dinosaur about 35 cm long. A powder-blue body, cream belly, five graduated pastel plates, four low legs and a tapered tail create the intermediate plush construction shown in the reference.
The Design: What Makes This Stegosaurus Different
The body is kept long and nearly horizontal so the four legs support it close to the table rather than producing an upright dinosaur. Its head is large enough for 12 mm eyes but remains lower than the first dorsal plate, preserving the characteristic stegosaurus profile. Five rounded plates are worked separately in yellow, coral, lavender, green and mint, with the largest pieces positioned over the shoulder and central back before decreasing toward the tail. A cream underside breaks up the blue body without interrupting the main silhouette, while small white toe stitches give the feet definition. This crochet stegosaurus plush also uses a long tail rather than a short cone. A common maker error is placing all five plates at equal height; that creates a decorative ridge but loses the graduated armored-back shape that identifies a stegosaurus.
Project Info at a Glance
| Skill Level | Time | Finished Size | Hook | Best For |
|---|---|---|---|---|
| Intermediate | 8–10 hours | Approx. 35 cm long × 20 cm tall | 4.5 mm | Dinosaur collections, nursery decor and display plushies |
Materials and Tools
Yarn
- Powder blue — chunky chenille / plush yarn — approximately 180–200 g — head, body, legs and tail.
- Warm cream — matching chenille — approximately 25–35 g — belly patch and toe accents.
- Sunny yellow — matching chenille — approximately 10–15 g — first plate.
- Soft coral — matching chenille — approximately 10–15 g — second plate.
- Lavender — matching chenille — approximately 10–15 g — third plate.
- Leaf green — matching chenille — approximately 8–12 g — fourth plate.
- Mint / aqua — matching chenille — approximately 5–8 g — smallest tail plate.
- Pink — scrap chenille or smooth DK yarn — cheek patches.
- Black — smooth yarn — embroidered smile.
Keep the five plate yarns close to the same thickness. A thinner lavender or green yarn can make two plates look smaller even when their row counts match.
Tools
- 4.5 mm crochet hook
- 12 mm safety eyes — 2
- Polyester fiberfill — approximately 220–280 g
- Long tapestry needle
- Standard yarn needle
- Locking stitch markers
- Dressmaking pins
- Scissors
- Measuring tape
Plastic safety eyes are not appropriate for a toy intended for a child who may remove or swallow small components. Embroidered eyes can be substituted when required.
Abbreviations
- MR — magic ring
- sc — single crochet
- inc — two single crochets in one stitch
- dec — invisible decrease
- sl st — slip stitch
- ch — chain
- hdc — half double crochet
- dc — double crochet
- BLO — back loop only
An invisible decrease is worked through the front loops of the next two stitches before completing one single crochet through both loops.
Pattern — Step by Step
Unless a section states otherwise, work in a continuous spiral. Move the stitch marker to the first stitch of every completed round.
Head
Yarn: powder blue.
R1: 6 sc in MR (6)
R2: inc ×6 (12)
R3: (sc, inc) ×6 (18)
R4: (2 sc, inc) ×6 (24)
R5: (3 sc, inc) ×6 (30)
R6: (4 sc, inc) ×6 (36)
R7: sc around (36)
R8: sc around (36)
R9: sc around (36)
R10: sc around (36)
R11: sc around (36)
R12: sc around (36)
R13: (4 sc, dec) ×6 (30)
R14: sc around (30)
R15: (3 sc, dec) ×6 (24)
R16: sc around (24)
R17: (2 sc, dec) ×6 (18)
R18: sc around (18)
R19: (sc, dec) ×6 (12)
R20: dec ×6 (6)
Insert the 12 mm safety eyes between R9 and R10, approximately 8–9 stitches apart. Begin stuffing after R13 and keep the muzzle end slightly softer than the back of the head.
Fasten off. Leave a 45 cm tail if the head will be sewn to the body.
Muzzle Shaping
The reference has a broad rounded snout rather than a separate projecting muzzle.
Thread approximately 40 cm of blue yarn.
Enter at the underside of the head and exit approximately two rounds below the eyes.
Make one shallow horizontal shaping stitch across the front center.
Pull only until the muzzle projects approximately 10–15 mm beyond the lower face.
Do not compress the center strongly enough to create a pointed nose.
Cheek Patches — Make 2
Yarn: pink.
R1: 6 sc in MR (6)
R2: inc ×6 (12)
Fasten off. Leave a 15 cm sewing tail.
Flatten each circle.
With chunky yarn, stop after R1 if a 12-stitch cheek appears larger than approximately 18 mm.
Smile
Yarn: black smooth yarn.
Embroider a curved line approximately 3–3.5 cm long across the lower front of the head.
Place the lowest point approximately 8–10 mm below the cheek centers.
Use two or three long stitches rather than many short stitches so the curve remains clean against chenille.
Body
Yarn: powder blue.
R1: 6 sc in MR (6)
R2: inc ×6 (12)
R3: (sc, inc) ×6 (18)
R4: (2 sc, inc) ×6 (24)
R5: (3 sc, inc) ×6 (30)
R6: (4 sc, inc) ×6 (36)
R7: (5 sc, inc) ×6 (42)
R8: sc around (42)
R9: sc around (42)
R10: sc around (42)
R11: sc around (42)
R12: sc around (42)
R13: sc around (42)
R14: sc around (42)
R15: sc around (42)
R16: sc around (42)
R17: sc around (42)
R18: sc around (42)
R19: (5 sc, dec) ×6 (36)
R20: sc around (36)
R21: (4 sc, dec) ×6 (30)
R22: sc around (30)
R23: (3 sc, dec) ×6 (24)
R24: sc around (24)
R25: (2 sc, dec) ×6 (18)
R26: (sc, dec) ×6 (12)
R27: dec ×6 (6)
Begin stuffing after R19. Keep the body elongated by packing more filling into both ends than through the vertical center.
Fasten off and close the remaining opening.
Cream Belly Patch
Yarn: warm cream.
Ch 17.
Starting in the second chain from the hook:
sc in next 15 ch,
3 sc in final ch,
continue along the opposite side of the foundation chain,
sc in next 14 ch,
inc in final ch.
For the second round, work sc around while placing three evenly spaced increases at each curved end.
Fasten off with a 40 cm sewing tail.
Target approximately 11–13 cm long × 4–5 cm wide. The patch should remain mostly underneath the body and show only slightly from the side.
Front Legs — Make 2
Yarn: powder blue.
R1: 6 sc in MR (6)
R2: inc ×6 (12)
R3: (sc, inc) ×6 (18)
R4: sc around (18)
R5: sc around (18)
R6: sc around (18)
R7: sc around (18)
R8: (sc, dec) ×6 (12)
R9: sc around (12)
R10: sc around (12)
Stuff the lower two-thirds firmly and keep the upper 2 cm softer for attachment.
Flatten the opening. Fasten off with a 35 cm sewing tail.
Back Legs — Make 2
Yarn: powder blue.
R1: 6 sc in MR (6)
R2: inc ×6 (12)
R3: (sc, inc) ×6 (18)
R4: sc around (18)
R5: sc around (18)
R6: sc around (18)
R7: sc around (18)
R8: sc around (18)
R9: (sc, dec) ×6 (12)
R10: sc around (12)
R11: sc around (12)
The extra straight round gives the rear legs slightly more mass than the front pair.
Stuff firmly at the foot and moderately at the upper section. Fasten off with a 35 cm sewing tail.
White Toes
Yarn: warm cream or white.
After the legs are attached, embroider three short toe stitches at the bottom front of each foot.
Each toe should measure approximately 6–8 mm.
Space the three stitches across no more than half the foot circumference.
Tail
Yarn: powder blue.
R1: 6 sc in MR (6)
R2: sc around (6)
R3: inc ×6 (12)
R4: sc around (12)
R5: sc around (12)
R6: sc around (12)
R7: (sc, inc) ×6 (18)
R8: sc around (18)
R9: sc around (18)
R10: sc around (18)
R11: sc around (18)
R12: sc around (18)
R13: (2 sc, inc) ×6 (24)
R14: sc around (24)
R15: sc around (24)
R16: sc around (24)
Stuff progressively. Pack the wide base firmly but use only a thin line of stuffing through the final 6-stitch tip so the tail remains tapered.
Fasten off with a 50 cm tail.
Yellow Plate — Largest
Yarn: sunny yellow.
Ch 10.
Starting in the second chain:
sl st, sc, hdc, 3 dc, hdc, sc, sl st.
Work 3 sc in the final chain.
Continue along the opposite side:
sl st, sc, hdc, 3 dc, hdc, sc, sl st.
Work one round of sc evenly around the plate.
Fasten off with a 30 cm sewing tail.
Target approximately 8–9 cm high.
Coral Plate
Yarn: soft coral.
Ch 11.
Work the same double-sided plate construction as the yellow plate, adding one extra dc at the center of each side.
Finish with one sc edging round.
This plate should be the tallest, approximately 9–10 cm.
Lavender Plate
Yarn: lavender.
Ch 10.
Repeat the yellow plate construction.
For the edging round, use lavender throughout or add a narrow cream surface edge to match the pale outline visible in the reference.
Fasten off with a long sewing tail.
Green Plate
Yarn: leaf green.
Ch 8.
Starting in the second chain:
sl st, sc, hdc, 2 dc, hdc, sc.
Work 3 sc in the final chain and repeat the sequence along the opposite side.
Finish with one sc edging round.
Target approximately 6–7 cm high.
Mint Tail Plate — Smallest
Yarn: mint / aqua.
Ch 6.
Starting in the second chain:
sl st, sc, hdc, sc, sl st.
Work 3 sc in the final chain.
Repeat along the opposite side.
Work one sc edging round.
Target approximately 4–5 cm high.
Plate Placement
Pin all five plates before sewing any of them.
The coral plate should sit approximately over the shoulder-to-front-body transition. Place the yellow plate just ahead of it, then the lavender plate slightly behind it. Continue with green and finish with mint near the tail base.
Leave approximately 8–15 mm between neighboring plate bases. The plate edges can overlap visually above the back, but their sewing lines should remain separate.
The plates should decrease clearly toward the tail. If the mint plate appears as tall as the green plate after pinning, move it farther back or remove its outer edging round.
Assembly
- Sew the head to the front of the body with the eye line approximately level and the muzzle projecting slightly forward rather than upward.
- Attach the cream belly patch to the underside, keeping at least 70 percent of it below the body’s horizontal midpoint.
- Pin both front legs approximately 3–4 cm behind the head-body join and position their feet flat before sewing.
- Attach both back legs beneath the rear half of the body, spacing them far enough from the front pair that all four feet can contact the table.
- Sew the tail centrally to the rear body with the wide 24-stitch base spread across approximately 4–5 cm of the body surface.
- Angle the tail upward gradually rather than lifting it sharply at the seam; the final third should rise approximately 3–5 cm above the tabletop.
- Pin the five dorsal plates in yellow, coral, lavender, green and mint order, keeping the tallest plate over the shoulder/central body region.
- Sew each plate through its lower 10–15 mm only, leaving most of the oval surface free to stand upright.
- Attach the two pink cheek patches and embroider the curved black smile after the head position is permanent.
- Add three cream toe stitches to each foot, then weave every structural tail through at least 4 cm of matching chenille before trimming.
The completed stegosaurus should stand on four feet with a nearly horizontal body, five upright graduated plates and a long tail that rises gradually from the rear.
7 Technical Tips
- Stegosaurus tipping forward: A heavily stuffed 36-stitch head can outweigh the rear body. Move the front legs no farther than approximately 3–4 cm behind the head join and pack the tail base firmly enough to act as rear counterweight.
- Plates leaning sideways: Sewing only through one or two chenille stitches gives a tall plate a narrow hinge. Catch approximately 10–15 mm of its lower edge and sew through several body stitches on both sides of the plate base.
- Plate sequence looking flat: Five equal-height pieces remove the characteristic stegosaurus profile. Keep the tallest coral plate around 9–10 cm and reduce the final mint plate to approximately 4–5 cm.
- Tail forming a hard bend: Packing the narrow end as firmly as the base creates one stiff angle at attachment. Use dense filling at the 24-stitch base and progressively less stuffing toward the 6-stitch tip.
- Legs splaying outward: Sewing the upper edge while the feet are unsupported can rotate the limbs. Pin all four feet against a level surface before taking the first permanent attachment stitch.
- Safety eyes disappearing into chenille: An eye smaller than about 10–12 mm can become visually buried in plush fibers. Use approximately 12 mm eyes at this scale and trim no yarn fibers around the eye opening.
- Cream belly creeping too high: A side-mounted patch can make the dinosaur look two-tone rather than pale underneath. Keep at least 70 percent of the cream oval below the body midpoint and check both side views before sewing.
Conclusion
Check the plate sequence before attaching the first piece because the dinosaur’s silhouette depends more on plate height than on color. The next practical step is to pin all five plates from shoulder to tail, view the stegosaurus from both sides and correct any spacing before sewing. Keep all four feet on a level surface during limb attachment so the finished body remains horizontal. Share the completed stegosaurus amigurumi crochet pattern project on Pinterest with a full side-profile photograph, then post a close view of the rainbow plates on Instagram using #RainbowPlateStegosaurus. For this stegosaurus specifically, would you keep the yellow-to-mint plate sequence or reverse the five colors?









