Introduction
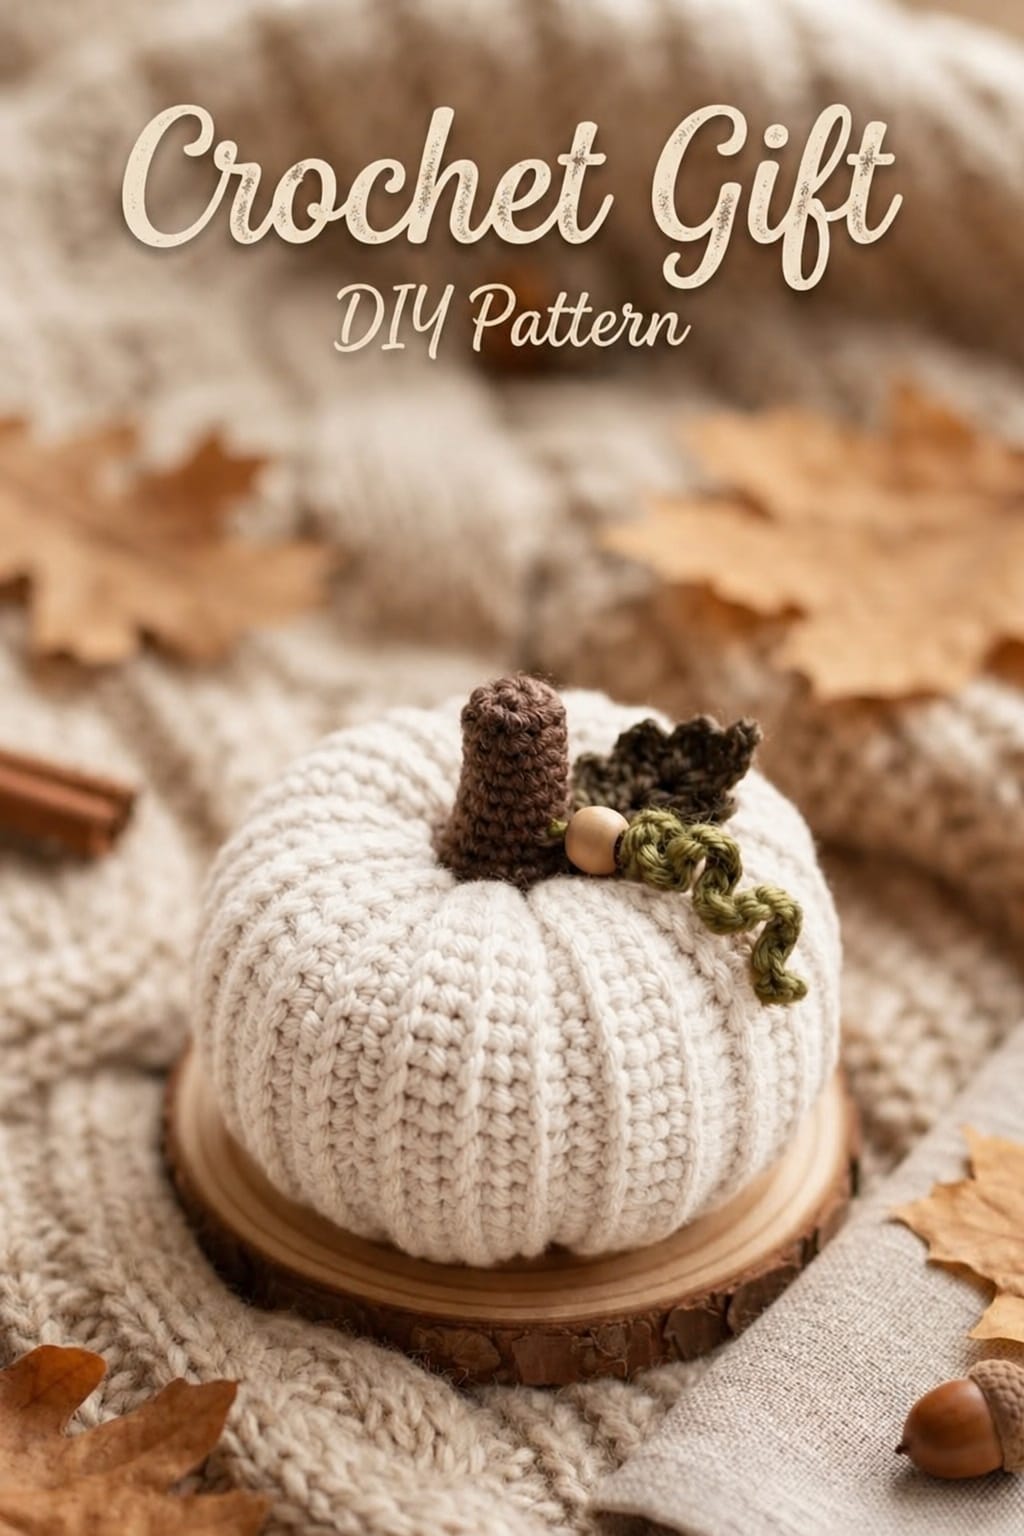
An ivory pumpkin needs deeper grooves than an orange one because color cannot separate one lobe from the next. This white crochet pumpkin pattern uses worsted yarn and a 5 mm hook to make an approximately 19–22 cm body. Eight sculpted sections, a curved brown stem, dark olive leaf, tight green tendril and single wooden bead reproduce the compact botanical crown shown in the reference.
The Design: What Makes This White Pumpkin Different
The pumpkin begins as a continuous stuffed form rather than a ribbed rectangle. That construction keeps the horizontal single-crochet texture consistent across every lobe and allows the maker to control groove depth after stuffing. A 42-stitch plateau supplies enough circumference for eight broad sections while still leaving a compact crown. The body is compressed vertically before the eight exterior channels are added, which creates the low, substantial profile seen in the photograph. Above that neutral body, the topper is deliberately small: one chocolate-brown stem, one dark olive leaf, one curled vine and a single wooden bead. This farmhouse crochet pumpkin depends on precise shaping rather than color changes. A frequent failure occurs when all eight channels are tightened clockwise; stuffing migrates toward the unfinished side and the final lobes become noticeably smaller.
Project Info at a Glance
| Skill Level | Time | Finished Size | Hook | Best For |
|---|---|---|---|---|
| Intermediate | 5–7 hours | Approx. 19–22 cm wide × 20–23 cm high including stem | 5.0 mm | Fall tables, shelves, neutral seasonal displays and centerpiece groups |
Materials and Tools
Yarn
- Natural ivory / warm cream — worsted / Aran #4 — approximately 130–170 g — pumpkin body and hidden sculpting strands.
- Chocolate brown — worsted / Aran #4 — approximately 15–20 g — curved stem.
- Dark olive green — worsted / Aran #4 — approximately 15–20 g — leaf and curly vine.
Use a firm plied yarn for the ivory body. A soft loosely spun yarn can blur the boundaries between the eight sculpted sections after stuffing.
Tools and Accessories
- 5.0 mm crochet hook
- 4.0–4.5 mm crochet hook for a firmer leaf if needed
- Polyester stuffing — approximately 180–230 g
- Long tapestry or doll needle
- Standard yarn needle
- Eight removable stitch markers
- One unfinished wooden bead — approximately 12–16 mm
- Scissors
- Measuring tape
Abbreviations
- MR — magic ring
- sc — single crochet
- inc — two single crochet stitches in one stitch
- dec — invisible decrease
- sl st — slip stitch
- ch — chain
- hdc — half double crochet
- dc — double crochet
- tr — treble crochet
An invisible decrease is made through the front loops of the next two stitches before one single crochet is completed through both loops.
Pattern — Step by Step
Work the pumpkin body in a continuous spiral. Place a marker in the first stitch of every round and move it after each completed round.
Ivory Pumpkin Body
Yarn: natural ivory — standard six-stitch amigurumi math adapted to the photographed pumpkin.
R1: 6 sc in MR (6)
R2: inc ×6 (12)
R3: (sc, inc) ×6 (18)
R4: (2 sc, inc) ×6 (24)
R5: (3 sc, inc) ×6 (30)
R6: (4 sc, inc) ×6 (36)
R7: (5 sc, inc) ×6 (42)
R8: sc around (42)
R9: sc around (42)
R10: sc around (42)
R11: sc around (42)
R12: sc around (42)
R13: sc around (42)
R14: sc around (42)
R15: sc around (42)
R16: sc around (42)
R17: sc around (42)
R18: (5 sc, dec) ×6 (36)
R19: sc around (36)
R20: (4 sc, dec) ×6 (30)
R21: sc around (30)
R22: (3 sc, dec) ×6 (24)
R23: sc around (24)
R24: (2 sc, dec) ×6 (18)
R25: sc around (18)
R26: (sc, dec) ×6 (12)
R27: dec ×6 (6)
Begin stuffing after R18. Pack the outside wall first and keep the central vertical core approximately 15–20 percent softer. Add the final small pieces of stuffing before R27.
Fasten off. Leave a 60 cm tail.
Close the Body
Thread the remaining tail through the front loops of the final six stitches.
Pull the opening closed.
Pass the needle through the center of the body and bury the tail.
At this point the piece should resemble a broad stuffed sphere without defined pumpkin channels.
Vertical Compression
Yarn: matching ivory.
Cut approximately 140 cm of yarn.
Thread a long needle.
Enter through the bottom center and exit through the crown center.
Return through the pumpkin on the same vertical axis.
Pull gradually until the body loses approximately 1.5–2 cm of height.
The sides should spread outward and both centers should recess slightly.
Stop before either center becomes a sharp hole. The photographed crown is depressed but broad enough to support the stem, leaf and bead.
Secure the strand temporarily.
Mark Eight Lobe Positions
View the pumpkin from directly above.
Place eight stitch markers around the widest circumference at approximately 45-degree intervals.
Pair the markers as four opposite sets.
Marker 1 pairs with Marker 5.
Marker 2 pairs with Marker 6.
Marker 3 pairs with Marker 7.
Marker 4 pairs with Marker 8.
Compare the spacing before adding any sculpting yarn. Correct a planned section if it differs from its opposite by more than approximately 10 mm.
Sculpting Channel 1
Yarn: matching ivory.
Cut approximately 170 cm of yarn.
Anchor it at the bottom center.
Bring the yarn over the outside of the pumpkin along the first marked line.
Insert through the crown center.
Pass the needle through the complete body and exit through the bottom center.
Pull until the channel sits approximately 12–16 mm below the fullest neighboring surfaces.
Do not permanently knot the yarn yet.
Sculpting Channel 2
Move immediately to the channel opposite the first.
Repeat the same pass from base to crown and back through the body.
Match its groove depth to Channel 1.
Set the pumpkin on a level surface and compare both sides.
Sculpting Channels 3 and 4
Work the next marked channel.
Then work its opposite.
Pull gradually rather than tightening one channel in a single movement.
The goal is to move stuffing evenly between lobes, not force one narrow cord deeply into the crochet.
Sculpting Channels 5 and 6
Repeat with the third opposite pair.
Rotate the pumpkin and press lightly around the outer circumference.
Move stuffing toward any section that appears flatter than the others.
Sculpting Channels 7 and 8
Complete the final opposite pair.
Inspect the pumpkin from the top, front and side.
Adjust all eight channels until the groove depths remain within approximately 3–4 mm of one another.
Knot the sculpting yarn securely at the lower center.
Bury the tails through the stuffed body.
Deepen the Crown Recess
Cut approximately 80 cm of ivory yarn.
Pass from crown center to bottom center and back once.
Pull until the crown recess measures approximately 12–15 mm.
This depression provides the attachment area for the botanical topper without collapsing the upper ends of the eight lobes.
Secure and bury the tail.
Brown Stem
Yarn: chocolate brown.
R1: 6 sc in MR (6)
R2: sc around (6)
R3: sc around (6)
R4: sc around (6)
R5: sc around (6)
R6: sc around (6)
R7: sc around (6)
R8: sc around (6)
R9: (2 sc, inc) ×2 (8)
R10: sc around (8)
R11: (3 sc, inc) ×2 (10)
R12: sc around (10)
R13: (4 sc, inc) ×2 (12)
R14: sc around (12)
R15: (sc, inc) ×6 (18)
R16: sc around (18)
Stuff R10–R16 lightly. Leave the narrow upper section mostly empty so the stem can bend without forming one hard fold.
Fasten off. Leave a 40 cm sewing tail.
Shape the Stem
Hold the widened base firmly.
Bend the upper six-stitch tube gradually across approximately 4–5 cm.
The tip should move roughly 15–25 mm away from the vertical center line.
If the tube springs upright, use one or two concealed brown stitches on the inside of the curve.
Dark Olive Leaf
Yarn: dark olive green.
Ch 10.
Starting in the second chain from the hook:
sl st, sc, hdc, dc, 2 tr, dc, hdc, sc.
Work 3 sc into the final chain.
Continue down the opposite side:
sc, hdc, dc, 2 tr, dc, hdc, sc, sl st.
Fasten off. Leave a 25 cm sewing tail.
The finished leaf should measure approximately 6–7 cm long.
Leaf Center Vein
Thread the green tail onto a yarn needle.
Make one surface stitch along the foundation chain from the leaf base toward the tip.
Add one short diagonal stitch on each side if stronger structure is wanted.
Do not pull the vein tightly enough to fold the leaf in half.
Curly Olive Vine
Yarn: olive green.
Ch 18.
Starting in the second chain from the hook, work 3 sc into every chain across.
The cord will curl as the stitches accumulate.
Fasten off. Leave a 20 cm attachment tail.
Do not manually tighten the spiral. The reference shows an irregular loose curl rather than a compact spring.
Prepare the Wooden Bead
Use one unfinished wooden bead approximately 12–16 mm in diameter.
Check that the bead hole can accept the green yarn or a narrow strand of natural twine.
The bead is decorative and should not carry the weight of the stem or leaf.
Attach the Stem
Center the 18-stitch stem base over the crown recess.
Pin it before sewing.
Use the brown tail to stitch through the stem base and several different ivory lobes.
Work around the full circumference of the stem base.
The stem should stand without assistance before the leaf and vine are added.
Attach the Leaf
Place the olive leaf behind and slightly to one side of the brown stem.
Its point should angle outward rather than straight upward.
Sew the lower 15–20 mm to the pumpkin crown.
Leave the outer leaf edges and tip free.
Add the Wooden Bead
Thread the bead onto a short green yarn tail or narrow natural cord.
Position it at the front of the crown between the stem and leaf.
Pass the attachment strand into the pumpkin body and secure it beneath the topper.
Keep the bead touching the crown rather than suspending it on a long strand.
Attach the Curly Vine
Place the straight end of the vine beside the wooden bead.
Sew approximately 10–15 mm of the vine base to the crown.
Leave the remaining spiral free.
Arrange the curl so it crosses one upper lobe and then lifts away from the pumpkin surface.
Check the Final Proportions
Measure the body at the widest point. A target of approximately 19–22 cm produces the hand-sized decorative scale visible in the photograph.
The ivory body should remain wider than its body height. Before the stem, target approximately 14–16 cm from the base to the crown.
With the topper attached, total height should fall near 20–23 cm.
Set the white crochet pumpkin pattern project on a level table. At least three lower lobes should make contact with the surface so the curved stem and bead do not pull the body sideways.
Assembly
- Complete the ivory body through R27 and keep the central stuffing approximately 15–20 percent softer than the outside wall.
- Compress the body vertically by approximately 1.5–2 cm before marking any exterior channels.
- Mark eight equal sections and sculpt them as four opposite pairs, targeting grooves approximately 12–16 mm deep.
- Check all eight lobes from above and redistribute stuffing before permanently knotting the sculpting yarn.
- Deepen the crown center to approximately 12–15 mm and sew the 18-stitch brown stem base over that recessed area.
- Shape the stem gradually before attachment so its tip shifts approximately 15–25 mm from the center without forming a sharp hinge.
- Position the olive leaf behind the stem and sew only its lower 15–20 mm so the point remains dimensional.
- Fix one 12–16 mm wooden bead against the front of the crown without using it as a structural anchor.
- Attach the first 10–15 mm of the curly vine beside the bead and leave the remaining spiral free.
- Place the pumpkin on a level surface, correct any rocking by moving lower stuffing, then weave all yarn tails through at least 4 cm of matching crochet.
The finished piece should have eight balanced ivory lobes, a recessed crown, one curved brown stem, one dark olive leaf, one loose spiral vine and one visible natural wooden bead.
7 Technical Tips
- Lobes becoming unequal: Tightening all eight channels in sequence pushes filling toward the final sections. Work one groove and then its opposite, keeping the markers approximately 45 degrees apart.
- Body remaining too spherical: A firm vertical core resists both compression and sculpting. Keep the center approximately 15–20 percent softer than the outer wall before closing R27.
- Shaping strands disappearing into the fabric: Excessive tension can pull the ivory yarn between adjacent single crochets. Stop when each groove reaches approximately 12–16 mm below the neighboring lobe surfaces.
- Stem folding sharply: Heavy stuffing in the narrow six-stitch tube creates one abrupt hinge when bent. Leave most of R1–R8 empty and distribute the curve across approximately 4–5 cm.
- Leaf flattening against the body: Sewing around its complete perimeter removes the raised botanical profile. Fix only the lower 15–20 mm and leave at least the outer two-thirds unattached.
- Vine losing its curl: Stretching the 3-sc-per-chain cord during attachment can open the spiral. Secure only the first 10–15 mm and leave the remaining coils without sewing stitches.
- Pumpkin rocking after the topper is added: An exposed bottom closure can become the only contact point. Push the lower center upward by approximately 5 mm and redistribute stuffing until several lobes share the weight.
Conclusion
Check the eight groove positions before attaching the crown pieces because the dark stem and leaf make asymmetry in the ivory body easier to see. The next practical step is to set the sculpted pumpkin on a flat surface, compare opposite lobes and correct the filling before the shaping yarn is buried. Attach the stem first, then layer the leaf, bead and vine around its base. Share the finished white crochet pumpkin pattern project on Pinterest with a three-quarter image showing the full lobe structure, then post a crown close-up on Instagram using #IvoryBotanicalCrochetPumpkin. For this pumpkin specifically, would you keep the single natural wooden bead or add two smaller beads beside it?









