Introduction
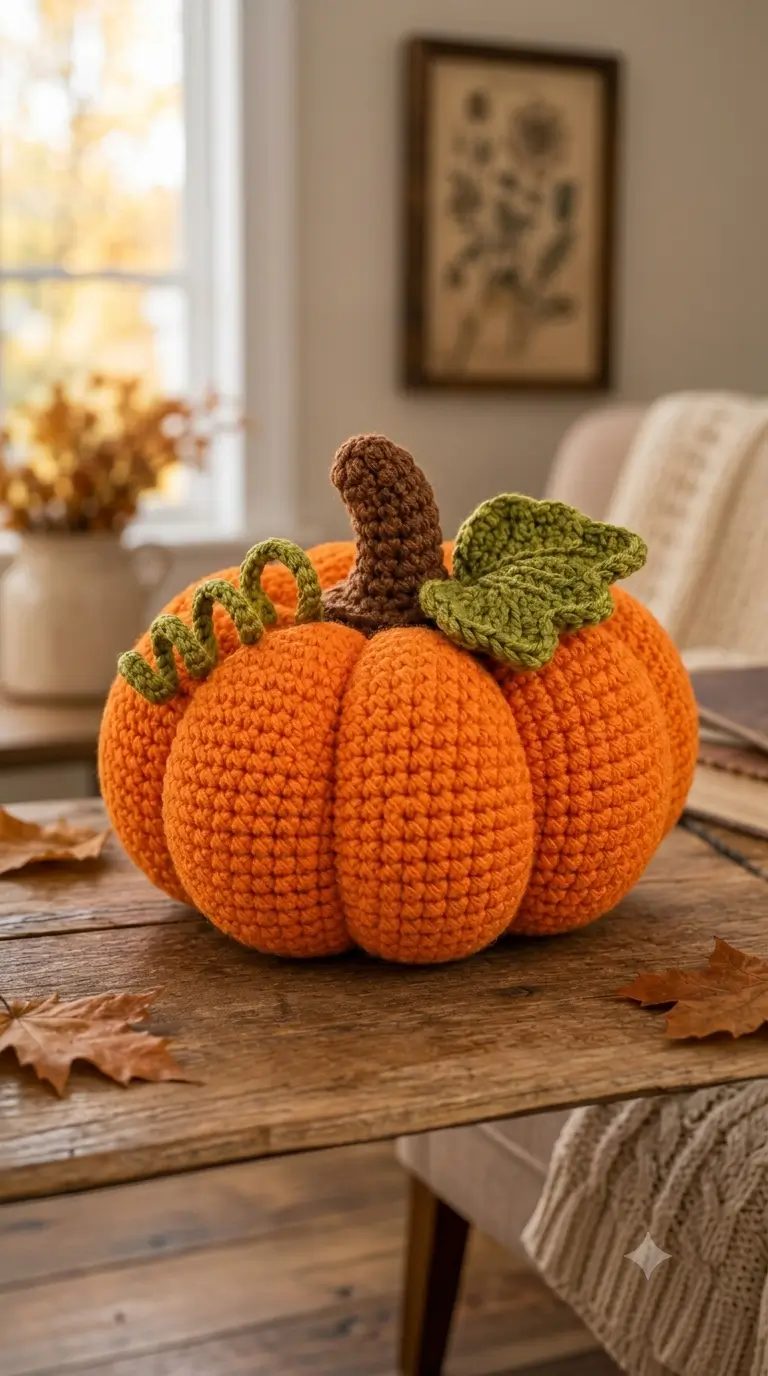
Pumpkin ribs collapse into a ball unless the shaping yarn passes through both the top and bottom centers. This pumpkin amigurumi crochet pattern recreates the photographed gourd with worsted/Aran yarn, a 3.5 mm hook, deep orange lobes, a brown stem, two olive leaves and one coiled tendril. The project targets a large tabletop scale and an intermediate skill level. Make it when you need reusable fall décor without plastic facial parts.
The Design: What Makes This Pumpkin Different
The first structural choice is the 42-stitch body plateau. It provides enough circumference for a large crochet pumpkin while keeping the stitch math on the standard six-stitch amigurumi progression.
Second, the body is closed before eight external sculpting passes are added. Those passes create deeper channels than surface stitch texture alone and produce the broad lobes visible in the reference design.
Third, the crown is deliberately asymmetrical. The tall brown stem sits between two overlapping leaves while the green tendril falls toward one side. This creates a low orange mass balanced by a narrow vertical stem rather than a simple sphere.
A common ribbed pumpkin crochet failure is pulling one shaping strand much tighter than the others. The finished piece then develops one narrow lobe and several oversized sections instead of an even segmented silhouette.
Project Info at a Glance
| Skill Level | Time | Finished Size | Hook | Best For |
|---|---|---|---|---|
| Intermediate | 5–7 hours | Approx. 20 cm wide × 17–20 cm high | 3.5 mm | Tabletop fall display and centerpiece |
Materials and Tools
Yarn
- Pumpkin orange — worsted/Aran — 140–170 g
- Olive green — worsted/Aran — 20–30 g
- Dark brown — worsted/Aran — 8–10 g
A smooth acrylic or cotton-blend yarn works well for this construction because the sculpted channels remain clearly defined. Keep several extra metres of orange yarn available for forming the external ribs after the body has been stuffed and closed.
Tools
- 3.5 mm crochet hook
- Polyester fiberfill
- Long 12–15 cm tapestry or doll needle
- Standard yarn needle
- Locking stitch marker
- Eight removable pins or stitch markers
- Scissors
- Measuring tape
No safety eyes are required. This pumpkin is designed as a faceless decorative piece.
Abbreviations
- MR — magic ring
- sc — single crochet
- inc — 2 sc in the same stitch
- dec — invisible single-crochet decrease
- sl st — slip stitch
- ch — chain
- BLO — back loop only
- st/sts — stitch/stitches
- R — round or row
For an invisible decrease, insert the hook through the front loops of the next two stitches, draw up a loop, then complete one sc through both stitches.
Pattern — Step by Step
Work the pumpkin body in a continuous spiral unless a section states otherwise.
Pumpkin Body
Yarn: pumpkin orange — Standard amigurumi math.
R1: 6 sc in MR (6)
R2: inc ×6 (12)
R3: (sc, inc) ×6 (18)
R4: (2 sc, inc) ×6 (24)
R5: (3 sc, inc) ×6 (30)
R6: (4 sc, inc) ×6 (36)
R7: (5 sc, inc) ×6 (42)
R8: sc around (42)
R9: sc around (42)
R10: sc around (42)
R11: sc around (42)
R12: sc around (42)
R13: sc around (42)
R14: sc around (42)
R15: sc around (42)
R16: sc around (42)
R17: sc around (42)
R18: sc around (42)
R19: sc around (42)
R20: (5 sc, dec) ×6 (36)
R21: (4 sc, dec) ×6 (30)
R22: (3 sc, dec) ×6 (24)
Stuff the body firmly now. Push filling toward the outside wall rather than packing a hard lump through the center. A clear vertical path through the middle makes the later sculpting stage easier.
R23: (2 sc, dec) ×6 (18)
R24: (sc, dec) ×6 (12)
R25: dec ×6 (6)
Fasten off and close the remaining six front loops.
Weave the tail securely into the body. Use a separate long orange strand for the sculpted ribs rather than relying on the closing tail.
Eight Sculpted Pumpkin Ribs
Yarn: pumpkin orange — approximately 3–3.5 m.
Cut one long orange strand and thread it onto a long tapestry or doll needle.
Insert the needle at the bottom center of the pumpkin and bring it vertically through the stuffed body so it exits at the exact top center. Run the yarn down the outside of the pumpkin, following the shortest path back to the bottom center.
Insert the needle through the bottom again and bring it through the same top point. Pull the strand until the surface forms a visible groove.
Do not pull until the surrounding sections flatten.
Rotate the pumpkin approximately one eighth of a turn and repeat the same process. Continue until eight evenly spaced grooves divide the body.
Check the shape from directly above before securing the strand. All eight sections should appear approximately equal in width.
Secure the yarn at the lower center and bury the remaining tail inside the stuffing.
Tall Brown Stem
Yarn: dark brown.
R1: 6 sc in MR (6)
R2: sc around (6)
R3: sc around (6)
R4: sc around (6)
R5: sc around (6)
R6: sc around (6)
R7: sc around (6)
R8: sc around (6)
R9: sc around (6)
R10: inc ×6 (12)
R11: sc around (12)
R12: sc around (12)
Add a small amount of stuffing to the wider bottom portion. The upper section should remain relatively flexible so the stem can be curved.
Fasten off. Leave a 30 cm sewing tail.
To create the bent profile, curve the stem after attaching its base. Use two small brown stitches to catch approximately R5 to R7 along the inside of the bend. Tightening those stitches shortens one edge and holds the curve without adding wire.
Broad Olive Leaf — Make 2
Yarn: olive green.
R1: ch 10, sc in second ch from hook and across (9)
R2: ch 1, turn, inc, 7 sc, inc (11)
R3: ch 1, turn, inc, 9 sc, inc (13)
R4: ch 1, turn, inc, 11 sc, inc (15)
R5: ch 1, turn, dec, 11 sc, dec (13)
R6: ch 1, turn, dec, 9 sc, dec (11)
R7: ch 1, turn, dec, 7 sc, dec (9)
R8: ch 1, turn, dec, 5 sc, dec (7)
R9: ch 1, turn, dec, 3 sc, dec (5)
R10: ch 1, turn, dec, sc, dec (3)
Fasten off. Leave a 25 cm tail for sewing.
The widening rows create the broad center of the leaf, while the final decreases produce the pointed outer end.
Use the starting edge as the attachment end.
Make the second leaf in the same way. During assembly, rotate it in the opposite direction so the leaves overlap without covering each other completely.
Leaf Veins
Yarn: olive green.
Cut approximately 50 cm of yarn for each leaf.
Starting near the attachment edge, embroider a loose central line toward the pointed tip with surface slip stitches or short backstitches.
Add one short diagonal vein on each side around Rows 4–6.
Avoid pulling the embroidery tightly. Excess tension causes the flat leaf to cup or fold through the center.
Secure all tails on the wrong side.
Curly Tendril
Yarn: olive green.
R1: ch 30 (30 ch)
R2: starting in the second ch from hook, work 2 sc into every chain (58 sc)
The increase density causes the strip to curl automatically.
Fasten off. Leave a 20 cm tail for attachment.
If the finished coil becomes too open, wrap it gently around the handle of a 10–12 mm crochet hook for several minutes before sewing it to the pumpkin.
Optional Crown Base
Yarn: olive green.
Use this piece only if there is a visible orange gap underneath the stem and leaves.
R1: 6 sc in MR (6)
R2: inc ×6 (12)
R3: (sc, inc) ×6 (18)
Fasten off. Leave a 20 cm sewing tail.
Place the green circle directly over the top center before attaching the stem. Position the leaves over its edges so most of the disc remains hidden.
Skip this section when the stem base already covers the top opening cleanly.
Assembly
- Check the closed orange body and redistribute the stuffing until every lobe has a rounded outer surface.
- Finish all eight sculpting passes before attaching the crown. Tightening the ribs can move the apparent top center several millimeters.
- Position the widened brown stem directly over the top center. Pin it in place and sew around the base with small brown stitches.
- Bend the stem slightly forward. Secure the inner side of the bend with two hidden brown stitches between the middle rounds.
- Place the first olive leaf behind the stem with its pointed tip extending toward one side.
- Position the second leaf across the first at approximately a 35–50 degree angle so both leaf tips remain visible.
- Sew only the lower 15–20 mm of each leaf to the pumpkin. The remaining sections should stay free rather than being stitched flat against the body.
- Attach the curly tendril beside the leaves. Rotate the coil until three or four loops remain clearly visible from the front.
- Hide each yarn tail by running the needle through several centimeters of stuffing before bringing it back through the orange surface and trimming.
- Set the pumpkin on a flat table. Correct any uneven lobe by redistributing stuffing or slightly adjusting the tension of the neighboring sculpting strand.
The finished pumpkin should have eight visible body sections, one tall curved brown stem, two overlapping green leaves and one coiled tendril.









