Introduction
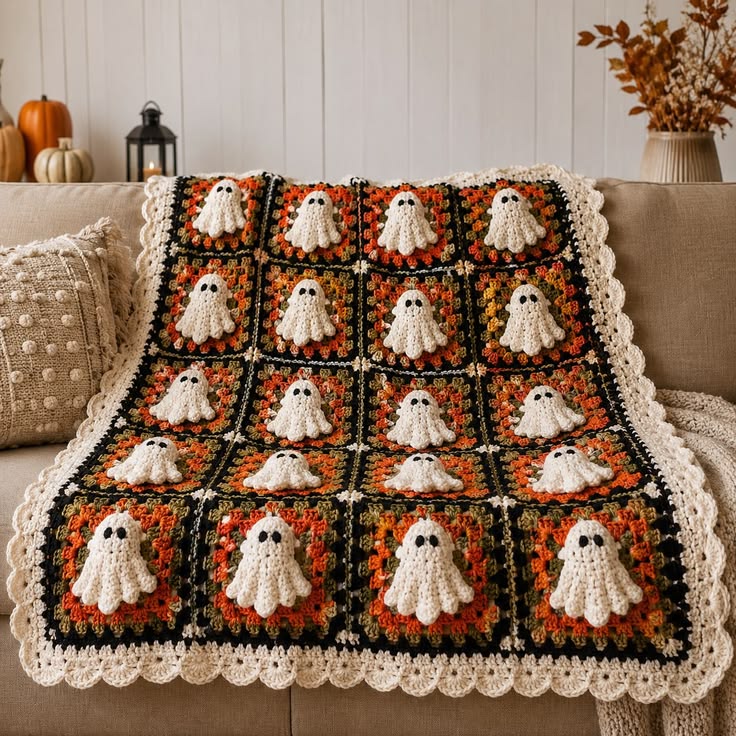
Twenty white ghosts only look like one planned blanket when every head sits at the same height inside its square. This ghost granny square crochet blanket pattern uses worsted yarn and a 5 mm hook to build a 4 × 5 grid approximately 82–88 cm wide. Raised ghost appliqués, black-centered autumn squares, cream joining seams and a broad scalloped border create an intermediate Halloween throw.
The Design: What Makes This Ghost Blanket Different
The ghosts are separate dimensional pieces rather than flat color changes inside the granny squares. That choice keeps their rounded heads and five lower waves raised above the darker background. Each block combines black structural rounds with rust, orange, mustard and cream clusters, so the blanket reads as Halloween decor without relying on twenty identical backgrounds. Cream joining seams divide the dark squares into a visible grid and connect directly to the large outer border. The supplied layout uses four blocks across and five blocks down, giving twenty ghost motifs in total. This 3D ghost granny square construction depends on consistent placement. A common maker mistake is centering the ghost by its total height rather than its head; the lower scallops then sit too close to the bottom edge and make the figure look low inside the square.
Project Info at a Glance
| Skill Level | Time | Finished Size | Hook | Best For |
|---|---|---|---|---|
| Intermediate | 30–38 hours | Approx. 82–88 × 100–110 cm | 5.0 mm | Halloween sofa throws, lap blankets and seasonal displays |
Materials and Tools
Yarn
- Black — worsted / medium #4 — approximately 450–550 g — dark square sections and structural edging.
- Warm ivory / cream — worsted / medium #4 — approximately 500–650 g — ghosts, square accents, joining and outer border.
- Burnt orange — worsted / medium #4 — approximately 120–150 g — autumn granny clusters.
- Rust — worsted / medium #4 — approximately 80–100 g — secondary square clusters.
- Mustard — worsted / medium #4 — approximately 50–70 g — small background accents.
- Dark brown — optional worsted scrap — approximately 20–30 g for additional autumn color variation.
Tools
- 5.0 mm crochet hook
- 4.0–4.5 mm crochet hook for firmer ghost appliqués if needed
- Tapestry needle
- Locking stitch markers
- Dressmaking pins
- Blocking mats
- Rust-resistant pins
- Scissors
- Measuring tape
Use yarns from the same weight category through the square backgrounds. A thinner accent yarn changes the block dimensions and can leave one side of the joining grid shorter than another.
Abbreviations
- MR — magic ring
- ch — chain
- sc — single crochet
- hdc — half double crochet
- dc — double crochet
- tr — treble crochet
- sl st — slip stitch
- inc — two stitches in one stitch
- dec — decrease
- sp — space
- RS — right side
- WS — wrong side
For a compact decrease on the ghost shaping, insert the hook through the front loops of the next two stitches and complete one single crochet through both loops.
Pattern — Step by Step
Make twenty square backgrounds first. Block them to the same dimensions before producing and attaching the ghosts.
Autumn Granny Square — Round 1
Make 20. Vary orange, rust and mustard placement while keeping the black rounds in the same positions.
With burnt orange, rust or mustard, make an MR.
R1: Ch 3, 2 dc in MR, ch 2; *3 dc in MR, ch 2* three times. Join with sl st to top of beginning ch 3.
You now have four 3-dc clusters and four corner spaces.
Fasten off the first color.
Square — Round 2
Join a second autumn color in any corner.
In the same corner work:
ch 3, 2 dc, ch 2, 3 dc.
In each remaining corner work:
3 dc, ch 2, 3 dc.
Join with sl st.
Keep the corner chains relaxed. Tight corners pull the square into a rounded diamond.
Square — Round 3
Join black in any corner.
Work:
ch 3, 2 dc, ch 2, 3 dc
in the corner.
Work 3 dc in the next side space.
At the next corner work 3 dc, ch 2, 3 dc.
Repeat around.
Join with sl st and fasten off.
Square — Round 4
Join another autumn color.
Work one standard granny cluster in each side space.
At each corner work:
3 dc, ch 2, 3 dc.
Join with sl st.
For visual variation, rotate orange, rust and mustard placement from block to block rather than repeating one exact sequence twenty times.
Square — Round 5
Join black.
Work one 3-dc cluster in every side space.
Work 3 dc, ch 2, 3 dc in each corner.
Join with sl st.
Fasten off.
Square — Cream Accent Round
Join cream in one corner.
Ch 1.
Work sc in each dc and ch space around the square.
At each corner work:
2 sc, ch 1, 2 sc.
Join with sl st.
This narrow light round gives the joining seams a cleaner transition and makes the black background read as a framed motif.
Square — Final Black Round
Join black in a corner ch-1 space.
Ch 1 and sc around.
At each corner work:
2 sc, ch 2, 2 sc.
Join with sl st.
Fasten off.
Block the square to approximately 18 × 18 cm.
Ghost Head and Upper Body
Make 20 in warm ivory.
R1: 6 sc in MR. (6)
R2: inc ×6. (12)
R3: (sc, inc) ×6. (18)
R4: (2 sc, inc) ×6. (24)
R5: (3 sc, inc) ×6. (30)
Do not continue increasing.
The upper half now forms the rounded ghost head.
Ghost Body Extension
Stop working in a complete circle.
Row 6: Ch 1, sc in next 22 sts. Turn. (22)
Row 7: Ch 1, sc across. Turn. (22)
Row 8: Ch 1, dec, 18 sc, dec. Turn. (20)
Row 9: Ch 1, sc across. Turn. (20)
Row 10: Ch 1, dec, 16 sc, dec. Turn. (18)
Rows 11–13: Ch 1, sc across. Turn. (18)
The piece should now have a rounded head and a slightly narrower hanging body approximately 8–9 cm long.
Ghost Lower Wave 1
Ch 1.
In the first three stitches work:
sc, hdc, 3 dc in next stitch, hdc, sc.
Use the next stitches to transition into the following wave.
Ghost Lower Waves 2–5
Continue across the lower edge using alternating groups:
sc, hdc, 3 dc in one stitch, hdc, sc.
Space the groups so five rounded points span the lower edge.
The center wave may be approximately one stitch deeper than the two outer waves.
Do not force every scallop to identical width. The photograph shows slightly organic folds rather than five rigid semicircles.
Ghost Side Edging
Continue with ivory.
Work sc evenly up the first side.
Follow the rounded head with sc stitches placed evenly around the unused head stitches.
Work down the second side.
Join to the lower edge with sl st.
Fasten off, leaving a 50 cm sewing tail.
Ghost Left Arm
Make 20.
Join ivory approximately halfway down the left side.
Ch 6.
Starting in the second chain:
sl st, sc, hdc, sc, sl st.
Sl st back into the body attachment point.
Fasten off.
Ghost Right Arm
Repeat the left arm on the opposite side.
Angle both arms slightly downward.
The arm tips should remain inside the black square frame after assembly.
Ghost Eyes — Make 40
Yarn: black.
With the smaller hook:
R1: 5 sc in MR. (5)
Close the ring tightly.
Fasten off, leaving a 12 cm tail.
For an embroidered version, substitute two vertical satin-stitch ovals approximately 6–8 mm high.
Optional Ghost Mouth
The supplied ghosts appear to use eyes only, so a mouth is not required.
If a variation is wanted, embroider a very small black oval approximately 5 mm long between and below the eyes.
Position the Eyes
Lay one ghost flat.
Place the eyes in the upper half of the rounded head.
Leave approximately 12–16 mm between their inner edges.
The eyes should sit approximately 20–25 mm below the highest point of the head.
Sew each eye around its outer edge without pulling the ivory fabric inward.
Block All Twenty Ghosts
Pin each ghost with the head rounded and the five lower waves separated.
Target approximately 8–9 cm width × 10–11 cm height.
Dampen according to the yarn label.
Allow the pieces to dry before attaching them to the squares.
Attach the Ghosts to the Squares
Center one ghost on each blocked square.
Position the top of the head approximately 25–30 mm below the inner black frame.
The lowest wave should remain approximately 15–20 mm above the lower black edge.
Pin the head, sides and lower scallops before sewing.
Sew around the head and upper side edges.
Attach the lower waves mainly at their bases, leaving the rounded outer portions slightly raised.
The dimensional effect should remain visible after the square lies flat.
Prepare the 4 × 5 Blanket Layout
Arrange the twenty completed blocks in five horizontal rows of four squares.
Rotate the autumn color combinations until neighboring blocks do not repeat the same dominant orange or rust placement.
Photograph the arrangement before joining.
Label the rows 1 through 5 if needed.
Join Row 1
Yarn: warm cream.
Place Square 1 beside Square 2 with right sides facing upward.
Using a flat slip-stitch join, insert the hook through corresponding back loops along both square edges.
Slip stitch from one corner to the next.
Add Squares 3 and 4 in the same manner.
Join Rows 2–5
Repeat the same joining method until five separate four-square strips are complete.
Keep the cream joining tension slightly looser than the black square edging.
A tight join creates a raised ridge and shortens the blanket width.
Join the Five Rows
Place Row 1 above Row 2.
Slip stitch through corresponding back loops from one blanket side to the other.
At every four-square intersection, pass through the adjacent corner loops without adding an extra chain.
Continue until all five rows are connected.
The central field now contains twenty squares in a 4 × 5 grid.
Outer Border
Border Round 1 — Cream Foundation
Join cream at any outer corner.
Ch 1.
Sc evenly around the entire blanket.
Work 3 sc in each corner.
At every square-to-square seam, place one sc directly into the seam junction.
Join with sl st.
Count opposite edges.
The two long sides should match one another, and the two short sides should match.
Border Round 2 — Cream
Ch 1.
Sc in every stitch around.
Work 3 sc in the center stitch of each corner.
Join with sl st.
This round creates a flat structural base before the wider decorative edge.
Border Round 3 — Openwork Setup
Ch 1, sc in first stitch.
*Ch 2, skip 1 stitch, sc in next stitch.*
Repeat across each side.
At every corner work:
sc, ch 3, sc
into the corner stitch.
Join with sl st.
Border Round 4 — Large Scallops
Sl st into the first ch-2 space.
In that space work:
7 dc.
Sc in the next ch-2 space.
Work 7 dc in the following ch-2 space.
Continue alternating 7-dc shells and sc anchors around the blanket.
At each corner ch-3 space, work 9 dc.
If the final shell approaches a corner unevenly, redistribute the preceding two shells rather than squeezing an extra shell into too few stitches.
Border Round 5 — Optional Picot Finish
For a more pronounced edge, continue in cream.
Across each 7-dc shell work:
sl st in first dc, sc in second dc, ch 3, sl st into first ch, sc in next three dc, ch 3, sl st into first ch, sc in sixth dc, sl st in final dc.
Repeat across each shell.
Work the same structure across the 9-dc corner shells with one additional central picot.
Fasten off.
Assembly
- Make all twenty granny backgrounds and block every square to approximately 18 × 18 cm before starting the blanket grid.
- Make twenty ivory ghosts and check that their finished widths remain within approximately 5 mm of one another.
- Attach two black eyes to each ghost, giving forty eyes total, and keep their height consistent from motif to motif.
- Pin one ghost inside each square with the head approximately 25–30 mm below the upper black frame.
- Sew the ghost head and body securely while leaving the lower scallop edges slightly free for three-dimensional relief.
- Arrange four completed blocks across and five down, changing the autumn-color orientation where neighboring squares look too similar.
- Join each group of four squares into horizontal rows with cream, then connect the five rows using the same stitch placement.
- Work two cream structural border rounds and count opposite edges before starting any shells.
- Add the openwork setup and large scalloped border, placing one complete 9-dc shell through every outer corner.
- Block the finished blanket to approximately 82–88 × 100–110 cm, then weave all tails through at least 4 cm of matching-color fabric.
The completed blanket should contain twenty aligned raised ghosts, a clear cream joining grid, balanced autumn-color backgrounds and an uninterrupted scalloped cream frame.
7 Technical Tips
- Ghost heads sitting at different heights: A placement difference greater than approximately 10 mm becomes obvious once five rows are joined. Measure 25–30 mm down from the upper black frame before pinning every ghost.
- Lower ghost waves flattening: Sewing around the complete edge removes the raised drape visible in the reference. Attach mainly through the inner 5–8 mm of each lower wave and leave the curved outer portion free.
- Square grid pulling inward: Tight cream slip-stitch joins can shorten every seam by several millimeters. Keep the joining yarn relaxed and compare each completed four-square row against the next before connecting them.
- Ghost eyes becoming uneven: A 5 mm vertical difference between two eyes can make the face appear tilted. Mark both eye centers before sewing and keep approximately 12–16 mm between their inner edges.
- Four-square intersections forming holes: Skipping the corner loops where seams cross can leave openings larger than 5 mm. Catch the adjacent corner loops at each intersection before continuing the joining line.
- Scalloped border waving: Too many shells add excess circumference around the blanket. Work a counted foundation round first and redistribute the final two shells before each corner when the repeat does not land cleanly.
- Blanket blocks finishing different sizes: A 5 mm error repeated across four squares can change one row width by roughly 2 cm. Block all twenty backgrounds to one template before any ghosts or joining stitches are added.
Conclusion
Check the twenty ghost positions before joining the first row because the cream grid will make every alignment difference easier to see. The next practical step is to block the squares to one 18 cm template, place the ghosts at a consistent head height and photograph the full 4 × 5 arrangement. Join only after the autumn colors are balanced across the grid. Share the finished ghost granny square crochet blanket pattern project on Pinterest with a full-blanket photograph, then post a close view of one raised ghost and the scalloped edge on Instagram using #GhostGrannySquareBlanket. For this blanket specifically, would you keep all twenty ghosts ivory or make one central ghost pale gray?









