Introduction
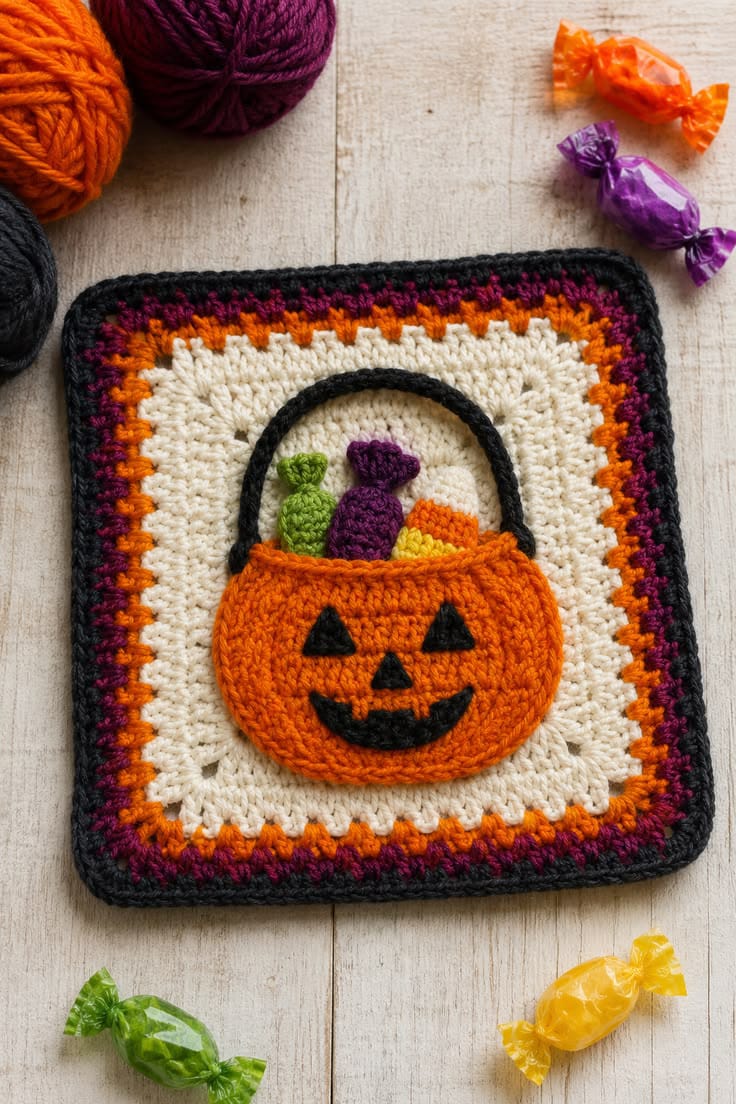
A trick-or-treat basket stops reading as a basket when its black handle is wider than the pumpkin beneath it. This Halloween granny square crochet pattern uses worsted yarn and a 5 mm hook to make an approximately 18 cm block. A cream background supports a dimensional orange Jack-o’-Lantern pocket, four candy pieces, a black handle and a three-color Halloween border for an intermediate decorative square.
The Design: What Makes This Halloween Square Different
The pumpkin is constructed as a separate appliqué because the reference shows its upper edge projecting away from the cream square. That small amount of depth creates an actual pocket effect and gives the four candy shapes somewhere to sit. The black handle is attached behind both upper corners and follows a compact arch instead of lying flat across the pumpkin. Three facial triangles and a curved mouth remain on the front surface, where they can be aligned after the pocket has been shaped. Orange, plum and black border rounds repeat the candy and face colors without adding more motifs to the background. This Jack-o’-Lantern crochet square depends on controlled layering. A frequent maker error is sewing the complete upper pumpkin edge to the background; doing so removes the pocket opening and forces every candy piece to sit unnaturally on top.
Project Info at a Glance
| Skill Level | Time | Finished Size | Hook | Best For |
|---|---|---|---|---|
| Intermediate | 3–4 hours | Approx. 18 × 18 cm | 5.0 mm main / 4.0–4.5 mm details | Halloween blankets, cushions, wall panels and bags |
Materials and Tools
Yarn
- Warm ivory / cream — worsted #4 — approximately 35–45 g — square background.
- Pumpkin orange — worsted #4 — approximately 20–25 g — pumpkin pocket and first border round.
- Black — worsted #4 — approximately 8–10 g — handle, eyes, nose, mouth and outer border.
- Deep plum — worsted #4 — approximately 5–7 g — middle border and one candy.
- Bright purple — scrap yarn — one candy detail.
- Leaf green — scrap yarn — one candy.
- Golden yellow — scrap yarn — one candy.
- Natural cream — scrap yarn — one candy.
Use yarns with similar thickness through the square, border and appliqués. A substantially thicker orange yarn makes the basket dominate the cream field and can pull the finished block forward.
Tools
- 5.0 mm crochet hook for the square
- 4.0–4.5 mm crochet hook for facial pieces and candies
- Yarn needle
- Locking stitch markers
- Dressmaking pins
- Scissors
- Blocking mat
- Rust-resistant blocking pins
- Measuring tape
Abbreviations
- MR — magic ring
- ch — chain
- sc — single crochet
- hdc — half double crochet
- dc — double crochet
- inc — two stitches in one stitch
- dec — decrease
- sl st — slip stitch
- RS — right side
- WS — wrong side
For neat appliqué decreases, work through the front loops of the next two stitches and complete one single crochet through both loops.
Pattern — Step by Step
Make the cream square first. Block the background before positioning the pumpkin basket so its final center point and border clearance can be measured accurately.
Cream Square Background
Yarn: warm ivory.
Ch 32.
Row 1: Sc in second ch from hook and across. Turn. (31)
Row 2: Ch 1, sc across. Turn. (31)
Repeat Row 2 until the background measures approximately 14.5–15 cm high.
This will usually require approximately 30–32 rows.
Measure the square every six rows. Stop when width and height differ by no more than approximately 5 mm.
Do not fasten off.
Square Edging Round
Ch 1.
Sc across the top edge.
At the first corner work 3 sc.
Work sc evenly down the first side, placing approximately one sc in every row end.
Work 3 sc at the next corner.
Continue around the foundation edge and final side.
Work 3 sc at each corner.
Join with sl st.
Fasten off cream.
Orange Border Round
Yarn: pumpkin orange.
Join in any corner stitch.
Ch 1.
Sc in every stitch around.
Work 3 sc in each corner stitch.
Join with sl st.
Keep corner stitches loose enough that the square remains flat.
Fasten off.
Plum Border Round
Yarn: deep plum.
Join at a corner.
Ch 1 and sc in every stitch around.
Work 3 sc in each corner.
Join with sl st and fasten off.
Black Outer Border
Yarn: black.
Join at any corner.
Ch 1.
Sc around, working 3 sc in each corner.
Join with sl st.
The completed square should measure close to 18 × 18 cm before appliqués are attached.
Fasten off and weave in the border tails.
Jack-O’-Lantern Basket Front
Yarn: pumpkin orange.
Ch 25.
Row 1: Sc in second ch from hook and across. Turn. (24)
Row 2: Ch 1, inc, 22 sc, inc. Turn. (26)
Row 3: Ch 1, inc, 24 sc, inc. Turn. (28)
Row 4: Ch 1, inc, 26 sc, inc. Turn. (30)
Row 5: Ch 1, inc, 28 sc, inc. Turn. (32)
Rows 6–10: Ch 1, sc across. Turn. (32)
Row 11: Ch 1, dec, 28 sc, dec. Turn. (30)
Row 12: Ch 1, dec, 26 sc, dec. (28)
The lower corners should remain rounded rather than sharply rectangular.
Do not fasten off.
Basket Top Edge
Ch 1.
Work sc evenly along the short side, across the foundation edge and down the opposite side.
Do not work across the upper pocket opening.
Fasten off, leaving approximately 60 cm for attaching the basket to the square.
Left Eye
Yarn: black.
Ch 5.
Row 1: Sc in second ch from hook and across. Turn. (4)
Row 2: Ch 1, dec, 2 sc. Turn. (3)
Row 3: Ch 1, dec, sc. Turn. (2)
Row 4: Ch 1, dec. (1)
Fasten off. Leave a 15 cm sewing tail.
Right Eye
Repeat the Left Eye.
Both eye triangles should finish approximately 22–25 mm across at their widest edge.
Triangular Nose
Yarn: black.
Ch 4.
Row 1: Sc in second ch from hook and across. Turn. (3)
Row 2: Ch 1, dec, sc. Turn. (2)
Row 3: Ch 1, dec. (1)
Fasten off. Leave a sewing tail.
Smiling Mouth
Yarn: black.
Ch 15.
Starting in second ch from hook:
sl st in next 3 ch,
sc in next 3 ch,
hdc in next 2 ch,
sc in next 3 ch,
sl st in remaining 3 ch.
Fasten off. Leave a 25 cm sewing tail.
Pin the middle section approximately 5–8 mm lower than the two ends to form the visible upward smile.
Black Basket Handle
Yarn: black.
Ch 41.
Starting in second ch from hook, sl st in every chain across. (40)
Fasten off. Leave a 25 cm tail at each end.
The finished handle should form an arch approximately 8–9 cm high when its ends are positioned 9–10 cm apart.
Green Wrapped Candy
Yarn: green.
R1: 6 sc in MR. (6)
R2: inc ×6. (12)
R3: sc around. (12)
Flatten the small circle vertically.
At the top, ch 3, sl st back into the base.
Repeat once beside it.
At the bottom edge, make two matching ch-3 points.
Fasten off.
The final candy should measure approximately 3–3.5 cm tall.
Purple Wrapped Candy
Yarn: deep purple.
R1: 6 sc in MR. (6)
R2: inc ×6. (12)
R3: (sc, inc) ×6. (18)
R4: sc around. (18)
Flatten lightly.
At the upper edge, ch 4 and sl st back into the same point.
Make a second ch-4 point beside it to suggest a wrapper twist.
Fasten off with a 15 cm tail.
Golden Candy
Yarn: golden yellow.
R1: 6 sc in MR. (6)
R2: inc ×6. (12)
Fasten off.
Fold the circle slightly and sew the bottom half behind the pumpkin opening.
Cream Candy
Yarn: natural cream.
R1: 6 sc in MR. (6)
R2: inc ×6. (12)
R3: (sc, inc) ×6. (18)
Fasten off.
Keep this piece mostly hidden so only its upper half is visible above the basket edge.
Optional Orange Candy Accent
Yarn: orange.
Ch 7.
Starting in second ch from hook, hdc across. (6)
Fasten off.
Fold the strip slightly and position it beside the yellow candy for an additional rectangular wrapper shape.
Position the Basket
Lay the blocked square flat.
Center the pumpkin basket horizontally.
The lower basket edge should sit approximately 20–25 mm above the inner orange border.
The basket top should fall slightly below the vertical midpoint of the square.
Leave at least 15–20 mm of cream background visible between both pumpkin sides and the colored border.
Assembly
- Block the bordered square to approximately 18 × 18 cm before positioning any appliqués.
- Pin the orange pumpkin basket in the lower half of the cream field and sew its bottom and two side edges only, leaving the complete upper edge open.
- Attach both black triangular eyes and the nose to the pumpkin front before positioning the mouth so the expression can be centered as one unit.
- Pin the mouth with its center approximately 5–8 mm lower than both ends, then sew it to the basket without closing the pocket opening.
- Attach the black handle behind the two upper basket corners, spacing the endpoints approximately 9–10 cm apart and keeping the arch centered over the pumpkin.
- Place the cream and golden candies deepest inside the pocket, fixing only their lower halves to the square background.
- Add the green candy to the left and the purple candy near the center, leaving approximately 20–30 mm of each piece visible above the basket opening.
- Add the optional orange wrapper between the cream and purple pieces if the pocket needs another color accent.
- Check that none of the candy pieces pushes the handle sideways; the top of the black arch should remain centered within approximately 5 mm of the square midpoint.
- Weave each tail through at least 3–4 cm of matching crochet on the wrong side, reverse direction once and trim after the block has been lightly blocked again.
The finished block should remain flat around the border while the pumpkin front projects slightly from the cream square, creating a visible pocket with four candy shapes and one centered black handle.
7 Technical Tips
- Basket losing its pocket shape: Sewing across the complete orange upper edge removes the opening. Attach only the bottom and sides, leaving approximately 9–10 cm across the top completely free.
- Handle leaning sideways: Endpoints placed more than about 5 mm off symmetrical positions make the arch visibly skewed. Mark both handle bases before sewing and check the top against the square center line.
- Candy disappearing inside the basket: Pieces buried more than roughly two-thirds of their height become difficult to identify. Keep approximately 20–30 mm of the green and purple pieces exposed above the orange edge.
- Pumpkin face looking crowded: A mouth placed too close to the nose compresses the lower face. Leave approximately 10–15 mm between the bottom of the triangular nose and the highest point of the black smile.
- Square border waving: Excess corner stitches add circumference faster than the straight sides. Work three single crochets at each corner and check the block after every border color.
- Appliqué pulling the background inward: Tight sewing stitches can shorten the cream fabric beneath the pumpkin. Keep attachment stitches relaxed and confirm that the square still measures within approximately 5 mm of 18 cm after assembly.
- Handle becoming too thick: Working single crochet back across the chain can create a heavy cord that hides the candies. A slip-stitch return produces a narrow handle roughly 5–7 mm thick with worsted yarn.
Conclusion
Check the basket opening before securing the candy tails because the depth of that pocket controls how much of each wrapper remains visible. Next, place the square flat and compare the pumpkin center, black handle arch and border spacing from all four sides. Correct any tilted appliqué before the final blocking stage. Share the finished Halloween granny square crochet pattern project on Pinterest with an overhead image that clearly shows the raised candy pocket, then post a close view of the Jack-o’-Lantern face and colorful wrappers on Instagram using #HalloweenCandyBasketSquare. For this block specifically, would you keep the candies green, purple and yellow or replace one with a tiny crochet ghost?









