Introduction
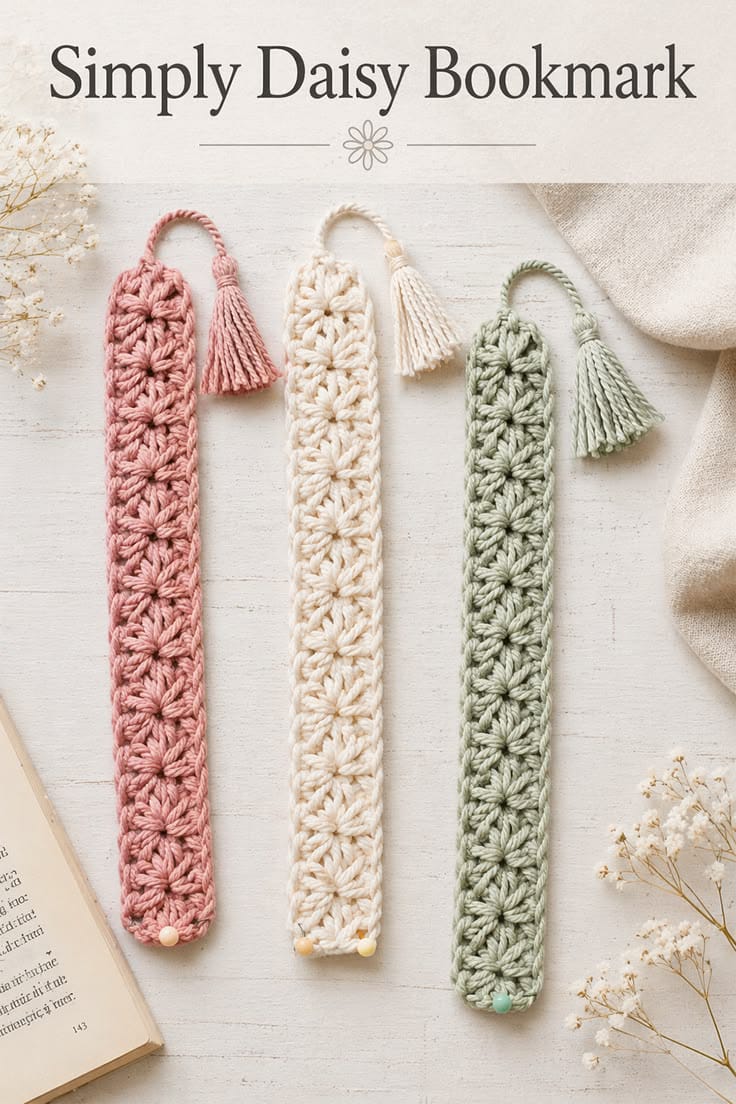
A daisy column loses its flower effect as soon as one star eye drifts sideways from the row above it. This daisy stitch crochet bookmark pattern uses DK or light worsted cotton and a 4 mm hook to make a strip approximately 3.5–4 cm wide and 21–23 cm long. Repeating star stitches form the floral texture, while a top loop and matching tassel finish the narrow page marker.
The Design: What Makes This Daisy Bookmark Different
The flower effect is produced by the structure of the fabric rather than by sewing separate daisies onto a plain strip. Four star stitches span each textured row, creating repeated radiating spokes that resemble small flower heads. Half double crochet return rows separate those stars and create the loops required for the next flower row. The bookmark remains narrow because only nine working stitches are needed after the foundation row, while its length can be adjusted without changing the stitch sequence. A matching tassel sits outside the closed book and a small loop gives the upper end a finished shape. This floral crochet bookmark depends on controlled star height. A frequent mistake is pulling the closing chain of each star too tightly; that reduces the eye size and makes later stars harder to place consistently.
Project Info at a Glance
| Skill Level | Time | Finished Size | Hook | Best For |
|---|---|---|---|---|
| Confident beginner | 60–90 minutes | Approx. 3.5–4 × 21–23 cm excluding tassel | 4.0 mm | Books, journals, teacher gifts and scrap-yarn projects |
Materials and Tools
Yarn
- Dusty pink, cream or sage green — DK #3 or light worsted #4 cotton — approximately 15–20 g per bookmark.
- Matching tassel yarn — approximately 3–5 g from the same yarn.
Cotton gives the narrow strip enough body to remain flat between book pages. Select one consistent yarn thickness for the strip and tassel so the upper loop does not become heavier than the bookmark itself.
Tools
- 4.0 mm crochet hook
- Yarn needle
- Scissors
- Locking stitch marker
- Ruler or measuring tape
- Piece of cardboard approximately 6 cm wide for making the tassel
- Blocking mat and pins if the completed strip twists
Abbreviations
- ch — chain
- sc — single crochet
- hdc — half double crochet
- sl st — slip stitch
- st — stitch
- yo — yarn over
- eye — the ch-1 closing space at the center of a star stitch
A star stitch is formed by drawing up six loops from adjacent chains or stitches, then pulling one yarn-over through all six loops and closing the center with ch 1.
Star Stitch Anatomy
Each completed star has six visible spokes. The small ch-1 space in its center is called the eye. The next star begins partly inside that eye and partly through the previous star, which is what connects the flowers into a continuous row.
Do not count the closing ch 1 as a separate background stitch. It belongs to the star structure and becomes the point where the return row places two half double crochet stitches.
Pattern — Step by Step
Work the bookmark flat. Turn after every row. The finished strip uses four stars across each textured row and nine half double crochet stitches across every return row.
Foundation Chain
Yarn: main bookmark color.
Ch 13.
Keep the foundation chains relaxed and similar in size.
A tight starting chain can make the lower end approximately 5–8 mm narrower than the rest of the strip.
Row 1 — First Star
Insert the hook into the second chain from the hook.
Yarn over and pull up one loop.
Insert the hook into each of the next four chains, pulling up one loop from each chain.
You should now have six loops on the hook.
Yarn over and pull through all six loops.
Ch 1.
The ch-1 space forms the eye of the first star.
Row 1 — Second Star
Insert the hook into the eye of the first star and pull up one loop.
Insert the hook under the two vertical strands on the side of the final spoke of the first star and pull up one loop.
Insert the hook into the same foundation chain that held the final loop of the previous star and pull up one loop.
Insert the hook into each of the next two unused foundation chains, pulling up one loop from each.
You should again have six loops.
Yarn over and pull through all six loops.
Ch 1 to close the second star.
Row 1 — Third and Fourth Stars
Repeat the Second Star method twice more.
After completing the fourth star, work 1 hdc into the final foundation chain.
Turn.
Count four complete star eyes before moving to Row 2.
Row 2 — Half Double Crochet Return Row
Ch 2.
Work 2 hdc into the eye of each star across. (8 hdc)
Work 1 hdc into the final edge stitch. (9)
Turn.
The nine stitches in this return row establish the exact width used by every later star row.
Row 3 — Set Up the First Star
Ch 3.
Insert the hook into the second chain from the hook and pull up one loop.
Insert the hook into the third chain and pull up one loop.
Insert the hook into the first hdc and pull up one loop.
Insert the hook into the second hdc and pull up one loop.
Insert the hook into the third hdc and pull up one loop.
Six loops should now be on the hook.
Yarn over and pull through all six loops.
Ch 1 to close the eye.
Row 3 — Complete the Remaining Stars
For the next star, insert the hook into the previous eye and pull up a loop.
Insert beneath the two vertical strands of the previous star’s last spoke and pull up a loop.
Insert into the same hdc that held the last loop of the previous star and pull up a loop.
Pull up one loop from each of the next two hdc stitches.
Yarn over and pull through all six loops.
Ch 1.
Repeat until four stars are complete.
Work 1 hdc into the last hdc at the edge.
Turn.
Row 4 — Return Row
Ch 2.
Work 2 hdc into each of the four star eyes. (8)
Hdc into the final edge stitch. (9)
Turn.
Rows 5 Onward — Daisy Stitch Repeat
Repeat Rows 3 and 4.
Continue until the strip measures approximately 21–23 cm from the foundation edge.
Finish after an HDC return row rather than after a star row.
Ending on the solid return row provides a stronger edge for the hanging loop and tassel attachment.
Length Adjustment
For a small paperback, stop when the strip measures approximately 17–18 cm.
For a standard novel, work to approximately 21–23 cm.
For a large journal or textbook, continue to approximately 25 cm.
Always finish with a complete two-row repeat.
Top Edge
Ch 1.
Work 1 sc in each of the nine stitches across. (9)
Do not fasten off.
This row stabilizes the edge before the hanging loop is formed.
Hanging Loop
At the upper corner, ch 16.
Sl st back into the same corner stitch to form a loop.
Work one additional sl st through the next bookmark stitch to reinforce the attachment.
The folded loop should measure approximately 5–6 cm. Add or remove chains when a different loop size is wanted.
Fasten off and weave in the end.
Bottom Edge
Join the main yarn at one lower corner.
Ch 1.
Work 9 sc evenly across the foundation edge.
Fasten off.
This small finishing row corrects minor foundation-chain tension differences and gives the tassel a defined attachment point.
Tassel — Cut the Strands
Wrap the matching yarn around a 6 cm piece of cardboard approximately 14–18 times.
Cut across one edge of the wrapped yarn.
You should have a group of strands approximately 12 cm long before folding.
Tassel — Attach to Bookmark
Fold the strand bundle in half.
Cut a separate 25 cm length of matching yarn.
Pass that strand through the center bottom stitch of the bookmark.
Use it to tie the folded tassel bundle securely to the bookmark.
The fold should sit immediately below the lower edge.
Tassel — Form the Neck
Cut another approximately 30 cm strand.
Wrap it around the tassel approximately 10–12 mm below the folded top.
Wrap six to eight times.
Knot firmly and bury the ends inside the tassel.
Trim the Tassel
Comb the strands lightly with your fingers.
Trim the lower edge to approximately 5–6 cm long.
Cut only after the tassel has been attached. Trimming loose strands first can leave the finished ends uneven after the bundle is folded.
Alternative Loop-and-Tassel Placement
The supplied reference shows a decorative loop and tassel concentrated near one end of the bookmark.
For that arrangement, omit the bottom tassel.
Make the 16-chain hanging loop at the top, then attach the tassel to the outer end of that loop using a separate strand.
This variation keeps the complete decorative section outside the book while the flat daisy stitch strip remains between the pages.
Blocking
Pin the bookmark to approximately 3.5–4 cm wide and the chosen finished length.
Keep both long edges parallel.
Use one pin approximately every 3–4 cm along each side.
Shape each star eye into a small round opening with the hook tip or yarn needle.
Dampen according to the yarn-care instructions and allow the strip to dry fully before removing the pins.
Do not stretch the bookmark length aggressively. Excess vertical stretching elongates the star spokes and reduces the visible daisy effect.
Assembly and Finishing
- Work the 13-chain foundation and complete the first four-star row before checking the finished width.
- Work nine half double crochet stitches on every return row and recount whenever the long edges begin drifting inward or outward.
- Repeat the star and HDC rows until the flat strip measures approximately 21–23 cm for a standard book.
- Finish on an HDC return row and add nine single crochet stitches across the upper edge for stability.
- Make the 16-chain loop and reinforce its base through two bookmark stitches rather than attaching it through one loop only.
- Add nine single crochet stitches across the lower foundation edge before fixing the tassel.
- Attach a 5–6 cm tassel at the lower center, or move the tassel to the hanging loop to copy the arrangement shown in the reference more closely.
- Weave each yarn tail through at least 3 cm of matching stitches and reverse direction once before trimming.
- Pin the bookmark with both long edges parallel and reshape any star eye that has tightened below approximately 4–5 mm.
- Allow the piece to dry completely before trimming the tassel to its final length.
The finished bookmark should lie flat with four aligned stars across each flower row, straight parallel edges, one reinforced hanging loop and an evenly trimmed tassel.
7 Technical Tips
- Stars shrinking across the bookmark: Pulling the ch-1 eye tightly makes each later star harder to enter and progressively reduces width. Keep every eye approximately 4–5 mm across before beginning the next star.
- Long edges drifting outward: Accidentally working an extra HDC into the edge produces ten stitches instead of nine. Count exactly eight HDC across the four star eyes plus one final edge HDC on every return row.
- Flower columns leaning: Inserting a new star into the wrong previous spoke moves its center sideways. The first three pickup points must always be the previous eye, the two strands of its last spoke and the same base stitch used by that spoke.
- Foundation edge narrower than the body: A tight 13-chain foundation can reduce the lower width by more than 5 mm. Make the starting chains with relaxed tension or use a hook 0.5 mm larger for the chain only.
- Bookmark becoming too thick: Bulky yarn and tight star stitches can create a strip that presses heavily between pages. Keep the finished fabric near 2–3 mm thick and switch to DK cotton when a worsted sample feels substantially thicker.
- Loop pulling out of shape: Attaching a 16-chain loop through one edge stitch concentrates all tension at one point. Reinforce the loop base through at least two adjacent bookmark stitches.
- Tassel spreading unevenly: Tying the neck farther than about 12 mm below the fold creates a loose top. Wrap the neck 10–12 mm below the attachment point and trim the finished strands together to approximately 5–6 cm.
Conclusion
Check the four star eyes in the first complete row before committing to the bookmark length because that row establishes every later floral column. Continue the two-row repeat until the strip matches the book size, then add the loop, tassel and final blocking. Keep the flower centers open enough that the daisy texture remains visible from end to end. Share the finished daisy stitch crochet bookmark pattern project on Pinterest with all three color versions together, then post a close view of the star texture on Instagram using #DaisyStitchCrochetBookmark. For this bookmark specifically, would you make the next version dusty pink, cream or sage green?









