Introduction
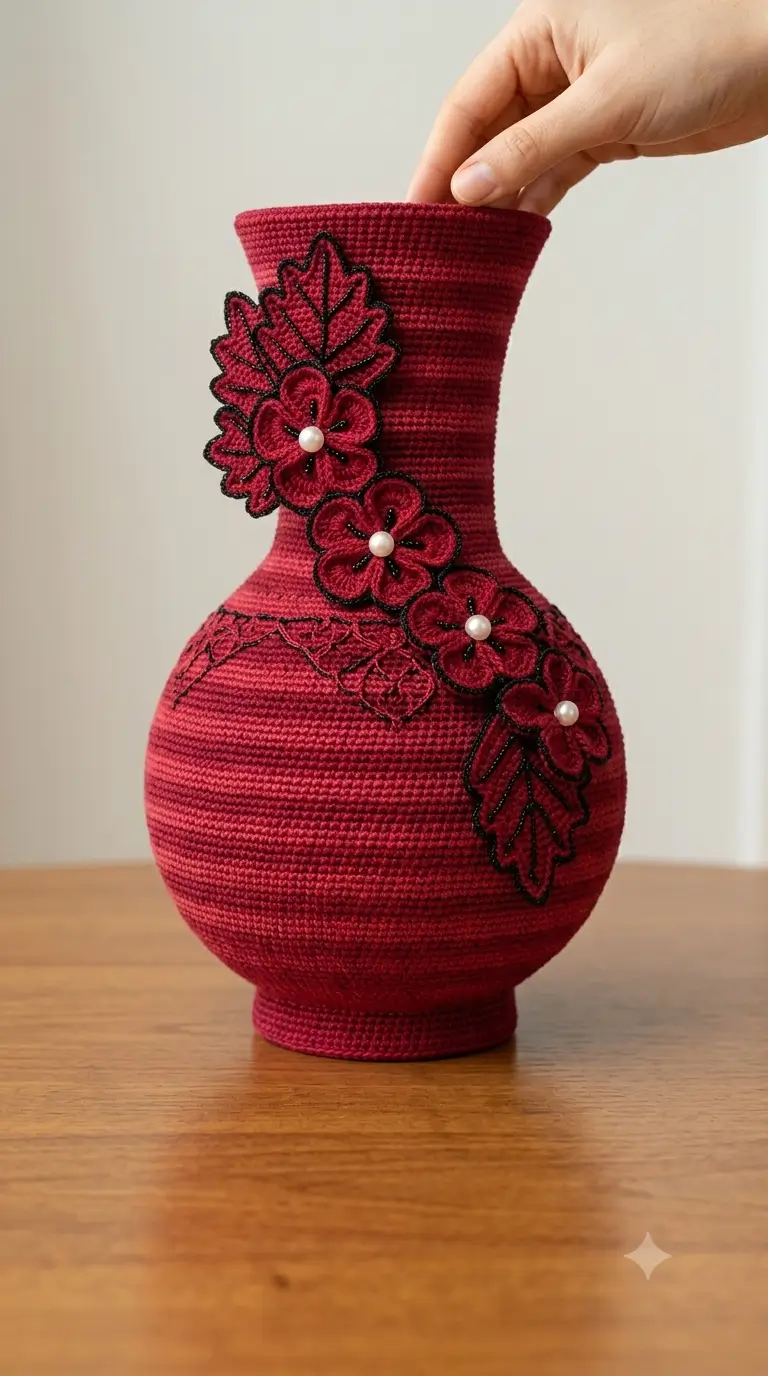
Four pearl-centered burgundy flowers climb a black-edged leaf spray across a narrow crochet neck; that diagonal layout controls the whole build. This crochet vase pattern uses DK cotton, a 3.0 mm hook, and a rigid liner to target a 23 cm finished height. The skill level is intermediate because vessel shaping and appliqué placement must stay aligned. Make it for a reusable dry-flower or tabletop display with a stable textile surface.
The Design: What Makes the Burgundy Cascade Vase Different
The vessel needs three different geometries: a broad lower chamber, a compressed shoulder, and a long cylindrical neck. Expanding to 60 stitches creates the rounded belly, while four six-stitch decrease rounds reduce the circumference without a sudden inward step.
The rim then expands twice so the opening turns outward like the photographed vase. Separate appliqués matter just as much. Building the flowers and leaves away from the shell lets the maker pin the entire diagonal composition before a permanent stitch is placed, which is useful in a decorative crochet vase with asymmetric ornament.
Black slip-stitch edging sharpens each burgundy motif and keeps the crochet vase with flowers from becoming one undifferentiated color field. A common error is stacking shoulder decreases directly above one another; six vertical ridges appear instead of a rounded transition.
Project Info at a Glance
| Skill Level | Time | Finished Size | Hook | Best For |
|---|---|---|---|---|
| Intermediate | 8–10 hours | Approx. 23 cm | 3.0 mm | Dry stems, shelf display, removable liner |
Materials and Tools
Yarn
- Burgundy DK cotton — 100 g for the vessel shell
- Burgundy DK cotton — 20 g for flowers and leaves
- Black DK or sport cotton — 10 g for edging, veins, and vine details
Suggested yarn types include tightly spun cotton or cotton-blend DK yarn. A firm yarn gives the vase cleaner shaping than a soft, loosely twisted fiber.
Tools
- 3.0 mm crochet hook
- 4 pearl beads, 8–10 mm
- Rigid plastic liner or recycled container, approximately 22–23 cm tall
- Plastic or firm cardboard base disc, 10–11 cm diameter
- Tapestry needle
- Locking stitch marker
- Dressmaking pins
- Scissors
- Optional fabric glue for stabilizing bead knots
Stuffing is not required when a rigid liner is used.
Abbreviations
MR — magic ring
sc — single crochet
inc — 2 sc in the same stitch
dec — single-crochet decrease
sl st — slip stitch
ch — chain
BLO — back loop only
hdc — half double crochet
dc — double crochet
st / sts — stitch / stitches
R / Rnd — round
For an invisible decrease, insert the hook through the front loops of the next two stitches, yarn over, pull through both front loops, then complete one sc.
Pattern — Step by Step
Work the main vessel in a continuous spiral unless a section states otherwise. Place a marker in the first stitch and move it after every round.
The construction uses a wide 60-stitch belly, a gradually reduced shoulder, a 36-stitch neck, and a 48-stitch flared rim.
Vase Body and Neck — Make 1
Yarn: burgundy DK
R1: 6 sc in MR (6)
R2: inc ×6 (12)
R3: [sc, inc] ×6 (18)
R4: [2 sc, inc] ×6 (24)
R5: [3 sc, inc] ×6 (30)
R6: [4 sc, inc] ×6 (36)
R7: [5 sc, inc] ×6 (42)
R8: [6 sc, inc] ×6 (48)
R9: [7 sc, inc] ×6 (54)
R10: [8 sc, inc] ×6 (60)
R11: BLO sc around (60)
R12: sc around (60)
R13: sc around (60)
R14: sc around (60)
R15: sc around (60)
R16: sc around (60)
R17: sc around (60)
R18: sc around (60)
R19: sc around (60)
R20: sc around (60)
R21: sc around (60)
R22: sc around (60)
R23: sc around (60)
R24: sc around (60)
R25: sc around (60)
R26: sc around (60)
R27: sc around (60)
R28: sc around (60)
R29: [8 sc, dec] ×6 (54)
R30: sc around (54)
R31: sc around (54)
R32: [7 sc, dec] ×6 (48)
R33: sc around (48)
R34: sc around (48)
R35: [6 sc, dec] ×6 (42)
R36: sc around (42)
R37: sc around (42)
R38: [5 sc, dec] ×6 (36)
R39: sc around (36)
R40: sc around (36)
R41: sc around (36)
R42: sc around (36)
R43: sc around (36)
R44: sc around (36)
R45: sc around (36)
R46: sc around (36)
R47: sc around (36)
R48: sc around (36)
R49: sc around (36)
R50: sc around (36)
R51: sc around (36)
R52: sc around (36)
R53: sc around (36)
R54: sc around (36)
R55: sc around (36)
R56: sc around (36)
R57: [5 sc, inc] ×6 (42)
R58: sc around (42)
R59: [6 sc, inc] ×6 (48)
R60: sc around (48)
Insert the rigid base disc after the lower wall has formed. Test the liner before the shoulder narrows past its widest point. The shell should remain hollow.
Fasten off. Leave a 15 cm tail and weave it through the final round.
Pedestal Foot — Make 1
Yarn: burgundy DK
Ch 37, taking care not to twist. Join with sl st to the first ch.
R1: ch 1, sc in each ch around, join (36)
R2: BLO sc around, join (36)
R3: [5 sc, inc] ×6 (42)
R4: sc around (42)
The 36-stitch inner edge keeps the pedestal narrower than the belly, while the 42-stitch lower edge creates the small outward foot visible in the design.
Fasten off. Leave a 30 cm sewing tail.
Five-Petal Flowers — Make 4
Yarn: burgundy DK with black edging
With burgundy, ch 4 and join with sl st to form a ring.
R1: 10 sc into ring, join with sl st (10)
R2: [sc in next st, ch 3, skip next st] ×5, join
You will have 5 ch-3 spaces.
R3: work [sc, hdc, 3 dc, hdc, sc] into each ch-3 space.
Change to black.
R4: sl st loosely around the outside of every petal.
Keep the black edging relaxed. Tight slip stitches will curl the petals inward.
Fasten off. Leave a 25 cm burgundy sewing tail.
Repeat until four flowers are complete.
Do not attach the pearl centers yet.
Large Pointed Leaves — Make 2
Yarn: burgundy DK with black edging
Ch 16.
Starting in the second ch from the hook:
sl st, sc, hdc, 9 dc, hdc, sc, sl st.
Ch 2 at the tip.
Working down the opposite side of the foundation chain:
sl st, sc, hdc, 9 dc, hdc, sc, sl st.
Change to black.
Slip stitch around the complete outside edge of the leaf.
Use black yarn to surface slip stitch or embroider a line along the center from the base toward the point.
Add two or three short diagonal vein lines on each side.
Fasten off. Leave a 20 cm tail.
Medium Pointed Leaves — Make 3
Yarn: burgundy DK with black edging
Ch 14.
Starting in the second ch from the hook:
sl st, sc, hdc, 7 dc, hdc, sc, sl st.
Ch 2 at the tip.
Working down the opposite side:
sl st, sc, hdc, 7 dc, hdc, sc, sl st.
Change to black.
Slip stitch around the outer edge.
Add one central black vein and short diagonal branches.
Fasten off. Leave a 20 cm tail.
Shoulder Lace Band — Make 1
Yarn: black DK or sport cotton
Ch 61.
Row 1: starting in second ch from hook, sc across (60)
Row 2: ch 1, turn, [sc in next st, ch 3, skip 2 sts] ×20.
The band should remain narrow and open rather than forming a thick stripe.
Fasten off. Leave a 35 cm tail at both ends.
Black Vine Lines — Make 3
Yarn: black
The vines are added after the flowers and leaves have been positioned.
Vine A: approximately 8 cm
Vine B: approximately 11 cm
Vine C: approximately 14 cm
Use surface chain stitch or backstitch directly through the crochet shell.
Begin each vine beneath a flower or leaf so the starting knot remains hidden.
Add branch lines about 2–4 cm long toward nearby leaves.
Secure the black yarn inside the shell with several woven passes.
Assembly
- Place the completed vase body on a flat table. Check that the 60-stitch lower section stands vertically and that the shoulder decreases have not twisted.
- Insert the 10–11 cm base disc against the lower interior. Slide the rigid liner into the shell and check that its top edge remains below the flared crochet rim.
- Position the pedestal around the lower body. Sew its 42-stitch edge near R7–R8 using burgundy yarn and small mattress stitches.
- Wrap the black shoulder band around approximately R30–R34. Keep the most decorative section visible at the front and hide the join beneath the future floral arrangement.
- Pin one large leaf high on the neck. Position the second large leaf toward the lower-right shoulder, then place the three medium leaves between them. Leave approximately 5–10 mm between neighboring leaf tips.
- Position the first flower near the transition between the neck and shoulder. Add the next three flowers diagonally downward across the right side of the vase.
- Sew each flower through the center and at two or three points close to the petal bases. Do not stitch the full outer edge because slightly raised petals produce the dimensional appearance shown in the design.
- Add the black vine lines between the flowers and leaf bases. Keep each line narrow so the vines remain secondary to the flower outlines.
- Sew one 8–10 mm pearl bead into the center of each flower. Pass the thread through the crochet center at least twice and knot it inside the shell.
- Weave every remaining yarn tail in three directions. Replace the liner and place the vase on a level surface to check the pedestal, body, neck, and rim alignment.
The finished vase should measure approximately 23 cm tall, depending on yarn, hook tension, and liner dimensions.
7 Technical Tips
- Marker drift: Losing the beginning-of-round marker by one stitch moves later decreases into a visible diagonal. Recount the work at R10, R29, R32, R35, and R38 before continuing.
- Base instability: A soft base can make a tall crochet vase rock after the decoration is attached. Use a rigid disc approximately 10–11 cm wide and replace it if it bends easily under finger pressure.
- Visible decrease ridges: Stacking all decreases directly over one another creates six vertical channels across the shoulder. Shift the starting point of alternate decrease rounds by about three stitches while maintaining the same final stitch count.
- Pearl-center distortion: Attaching an 8–10 mm bead before sewing the flower to the shell can pull the flower center sideways. Sew and position the complete appliqué first, then add the bead.
- Loose tension: A loose single-crochet fabric may sag around the liner and blur the vase silhouette. Check the lower section before R20; if gaps are visible between stitches, reduce the hook size by 0.25–0.5 mm.
- Appliqué movement: A diagonal arrangement can shift downward while the pieces are being sewn. Use at least four pins for each flower and two or three pins for every leaf before attaching the first motif.
- Tail failure: Short black tails can work loose around petal borders and leaf veins. Leave at least 8–10 cm and weave each tail through three different directions on the reverse side.
Conclusion
The Burgundy Floral Crochet Vase depends on controlled shaping: a 60-stitch lower section forms the rounded belly, four decrease stages produce the shoulder, and the long 36-stitch neck leads into a 48-stitch flared rim. Select or cut the rigid liner before attaching the floral cascade because its diameter determines how closely the crochet shell follows the intended silhouette. After assembly, photograph the vase from the front so the complete diagonal arrangement remains visible. Share the finished crochet vase pattern project on Pinterest or Instagram with #BurgundyCascadeVase. For a second version, would you keep all four pearl-centered flowers in one diagonal line or move the lowest flower farther across the shoulder?









