Introduction
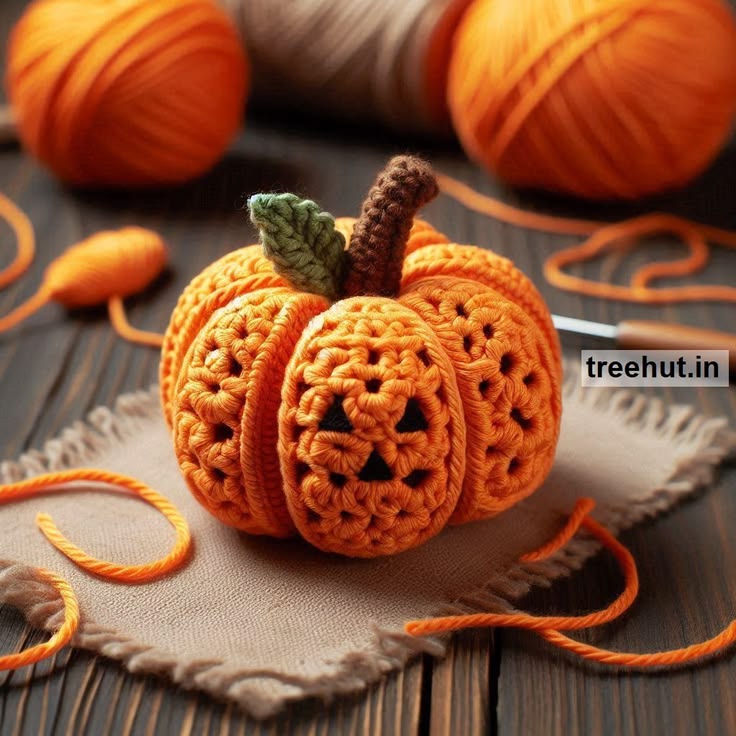
A Jack-o’-Lantern face has to stay centered inside one pumpkin lobe or the sculpting grooves will distort the expression. This jack-o-lantern crochet pumpkin pattern uses worsted yarn and a 5 mm hook to make an approximately 18–21 cm pumpkin. A stuffed orange body, six deep channels, black crochet facial pieces, curved brown stem and small green leaf reproduce the photographed Halloween structure.
The Design: What Makes This Jack-O’-Lantern Different
The pumpkin begins as one continuous orange form rather than six separately stuffed wedges, which keeps the fabric smooth beneath the face. A 42-stitch plateau gives the body enough width for six substantial lobes and a readable front expression. After stuffing, exterior shaping strands create the deep vertical channels visible from crown to base. The face is added only after the front lobe has been established, so the triangular eyes, nose and curved mouth can be placed inside one defined section instead of crossing a groove. A narrow brown stem adds height without increasing crown bulk, while one olive leaf offsets the orange-and-black palette. A common mistake with a crochet pumpkin with face is sewing the facial pieces before sculpting. Groove tension can then move the eyes several millimeters apart or pull the mouth off center.
Project Info at a Glance
| Skill Level | Time | Finished Size | Hook | Best For |
|---|---|---|---|---|
| Intermediate | 6–8 hours | Approx. 18–21 cm wide × 20–23 cm high | 5.0 mm | Halloween shelves, tables and seasonal displays |
Materials and Tools
Yarn
- Pumpkin orange — worsted / medium #4 — approximately 110–135 g — body and sculpting strands.
- Black — worsted / medium #4 — approximately 8–12 g — eyes, nose and mouth.
- Chocolate brown — worsted / medium #4 — approximately 15–20 g — curved stem.
- Muted olive green — worsted / medium #4 — approximately 8–10 g — leaf.
Tools
- 5.0 mm crochet hook
- Polyester stuffing — approximately 160–190 g
- Long tapestry or doll needle
- Standard yarn needle
- Six removable stitch markers
- Dressmaking pins
- Scissors
- Measuring tape
Select a firm plied yarn rather than a brushed fiber. Sharp black triangles and deep orange channels remain more defined against compact stitches.
Abbreviations
- MR — magic ring
- sc — single crochet
- inc — two single crochet stitches in one stitch
- dec — invisible single crochet decrease
- sl st — slip stitch
- ch — chain
- hdc — half double crochet
- dc — double crochet
- tr — treble crochet
- BLO — back loop only
An invisible decrease is worked through the front loops of the next two stitches before completing one single crochet through both loops.
Pattern — Step by Step
Work the body and stem in continuous spirals unless stated otherwise. Mark the first stitch of every round.
Pumpkin Body
Yarn: pumpkin orange — Source: standard six-stitch amigurumi math adapted to a large decorative pumpkin.
R1: 6 sc in MR (6)
R2: inc ×6 (12)
R3: (sc, inc) ×6 (18)
R4: (2 sc, inc) ×6 (24)
R5: (3 sc, inc) ×6 (30)
R6: (4 sc, inc) ×6 (36)
R7: (5 sc, inc) ×6 (42)
R8–R17: sc around (42)
R18: (5 sc, dec) ×6 (36)
R19: sc around (36)
R20: (4 sc, dec) ×6 (30)
R21: sc around (30)
R22: (3 sc, dec) ×6 (24)
R23: (2 sc, dec) ×6 (18)
R24: sc around (18)
R25: (sc, dec) ×6 (12)
R26: dec ×6 (6)
Begin stuffing after R18. Place most filling around the outer wall and keep the center slightly more compressible. Add the final filling before R26.
Fasten off. Leave a 45 cm tail and close the remaining six front loops.
Vertical Compression
Yarn: matching orange.
Cut approximately 110 cm of orange yarn.
Enter through the bottom center and exit through the crown center.
Pass back through the body and pull until the pumpkin loses approximately 1–1.5 cm of height.
The widest circumference should spread outward while the top and bottom centers become slightly recessed.
Secure temporarily.
Mark the Six Lobes
View the pumpkin directly from above.
Place six markers around the widest circumference, approximately 60 degrees apart.
Select one broad section as the future face lobe.
Keep its two boundary channels equally spaced from the vertical center line. This lobe needs a nearly symmetrical front surface for the Jack-o’-Lantern face.
First Sculpting Channel
Yarn: orange.
Cut approximately 130 cm of yarn and anchor it at the bottom center.
Bring the strand over the outside along the first marked line.
Enter the crown center, pass through the body and exit at the bottom.
Pull until the groove sits approximately 10–12 mm below the neighboring surface.
Do not knot permanently.
Second Sculpting Channel
Work the channel directly opposite the first using the same method.
Compare both halves before tightening further.
If one lobe becomes narrower, move stuffing into it before completing the next pair.
Channels Three and Four
Add the next two grooves as another opposite pair.
Keep the external yarn seated between crochet columns rather than crossing directly over a raised stitch.
Check the pumpkin on a level surface.
Channels Five and Six
Complete the final opposite pair.
Rotate the pumpkin and compare all six lobes.
Adjust tension until no lobe differs from its opposite by more than approximately 10 mm at the widest point.
Secure the shaping yarn at the bottom and bury the tails.
Left Eye
Yarn: black.
Ch 5.
Row 1: Sc in second ch from hook and across. Turn. (4)
Row 2: Ch 1, dec, 2 sc. Turn. (3)
Row 3: Ch 1, dec, sc. Turn. (2)
Row 4: Ch 1, dec. (1)
Fasten off. Leave a 20 cm sewing tail.
The resulting triangle should measure approximately 25–30 mm across its base.
Right Eye
Repeat the Left Eye pattern.
Fasten off with a 20 cm sewing tail.
Triangular Nose
Yarn: black.
Ch 4.
Row 1: Sc in second ch from hook and across. Turn. (3)
Row 2: Ch 1, dec, sc. Turn. (2)
Row 3: Ch 1, dec. (1)
Fasten off. Leave a 15 cm sewing tail.
The nose should finish approximately 18–22 mm wide.
Jack-O’-Lantern Mouth
Yarn: black.
Ch 18.
Starting in second ch from hook:
Sl st in next 4 ch, sc in next 3 ch, hdc in next 3 ch, sc in next 3 ch, sl st in final 4 ch.
The strip should curve slightly.
Fasten off. Leave a 30 cm sewing tail.
Mouth Teeth (Make 2)
Yarn: black.
Ch 4.
Starting in second ch from hook, sl st, sc, hdc.
Fasten off. Leave a 10 cm tail.
One tooth points upward from the mouth and one points downward, reproducing the broken Jack-o’-Lantern grin.
Curved Brown Stem
Yarn: chocolate brown.
R1: 6 sc in MR (6)
R2–R7: sc around (6)
R8: (2 sc, inc) ×2 (8)
R9–R11: sc around (8)
R12: (3 sc, inc) ×2 (10)
R13–R14: sc around (10)
R15: (4 sc, inc) ×2 (12)
Stuff R10–R15 lightly. Leave the narrow upper section nearly empty so the stem can bend backward without a hard kink.
Fasten off. Leave a 35 cm sewing tail.
Stem Base Disc
Yarn: chocolate brown.
R1: 6 sc in MR (6)
R2: inc ×6 (12)
R3: (sc, inc) ×6 (18)
Fasten off. Leave a 25 cm tail.
Green Leaf
Yarn: muted olive green.
Ch 10.
Starting in the second chain from the hook:
sl st, sc, hdc, dc, 2 tr, dc, hdc, sc; work 3 sc in the final chain.
Continue along the opposite side:
sc, hdc, dc, 2 tr, dc, hdc, sc, sl st.
Pinch the foundation chain slightly to create a raised center vein.
Fasten off. Leave a 20 cm sewing tail.
Leaf Vein
Using the remaining green tail, make one long surface stitch from the leaf base toward the tip.
Add two short diagonal stitches on each side.
Keep the tension light so the finished leaf remains approximately 6–7 cm long and mostly flat.
Assembly
- Complete and stuff the pumpkin body, then compress it vertically by approximately 1–1.5 cm before adding any facial pieces.
- Mark and sculpt all six lobes in three opposite pairs, reserving the broadest front section for the Jack-o’-Lantern face.
- Pin both black eye triangles on the upper half of the front lobe with approximately 25–30 mm between their inner corners.
- Place the black nose midway beneath the eyes and position the curved mouth approximately 15–20 mm below the nose.
- Sew the eyes, nose and mouth with small black stitches, then add one upper and one lower tooth to break the mouth line.
- Sew the 18-stitch brown stem base disc over the crown, covering the meeting point of all six shaping channels.
- Attach the curved stem through its 12-stitch lower edge and bend the upper section slightly backward.
- Position the green leaf against one side of the stem and sew through its base and the first 10–15 mm of the center vein.
- Place the pumpkin on a level surface and check that the face lobe points directly forward rather than rotating toward one channel.
- Weave every structural yarn tail through at least 4 cm of dense crochet, reverse direction once and trim after the end retracts beneath the stitches.
The completed pumpkin should show six deep orange lobes, a centered black Jack-o’-Lantern face, one curved brown stem and a small green leaf beside the crown.
7 Technical Tips
- Face distorted by sculpting: Sewing facial pieces before tightening the six channels can shift an eye by more than 10 mm. Complete all body shaping first and mark the final lobe center before pinning the face.
- Lobes becoming unequal: Tightening six channels clockwise pushes filling into the remaining unfinished sections. Form every groove and then work the one directly opposite it before continuing.
- Grooves cutting into stitches: Excess shaping tension can bury the yarn into the orange fabric. Stop when each channel sits approximately 10–12 mm below the fullest part of its neighboring lobes.
- Triangle eyes curling: Very tight edge stitches make the black eye pieces cup away from the pumpkin. Block each eye flat to roughly 25–30 mm across before sewing all three sides.
- Mouth looking straight: Pulling both end stitches too firmly removes the shallow smile curve. Pin the center first, then place each end approximately 5–8 mm higher before sewing.
- Stem kinking: Dense stuffing through all 15 stem rounds creates one sharp bend. Leave approximately the upper nine rounds nearly empty and distribute the curve over 4–5 cm.
- Leaf hiding the stem: A 6–7 cm leaf sewn across its entire length can cover most of the brown crown detail. Attach only the lower 10–15 mm and angle the tip away from the front face.
Conclusion
Check the face from directly in front before attaching the crown because the stem and leaf can make a slightly rotated lobe more obvious. Next, place the pumpkin at eye level and compare both eye triangles, the nose center and the highest point of the curved mouth. Correct those positions before burying the black tails. Share the finished jack-o-lantern crochet pumpkin pattern project on Pinterest with a front-facing Halloween image, then post a close view of the facial appliqués and deep sculpted channels on Instagram using #CrochetJackOLanternPumpkin. For this pumpkin specifically, would you keep the classic triangular eyes or make the second version with crescent-shaped eyes?









