Introduction
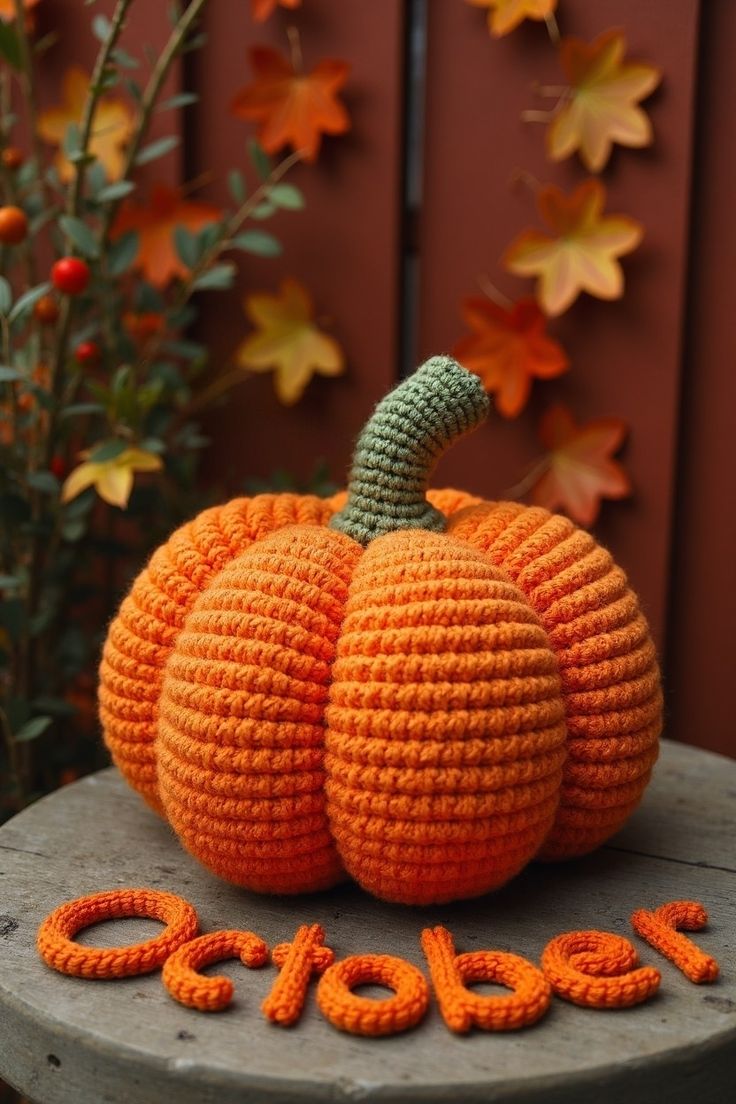
Six pumpkin lobes only look equal when every shaping strand leaves the crown at the same angle. This large crochet pumpkin pattern uses worsted or Aran yarn and a 5 mm hook to make a broad pumpkin approximately 21–24 cm wide. Dense single crochet forms the orange body, while external sculpting creates the deep sections and a tapered green stem adds the curved crown shown in the reference.
The Design: What Makes This Crochet Pumpkin Different
The body is worked as one large stuffed form rather than six separately sewn sections. That keeps the horizontal crochet rounds continuous across every lobe and matches the compact surface visible in the photograph. A 42-stitch plateau creates the necessary circumference without making the pumpkin excessively tall. After stuffing, six exterior strands compress the sphere into broad sections, producing much deeper channels than ordinary crochet ribbing. The green stem starts narrow at the upper tip, becomes wider near the pumpkin and remains partly unstuffed so it can form a controlled bend. This segmented crochet pumpkin depends heavily on even filling. One common mistake is packing the center harder than the outside. That creates a rigid core, prevents deep grooves and leaves the body looking spherical even after the sculpting strands are tightened.
Project Info at a Glance
| Skill Level | Time | Finished Size | Hook | Best For |
|---|---|---|---|---|
| Intermediate | 6–8 hours | Approx. 21–24 cm wide × 22–25 cm high including stem | 5.0 mm | Fall displays, Halloween decor and Thanksgiving centerpieces |
Materials and Tools
Yarn
- Pumpkin orange — worsted / Aran #4 — approximately 180–220 g — used for the complete body and matching shaping strands.
- Muted olive or sage green — worsted / Aran #4 — approximately 20–30 g — used for the curved stem and stem base.
A firm, smooth yarn makes the individual crochet rounds visible after stuffing. Select an orange yarn with enough twist that the fabric remains compact when the six sculpting strands are tightened.
Tools
- 5.0 mm crochet hook
- Polyester stuffing — approximately 200–250 g
- Long doll or tapestry needle — preferably 12–15 cm
- Standard yarn needle
- Six locking stitch markers
- Scissors
- Measuring tape
Abbreviations
- MR — magic ring
- sc — single crochet
- inc — two single crochet stitches in one stitch
- dec — invisible single crochet decrease
- sl st — slip stitch
- ch — chain
- BLO — back loop only
- FLO — front loop only
An invisible decrease is made through the front loops of the next two stitches before completing one single crochet through both loops.
Pattern — Step by Step
Work the pumpkin body in a continuous spiral. Place a marker in the first stitch of every round and move it upward as the work progresses.
Large Pumpkin Body
Yarn: pumpkin orange — Source: standard six-stitch amigurumi shaping adapted to the photographed large six-lobe body.
R1: 6 sc in MR (6)
R2: inc ×6 (12)
R3: (sc, inc) ×6 (18)
R4: (2 sc, inc) ×6 (24)
R5: (3 sc, inc) ×6 (30)
R6: (4 sc, inc) ×6 (36)
R7: (5 sc, inc) ×6 (42)
R8–R17: sc around (42)
R18: (5 sc, dec) ×6 (36)
R19: sc around (36)
R20: (4 sc, dec) ×6 (30)
R21: sc around (30)
R22: (3 sc, dec) ×6 (24)
R23: sc around (24)
R24: (2 sc, dec) ×6 (18)
R25: (sc, dec) ×6 (12)
R26: dec ×6 (6)
Begin stuffing after R18. Fill the outer circumference first and keep the center approximately 15–20 percent softer than the sides. Add the final stuffing before R26.
Fasten off. Leave a 45 cm tail and close the remaining six front loops.
Flatten the Pumpkin Vertically
Yarn: matching pumpkin orange.
Cut approximately 120 cm of orange yarn and thread the long needle.
Enter through the lower center and exit through the exact crown center.
Pass back down through the body.
Pull gradually until the body loses approximately 1.5–2 cm of height.
The circumference should widen as the top and bottom centers draw inward.
Secure the strand temporarily at the lower center.
Mark Six Lobe Positions
Place the pumpkin on a flat surface and look directly down at the crown.
Divide the circumference into six approximately equal sections.
Set one removable marker at each groove position.
The markers should sit about 60 degrees apart around the widest circumference.
Move any marker that produces a visibly narrow section before adding structural yarn.
First Lobe Channel
Yarn: pumpkin orange.
Cut approximately 140 cm of yarn.
Anchor the yarn at the bottom center.
Bring the strand across the exterior along the first marked path and enter through the crown center.
Pass the needle through the complete stuffed body and exit at the base.
Pull until the groove sits approximately 12–15 mm below the neighboring surface.
Do not knot permanently yet. Final tension is adjusted after all six channels are present.
Second Lobe Channel
Form the channel directly opposite the first.
Match the depth of the first groove.
Place the pumpkin back on the table and compare the two sides.
If one half appears smaller, redistribute a small amount of stuffing before continuing.
Third and Fourth Lobe Channels
Add another groove between the first two positions.
Rotate the pumpkin and work the channel directly opposite it.
Working in opposing pairs keeps the central stuffing from migrating toward one side.
Fifth and Sixth Lobe Channels
Complete the two remaining positions.
Rotate the pumpkin several times and compare all six lobes.
Adjust individual shaping strands until the lobe widths differ by no more than approximately 10 mm at the widest point.
Knot the strands securely at the base and bury the ends deeply through the body.
Refine the Bottom Center
Set the pumpkin on a hard surface.
If it rocks, push the lower center upward approximately 5–8 mm.
Move stuffing outward into the lower six sections.
Keep the bottom depression shallow; the body should rest on the lower edges of several lobes rather than one hard central point.
Curved Green Stem
Yarn: muted olive green.
R1: 6 sc in MR (6)
R2–R6: sc around (6)
R7: (2 sc, inc) ×2 (8)
R8–R10: sc around (8)
R11: (3 sc, inc) ×2 (10)
R12–R13: sc around (10)
R14: (4 sc, inc) ×2 (12)
R15–R16: sc around (12)
R17: (sc, inc) ×6 (18)
R18: sc around (18)
Stuff R12–R18 lightly. Leave R1–R11 almost empty so the upper stem can curve without creating a sharp fold.
Fasten off. Leave a 40 cm sewing tail.
Stem Base Disc
Yarn: muted olive green.
R1: 6 sc in MR (6)
R2: inc ×6 (12)
R3: (sc, inc) ×6 (18)
Do not stuff.
Fasten off. Leave a 30 cm sewing tail.
Shape the Stem Bend
Hold the 18-stitch lower stem base firmly.
Bend the narrow upper section gradually over approximately 5–6 cm.
The tip should finish about 2–3 cm off the vertical center line.
Make two concealed green stitches along the inside of the bend if the stem springs back.
Do not pull the tip down far enough to touch the pumpkin surface.
Optional Firm Stem Core
If the yarn is very soft, ch 16 with green yarn.
Starting in the second chain from the hook, sl st across.
Fasten off.
Thread this narrow crochet cord inside the lower portion of the stem.
Keep the reinforcement entirely yarn-based and stop it below the curved upper section.
Assembly
- Complete the full orange body through R26 and check that the stuffing remains firmer around the outside than through the central axis.
- Compress the pumpkin vertically by approximately 1.5–2 cm before marking the six lobe positions.
- Mark six equally spaced exterior paths around the widest circumference and inspect their spacing from directly above.
- Form the first two grooves as an opposite pair, then add the second and third pairs while redistributing stuffing between steps.
- Adjust all six channels until the deepest points sit approximately 12–15 mm below the fullest lobe surfaces.
- Set the pumpkin on a level table and correct the lower center before permanently burying the sculpting yarn tails.
- Sew the 18-stitch green base disc over the crown center so it covers the meeting point of the six shaping strands.
- Position the curved stem over the disc and sew its 18-stitch lower edge through both the disc and several orange crown stitches.
- Check the stem from the front and side, then add one or two concealed stitches on the inside of the curve if the upper section shifts.
- Weave every yarn tail through at least 4–5 cm of dense crochet, reverse direction once and trim only after the end retracts beneath the stitches.
The completed pumpkin should sit on a broad stable base with six similarly sized orange lobes, deep vertical channels and a substantial green stem curving gently away from the crown center.
7 Technical Tips
- Body remaining spherical: Sculpting strands cannot create deep lobes through an overpacked center. Keep the middle roughly 15–20 percent softer than the outer circumference before closing R26.
- Grooves cutting too deeply: Excess tension can bury the shaping yarn into the orange stitches. Stop when each channel reaches approximately 12–15 mm below the neighboring lobe surfaces.
- Unequal lobe width: Six unmarked shaping paths can drift substantially around a 22 cm pumpkin. Place all six markers first and maintain approximately 60-degree spacing when viewed from above.
- Visible decrease gaps: Loose decreases can expose white filling along the upper pumpkin. Work every decrease through the two front loops and keep the hook tension close to the surrounding single crochet stitches.
- Stem collapsing at the base: Leaving all 18 stem rounds empty concentrates the bend at the crown. Stuff the lower R12–R18 lightly while keeping the upper R1–R11 nearly empty.
- Stem kinking: Bending one isolated crochet round creates a sharp corner. Spread the curve over approximately 5–6 cm and use concealed inside stitches to hold the gradual arc.
- Pumpkin rocking: A hard knot of stuffing at the lower center creates one unstable contact point. Push the center upward only 5–8 mm and redistribute the filling into the bottoms of the six lobes.
Conclusion
Check all six lobe widths before attaching the green stem because its base will cover the crown where every shaping strand meets. The next step is to rotate the pumpkin on a hard surface and compare groove depth, lower contact and crown symmetry from every side. Adjust individual strands before burying their tails. Share the finished large crochet pumpkin pattern project on Pinterest with a vertical fall photograph, then post a close view of the horizontal stitch rows and deep lobe shaping on Instagram using #SixLobeCrochetPumpkin. For this pumpkin specifically, would you keep the muted green stem or switch it to dark brown for stronger contrast?









