Introduction
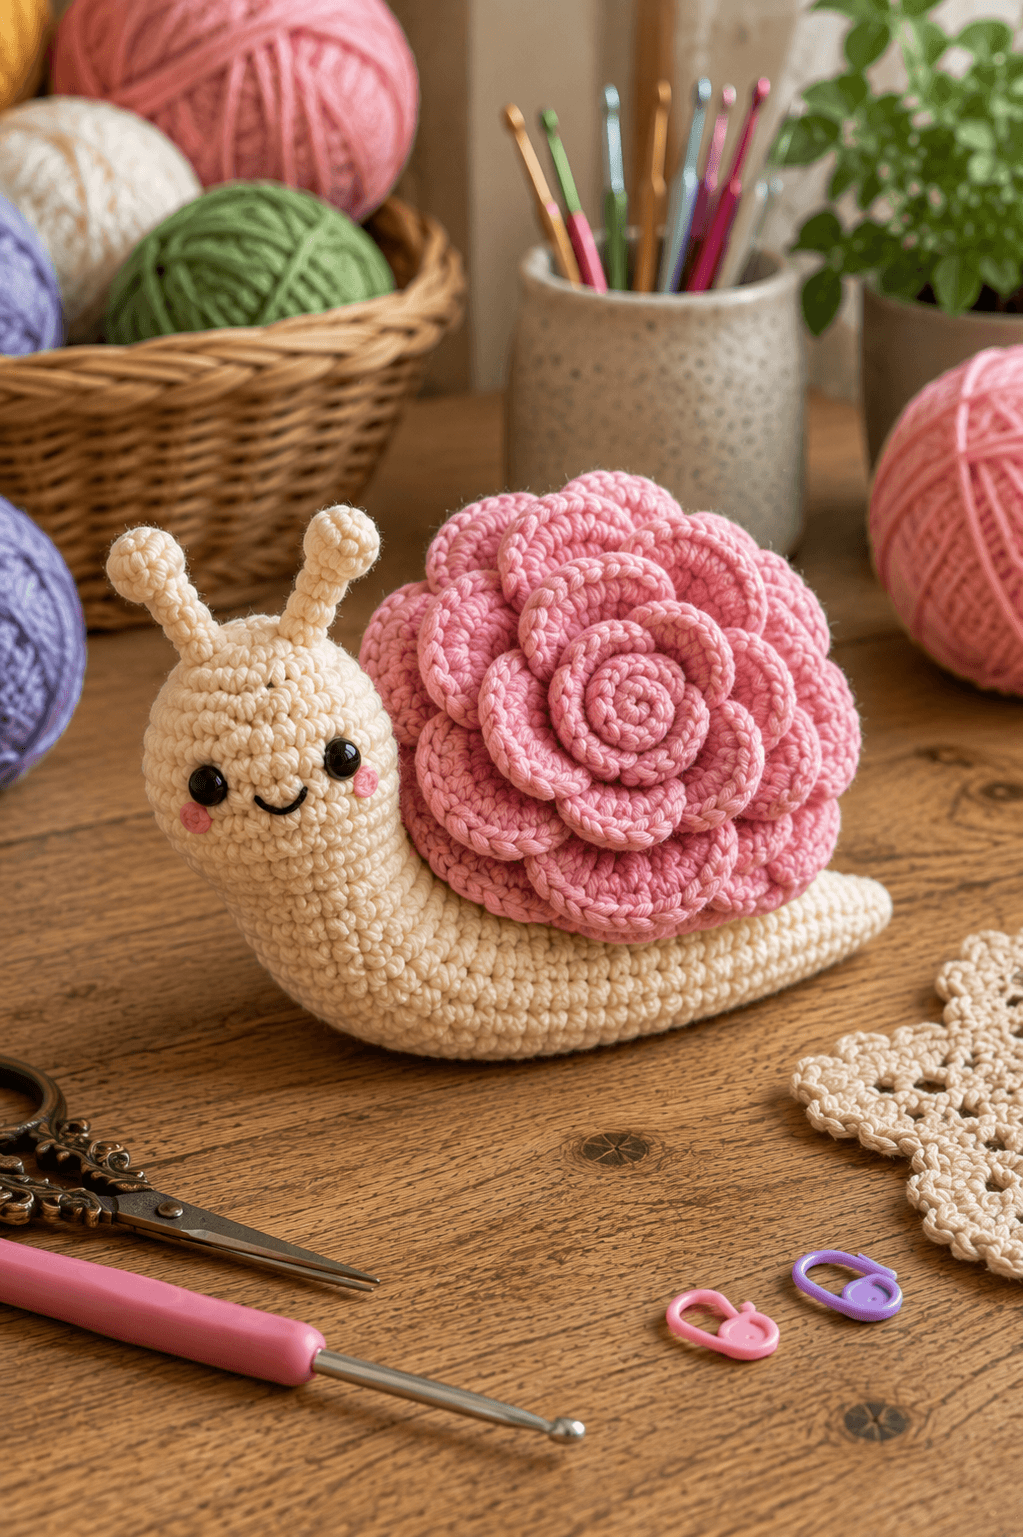
A snail carrying a rose instead of a spiral shell needs enough body length to support the flower without tipping backward. This rose shell snail amigurumi crochet pattern uses worsted yarn, a 4 mm hook and 10–12 mm safety eyes to make a snail approximately 25–28 cm long. A cream body, curved antennae, layered pink rose shell and compact facial details create an intermediate sculptural amigurumi project.
The Design: What Makes This Snail Different
The body is elongated rather than spherical because the large flower shell requires a broad attachment area behind the head. A 36-stitch front section creates enough height for the face, then controlled decreases narrow the body gradually toward the tail. The rose shell is built independently as a spiral flower with four overlapping petal tiers instead of a stuffed circular disc. That construction keeps the shell visually light while producing the large three-dimensional form seen in the reference. Two narrow antennae rise from the crown and curve slightly apart, leaving the face open. This floral snail amigurumi depends on shell placement more than a standard spiral-shell design. One common maker error is sewing the rose too high. Position its lower third against the body so the flower weight is transferred through a wide horizontal seam rather than one small attachment point.
Project Info at a Glance
| Skill Level | Time | Finished Size | Hook | Best For |
|---|---|---|---|---|
| Intermediate | 10–13 hours | Approx. 25–28 cm long × 19–22 cm high | 4.0 mm | Floral amigurumi collections, desk decor and spring displays |
Materials and Tools
Yarn
- Warm cream / ivory — worsted / Aran #4 — approximately 95–115 g — used for the snail body, head and antennae.
- Soft rose pink — worsted / Aran #4 — approximately 120–145 g — used for the layered flower shell.
- Blush pink — scrap yarn — approximately 3–5 g — used for two cheek patches.
- Black embroidery yarn — small amount — used for the smile.
Tools
- 4.0 mm crochet hook
- 10–12 mm safety eyes
- Polyester stuffing, approximately 120–150 g
- Long yarn needle
- Embroidery needle
- Locking stitch marker
- Dressmaking pins
- Scissors
Use embroidered eyes instead of plastic fittings when the finished snail is intended for a child under three.
Abbreviations
- MR — magic ring
- sc — single crochet
- inc — two single crochet stitches in one stitch
- dec — invisible single crochet decrease
- sl st — slip stitch
- ch — chain
- hdc — half double crochet
- dc — double crochet
- tr — treble crochet
- BLO — back loop only
- FLO — front loop only
An invisible decrease is worked through the front loops of the next two stitches before one single crochet is completed through both loops.
Pattern — Step by Step
Work the stuffed snail body and antennae in continuous spirals unless noted. Mark the first stitch of each round and verify the count before moving the marker.
Head and Front Body
Yarn: warm cream — Source: standard six-stitch amigurumi math.
R1: 6 sc in MR (6)
R2: inc ×6 (12)
R3: (sc, inc) ×6 (18)
R4: (2 sc, inc) ×6 (24)
R5: (3 sc, inc) ×6 (30)
R6: (4 sc, inc) ×6 (36)
R7–R12: sc around (36)
Insert the safety eyes between R9 and R10 with approximately seven visible stitches between the posts. The eye line should sit slightly below the horizontal center of the head.
R13: (4 sc, dec) ×6 (30)
R14–R18: sc around (30)
R19: (3 sc, dec) ×6 (24)
R20–R25: sc around (24)
Begin stuffing after R13. Keep the face firm and the lower body slightly more flexible so it can rest flat on the table.
Middle Body
R26: (2 sc, dec) ×6 (18)
R27–R34: sc around (18)
Continue stuffing in small portions. Keep the underside flatter than the upper surface by pushing most filling toward the sides and top.
Tail
R35: (sc, dec) ×6 (12)
R36–R42: sc around (12)
R43: dec ×6 (6)
Add only light stuffing through R35–R40. Leave the final 2–3 cm flexible enough to taper naturally toward the tail tip.
Fasten off. Leave a 25 cm tail and close the final six front loops.
Shape the Head Lift
Thread approximately 60 cm of cream yarn onto a long needle.
Enter through the underside approximately 4 cm behind the face and exit near the lower back of the head.
Return through the body and pull gently until the front section rises approximately 15–20 mm above the body line.
Do not pull the head into a vertical position. The reference uses a gradual upward curve from body to face.
Knot securely and bury the yarn.
Left Antenna
Yarn: warm cream.
R1: 6 sc in MR (6)
R2–R10: sc around (6)
R11: inc ×6 (12)
R12–R13: sc around (12)
R14: dec ×6 (6)
Stuff the 12-stitch rounded tip lightly. Leave the narrow stalk almost empty.
Fasten off. Leave a 25 cm sewing tail.
Right Antenna
Yarn: warm cream.
Repeat R1–R14 of the Left Antenna.
Keep both stalk lengths within approximately 5 mm of one another.
Fasten off. Leave a 25 cm tail.
Cheek Patches (Make 2)
Yarn: blush pink.
R1: 6 sc in MR (6)
Join with sl st.
Do not increase. The reference cheeks are small compared with the eyes.
Fasten off. Leave a 10 cm sewing tail.
Smile
Yarn: black embroidery yarn.
Place the smile approximately one round below the midpoint between the eyes.
Work a shallow curve approximately 14–16 mm wide.
Keep both ends of the smile inside the inner edges of the pink cheek circles.
Secure the thread inside the head.
Rose Shell Center Coil
Yarn: soft rose pink.
Ch 26.
Starting in the second chain from the hook:
2 sc in each of next 8 ch,
2 hdc in each of next 8 ch,
2 dc in each of final 9 ch.
The strip will curl naturally.
Beginning at the narrow sc end, roll the strip tightly into a spiral approximately 4–5 cm across.
Sew through the base layers with matching pink yarn.
Keep the front spiral visible and place all structural stitches on the rear face.
Inner Rose Petals (Make 5)
Yarn: soft rose pink.
R1: 6 sc in MR (6)
R2: inc ×6 (12)
R3: (sc, inc) ×6 (18)
Fold the circle slightly so it forms a shallow cup.
Do not stuff.
Fasten off. Leave a 20 cm sewing tail.
Middle Rose Petals (Make 7)
Yarn: soft rose pink.
R1: 6 sc in MR (6)
R2: inc ×6 (12)
R3: (sc, inc) ×6 (18)
R4: (2 sc, inc) ×6 (24)
Keep each petal flat at the base and curve only the upper half forward.
Fasten off. Leave a 22 cm sewing tail.
Outer Rose Petals (Make 8)
Yarn: soft rose pink.
R1: 6 sc in MR (6)
R2: inc ×6 (12)
R3: (sc, inc) ×6 (18)
R4: (2 sc, inc) ×6 (24)
R5: (3 sc, inc) ×6 (30)
These petals create the final shell diameter. Fold each one into a shallow oval rather than leaving it as a flat circle.
Fasten off. Leave a 25 cm sewing tail.
Rose Shell Backing Disc
Yarn: soft rose pink.
R1: 6 sc in MR (6)
R2: inc ×6 (12)
R3: (sc, inc) ×6 (18)
R4: (2 sc, inc) ×6 (24)
R5: (3 sc, inc) ×6 (30)
R6: (4 sc, inc) ×6 (36)
R7: (5 sc, inc) ×6 (42)
Keep this circle flat. It acts as the structural rear face of the flower shell.
Fasten off. Leave a 60 cm sewing tail.
Build the Rose Shell — Tier 1
Place the center coil in the middle of the backing disc.
Sew through its base only.
Arrange the five inner petals around the spiral, overlapping each neighboring petal by approximately one-third of its width.
Sew only the lower third of each petal to the backing disc.
The upper two-thirds must remain free so the flower keeps its layered depth.
Build the Rose Shell — Tier 2
Arrange the seven middle petals behind the first layer.
Offset each petal so its center sits behind a gap between two inner petals.
Overlap neighboring petals by approximately 10–15 mm.
Sew through the lower 20–25 mm of each petal.
Build the Rose Shell — Tier 3
Place the eight outer petals around the backing disc.
Angle the lower petals slightly downward and the upper petals slightly outward.
This prevents the finished rose from reading as a flat mandala.
Sew each petal securely through its lower third.
Optional Edge Curl
If a petal lies too flat, thread pink yarn along approximately 20–25 mm of its outer edge using running stitches.
Pull very lightly to create a small curl.
Knot on the rear of the petal.
Use this correction on selected petals only. Curling every edge equally makes the flower look mechanical.
Shell Support Pad
Yarn: warm cream.
R1: 6 sc in MR (6)
R2: inc ×6 (12)
R3: (sc, inc) ×6 (18)
R4: (2 sc, inc) ×6 (24)
Do not stuff. This flat pad sits between the snail body and rose shell, spreading the shell weight over a wider attachment area.
Fasten off. Leave a 40 cm sewing tail.
Assembly
- Complete and stuff the long cream body first, shaping the face firmly while keeping the underside slightly flatter than the upper body.
- Use the hidden shaping strand to raise the head approximately 15–20 mm above the body line before attaching any antennae.
- Sew the two antennae to the head crown approximately four to five background stitches apart and angle their rounded tips slightly outward.
- Attach the pink cheek circles below and outside the eyes, then embroider the curved black smile between them.
- Complete the full rose shell on its 42-stitch backing disc before placing it against the snail so its final weight and diameter can be checked.
- Sew the 24-stitch cream support pad to the middle rear body approximately 4–5 cm behind the base of the head.
- Position the rose so its center sits slightly above the body center line and its lowest outer petals overlap the body by approximately 15–20 mm.
- Sew the rose backing disc to the support pad and body through a broad oval attachment zone at least 7–9 cm long rather than using one circular center seam.
- Place the snail on a hard surface and check that the body remains flat beneath the shell; add one hidden lower shell tack if the flower rotates backward.
- Weave every structural tail through at least 4 cm of dense crochet, reverse direction once and trim after the yarn retracts beneath the stitches.
The completed snail should rest along its full cream underside with the head raised, both antennae visible and the rose shell centered over the middle body without pulling the tail upward.
7 Technical Tips
- Shell tipping backward: A rose attached only through its center acts like a heavy lever. Use an attachment area approximately 7–9 cm long and place the lowest petal tier 15–20 mm over the body.
- Head collapsing under shell weight: Soft stuffing behind the face lets the body bend where the shell begins. Pack the front 8–10 cm firmly and keep the more flexible filling toward the tail.
- Visible decrease holes: Loose decreases expose stuffing through pale cream yarn. Work every decrease through the two front loops and match its tension to adjacent single crochet stitches.
- Antennae falling sideways: Stuffing the entire six-stitch tube makes the stalk bulky without improving the base. Leave the stalk empty and add filling only inside the 12-stitch tip, then sew the base through at least four body stitches.
- Rose becoming flat: Sewing each petal around its complete perimeter removes the layered shell structure. Fix only the lower third of every petal and leave at least the upper 20–30 mm free.
- Uneven flower spiral: Petals placed directly behind one another create straight radial seams. Offset every new tier so each petal center falls behind a gap in the previous layer.
- Tail lifting off the table: A shell mounted too far toward the rear shifts the center of gravity behind the widest body section. Position the rose center roughly 4–5 cm behind the head base and test balance before final knotting.
Conclusion
Check the rose position before burying the shell tails because the flower should rest over the middle body without lifting either the head or tail. Next, place the snail on a hard surface and compare shell height, antenna angle and face alignment from the side. Move the shell a few millimeters forward if the tail loses contact with the table. Share the finished rose shell snail amigurumi crochet pattern project on Pinterest with a side-profile image, then post a close view of the layered petals on Instagram using #RoseShellSnailAmigurumi. For this snail specifically, would you keep the rose shell soft pink or make the outer petal tier cream?









