Introduction
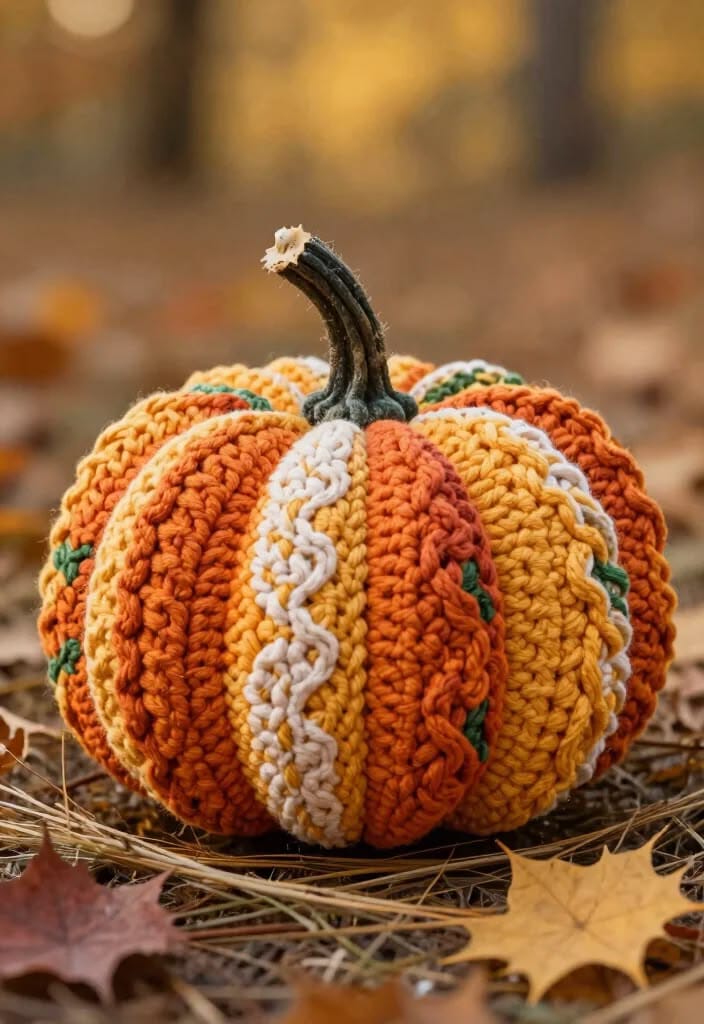
An eight-lobed pumpkin can carry several cable styles only when every textured column reaches the crown at the same height. This multicolor cable crochet pumpkin pattern uses worsted or Aran yarn and a 5.5 mm hook to make a pumpkin about 21–24 cm wide. Orange, mustard and cream panels combine raised braids, narrow ribs and contrasting overlays around a stuffed fall decoration.
The Design: What Makes This Crochet Pumpkin Different
The body is divided into eight vertical panels rather than crocheted as one plain sphere. That construction gives each lobe its own color and texture while preserving a controlled width from base to crown. Burnt orange panels carry dense raised ribs, mustard sections introduce lighter relief, and cream surface cables create the strongest contrast. Joined seams become the natural pumpkin grooves after stuffing, so relatively little external sculpting is required compared with a smooth amigurumi body. Small green accents near the crown prevent the warm palette from becoming visually flat, while the tall stem provides a narrow vertical counterpoint to the wide body. One common failure in a patchwork crochet pumpkin is making every panel at a slightly different row gauge. Even a 5–8 mm length difference becomes obvious once all eight ends are gathered into the same crown.
Project Info at a Glance
| Skill Level | Time | Finished Size | Hook | Best For |
|---|---|---|---|---|
| Intermediate | 9–12 hours | Approx. 21–24 cm wide × 23 cm high | 5.5 mm | Fall tables, Thanksgiving displays and seasonal centerpieces |
Materials and Tools
Yarn
- Burnt orange — worsted / Aran #4 — approximately 90–110 g — used for four textured body panels.
- Golden mustard — worsted / Aran #4 — approximately 75–90 g — used for four alternating body panels.
- Natural cream — matching worsted yarn — approximately 30–40 g — used for raised contrasting cable overlays.
- Forest or olive green — matching yarn — approximately 5–10 g — used for small crown accents if desired.
Additional Material
- Natural twig stem — approximately 8–10 cm long and 12–18 mm wide, matching the stem appearance in the supplied image.
Tools
- 5.5 mm crochet hook
- Polyester stuffing, approximately 180–220 g
- Long tapestry needle
- Standard yarn needle
- Locking stitch markers
- Dressmaking pins
- Scissors
- Measuring tape
Use yarns from the same weight category and with similar fiber composition. A soft mustard yarn paired with a firm orange yarn can produce visibly different panel widths even when both pieces contain the same number of stitches.
Abbreviations
- ch — chain
- sc — single crochet
- hdc — half double crochet
- dc — double crochet
- FPdc — front post double crochet
- BPdc — back post double crochet
- FPtr — front post treble crochet
- sl st — slip stitch
- BLO — back loop only
- RS — right side
- WS — wrong side
A crossed cable is made by skipping selected raised posts, working the following posts first and then returning to the skipped posts so one group crosses over the other.
Pattern — Step by Step
The pumpkin uses eight individual panels. Four are burnt orange and four are mustard. Alternate them during assembly. Cream surface cables are added to selected mustard panels before the body is joined.
Orange Cable Panels (Make 4)
Yarn: burnt orange — original 12-stitch vertical cable reconstruction.
Ch 13.
Row 1: Sc in second ch from hook and across. Turn. (12)
Row 2: Ch 1, sc across. Turn. (12)
Row 3, RS: Ch 2, dc in first 2 sts, FPdc around next 2 corresponding stitches, dc in next 4 sts, FPdc around next 2 corresponding stitches, dc in final 2 sts. Turn. (12)
Row 4: Ch 1, sc across. Turn. (12)
Orange Cable Crossing
Row 5, RS: Ch 2, dc in first 2 sts. Skip the first raised post, FPtr around the second raised post, then FPtr around the skipped post. Dc in next 4 sts. Repeat the same two-post crossing over the next cable pair. Dc in final 2 sts. Turn. (12)
Row 6: Ch 1, sc across. Turn. (12)
Row 7: Repeat Row 3. (12)
Row 8: Ch 1, sc across. Turn. (12)
Repeat Rows 5–8 until the panel measures approximately 21–23 cm.
Finish all four orange panels after the same wrong-side row. Do not calculate length only from row count because cable tension can vary between panels.
Fasten off. Leave a 30 cm sewing tail.
Mustard Raised-Rib Panels (Make 2)
Yarn: golden mustard.
Ch 13.
Row 1: Sc in second ch from hook and across. Turn. (12)
Row 2: Ch 2, dc across. Turn. (12)
Row 3: Ch 2, *FPdc around next 2 corresponding posts, dc in next 2 sts; repeat from * across. Turn. (12)
Row 4: Ch 1, sc across. Turn. (12)
Repeat Rows 2–4 until the piece matches the exact length of the orange panels.
The mustard relief should remain narrower and less dominant than the large orange cable crossings.
Fasten off. Leave a 30 cm sewing tail.
Mustard Panels for Cream Overlay (Make 2)
Yarn: golden mustard.
Ch 13.
Row 1: Sc in second ch from hook and across. Turn. (12)
Rows 2 onward: Ch 1, sc across. Turn. (12)
Continue until the panel matches the finished orange panel length.
A relatively flat background makes the cream surface cable visible.
Fasten off and weave in the working tail.
Cream Surface Cable — Make 2
Yarn: natural cream.
Ch 4.
Row 1: Sc in second ch from hook and across. Turn. (3)
Row 2: Ch 1, BLO sc across. Turn. (3)
Repeat Row 2 until the narrow strip is approximately 15 percent longer than the mustard panel.
The extra length is required because the strip will curve from side to side rather than traveling in a straight vertical line.
Fasten off. Leave a 40 cm sewing tail.
Shape the Cream Cable
Lay the cream strip over one flat mustard panel.
Pin the strip into a shallow alternating S-curve, moving approximately 12–18 mm left and right of the panel center line.
Each curve should span approximately four to five background rows.
Sew the strip through its back loops with small cream stitches.
Leave the outer curve edges slightly raised. Sewing through the complete width removes the cord-like appearance.
Repeat on the second mustard panel.
Optional Green Surface Accent (Make 2)
Yarn: forest green.
Ch 16.
Starting in the second chain from the hook, sl st in every chain across.
Fasten off. Leave a 15 cm sewing tail.
Place the narrow cord inside one orange or mustard recessed line close to the crown.
Use only a small section of green; the supplied pumpkin remains predominantly orange, mustard and cream.
Block and Match the Eight Panels
Lay all eight panels beside one another on a flat surface.
Measure from foundation edge to final row without stretching.
Every piece should finish within approximately 5 mm of the same length.
Add another complete texture repeat to a short panel rather than stretching it to match a longer one.
Join the First Two Panels
Place one orange panel and one mustard panel right sides together.
Using matching orange or neutral yarn, mattress stitch the long edges.
Keep the seam firm enough to close the gap but loose enough to fold inward after stuffing.
Join All Eight Panels
Continue in this order:
Orange
Mustard
Orange
Mustard
Orange
Mustard
Orange
Mustard
The two mustard panels with cream overlays should be separated rather than positioned beside one another.
After joining Panel 8 to Panel 1, the work forms a tube.
Turn the tube right side out and check that all cable motifs travel vertically in the same direction.
Gather the Bottom
Cut approximately 100 cm of orange or mustard yarn and thread the long needle.
Run the yarn through the lower row ends around the complete tube, catching one point approximately every 8–10 mm.
Pull until the opening reduces to about 2 cm.
Cross the center several times and knot securely.
Stuff the Pumpkin
Add polyester filling around the outer wall first.
Push small pieces behind every textured panel so the cables project rather than collapse inward.
Fill the center last.
Stop when firm thumb pressure creates approximately 10–15 mm of temporary compression. The panels need room to move during final sculpting.
Gather the Crown
Run a second long yarn strand around the top edge.
Pull until the opening reduces to approximately 3 cm.
Add final stuffing beneath the upper cable ends.
Close the crown to approximately 1–1.5 cm if using a narrow twig stem.
Secure the yarn firmly.
Deepen the Eight Lobes
Yarn: orange, mustard or a hidden neutral shade.
Thread approximately 150 cm of yarn through a long needle.
Enter at the bottom center and bring the yarn along one joined panel seam to the top.
Pass through the center of the pumpkin and return to the bottom.
Pull until the seam recesses approximately 8–12 mm.
Repeat on the seam directly opposite the first.
Continue in opposite pairs until all eight joins form visible pumpkin grooves.
Do not place sculpting strands over the center of a cream overlay. The panel seams already provide the correct groove positions.
Flatten the Base
Set the pumpkin on a hard surface.
If it rocks, press the lower center upward while redistributing stuffing outward into the lowest sections.
Pass one short yarn strand from lower center to upper center and tighten only enough to reduce rocking.
Keep the lower indentation shallower than approximately 10 mm.
Natural Stem
Select a dry twig approximately 8–10 cm long.
Remove loose bark and sand both cut ends.
Insert approximately 2.5–3 cm of the lower end into the crown opening.
Pack a small amount of stuffing around the internal stem base.
Sew several tight stitches around the crochet crown immediately beside the wood.
The photograph shows a tall stem with a natural forward curve, making a real twig the closest reconstruction.
Optional Crochet Stem
Use this section when a washable all-yarn pumpkin is preferred.
R1: 6 sc in MR (6)
R2–R6: sc around (6)
R7: (2 sc, inc) ×2 (8)
R8–R10: sc around (8)
R11: (3 sc, inc) ×2 (10)
R12–R13: sc around (10)
R14: (4 sc, inc) ×2 (12)
Stuff the lower six rounds lightly and leave the upper section nearly empty for a gradual curve.
Fasten off. Leave a 30 cm sewing tail.
Assembly
- Complete all eight vertical panels and compare their finished lengths before any seams are sewn.
- Add the two cream surface cables to their mustard backgrounds and fix any small green accent cords before joining the body.
- Join the eight panels in alternating orange-and-mustard order, positioning the cream-overlay sections apart from one another.
- Gather the lower edge firmly, add stuffing around the outer panels first and keep the center slightly more compressible.
- Gather the crown and form eight recessed channels along the panel seams in four opposite pairs.
- Set the pumpkin on a level surface and correct any lobe that projects more than approximately 10 mm beyond its neighbors.
- Adjust each cream cable so its curves remain visible and do not disappear into a neighboring sculpted groove.
- Prepare the natural twig or optional crochet stem and position it directly over the crown center.
- Insert and secure the stem, adding a small amount of stuffing around the internal base if it leans excessively.
- Weave every structural yarn tail through at least 4–5 cm of dense crochet, reverse direction once and trim after the end retracts beneath the stitches.
The completed pumpkin should rest on a broad eight-lobed base with alternating orange and mustard sections, visible cream cable accents and a centered curved stem.
7 Technical Tips
- Unequal panel length: A difference greater than approximately 5–8 mm creates a twisted crown after gathering. Measure each panel flat every 12 rows and add only complete texture repeats when more length is required.
- Compressed cable crossings: Tight FPtr stitches pull the orange panels inward. Keep each raised crossing approximately 5–7 mm above the background fabric rather than drawing it flush.
- Cream overlay disappearing: A surface cable sewn along both edges becomes a flat applique. Fix it mainly through the center/back loops and leave the outer 3–5 mm of each curve unsupported.
- Overstuffed body: Excess filling stretches the panel joins and reduces the depth available for sculpting. Stop when thumb pressure creates roughly 10–15 mm of temporary indentation at the widest point.
- Crooked lobes: Shaping all eight seams clockwise pushes filling progressively toward the final section. Tighten one channel and then its opposite before moving to the next pair.
- Unstable stem: A twig inserted less than about 25 mm into the stuffing can rotate or fall sideways. Seat 25–30 mm of the stem inside the crown and pack filling around its hidden base.
- Color distribution imbalance: Placing both cream-overlay mustard panels beside one another makes one half of the pumpkin visually heavier. Separate them by at least one orange lobe so the pale accents appear around more than one face of the pumpkin.
Conclusion
Check the eight panel lengths before stuffing because gathering cannot correct a cable section that ends several rows short of its neighbors. Next, inspect the assembled tube and place the two cream overlays where they remain visible from different viewing angles. After stuffing, deepen each joined seam in opposite pairs and correct the base before adding the stem. Share the finished multicolor cable crochet pumpkin pattern project on Pinterest with a vertical fall photograph, then post a close view of the orange braids and cream surface cables on Instagram using #PatchworkCablePumpkin. For this pumpkin specifically, would you keep the mustard panels golden or replace two of them with deep olive green?









