Introduction
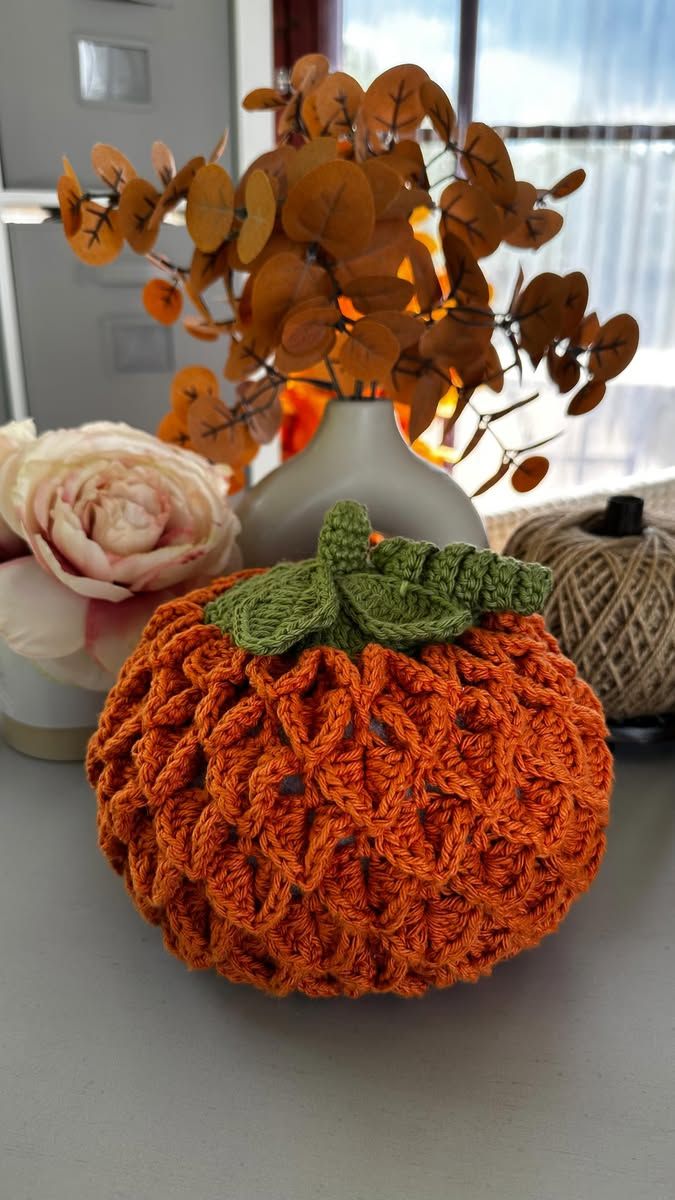
Six braided columns have to arrive at the pumpkin crown together or the leaf cluster exposes every alignment error. This cable crochet pumpkin pattern uses Aran yarn and a 5.5 mm hook to make an approximately 21 cm decorative pumpkin. Repeated post-stitch cables form the orange body, while gathering, exterior shaping, a short green stem and layered leaves build the rounded fall silhouette.
The Design: What Makes This Cable Pumpkin Different
The body begins as one rectangular piece rather than a sphere worked in continuous rounds. That structure gives each cable column a fixed path from the lower center to the crown and keeps the braided texture vertical after stuffing. Six cable sections alternate with narrow recessed channels, producing stronger segmentation than ordinary ribbing. The photographed texture also leaves small openings beside the crossed post stitches, so the cables remain visually separate instead of merging into one dense surface. An olive crown covers the gathered top with overlapping leaves, while a short stem keeps the overall height controlled. This textured crochet pumpkin depends heavily on consistent row tension. One common failure is pulling the crossed front-post treble stitches too tightly. The panel then contracts around the cable and the finished pumpkin develops narrow, pinched lobes rather than six similarly sized sections.
Project Info at a Glance
| Skill Level | Time | Finished Size | Hook | Best For |
|---|---|---|---|---|
| Intermediate | 7–9 hours | Approx. 21 cm wide × 19–21 cm high | 5.5 mm | Fall tables, shelves and seasonal centerpiece displays |
Materials and Tools
Yarn
- Burnt orange / rust — Aran or worsted #4 yarn — approximately 180–220 g — used for the complete cable body and sculpting strands.
- Olive / moss green — matching Aran or worsted yarn — approximately 30–40 g — used for the stem and layered crown leaves.
A smooth plied yarn gives better cable definition than a heavily brushed fiber because each front-post crossing stays visible. Cotton-acrylic blends and firm acrylic yarns also hold the gathered pumpkin shape well.
Tools
- 5.5 mm crochet hook
- Polyester stuffing, approximately 180–220 g
- Long tapestry or doll needle
- Standard yarn needle
- Locking stitch markers
- Dressmaking pins
- Scissors
- Measuring tape
Abbreviations
- ch — chain
- sc — single crochet
- hdc — half double crochet
- dc — double crochet
- FPdc — front post double crochet
- BPdc — back post double crochet
- FPtr — front post treble crochet
- sl st — slip stitch
- MR — magic ring
- BLO — back loop only
- RS — right side
- WS — wrong side
A cable crossing is made by skipping a set of raised posts, working the following posts first, then returning to the skipped posts so the second group crosses in front.
Pattern — Step by Step
The pumpkin body is worked flat. After the rectangle is complete, its short ends are joined to form a tube, both open edges are gathered, and six final shaping strands deepen the natural channels between the cable sections.
Main Cable Body
Yarn: burnt orange — original six-panel reconstruction based on standard front-post cable structure.
Ch 49.
Row 1: Sc in second ch from hook and in every ch across. Turn. (48)
Row 2: Ch 1, sc across. Turn. (48)
Cable Setup Row
Row 3, RS: Ch 2. *Dc in next 2 sts, FPdc around next 4 corresponding stitches, dc in next 2 sts; repeat from * six times. Turn. (48)
Row 4, WS: Ch 1, sc across. Turn. (48)
Each eight-stitch repeat creates one future pumpkin section. Place a marker after stitches 8, 16, 24, 32 and 40 for the first several repeats.
First Cable Crossing
Row 5, RS: Ch 2. *Dc in next 2 sts. Skip the first 2 raised cable posts. Work one FPtr around each of the next 2 raised posts. Working in front of those stitches, return to the 2 skipped posts and work one FPtr around each. Dc in next 2 sts; repeat from * across all six sections. Turn. (48)
Row 6: Ch 1, sc across. Turn. (48)
Do not pull the FPtr stitches tight against the background. Each crossing should sit approximately 5–7 mm above the plain fabric.
Straight Cable Row
Row 7, RS: Ch 2. *Dc in next 2 sts, FPdc around each of the next 4 raised posts, dc in next 2 sts; repeat from * six times. Turn. (48)
Row 8: Ch 1, sc across. Turn. (48)
Second Cable Crossing
Row 9, RS: Repeat Row 5. (48)
Row 10: Ch 1, sc across. Turn. (48)
Continue repeating Rows 7–10 until the rectangle measures approximately 48–52 cm along its row edge.
The exact row count depends on gauge. The long edge must be roughly 2.3–2.5 times the intended finished pumpkin height before gathering.
Finish after a wrong-side single crochet row. Leave a 70 cm sewing tail.
Check the Cable Rectangle
Lay the piece flat without stretching.
Confirm that all six cable columns contain the same number of crossings and that the two short ends meet without one edge extending more than approximately 5 mm beyond the other.
If one section appears narrower, block the rectangle lightly before seaming rather than stretching it during assembly.
Join the Body Tube
Fold the rectangle with the short ends together and the right side facing inward.
Whipstitch or mattress stitch the short ends from bottom to top.
Turn the tube right side out.
Position the seam inside one recessed space rather than through the center of a cable column.
Gather the Bottom
Cut approximately 100 cm of orange yarn and thread a long needle.
Run the yarn in and out around the complete lower edge, catching approximately one stitch every 8–10 mm.
Pull the gathering strand firmly until the opening closes to roughly 1–2 cm.
Pass the yarn across the opening three or four times and knot securely.
Leave the final center slightly flexible so the finished pumpkin can sit flat after stuffing.
Stuff the Pumpkin
Add stuffing in small portions around the outer circumference first.
Push filling behind each cable column so all six sections project similarly.
Continue filling the center until the pumpkin holds its round profile but still compresses approximately 10–15 mm under firm thumb pressure.
Overfilling stretches the cable crossings and closes the small gaps that give the surface its open texture.
Gather the Top
Thread another approximately 100 cm strand through the upper edge.
Pull gradually until the opening reduces to about 3 cm.
Add the final small pieces of stuffing through the gap.
Close the opening to approximately 1–1.5 cm but leave enough space for the green stem attachment.
Secure the strand.
Shape the Six Pumpkin Sections
Yarn: matching burnt orange.
Cut a strand approximately 150 cm long and thread the long needle.
Enter at the bottom center. Carry the yarn along the recessed channel between Cable Sections 1 and 2, then enter the top center and pass through the body to the bottom.
Pull gradually until the channel sits approximately 10–12 mm below the neighboring cable surfaces.
Repeat in the opposite channel.
Continue around the pumpkin in opposite pairs until six shaping channels have been formed.
Alternate sides rather than working clockwise. This prevents stuffing from migrating toward one side of the pumpkin.
Secure all shaping strands at the bottom center and bury the tails.
Green Stem
Yarn: olive green.
R1: 6 sc in MR (6)
R2–R5: sc around (6)
R6: (2 sc, inc) ×2 (8)
R7–R8: sc around (8)
R9: (3 sc, inc) ×2 (10)
R10: sc around (10)
R11: (4 sc, inc) ×2 (12)
R12: sc around (12)
Stuff the lower half lightly and leave the upper rounds nearly empty. Flatten the top slightly rather than forming a perfectly round cylinder.
Fasten off. Leave a 30 cm sewing tail.
Stem Base Disc
Yarn: olive green.
R1: 6 sc in MR (6)
R2: inc ×6 (12)
R3: (sc, inc) ×6 (18)
Do not stuff. Keep this disc flat so it covers the orange gathering point.
Fasten off. Leave a 25 cm sewing tail.
Large Three-Lobed Crown Leaf
Yarn: olive green.
R1: 10 sc in MR. Join. (10)
For the first side lobe:
3 hdc in next st; hdc and 2 dc in next st; dc, tr, ch 3 and sl st in next st.
Sl st in the next two stitches.
For the center lobe:
Ch 2, dc and 2 tr in next st; ch 1; 2 tr, dc, ch 2 and sl st in next st.
Sl st in the next two stitches.
For the final side lobe:
Ch 3, tr and dc in next st; 2 dc and hdc in next st; 3 hdc in final stitch, ch 1 and sl st.
The middle point should extend approximately 1–1.5 cm farther than the side lobes.
Fasten off. Leave a 30 cm sewing tail.
Pointed Crown Leaves (Make 2)
Yarn: olive green.
Row 1: Ch 10.
Row 2: Starting in second ch from hook: sl st, sc, hdc, dc, 2 dc, hdc, sc, sl st; work 3 sc in the final chain.
Continue along the opposite side:
Sl st, sc, hdc, 2 dc, dc, hdc, sc, sl st.
Pinch the foundation chain slightly to create a raised center vein.
Fasten off. Leave a 20 cm sewing tail.
Short Crown Strip
Yarn: olive green.
Ch 13.
Starting in the second chain from the hook, sc across. Turn. (12)
Row 2: Ch 1, BLO sc across. Turn. (12)
Row 3: Ch 1, BLO sc across. (12)
This narrow textured piece can be folded beneath the leaves to reproduce the compact layered green crown visible around the stem.
Fasten off. Leave a 20 cm sewing tail.
Optional Curled Vine
Yarn: olive green.
Ch 18.
Starting in the second chain from the hook, work 2 sc in every chain across.
The vine should coil automatically. Use only one short curl if you want to keep the crown close to the photographed design.
Fasten off. Leave a 15 cm attachment tail.
Assembly
- Complete the full 48-stitch cable rectangle and compare all six cable columns before joining the short edges into a tube.
- Gather the lower edge firmly, add stuffing in small portions and distribute filling behind every cable section before closing the upper edge.
- Shape six recessed channels in opposite pairs, stopping when each groove reaches approximately 10–12 mm below the raised cable surfaces.
- Place the pumpkin on a level table and redistribute stuffing beneath any section that projects more than approximately 10 mm beyond its neighbors.
- Sew the 18-stitch green base disc over the upper gathering point, keeping the disc centered over the six shaping channels.
- Attach the short stem to the middle of the base disc through its 12-stitch lower edge.
- Position the three-lobed leaf beside the stem and sew through its center only, leaving most of the outer lobes free.
- Add the two pointed leaves behind and beside the large leaf so their tips project in different directions.
- Fold or curve the narrow green crown strip around the rear stem base, then add the optional short tendril if additional crown detail is required.
- Weave every structural tail through at least 4–5 cm of dense crochet, reverse direction once and trim after the ends retract beneath the fabric.
The finished pumpkin should sit on a broad stable base with six cable sections, clearly recessed channels and a layered olive crown centered over the gathered top.
7 Technical Tips
- Compressed cable columns: Tight front-post treble crossings can make one section several millimeters narrower than the others. Keep each crossing loose enough to rise approximately 5–7 mm above the single-crochet background.
- Lost stitch count: Cable stitches can hide skipped edge stitches in a 48-stitch row. Count the full row after every cable crossing and keep markers after each eight-stitch section until the repeat is established.
- Flattened texture: Too much stuffing stretches the raised posts and reduces the visible openings beside the cables. Stop filling when firm thumb pressure creates approximately 10–15 mm of temporary compression.
- Uneven pumpkin sections: Shaping all six grooves clockwise can push stuffing progressively toward the final lobe. Tighten each groove and then work the channel directly opposite it before moving to the next pair.
- Visible side seam: Joining the rectangle through the middle of a cable leaves a vertical interruption on the finished front. Place the seam inside one narrow recessed channel and match every row edge before stitching.
- Stem wobble: A 12-stitch stem sewn directly over the gathered body opening can tilt under the leaf weight. Add the 18-stitch base disc first so the attachment spans approximately 3–4 cm of the crown.
- Leaf crown collapsing: Sewing every leaf around its full perimeter removes the overlapping dimensional structure. Secure each leaf at the base and center only, leaving at least the outer half unsupported.
Conclusion
Check all six cable crossings from above before attaching the crown because the green leaves will hide the upper ends of several shaping channels. The next practical step is to compare lobe width, groove depth and seam placement on a level surface, correcting any section that projects more than about 10 mm beyond its neighbors. Attach the stem and layered leaves only after that geometry is stable. Share the finished cable crochet pumpkin pattern project on Pinterest with a vertical fall photograph, then post a close view of the braided texture on Instagram using #BurntOrangeCablePumpkin. For this pumpkin specifically, would you keep the olive crown compact or add one long spiral vine beside the stem?









