Introduction
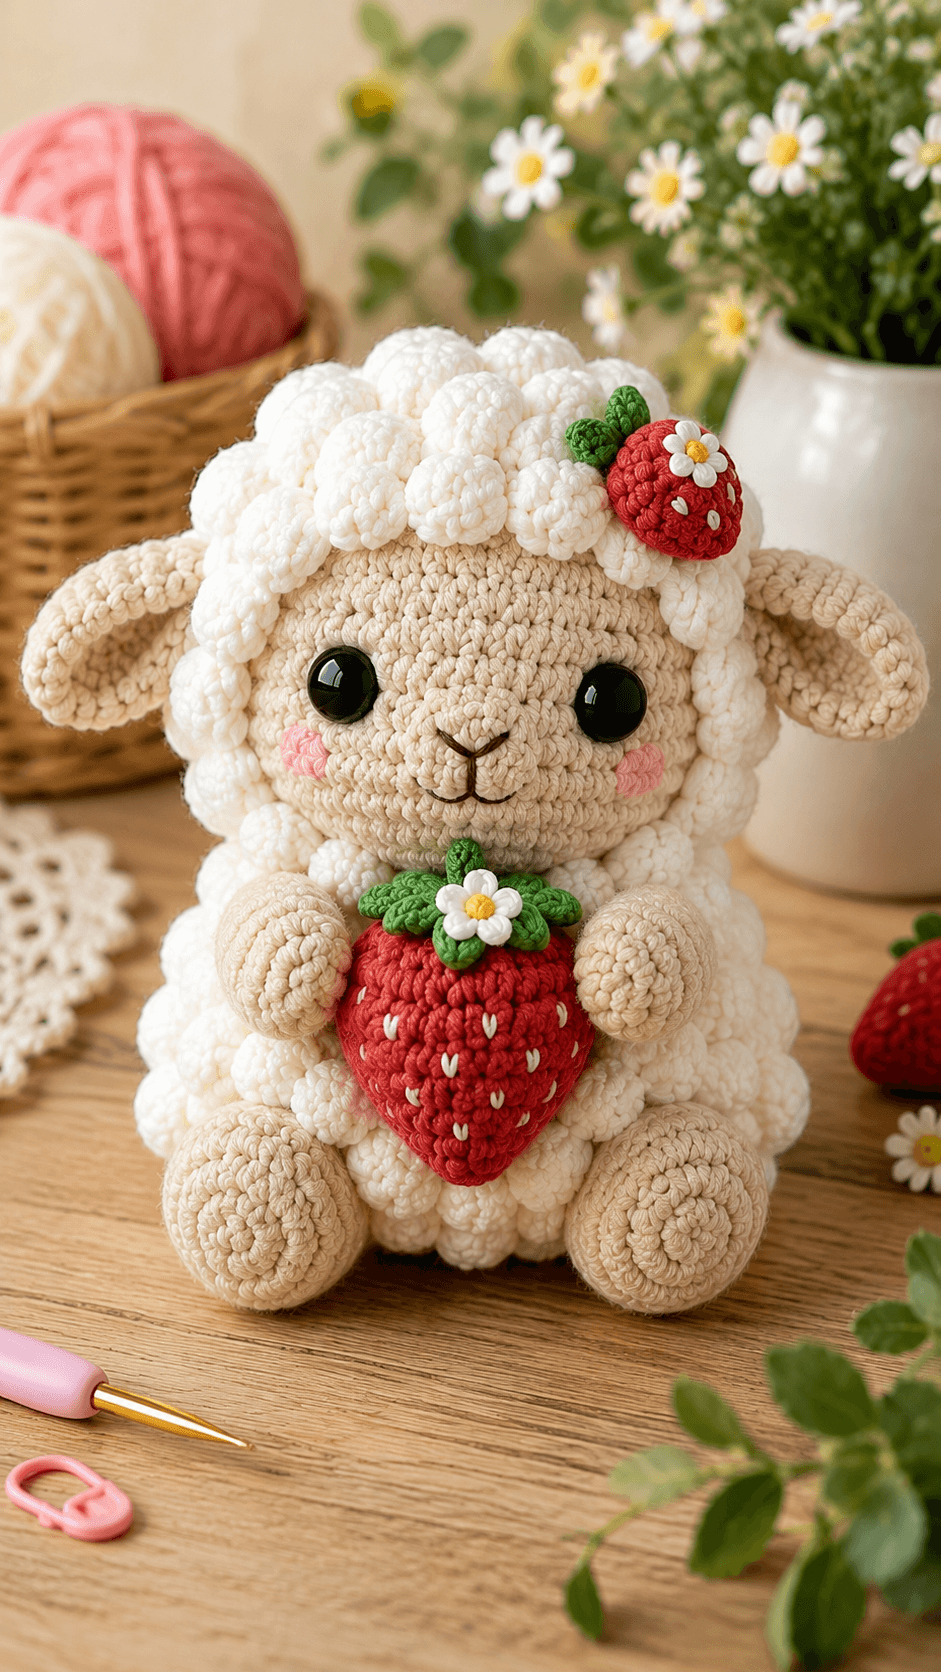
A lamb covered in separate wool curls needs an exposed forehead and muzzle or the fleece will swallow the entire face. This strawberry lamb amigurumi crochet pattern uses worsted or light chunky yarn, a 3.5 mm hook and 14–16 mm safety eyes to make an approximately 23–24 cm seated lamb. Dimensional fleece, oversized ears, a large strawberry and a matching berry headpiece make this an intermediate build.
The Design: What Makes This Strawberry Lamb Different
The beige head reaches a 36-stitch plateau, giving the face enough width for large eyes and a projecting muzzle without competing with the fleece. White wool is added afterward as individual padded clusters around the crown, cheeks and body. That choice leaves the facial structure readable while creating the heavy woolly outline seen in the reference. The body also reaches 36 stitches, but it is elongated through several straight rounds to support the seated legs and the strawberry held against the chest. Long horizontal ears extend beyond the fleece instead of disappearing beneath it. This woolly lamb amigurumi also repeats the strawberry theme at two scales. One common maker error is covering the forehead uniformly with white clusters; keep a beige face window approximately 8–10 cm wide so the eyes, muzzle and cheeks remain visually separate.
Project Info at a Glance
| Skill Level | Time | Finished Size | Hook | Best For |
|---|---|---|---|---|
| Intermediate | 11–14 hours | Approx. 23–24 cm seated | 3.5 mm | Spring displays, lamb collections and strawberry-themed amigurumi |
Materials and Tools
Yarn
- Warm beige / oatmeal — worsted or light chunky yarn — approximately 70–85 g — used for head, muzzle, ears, arms and legs.
- Warm white — matching yarn — approximately 90–110 g — used for the dimensional fleece and flower petals.
- Strawberry red — matching yarn — approximately 25–30 g — used for both berries.
- Leaf green — worsted yarn — approximately 10–15 g — used for strawberry tops, leaves and stem.
- Blush pink — scrap yarn — used for cheek patches.
- Golden yellow — scrap yarn — used for flower centers.
- Dark brown or black — embroidery floss — used for nose and mouth.
- Cream embroidery thread — small amount — used for strawberry seeds.
Tools
- 3.5 mm crochet hook
- 14–16 mm safety eyes
- Polyester stuffing, approximately 110–140 g
- Yarn needle
- Embroidery needle
- Locking stitch marker
- Dressmaking pins
- Scissors
Current plush lamb patterns document 14–16 mm safety eyes at approximately 18 cm scale. Replace plastic eyes with firmly embroidered features when the finished lamb is intended for a child under three.
Abbreviations
- MR — magic ring
- sc — single crochet
- inc — two single crochet stitches in one stitch
- dec — invisible single crochet decrease
- sl st — slip stitch
- ch — chain
- hdc — half double crochet
- dc — double crochet
- tr — treble crochet
- BLO — back loop only
An invisible decrease is worked through the front loops of the next two stitches before completing one single crochet through both loops.
Pattern — Step by Step
Work stuffed components in continuous spirals unless rows or joined rounds are specified. Keep the first stitch marked and verify every total before moving the marker.
Head
Yarn: warm beige — Source: standard six-stitch amigurumi math.
R1: 6 sc in MR (6)
R2: inc ×6 (12)
R3: (sc, inc) ×6 (18)
R4: (2 sc, inc) ×6 (24)
R5: (3 sc, inc) ×6 (30)
R6: (4 sc, inc) ×6 (36)
R7–R12: sc around (36)
R13: (4 sc, dec) ×6 (30)
R14: (3 sc, dec) ×6 (24)
R15: (2 sc, dec) ×6 (18)
R16: sc around (18)
R17: (sc, dec) ×6 (12)
R18: dec ×6 (6)
Insert the eyes between R9 and R10 with approximately eight visible stitches between the posts. Begin stuffing after R13 and fill the cheeks and forehead first.
Fasten off. Leave a 30 cm tail and close the remaining six front loops.
Muzzle
Yarn: warm beige.
R1: 6 sc in MR (6)
R2: inc ×6 (12)
R3: (sc, inc) ×6 (18)
R4–R5: sc around (18)
R6: (sc, dec) ×6 (12)
Add a small amount of stuffing to the front half only. Flatten the 12-stitch opening horizontally before sewing.
Fasten off. Leave a 25 cm sewing tail.
Ears (Make 2)
Yarn: warm beige.
R1: 6 sc in MR (6)
R2: inc ×6 (12)
R3: (sc, inc) ×6 (18)
R4–R7: sc around (18)
R8: (sc, dec) ×6 (12)
R9–R10: sc around (12)
R11: dec ×6 (6)
Do not stuff. Flatten each ear and stretch the center gently to create the long oval shape visible beside the fleece.
Fasten off. Leave a 30 cm sewing tail.
Body
Yarn: warm white or beige; white will be mostly hidden by fleece clusters.
R1: 6 sc in MR (6)
R2: inc ×6 (12)
R3: (sc, inc) ×6 (18)
R4: (2 sc, inc) ×6 (24)
R5: (3 sc, inc) ×6 (30)
R6: (4 sc, inc) ×6 (36)
R7–R13: sc around (36)
R14: (4 sc, dec) ×6 (30)
R15–R16: sc around (30)
R17: (3 sc, dec) ×6 (24)
R18: sc around (24)
R19: (2 sc, dec) ×6 (18)
R20: (sc, dec) ×6 (12)
R21: dec ×6 (6)
Stuff R1–R16 firmly enough to support the large strawberry. Keep the neck area slightly softer.
Fasten off. Leave a 35 cm sewing tail.
Arms (Make 2)
Yarn: warm beige.
R1: 6 sc in MR (6)
R2: inc ×6 (12)
R3: (sc, inc) ×6 (18)
R4–R6: sc around (18)
R7: (sc, dec) ×6 (12)
R8–R11: sc around (12)
R12: dec ×6 (6)
Stuff the rounded hand through R6 and use less filling toward the shoulder so each arm can curve around the strawberry.
Fasten off. Leave a 30 cm sewing tail.
Back Legs (Make 2)
Yarn: warm beige.
R1: 6 sc in MR (6)
R2: inc ×6 (12)
R3: (sc, inc) ×6 (18)
R4: (2 sc, inc) ×6 (24)
R5–R7: sc around (24)
R8: (2 sc, dec) ×6 (18)
R9–R10: sc around (18)
R11: (sc, dec) ×6 (12)
R12–R13: sc around (12)
Pack the broad foot firmly and keep the upper two rounds slightly softer so the legs can angle outward.
Fasten off. Leave a 35 cm sewing tail.
Cheek Patches (Make 2)
Yarn: blush pink — Source: standard flat-circle math.
R1: 6 sc in MR (6)
R2: inc ×6 (12)
Do not stuff. Flatten both pieces.
Fasten off. Leave a 12 cm sewing tail.
Large Fleece Clusters (Make 24)
Yarn: warm white — original dimensional wool construction.
R1: 6 sc in MR (6)
R2: inc ×6 (12)
R3–R5: sc around (12)
R6: dec ×6 (6)
Add only a tiny amount of stuffing or leave unstuffed for a softer cluster. Flatten slightly into an oval before attachment.
Fasten off. Leave an 18 cm sewing tail.
Small Fleece Clusters (Make 18)
Yarn: warm white.
R1: 6 sc in MR (6)
R2–R4: sc around (6)
Do not stuff. Close and flatten into a short rounded curl.
Fasten off. Leave a 15 cm sewing tail.
Large Strawberry
Yarn: strawberry red — original tapered berry construction.
R1: 6 sc in MR (6)
R2: (sc, inc) ×3 (9)
R3: (2 sc, inc) ×3 (12)
R4: (sc, inc) ×6 (18)
R5: (2 sc, inc) ×6 (24)
R6–R8: sc around (24)
R9: (2 sc, dec) ×6 (18)
R10: (sc, dec) ×6 (12)
R11: dec ×6 (6)
Begin stuffing after R8. Pack the upper half more firmly than the pointed bottom so the berry keeps its heart-like strawberry profile.
Fasten off. Leave a 25 cm tail and close.
Large Strawberry Leaves
Yarn: leaf green.
R1: 6 sc in MR (6)
Repeat six times:
ch 5, sl st in second ch from hook, sc, hdc, dc, then sl st into the next stitch of R1.
Spread the six points around the top of the berry.
Fasten off. Leave a 20 cm sewing tail.
Strawberry Seeds
Yarn: cream embroidery thread.
Work approximately 16–20 short V-shaped stitches over the large strawberry. Keep each seed about 4–5 mm long.
Stagger the rows rather than forming vertical columns.
Secure all ends inside the berry.
Head Strawberry
Yarn: strawberry red.
R1: 6 sc in MR (6)
R2: (sc, inc) ×3 (9)
R3: (2 sc, inc) ×3 (12)
R4–R5: sc around (12)
R6: dec ×6 (6)
Add a small pinch of stuffing.
Fasten off. Leave a 20 cm sewing tail.
Head Strawberry Leaves
Yarn: leaf green.
R1: 5 sc in MR (5)
Repeat five times:
ch 4, sl st in second ch from hook, sc, hdc, sl st in next MR stitch.
Fasten off. Leave a 15 cm tail.
Small White Flower for Head Strawberry
Yarn: white petals with yellow center.
R1: with yellow, 6 sc in MR (6)
Change to white.
Repeat five times: sl st in next stitch, ch 2, 2 hdc in same stitch, ch 2, sl st in same stitch.
Fasten off. Leave a 12 cm sewing tail.
Large Daisy on Strawberry
Yarn: white petals and yellow center.
R1: with yellow, 6 sc in MR (6)
R2: inc ×6 (12)
Change to white.
Repeat six times: sl st in next stitch, ch 3, 2 dc in next stitch, ch 3, sl st in same stitch.
Fasten off. Leave a 15 cm tail.
Strawberry Stem
Yarn: leaf green.
Ch 24.
Starting in the second chain from hook, sl st across all 23 chains.
The reinforced stem should measure approximately 8–10 cm.
Fasten off. Leave tails at both ends.
Stem Leaf
Yarn: leaf green.
Row 1: ch 7
Row 2: starting in second ch from hook: sl st, sc, hdc, dc, hdc, sc; work 2 sc in final chain, then continue down the opposite side with sc, hdc, dc, hdc, sc, sl st.
Fasten off. Leave a 12 cm sewing tail.
Nose and Mouth
Yarn: dark brown embroidery floss.
Work a small horizontal nose approximately 10–12 mm wide at the upper center of the muzzle. Bring one vertical stitch down approximately 7 mm.
Add one shallow curved stitch to each side to create the split mouth.
Secure the floss behind the muzzle and bury the ends.
Assembly
- Sew the head to the body first, centering the beige face over the chest and adding a narrow amount of stuffing into the neck gap before closing the seam.
- Pin the muzzle beneath the eyes, attach it around the 12-stitch opening, then add the dark nose, split mouth and two pink cheek patches.
- Attach both flattened ears high on the sides of the head with their outer ends projecting horizontally beyond the future wool clusters.
- Sew the two large back legs low on the body, place the lamb on a level surface and adjust both feet until the figure remains upright without support.
- Attach the arms to the upper torso but leave their rounded hands free until the large strawberry has been positioned.
- Arrange approximately 14 large fleece clusters and six small clusters around the head, keeping the beige forehead, eyes, muzzle and ears visible.
- Cover the body with the remaining large and small fleece clusters, overlapping neighboring pieces by approximately 5–10 mm while leaving the beige hands and feet exposed.
- Complete the large strawberry, add its green top, cream seeds, daisy, stem and leaf, then place it centrally against the lamb’s chest.
- Curve both arms around the strawberry and secure each hand to the berry with two concealed stitches; attach the miniature strawberry, leaves and flower near the upper-right side of the fleece crown.
- Weave all structural tails through at least 4 cm of dense fabric, reverse direction once and trim only after each end retracts beneath the stitches.
The completed lamb should sit on both large feet with the strawberry centered between the hands, both ears extending beyond the fleece and the miniature berry remaining visible above one eye.
7 Technical Tips
- Face buried by fleece: Wool clusters placed closer than about 8–10 mm to the eye rims make the face look compressed. Pin the entire first ring of clusters before sewing and preserve a clear beige window around both eyes and the muzzle.
- Uneven seated stance: Sewing one 24-stitch foot permanently before positioning its partner can shift the body by 5–10 mm. Pin both legs and test the lamb on a hard surface before closing either seam.
- Visible decrease holes: Loose decreases reveal stuffing through beige yarn. Work each decrease through the two front loops and match its tension to neighboring single crochet stitches.
- Late eye placement: Installing 14–16 mm washers after the head has decreased below 24 stitches leaves restricted access. Fit both eyes after R12 and check the eight-stitch spacing first.
- Flat fleece texture: Sewing every wool cluster around its complete circumference removes the dimensional overlap. Fix each cluster mainly through its base and one side, leaving roughly one-third of the outer curve free.
- Strawberry rotation: A single attachment through the hands lets the 24-stitch berry twist sideways. Add one concealed stitch from the strawberry back into the chest and keep the two hand fixing points approximately 4–5 cm apart.
- Head accessory droop: The miniature stuffed strawberry can pull a fleece cluster downward. Stitch it through the underlying beige head fabric as well as the white wool and keep its center within roughly 3 cm of the crown.
Conclusion
Check the fleece boundary before fixing the strawberry accessories because both berries draw attention toward areas that can hide proportion errors. Next, photograph the lamb from the front and both three-quarter angles and compare ear exposure, eye clearance, foot height and strawberry alignment. Correct any cluster that covers the face before burying the remaining tails. Share the finished strawberry lamb amigurumi crochet pattern project on Pinterest with a vertical photograph, then post a close view of the dimensional fleece and berry details on Instagram using #StrawberryLambAmigurumi. For this lamb specifically, would you keep the matching strawberry headpiece or replace it with a second white daisy?









