Introduction
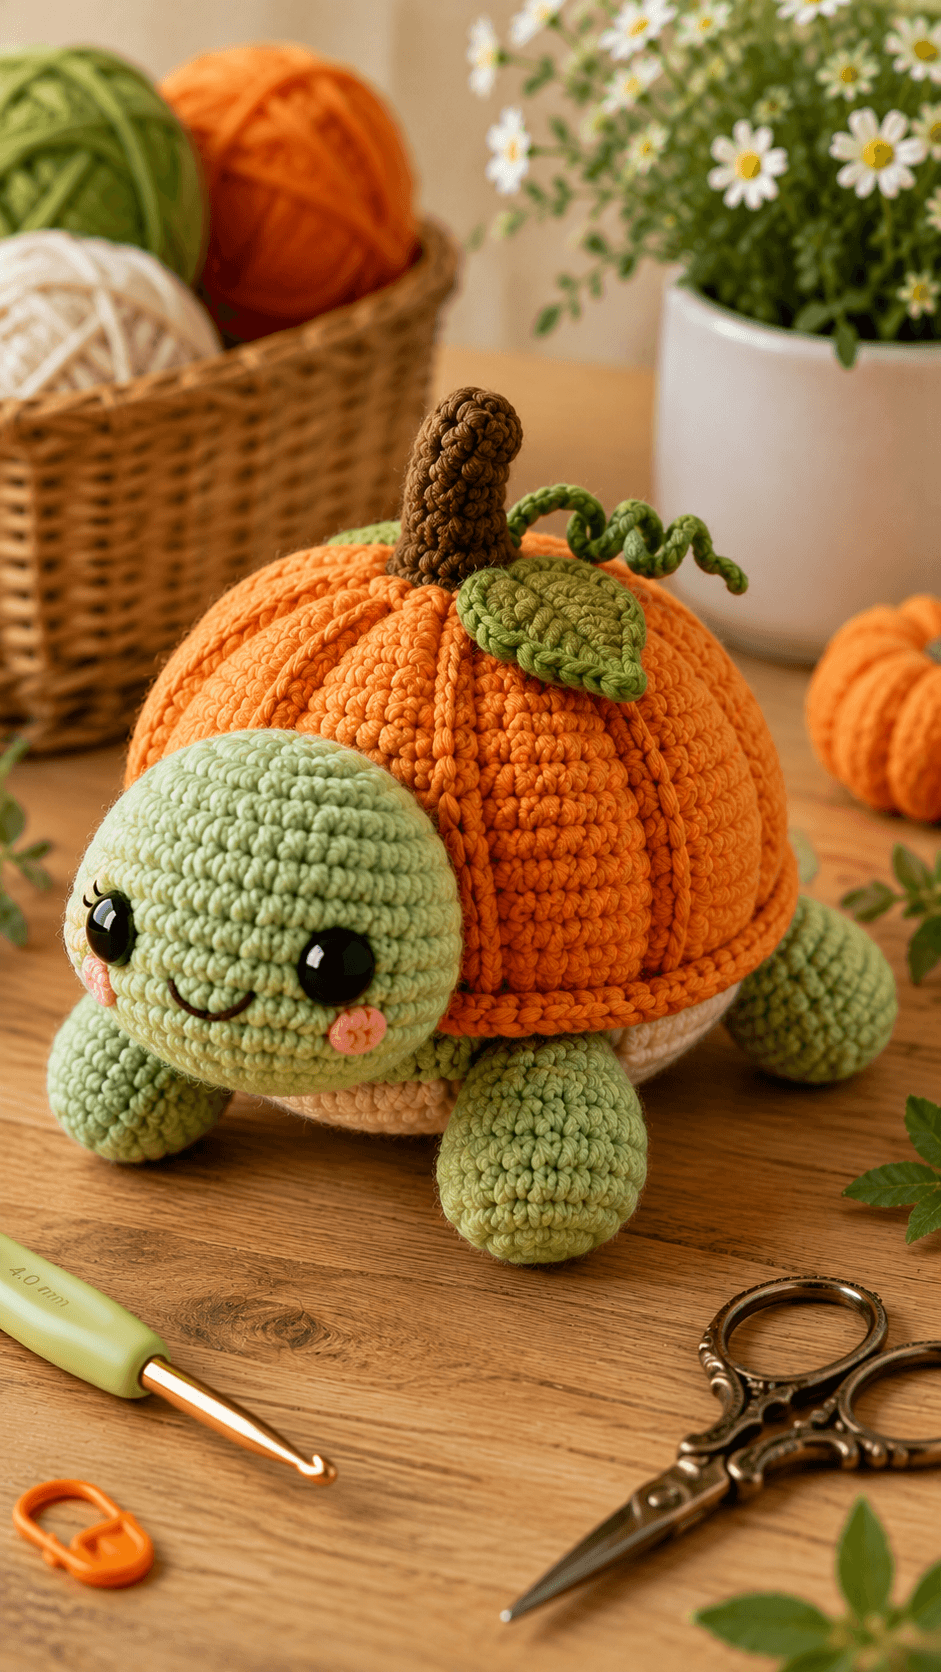
A turtle wearing a pumpkin shell only works when the shell stays broad enough for six ribs without swallowing the head. This pumpkin turtle amigurumi crochet pattern uses worsted or light chunky yarn, a 4 mm hook and 12 mm safety eyes to make a turtle about 21–23 cm long. The intermediate build includes four legs, cream underside, pumpkin ribs, stem, leaf and spiral vine.
The Design: What Makes This Pumpkin Turtle Different
The turtle head stops at a 30-stitch plateau because it needs to remain visibly smaller than the seasonal shell, while the low body reaches 36 stitches to support the pumpkin without producing a narrow neck connection. The orange shell also reaches 36 stitches, but its rounds are arranged as a shallow dome rather than a ball. Raised orange cords create the pumpkin divisions instead of extreme cinching, which keeps the shell surface rounded. A broad olive leaf and curled vine shift the crown away from strict symmetry. The front legs are larger than the rear pair, matching the crawling silhouette of this fall turtle amigurumi. One frequent construction error is overstuffing the shell. A rigid dome rises too high above the turtle and makes the stem appear to sit on a separate orange sphere.
Project Info at a Glance
| Skill Level | Time | Finished Size | Hook | Best For |
|---|---|---|---|---|
| Intermediate | 8–10 hours | Approx. 21–23 cm long | 4.0 mm | Fall displays, Halloween collections and seasonal plush projects |
Materials and Tools
Yarn
- Pale sage green — worsted / light chunky yarn — approximately 70–85 g — used for the head, legs and tail.
- Pumpkin orange — matching yarn — approximately 65–80 g — used for the pumpkin shell and raised ribs.
- Warm cream — matching yarn — approximately 10–15 g — used for the underside panel.
- Dark brown — worsted yarn — approximately 10–15 g — used for the pumpkin stem.
- Olive green — worsted yarn — approximately 12–15 g — used for the leaf and curled vine.
- Blush pink — scrap yarn — used for two cheek patches.
- Black or dark brown embroidery floss — scrap amount — used for the smile.
Tools
- 4.0 mm crochet hook
- 12 mm safety eyes
- Polyester stuffing, approximately 90–110 g
- Long yarn needle
- Standard tapestry needle
- Locking stitch marker
- Dressmaking pins
- Scissors
Current pumpkin-turtle patterns document 12 mm safety eyes for chunky constructions, while lighter worsted versions may use 6 mm eyes. Plastic eyes should be replaced with securely embroidered features when the finished figure is intended for a child under three.
Abbreviations
- MR — magic ring
- sc — single crochet
- inc — two single crochet stitches in one stitch
- dec — invisible single crochet decrease
- sl st — slip stitch
- ch — chain
- hdc — half double crochet
- dc — double crochet
- tr — treble crochet
- BLO — back loop only
- FLO — front loop only
An invisible decrease passes through the front loops of the next two stitches before one single crochet is completed through both loops.
Pattern — Step by Step
Work stuffed pieces in continuous spirals unless a row or joined round is specified. Mark the first stitch of every round and verify the total before moving the marker.
Head
Yarn: pale sage green — Source: standard six-stitch amigurumi math.
R1: 6 sc in MR (6)
R2: inc ×6 (12)
R3: (sc, inc) ×6 (18)
R4: (2 sc, inc) ×6 (24)
R5: (3 sc, inc) ×6 (30)
R6–R10: sc around (30)
R11: (3 sc, dec) ×6 (24)
R12: sc around (24)
R13: (2 sc, dec) ×6 (18)
R14: (sc, dec) ×6 (12)
R15: sc around (12)
R16: dec ×6 (6)
Insert the 12 mm eyes between R7 and R8 with approximately seven visible stitches between the posts. Begin stuffing after R11 and fill the cheek and forehead areas before the rear center.
Fasten off. Leave a 30 cm tail and close the six remaining front loops.
Body Base
Yarn: pale sage green — Source: standard six-stitch amigurumi math.
R1: 6 sc in MR (6)
R2: inc ×6 (12)
R3: (sc, inc) ×6 (18)
R4: (2 sc, inc) ×6 (24)
R5: (3 sc, inc) ×6 (30)
R6: (4 sc, inc) ×6 (36)
R7–R10: sc around (36)
R11: (4 sc, dec) ×6 (30)
R12: sc around (30)
R13: (3 sc, dec) ×6 (24)
R14: (2 sc, dec) ×6 (18)
R15: sc around (18)
R16: (sc, dec) ×6 (12)
R17: dec ×6 (6)
Stuff to approximately 70 percent firmness. The upper body must remain compressible because the pumpkin shell will sit directly over it.
Fasten off. Leave a 35 cm sewing tail.
Cream Underside Patch
Yarn: warm cream — Source: standard flat-circle math.
R1: 6 sc in MR (6)
R2: inc ×6 (12)
R3: (sc, inc) ×6 (18)
R4: (2 sc, inc) ×6 (24)
R5: (3 sc, inc) ×6 (30)
Do not stuff. Stretch the completed circle gently into an oval before attachment so it covers the lower center of the body without reaching the leg bases.
Fasten off. Leave a 30 cm sewing tail.
Front Legs (Make 2)
Yarn: pale sage green.
R1: 6 sc in MR (6)
R2: inc ×6 (12)
R3: (sc, inc) ×6 (18)
R4–R7: sc around (18)
R8: (sc, dec) ×6 (12)
R9–R10: sc around (12)
R11: dec ×6 (6)
Stuff R1–R7 firmly enough to maintain the rounded forward end. Keep the final three rounds softer so the leg can angle outward from the shell.
Fasten off. Leave a 25 cm sewing tail.
Back Legs (Make 2)
Yarn: pale sage green.
R1: 6 sc in MR (6)
R2: inc ×6 (12)
R3: (sc, inc) ×6 (18)
R4–R6: sc around (18)
R7: (sc, dec) ×6 (12)
R8: sc around (12)
R9: dec ×6 (6)
Stuff slightly less firmly than the front pair. Their shorter length keeps the rear of the turtle low beneath the pumpkin shell.
Fasten off. Leave a 25 cm sewing tail.
Tail
Yarn: pale sage green.
R1: 6 sc in MR (6)
R2: sc around (6)
R3: sc around (6)
R4: dec ×3 (3)
Add only a pinch of stuffing. Flatten the final opening and keep the tail under approximately 4 cm long.
Fasten off. Leave a 15 cm sewing tail.
Cheek Patches (Make 2)
Yarn: blush pink — Source: standard flat-circle math.
R1: 6 sc in MR (6)
R2: inc ×6 (12)
Do not stuff. Flatten both circles completely.
Fasten off. Leave a 12 cm sewing tail.
Pumpkin Shell
Yarn: pumpkin orange — Source: standard six-stitch amigurumi math.
R1: 6 sc in MR (6)
R2: inc ×6 (12)
R3: (sc, inc) ×6 (18)
R4: (2 sc, inc) ×6 (24)
R5: (3 sc, inc) ×6 (30)
R6: (4 sc, inc) ×6 (36)
R7–R11: sc around (36)
R12: (4 sc, dec) ×6 (30)
R13: sc around (30)
Do not close into a full sphere. Add a shallow layer of stuffing concentrated near the crown and leave the 30-stitch lower edge flexible.
Fasten off. Leave a 45 cm sewing tail.
Raised Pumpkin Rib Cords (Make 6)
Yarn: pumpkin orange.
Ch 27.
Starting in the second chain from the hook, sl st in each chain across (26 sl st).
Measure the first cord from the lower shell edge across the dome to the opposite lower edge. Adjust the foundation length before making the remaining five.
Fasten off. Leave a 20 cm sewing tail at each end.
Attach the Pumpkin Ribs
Place six removable markers around the lower shell edge at equal intervals.
Pin one cord over the shell dome from one marked point, through the top center and down to the opposite side.
Sew the cord to the shell approximately every 8–10 mm. Repeat with the other cords until six raised vertical divisions surround the shell.
Keep the cord itself raised. Sewing too tightly flattens it and turns the rib into a seam rather than a visible pumpkin ridge.
Brown Stem
Yarn: dark brown.
R1: 6 sc in MR (6)
R2–R6: sc around (6)
R7: (2 sc, inc) ×2 (8)
R8–R9: sc around (8)
R10: (3 sc, inc) ×2 (10)
R11: sc around (10)
Stuff R7–R11 lightly and leave the upper half almost empty. Curve the upper section several degrees toward the rear.
Fasten off. Leave a 25 cm sewing tail.
Large Pumpkin Leaf
Yarn: olive green.
Row 1: ch 12
Row 2: starting in second ch from hook: sl st, sc, hdc, dc, 2 tr, dc, hdc, sc, sl st; work 3 sc in the final chain.
Continue along the opposite side:
sl st, sc, hdc, dc, 2 tr, dc, hdc, sc, sl st.
Pinch the foundation chain lightly to form a raised central vein. The finished leaf should measure approximately 7–9 cm long.
Fasten off. Leave a 25 cm sewing tail.
Leaf Edge Texture
Continue in olive green.
Join at the leaf base and work around the edge:
(sl st in next st, sc in next st, ch 1, sc in same st) repeat along both sides as evenly as possible.
Use the increases sparingly so the leaf edge becomes irregular without forming a full ruffle.
Fasten off and leave a 15 cm attachment tail.
Curled Pumpkin Vine
Yarn: olive green.
Ch 31.
Starting in the second chain from the hook, work 2 sc into every chain across.
The strip should coil automatically. Do not stretch the spiral straight after finishing.
Fasten off. Leave a 20 cm attachment tail.
Smile
Yarn: black or dark brown embroidery floss.
Bring the embroidery yarn up approximately one crochet round below the center point between the eyes.
Make one shallow curved line measuring approximately 15–18 mm wide.
Keep the smile narrow enough that its ends remain inside the inner edges of the pink cheek patches.
Secure the thread inside the head and bury the ends.
Assembly
- Sew the cream underside patch to the lower body first, keeping its edge clear of all four future leg positions.
- Attach the head to the front of the body with the eye line level and the lower face projecting slightly beyond the body edge.
- Sew the pink cheek patches below the eyes, embroider the small smile, then check the complete face from directly in front.
- Attach the two larger front legs low on the body and angle them slightly forward and outward.
- Pin the shorter rear legs on both sides, add the small tail at the rear center and place the turtle on a flat surface before fixing all three pieces permanently.
- Complete the orange shell, attach all six raised rib cords and confirm that they meet cleanly around the top center before adding the pumpkin crown pieces.
- Sew the brown stem into the shell center, place the olive leaf beside its base and attach the curled vine behind the leaf.
- Pin the completed shell over the body so its front edge finishes just behind the head and its sides overhang the body by similar amounts.
- Sew the shell around its complete 30-stitch lower edge, adding a small amount of stuffing only where the dome appears flat.
- Weave every structural tail through at least 4 cm of dense fabric, reverse direction once and trim after the end retracts beneath the stitches.
The completed turtle should rest on all four legs with the pumpkin shell centered over the body, six visible ribs aligned around the crown and the stem remaining upright without pulling the shell backward.
7 Technical Tips
- Buried turtle head: A shell positioned more than about 10 mm too far forward covers the rear of the head and shortens the neck visually. Pin the shell only after the head is sewn and keep its front edge just behind the head-body seam.
- Shell too spherical: Dense stuffing in every shell round turns the orange dome into a ball. Concentrate filling near the top and leave the lower 2–3 cm relatively soft so the shell settles across the body.
- Visible decrease holes: Loose decreases can expose stuffing through light sage yarn. Work every decrease through the two front loops and keep its tension equal to neighboring single crochet stitches.
- Unequal leg height: Permanently sewing one leg before placing the other three can lift one side of the turtle by 5–10 mm. Pin all four legs and test the figure on a level surface before closing the seams.
- Flattened pumpkin ribs: Sewing a raised cord through every stitch removes its rounded profile. Fix each cord approximately every 8–10 mm and catch only shallow shell loops.
- Leaf rotation: A 7–9 cm leaf attached only at its base can turn behind the stem. Add a second concealed fixing stitch roughly 10 mm along the center vein while leaving the outer leaf free.
- Loose vine spiral: One single crochet per foundation chain produces a nearly straight cord. Work two single crochet stitches in each of the 30 chains and attach only the first 1–2 cm so the rest of the coil remains visible.
Conclusion
Check the shell from directly above before sewing it to the turtle because misaligned pumpkin ribs become harder to correct after the lower edge is fixed. Next, set the assembled figure on a level surface and compare the front-leg height, shell overhang and stem position from both sides. Adjust those points before burying structural tails. Share the finished pumpkin turtle amigurumi crochet pattern project on Pinterest with a vertical fall photograph, then post a close view of the shell ribs, leaf and curled vine on Instagram using #PumpkinTurtleAmigurumi. For this turtle specifically, would you keep the classic orange pumpkin shell or make the next version cream with sage-green ribs?









