Introduction
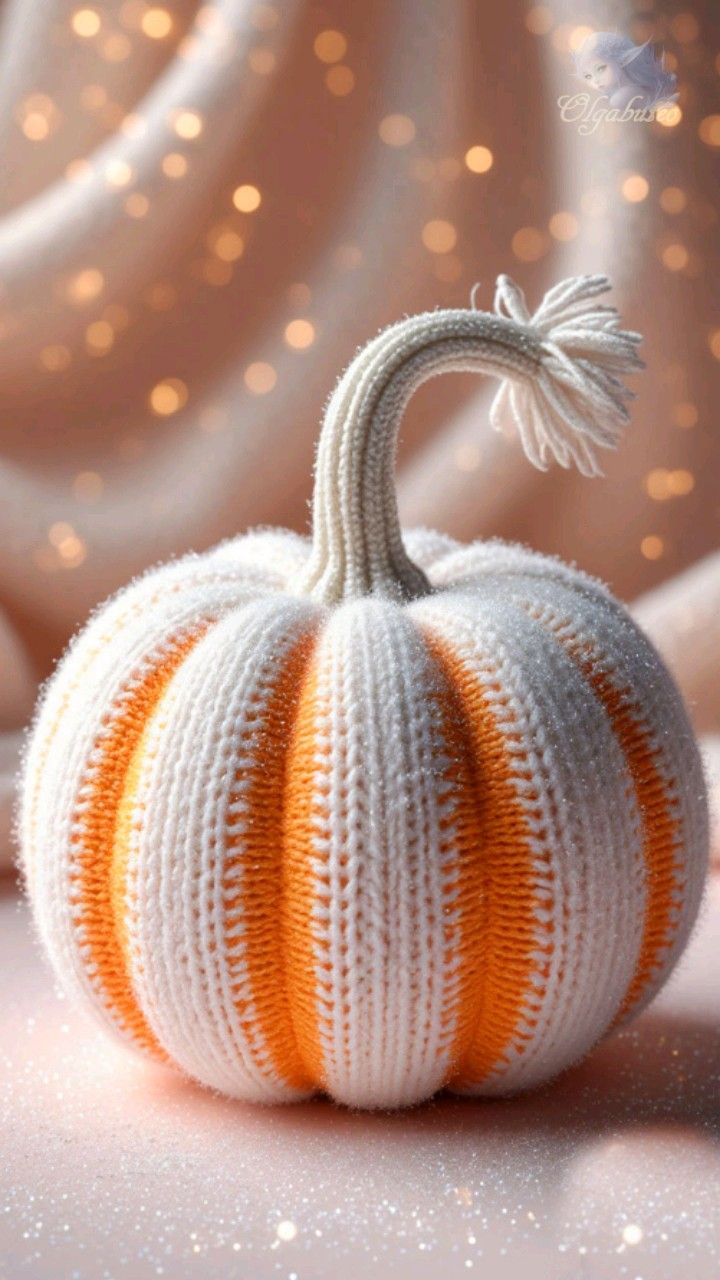
A white pumpkin only keeps its shape when the orange channels stay narrow enough to read as recessed ribs rather than broad color blocks. This striped crochet pumpkin pattern uses worsted or Aran yarn, a 4 mm hook and post-stuffing sculpting to make an approximately 20 cm pumpkin. Six orange channels, broad white lobes and a long curved stem reproduce the supplied fall-decor design.
The Design: What Makes This Pumpkin Different
The body reaches a 42-stitch plateau because the reference pumpkin is broad and low rather than tall and narrow. White remains the dominant surface color, while six orange stripes are positioned exactly where the later sculpting strands will form the deepest grooves. That alignment matters. If the orange sections drift away from the final ribs, the pumpkin looks striped rather than naturally segmented. The long stem is another structural difference. Instead of a short stump, this design uses a narrow tube that bends into a hook before finishing with a loose fringe tip. One common mistake in a two color pumpkin crochet project is making the accent stripes too wide. Keep each orange section visually narrower than the adjacent white lobe so the white remains the body color and the orange acts as depth.
Project Info at a Glance
| Skill Level | Time | Finished Size | Hook | Best For |
|---|---|---|---|---|
| Intermediate | 6–8 hours | Approx. 20 cm wide × 22 cm high including stem | 4.0 mm | Fall table decor, shelf styling and seasonal centerpieces |
Materials and Tools
Yarn
- Soft white / ivory — worsted / Aran yarn — approximately 120–140 g — used for the six broad pumpkin lobes.
- Pumpkin orange — matching worsted / Aran yarn — approximately 55–70 g — used for the six vertical stripe channels.
- Pale gray-green or warm cream — matching worsted yarn — approximately 20–25 g — used for the long stem and tassel tip.
Tools
- 4.0 mm crochet hook
- Polyester stuffing, approximately 140–170 g
- Long tapestry or doll needle
- Standard yarn needle
- Locking stitch marker
- Dressmaking pins
- Scissors
Use a hook size that produces a dense fabric with no visible stuffing. If your worsted yarn is especially soft or loosely spun, moving down to 3.5 mm will strengthen the rib definition.
Abbreviations
- MR — magic ring
- sc — single crochet
- inc — two single crochet stitches in one stitch
- dec — invisible single crochet decrease
- sl st — slip stitch
- ch — chain
- BLO — back loop only
- FLO — front loop only
An invisible decrease is worked through the front loops of the next two stitches before one single crochet is completed through both loops.
Pattern — Step by Step
Work the stuffed body in a continuous spiral. The orange stripe positions are added afterward as controlled surface channels so the color placement can be aligned exactly with the sculpted ribs.
Pumpkin Body
Yarn: soft white — Source: standard six-stitch amigurumi math.
R1: 6 sc in MR (6)
R2: inc ×6 (12)
R3: (sc, inc) ×6 (18)
R4: (2 sc, inc) ×6 (24)
R5: (3 sc, inc) ×6 (30)
R6: (4 sc, inc) ×6 (36)
R7: (5 sc, inc) ×6 (42)
R8–R14: sc around (42)
R15: sc around (42)
R16: (5 sc, dec) ×6 (36)
R17: (4 sc, dec) ×6 (30)
R18: (3 sc, dec) ×6 (24)
R19: (2 sc, dec) ×6 (18)
R20: (sc, dec) ×6 (12)
R21: dec ×6 (6)
Begin stuffing after R16. Pack the center firmly, but keep the top and bottom 2–3 cm slightly softer so the pumpkin can be compressed into a broad shape.
Fasten off. Leave a 35 cm tail and close the remaining six front loops.
Central Compression
Yarn: soft white.
Cut approximately 90 cm of yarn and thread the long needle. Insert through the bottom center, pass through the complete pumpkin and exit at the top center.
Return to the bottom through the same central channel and pull until the pumpkin shortens by approximately 1–1.5 cm.
The body should widen slightly. Stop pulling before the center becomes hard or sharply indented.
Secure temporarily and leave the tail accessible until the rib positions are finalized.
Mark Six Rib Positions
View the pumpkin from directly above. Use six removable stitch markers around the widest circumference, spacing them as evenly as possible.
Each marker identifies one future orange stripe and one sculpted groove.
Do not begin surface color work until all six positions look evenly spaced from above and from the side.
Orange Stripe 1
Yarn: pumpkin orange — original surface-stripe construction.
Attach orange yarn near the bottom center. Surface sl st upward in a straight line toward the top center, following one marked rib position.
At the top center, turn and work a second parallel line downward approximately one stitch-width beside the first.
The finished stripe should measure roughly 8–12 mm wide, depending on yarn thickness.
Fasten off and leave both tails inside the pumpkin.
Orange Stripes 2–6
Repeat the same two-line surface construction at the remaining five marked rib positions.
All six stripes must begin and finish close to the exact bottom and top centers. Unequal endpoints make the finished pumpkin appear twisted.
Fasten off each stripe separately.
First Pair of Sculpted Ribs
Yarn: orange or white; use orange if you want the groove color to deepen visually.
Cut approximately 120 cm of yarn. Anchor at the bottom center and carry the strand along the center of Orange Stripe 1 to the top center.
Pass the needle through the stuffed body and return to the bottom. Pull gradually until the stripe sinks into a visible groove.
Repeat on the stripe directly opposite it.
The groove should sit about 8–12 mm below the fullest point of the neighboring white lobes.
Second Pair of Sculpted Ribs
Repeat the same shaping process on the next pair of opposite orange stripes.
After both grooves are tightened, set the pumpkin down and compare the width of the four visible white lobes.
Redistribute stuffing before increasing tension if one lobe remains noticeably narrower.
Third Pair of Sculpted Ribs
Shape the final two opposite orange stripe channels.
View the pumpkin from above and adjust all six strands until the lobes appear even.
Every orange stripe should lie at the lowest point of a rib groove rather than on the rounded face of a white lobe.
Knot securely at the bottom center and bury the tails through the stuffing.
Long Curved Stem
Yarn: pale gray-green or warm cream — original long-stem construction.
R1: 6 sc in MR (6)
R2–R8: sc around (6)
R9: (2 sc, inc) ×2 (8)
R10–R13: sc around (8)
R14: (3 sc, inc) ×2 (10)
R15–R18: sc around (10)
R19: (4 sc, inc) ×2 (12)
R20–R21: sc around (12)
Stuff R12–R21 lightly. Leave the upper half nearly empty so the stem can bend into a long hook without forming hard angles.
Fasten off. Leave a 40 cm sewing tail.
Stem Base Disc
Yarn: same stem color.
R1: 6 sc in MR (6)
R2: inc ×6 (12)
R3: (sc, inc) ×6 (18)
Keep the disc flat. It spreads the stem seam across the compressed pumpkin center.
Fasten off. Leave a 25 cm sewing tail.
Stem Tassel Tip
Yarn: same stem color.
Cut 10–12 strands of yarn approximately 12 cm long.
Fold the strands in half. Pull the folded bundle through the open upper section of the stem or through two adjacent stem stitches, then secure the fold with a short wrap of matching yarn.
Trim the finished fringe to approximately 5–6 cm. Leave the strands uneven by a few millimeters so the end does not look mechanically cut.
Optional Stem Ridge Lines
Yarn: same stem color.
Thread a needle with approximately 50 cm of yarn. Make three long surface stitches from the stem base toward the bend.
Pull lightly enough to create shallow channels only.
Deep compression can prevent the stem from forming a smooth curve.
Fasten off and bury the ends inside the stem.
Assembly
- Finish and stuff the white pumpkin body before adding any orange stripe work, keeping the center firm and the top and bottom slightly softer.
- Compress the pumpkin vertically by approximately 1–1.5 cm so the body becomes broader and closer to the reference proportions.
- Mark six equally spaced rib positions around the widest circumference and inspect the layout from directly above.
- Work six narrow orange surface stripes from bottom center to top center, keeping each channel approximately 8–12 mm wide.
- Run one sculpting strand along the middle of every orange stripe and tighten the channels in three opposite pairs.
- Set the pumpkin on a level surface and compare the six white lobe widths before making the final shaping knots.
- Sew the 18-stitch stem base disc over the top center, covering the meeting point of the orange stripes and sculpting strands.
- Attach the long stem around its 12-stitch base and curve the unstuffed upper section into a hook similar to the reference.
- Add the tassel fringe to the stem tip and trim the strands only after the final stem curve has been established.
- Weave every structural tail through at least 4–5 cm of dense crochet, reverse direction once and trim only after the ends retract beneath the stitches.
The completed pumpkin should rest on a broad base with six white lobes, six recessed orange channels and a stem that bends without collapsing.
7 Technical Tips
- Orange stripes too wide: A channel wider than about 12 mm begins to read as a full orange lobe. Keep the accent stripe narrow and let the surrounding white sections remain visually dominant.
- Twisted rib layout: Stripes that do not meet the same top and bottom centers make the entire pumpkin spiral. Mark all six positions before surface stitching and check the alignment from directly above.
- Visible decrease holes: White yarn exposes stuffing quickly when decreases are loose. Work each decrease through the two front loops and keep its tension equal to the surrounding single crochet stitches.
- Hard pumpkin center: Maximum tension on six sculpting strands compresses the stuffing into a dense core. Stop tightening once each groove sits approximately 8–12 mm below the neighboring white lobes.
- Uneven lobes: Adjusting only the sculpting yarn cannot correct a badly distributed stuffing pocket. Move filling from a narrow lobe into a wide one before retightening the relevant strand.
- Stem kinking: Stuffing the full 21-round stem firmly creates angular bends instead of one smooth curve. Leave at least the upper half almost empty and shape the hook after attachment.
- Tassel droop: Fringe longer than about 6 cm overwhelms the narrow stem tip and pulls it downward. Trim the finished bundle to 5–6 cm and secure it close to the stem opening.
Conclusion
Check the orange channels before fixing the stem because the top attachment will hide the only easy access to all six rib endpoints. Next, place the pumpkin on a level surface and compare the lobe widths from the front, side and top. Correct any stripe that sits more than about 1 cm off the average spacing before burying the shaping tails. Share the completed striped crochet pumpkin pattern project on Pinterest with a vertical fall photograph, then post a close view of the orange rib channels and curved stem on Instagram using #StripedCrochetPumpkin. For this pumpkin specifically, would you keep the long tassel-tipped stem or shorten it to a compact traditional stem?









