Introduction
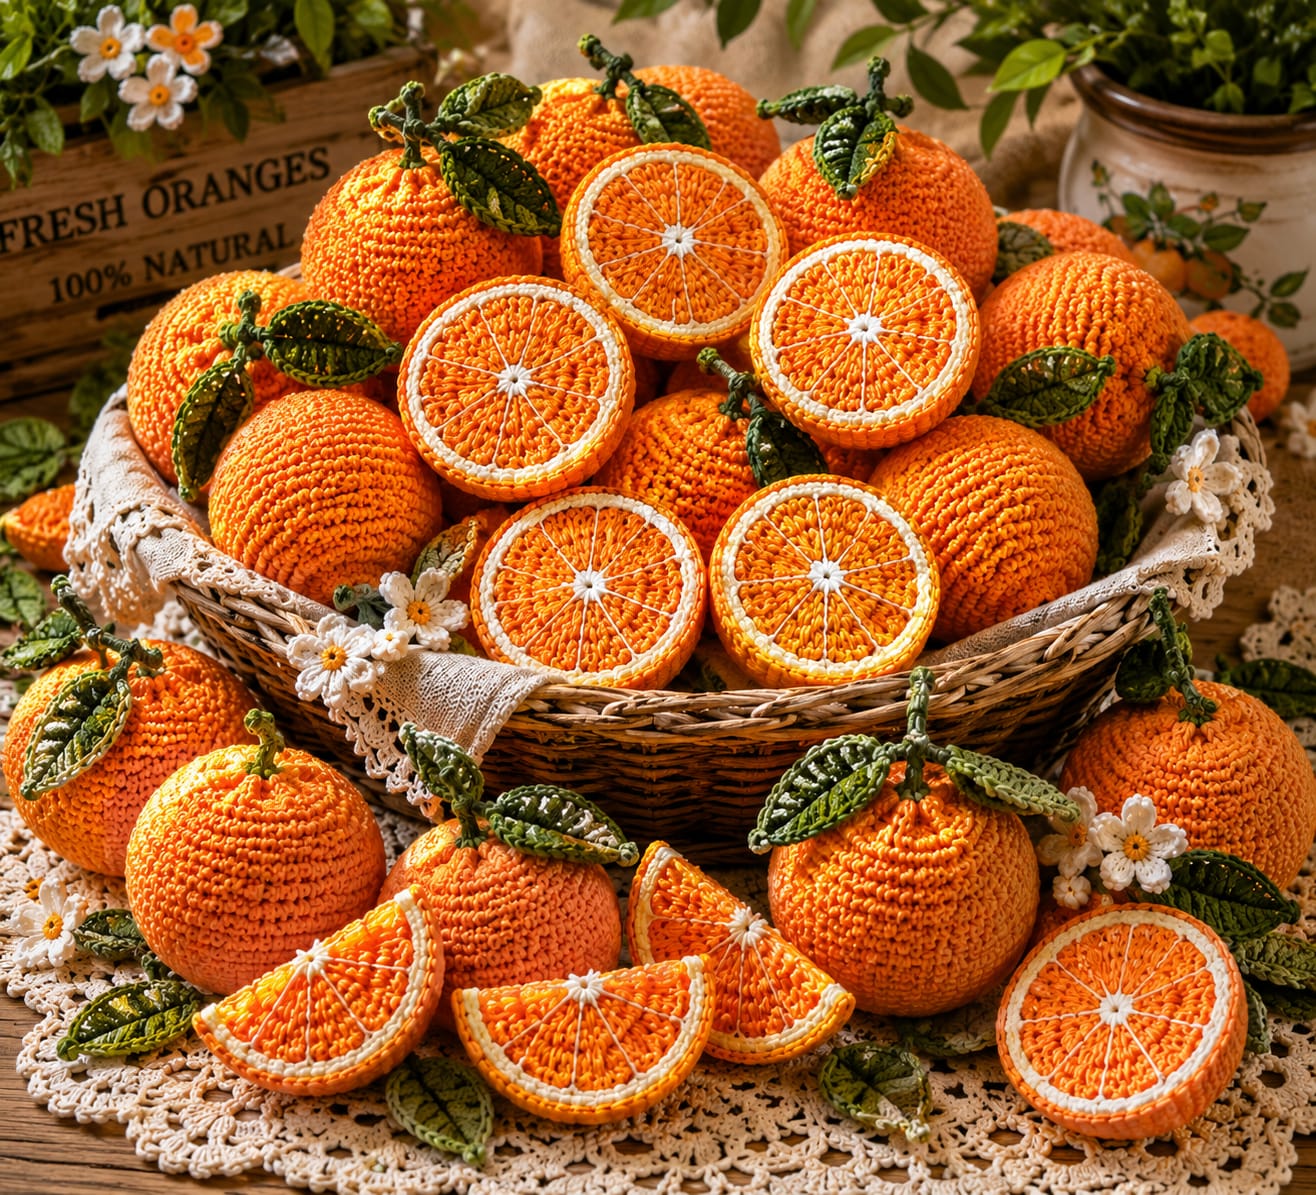
An orange only reads as citrus when the rind, pith ring and radial segments agree on the same center. This crochet orange pattern uses fine cotton yarn and a 2 mm hook to make whole fruit, cut halves and wedges at approximately 7–9 cm scale. The intermediate project also includes stems, dimensional leaves and embroidered segment membranes for a complete realistic crochet fruit set.
The Design: What Makes This Crochet Orange Set Different
The whole orange uses a controlled 36-stitch circumference rather than an oversized sphere, which keeps the proportions close to the photographed fruit while leaving enough surface area for a textured rind. Cut pieces use a second construction method. Their orange flesh is worked as a flat radial disc, surrounded by a narrow cream pith ring and joined to a shallow orange rind shell. White embroidery then divides the face into citrus segments without adding excessive thickness. The crochet orange slice and wedge pieces use the same color hierarchy, so every component belongs to one visual set. A frequent mistake with realistic crochet citrus is making the white pith too wide. Keep it to roughly one crochet round. A thick white border makes the fruit resemble a decorative coaster rather than a cut orange.
Project Info at a Glance
| Skill Level | Time | Finished Size | Hook | Best For |
|---|---|---|---|---|
| Intermediate | 2–3 hours per whole fruit | Approx. 7 cm diameter; about 9 cm including stem | 2.0 mm | Play food, kitchen display, market sets and citrus decor |
Materials and Tools
Yarn
- Bright orange — super-fine / weight 1 cotton or cotton blend — approximately 15–20 g per whole fruit.
- Cream white — matching fine cotton — approximately 2–3 g per cut orange — used for pith rings and segment membranes.
- Dark leaf green — fine cotton — approximately 2–3 g per fruit with leaves.
- Olive green — fine cotton — approximately 1–2 g — optional for leaf-vein contrast.
- White embroidery thread — small amount — used for the radial membranes on cut fruit.
Tools
- 2.0 mm crochet hook
- Polyester stuffing
- Yarn needle
- Embroidery needle
- Locking stitch marker
- Dressmaking pins
- Scissors
Cotton gives the rind and cut surfaces clearer stitch definition than very fuzzy yarn. If sport-weight cotton is substituted, test one whole orange first because the finished diameter will increase.
Abbreviations
- MR — magic ring
- sc — single crochet
- inc — two single crochet stitches in one stitch
- dec — invisible single crochet decrease
- sl st — slip stitch
- ch — chain
- hdc — half double crochet
- dc — double crochet
- BLO — back loop only
- FLO — front loop only
An invisible decrease is worked through the front loops of the next two stitches before completing one single crochet through both loops.
Pattern — Step by Step
Use continuous spirals for the stuffed fruit pieces unless the instructions specify joined rounds. Mark the first stitch of each round and check the total before moving the marker.
Whole Orange
Yarn: bright orange — Source: standard six-stitch amigurumi math.
R1: 6 sc in MR (6)
R2: inc ×6 (12)
R3: (sc, inc) ×6 (18)
R4: (2 sc, inc) ×6 (24)
R5: (3 sc, inc) ×6 (30)
R6: (4 sc, inc) ×6 (36)
R7–R14: sc around (36)
R15: (4 sc, dec) ×6 (30)
R16: (3 sc, dec) ×6 (24)
R17: (2 sc, dec) ×6 (18)
R18: (sc, dec) ×6 (12)
R19: dec ×6 (6)
Begin stuffing after R15. Fill the center firmly but keep the top and bottom poles slightly softer so they can be indented.
Fasten off. Leave a 20 cm tail and close the remaining six front loops.
Whole Orange Shaping
Yarn: matching orange.
Thread approximately 45 cm of orange yarn through the needle. Enter through the bottom center, pass through the complete stuffed fruit and exit at the top center.
Return through the fruit to the bottom and pull only until the top develops a shallow depression of approximately 3–5 mm.
Do not cinch tightly enough to create pumpkin-like vertical grooves. A citrus fruit should remain broadly spherical.
Secure the shaping yarn inside the bottom stitches and bury the tail.
Stem
Yarn: dark green.
R1: 6 sc in MR (6)
R2–R4: sc around (6)
Do not stuff. Flatten the final round slightly.
Fasten off. Leave a 15 cm tail and sew the stem into the top depression.
Large Leaves (Make 2 per selected orange)
Yarn: dark or olive green.
Row 1: ch 10
Row 2: starting in second ch from hook: sl st, sc, hdc, dc, 2 dc, hdc, sc, sl st; work 2 sc in the final chain, then continue along the opposite side with sl st, sc, hdc, 2 dc, dc, hdc, sc, sl st.
Pinch the foundation chain slightly so it forms a raised central vein.
Fasten off. Leave a 15 cm sewing tail.
Small Leaves (Make as Needed)
Yarn: dark green.
Row 1: ch 7
Row 2: starting in second ch from hook: sl st, sc, hdc, dc, hdc, sc; work 2 sc in the final chain, then continue along the opposite side with sc, hdc, dc, hdc, sc, sl st.
Curve the leaf while it is still slightly damp from blocking if a more natural angle is required.
Fasten off. Leave a 12 cm tail.
Half Orange — Rind Shell
Yarn: bright orange — make one shell for each half orange.
R1: 6 sc in MR (6)
R2: inc ×6 (12)
R3: (sc, inc) ×6 (18)
R4: (2 sc, inc) ×6 (24)
R5: (3 sc, inc) ×6 (30)
R6: (4 sc, inc) ×6 (36)
R7–R10: sc around (36)
Do not decrease. The open 36-stitch edge will be joined to the cut-face disc.
Fasten off. Leave a 35 cm sewing tail.
Half Orange — Flesh Disc
Yarn: bright orange.
R1: 6 sc in MR (6)
R2: inc ×6 (12)
R3: (sc, inc) ×6 (18)
R4: (2 sc, inc) ×6 (24)
R5: (3 sc, inc) ×6 (30)
R6: (4 sc, inc) ×6 (36)
Keep the disc flat. Steam or wet block lightly if the center begins to dome.
Do not fasten off if the cream pith ring will be worked immediately.
Half Orange — Cream Pith Ring
Change to cream white.
R7: sc around (36)
One round is enough. A wider cream band will overpower the orange flesh.
Fasten off. Leave a 30 cm sewing tail.
Half Orange — Radial Segment Lines
Thread the embroidery needle with cream-white thread.
Mark six evenly spaced points on the outer edge of the orange flesh, excluding the cream pith ring.
Bring the thread up through the center and make one straight stitch from the center to each marked point. Add a second line halfway between each first line for a total of 12 narrow segment divisions.
Keep every stitch on the surface. Pulling the embroidery through the back of the disc can distort its circular edge.
Secure the embroidery tail behind the flesh disc.
Half Orange — Assembly
Place the finished flesh disc over the open rind shell with the cream pith facing outward.
Sew through one stitch of the cream edge and one stitch of the orange shell around approximately three-quarters of the circumference.
Add stuffing until the rind becomes a firm shallow hemisphere. Continue sewing and close the final opening.
The cut face should remain nearly flat while the orange rind projects behind it.
Full Round Orange Slice
Yarn: orange and cream — make two matching panels for a slightly padded slice.
R1: with orange, 6 sc in MR (6)
R2: inc ×6 (12)
R3: (sc, inc) ×6 (18)
R4: (2 sc, inc) ×6 (24)
R5: (3 sc, inc) ×6 (30)
R6: change to cream, (4 sc, inc) ×6 (36)
R7: change back to orange, sc around (36)
Make two identical panels. Add radial cream embroidery to the front panel before joining.
Place the panels wrong sides together and sc around through both layers. Add only a thin layer of stuffing before closing.
Fasten off and weave the tail into the rind edge.
Orange Wedge — Front Panel
Yarn: bright orange — worked in turning rows to create a semicircle.
Row 1: 6 sc in MR, do not join (6)
Row 2: ch 1, turn, inc across (12)
Row 3: ch 1, turn, (sc, inc) ×6 (18)
Row 4: ch 1, turn, (2 sc, inc) ×6 (24)
Row 5: ch 1, turn, (3 sc, inc) ×6 (30)
The piece should form an open semicircular fan rather than a complete disc.
Orange Wedge — Pith and Rind
Continue across the curved outer edge only.
Row 6: with cream, sc evenly across curved edge
Row 7: change to orange, sc evenly across curved edge
Fasten off. Leave a 25 cm sewing tail.
Orange Wedge — Back Panel
Yarn: bright orange.
Repeat Rows 1–5 of the front panel. Add one orange sc edging row along the curved outer edge.
No pith or embroidery is needed on the back.
Fasten off. Leave a 25 cm sewing tail.
Orange Wedge — Segment Lines and Assembly
Use cream-white thread to make five or six straight surface stitches from the center of the straight edge toward the curved rind.
Place the front and back panels together. Sc or whipstitch around the complete perimeter, adding a thin strip of stuffing before closing.
Do not overfill. The wedge should remain flatter than a half orange.
Fasten off and bury the tail.
Optional Raised Rind Texture
Yarn: matching orange.
After completing a whole fruit, make scattered surface slip stitches between existing crochet stitches. Work short groups of two to four stitches rather than continuous rings.
Keep the texture subtle. Dense surface crochet changes the circumference and can pull the fruit out of round.
Fasten off and bury each tail inside the fruit.
Assembly
- Complete and stuff every whole orange before attaching any stems or leaves so the top depression can be shaped accurately.
- Sew each green stem into the center of the shallow top indentation and pass the attachment yarn through at least four surrounding orange stitches.
- Attach one or two leaves beside selected stems, fixing both the leaf base and a second point approximately 5 mm along the center vein.
- Embroider all radial segment lines on the flat half-orange faces before joining them to their rind shells.
- Join each cream-edged cut-face disc to its 36-stitch rind shell and stuff only until the rind holds a shallow hemispherical profile.
- Complete round slices by joining two flat panels and adding only enough filling to separate the front and back surfaces.
- Make the wedge pairs, embroider their segment membranes and close the edges with a narrow strip of stuffing inside.
- Compare all cream pith borders and correct any section wider than approximately one crochet round before burying the tails.
- Arrange the completed fruit together and check that whole oranges, halves and wedges share the same orange, cream and green color values.
- Weave every structural tail through at least 3–4 cm of matching fabric, reverse direction once and trim only after the end retracts beneath the stitches.
The completed citrus set should contain spherical whole fruit, shallow hemispherical halves and flatter wedges while maintaining the same rind and pith proportions throughout.
7 Technical Tips
- Flattened whole orange: Overpacking the final decrease rounds creates a hard oval instead of a sphere. Fill firmly through the center, then use smaller pieces of stuffing near the 12- and 6-stitch closures.
- Visible decrease holes: Standard decreases can expose pale stuffing through bright orange cotton. Work through the two front loops and keep the decrease tension equal to the neighboring single crochet stitches.
- Oversized pith: Two or three cream rounds create a white border that is too dominant for a 7 cm orange. Limit the visible pith to approximately one 3–4 mm crochet round.
- Off-center segments: Beginning the embroidery without marking the circumference produces unequal wedges. Mark six opposite pairs first, then add the intermediate divisions for 12 radial sections.
- Leaf rotation: A leaf sewn only through its base can spin around the stem. Add one concealed fixing stitch approximately 5 mm along the center vein while leaving the tip free.
- Bulging cut face: Overstuffing a half orange forces the flat citrus disc outward. Stop adding filling when the rind shell reaches its full curve and keep pressure away from the center of the cut face.
- Wedge distortion: A thick layer of stuffing turns the semicircle into a crescent-shaped pillow. Use a strip no thicker than approximately 10–12 mm and distribute it mainly along the curved rind edge.
Conclusion
Check the cut surfaces before making a full basket because radial embroidery is the detail most likely to reveal inconsistent scale. The next practical step is to complete one whole orange, one half and one wedge, then place the three pieces together and compare rind thickness, pith width and leaf size. Correct those proportions before batch production. Share the finished crochet orange pattern project on Pinterest with a basket-style vertical photograph, then post a close view of the embroidered citrus segments on Instagram using #RealisticCrochetOranges. For this orange set specifically, would you keep every fruit bright orange or add a few smaller green-tinted mandarins for variation?









