Introduction
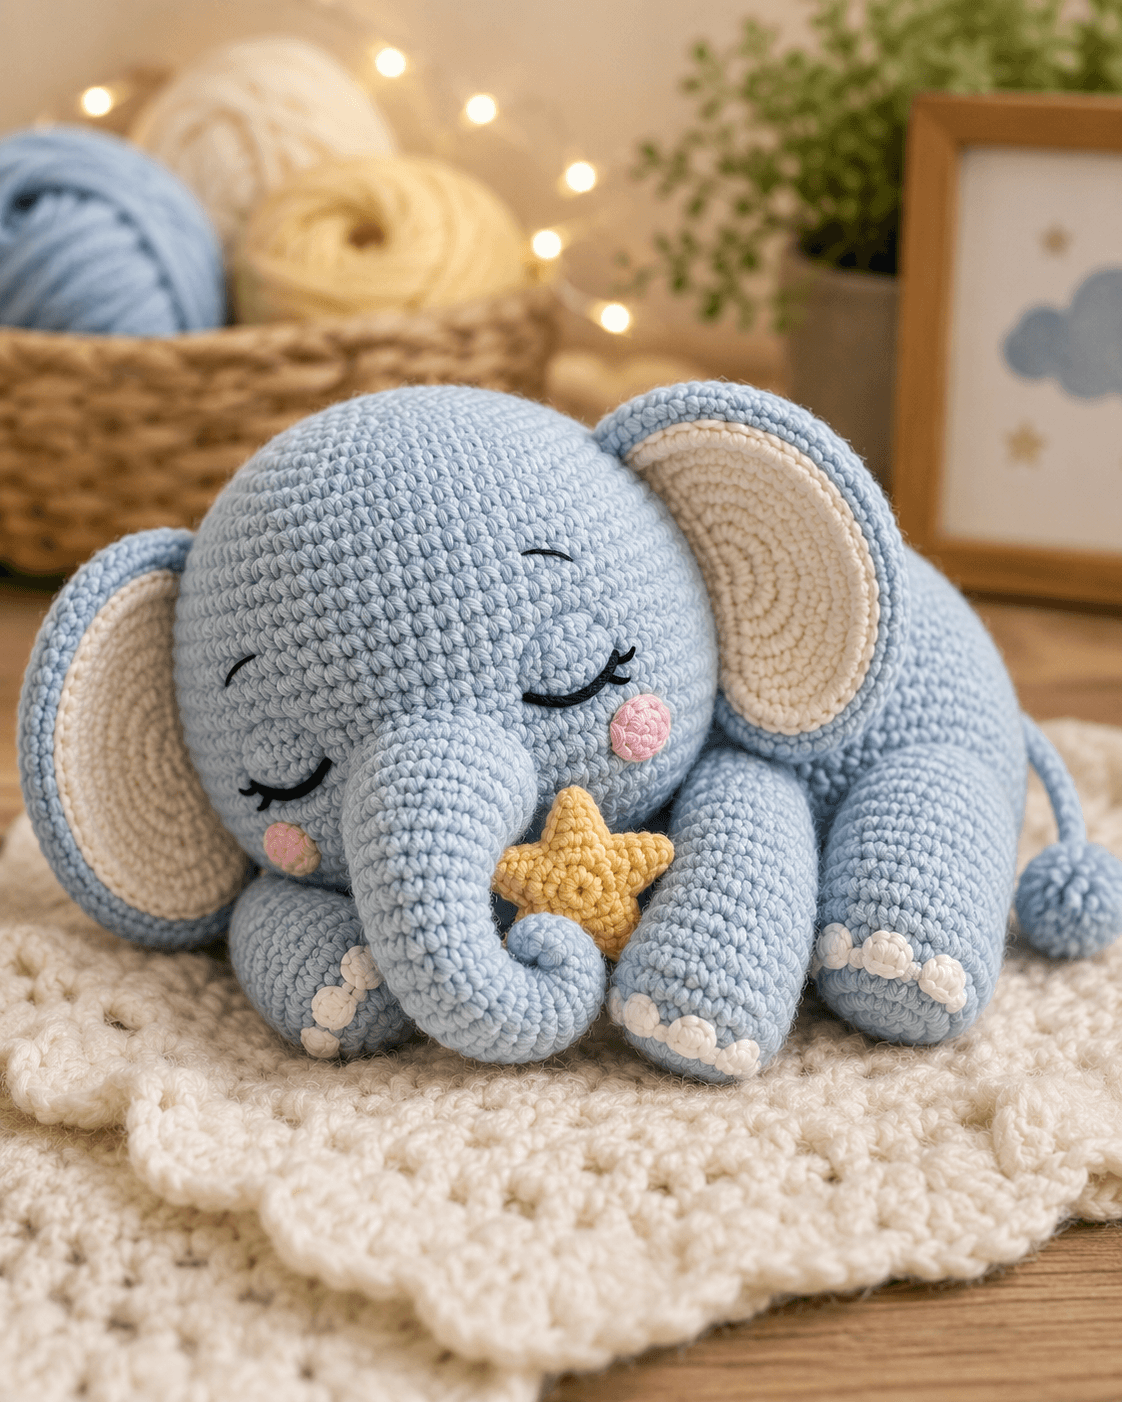
An elephant cannot look asleep if its trunk projects rigidly forward; the curve has to settle between the forelegs and stop above the star. This sleeping elephant amigurumi crochet pattern uses DK yarn, a 3.5 mm hook, embroidered eyes, oversized layered ears, and a five-point yellow star. The finished elephant measures approximately 20–24 cm high and 30–35 cm long, making the reclined shape suitable for nursery display or a large soft toy.
The Design: What Makes This Sleeping Elephant Different
The head carries most of the visual mass, so it expands to 42 stitches while the torso stops at 36. That difference creates the rounded baby-elephant proportion visible in the reference. Large cream-lined ears are worked separately and attached behind the head; they must remain flat enough to frame the face without pushing it forward. The trunk curves down between the front legs instead of pointing outward, which reinforces the sleeping position and leaves space for the star. This sleeping elephant crochet pattern also uses embroidered lashes rather than plastic eyes. The third major decision concerns the legs: they are attached in a tucked pose instead of supporting the body. One common maker error is overstuffing the front limbs. Thick, rigid arms will not fold inward around the star and can lift the head away from the intended resting position.
Project Info at a Glance
| Skill Level | Time | Finished Size | Hook | Best For |
|---|---|---|---|---|
| Intermediate | 10–14 hours | Approx. 20–24 cm high × 30–35 cm long | 3.5 mm | Nursery display, large soft toy, sleeping-animal collection |
Materials and Tools
Yarn
- Powder blue — DK / light worsted — approximately 180–220 g — head, trunk, body, ears, legs, and tail
- Cream / warm white — DK / light worsted — approximately 55–70 g — inner ears and toenails
- Blush pink — DK yarn — approximately 5–10 g — cheek patches
- Golden yellow — DK yarn — approximately 15–20 g — stuffed star
- Black embroidery yarn — small amount — closed eyes, lashes, and eyebrows
Tools
- 3.5 mm crochet hook
- Polyester stuffing
- Long yarn needle
- Embroidery needle
- Locking stitch markers
- Straight pins
- Scissors
Abbreviations
MR — magic ring
sc — single crochet
inc — increase, 2 sc in one stitch
dec — invisible decrease
sl st — slip stitch
ch — chain
hdc — half double crochet
dc — double crochet
tr — treble crochet
BLO — back loop only
For an invisible decrease, work through the front loops of the next two stitches before completing one single crochet.
Pattern — Step by Step
Work stuffed pieces in continuous spirals unless stated otherwise. The following construction is an original photo-matched pattern using standard amigurumi shaping.
Head
Yarn: powder blue — Source: Standard amigurumi math.
R1: 6 sc in MR (6)
R2: inc ×6 (12)
R3: (sc, inc) ×6 (18)
R4: (2 sc, inc) ×6 (24)
R5: (3 sc, inc) ×6 (30)
R6: (4 sc, inc) ×6 (36)
R7: (5 sc, inc) ×6 (42)
R8: sc around (42)
R9: sc around (42)
R10: sc around (42)
R11: sc around (42)
R12: sc around (42)
R13: sc around (42)
R14: sc around (42)
R15: (5 sc, dec) ×6 (36)
R16: (4 sc, dec) ×6 (30)
R17: (3 sc, dec) ×6 (24)
Stuff the forehead and sides firmly. Keep the lower-front face slightly softer where the trunk will be attached.
R18: (2 sc, dec) ×6 (18)
R19: (sc, dec) ×6 (12)
R20: dec ×6 (6)
Fasten off and close.
Curved Trunk
Yarn: powder blue — Source: Standard amigurumi math.
R1: 6 sc in MR (6)
R2: inc ×6 (12)
R3: (sc, inc) ×6 (18)
R4: sc around (18)
R5: sc around (18)
R6: (sc, dec) ×6 (12)
R7: sc around (12)
R8: sc around (12)
R9: sc around (12)
R10: sc around (12)
R11: (sc, dec) ×4 (8)
R12: sc around (8)
R13: sc around (8)
R14: sc around (8)
R15: (2 sc, dec) ×2 (6)
R16: sc around (6)
R17: sc around (6)
R18: sc around (6)
Stuff firmly through R8, lightly through R13, and leave the last five rounds almost empty. Curve the tip inward while sewing.
Fasten off with a 35 cm tail.
Body
Yarn: powder blue — Source: Standard amigurumi math.
R1: 6 sc in MR (6)
R2: inc ×6 (12)
R3: (sc, inc) ×6 (18)
R4: (2 sc, inc) ×6 (24)
R5: (3 sc, inc) ×6 (30)
R6: (4 sc, inc) ×6 (36)
R7: sc around (36)
R8: sc around (36)
R9: sc around (36)
R10: sc around (36)
R11: sc around (36)
R12: sc around (36)
R13: sc around (36)
R14: sc around (36)
R15: (4 sc, dec) ×6 (30)
R16: (3 sc, dec) ×6 (24)
Stuff firmly through the rear body and more lightly near the neck attachment.
R17: (2 sc, dec) ×6 (18)
R18: (sc, dec) ×6 (12)
R19: dec ×6 (6)
Fasten off and close.
Front Legs — Make 2
Yarn: powder blue — Source: Standard amigurumi math.
R1: 6 sc in MR (6)
R2: inc ×6 (12)
R3: (sc, inc) ×6 (18)
R4: sc around (18)
R5: sc around (18)
R6: sc around (18)
R7: (sc, dec) ×6 (12)
R8: sc around (12)
R9: sc around (12)
R10: sc around (12)
R11: sc around (12)
R12: sc around (12)
Stuff the paw and lower half. Leave the top three rounds lightly stuffed so the limb can fold inward.
Fasten off with a 30 cm sewing tail.
Back Legs — Make 2
Yarn: powder blue — Source: Standard amigurumi math.
R1: 6 sc in MR (6)
R2: inc ×6 (12)
R3: (sc, inc) ×6 (18)
R4: (2 sc, inc) ×6 (24)
R5: sc around (24)
R6: sc around (24)
R7: sc around (24)
R8: (2 sc, dec) ×6 (18)
R9: sc around (18)
R10: sc around (18)
R11: (sc, dec) ×6 (12)
R12: sc around (12)
Stuff the feet firmly but keep the final two rounds flexible for the reclining seam.
Fasten off with a 35 cm sewing tail.
Outer Ears — Make 2
Yarn: powder blue — Source: Standard flat-circle shaping.
R1: 6 sc in MR (6)
R2: inc ×6 (12)
R3: (sc, inc) ×6 (18)
R4: (2 sc, inc) ×6 (24)
R5: (3 sc, inc) ×6 (30)
R6: (4 sc, inc) ×6 (36)
R7: sc around (36)
Join with sl st.
Do not stuff.
Fasten off with a 40 cm tail.
Inner Ears — Make 2
Yarn: cream — Source: Standard flat-circle shaping.
R1: 6 sc in MR (6)
R2: inc ×6 (12)
R3: (sc, inc) ×6 (18)
R4: (2 sc, inc) ×6 (24)
R5: (3 sc, inc) ×6 (30)
Join with sl st.
Fasten off with a 30 cm tail.
Pin one cream circle slightly low and forward on each blue ear. Stitch around the cream edge, leaving an even blue border visible.
Pink Cheek Patches — Make 2
Yarn: blush pink — Source: Standard amigurumi math.
R1: 6 sc in MR (6)
R2: inc ×6 (12)
Join with sl st.
Fasten off with a sewing tail.
Toenails — Make 12
Yarn: cream — Source: Standard amigurumi math.
R1: 6 sc in MR (6)
R2: sc around (6)
Fasten off.
Do not stuff.
Sew three toenails to the end of each leg.
Tail
Yarn: powder blue — Source: Standard amigurumi math.
R1: 6 sc in MR (6)
R2: inc ×6 (12)
R3: (sc, dec) ×4 (8)
R4: sc around (8)
R5: sc around (8)
R6: sc around (8)
R7: sc around (8)
R8: sc around (8)
R9: sc around (8)
R10: sc around (8)
Stuff only the final rounded end.
Fasten off with a 30 cm tail.
Tail Tuft
Yarn: powder blue.
R1: 6 sc in MR (6)
R2: inc ×6 (12)
R3: sc around (12)
R4: dec ×6 (6)
Stuff lightly.
Fasten off and sew to the tail tip.
Yellow Star — Make 2 Panels
Yarn: golden yellow — Source: Standard five-point crochet-star construction.
R1: 10 sc in MR (10)
For each of five points:
ch 5, sl st in second ch from hook, sc in next ch, hdc in next ch, dc in next ch, skip 1 base stitch, sl st in next base stitch.
Repeat until five points are complete.
Fasten off the first panel.
Make the second panel without cutting the yarn.
Place both panels WS together.
Sc evenly around the perimeter, working through both layers.
Add a small amount of stuffing before closing the final point.
Fasten off with a 25 cm sewing tail.
Sleeping Eyes and Eyebrows
Yarn: black embroidery yarn.
Mark each closed eye approximately 2.5–3 cm long.
Position the eye lines symmetrically on either side of the trunk.
Embroider each eye as a shallow downward curve.
Add three short lashes, approximately 4–6 mm long, at the outer edge.
Work one short eyebrow approximately 1.5 cm above each eye.
Keep the eyebrows shallower than the eyelashes so the face remains visually relaxed.
Assembly
- Pin the trunk to the lower center of the head, beginning below the eye line, and sew around its 18-stitch base while curving the narrow end inward.
- Position the cream inner panels on both blue ears, sew them flat, then pin the finished ears behind the sides of the head so the upper edges rise slightly above the crown.
- Embroider both sleeping eyes, three lashes at each outer corner, and the two short eyebrows before attaching the head to the body.
- Sew the two pink cheek circles below the eye lines and slightly outward from the trunk, keeping their centers at equal height.
- Attach the head to the front-upper body with a slight downward angle so the trunk naturally falls toward the space between the front legs.
- Sew the two back legs low on the body in a tucked forward position, then attach three cream toenails to each visible foot.
- Position both front legs beneath the head and curve them inward; stitch three cream toenails to each paw before fixing the limbs around the star.
- Sew the tail to the rear body and bend the narrow section outward so the rounded tuft remains visible beside the hindquarters.
- Place the yellow star between the front legs and below the trunk, then add two or three hidden stitches through the rear star panel into the paws so it cannot rotate.
- Weave all tails into matching-color stitches, set the elephant on a flat surface, and adjust the head, trunk, ears, legs, and star until the entire body reads as one reclining sleeping pose.
The completed elephant should rest low on its body with the ears framing the head, the trunk descending between the forelegs, and the yellow star held directly below the face.
7 Technical Tips
- Trunk spring-back: A fully stuffed six-stitch trunk tip becomes too rigid to curve naturally. Leave approximately the final five rounds almost empty and form the bend before attaching the base.
- Ear droop: An outer ear attached along less than 4 cm of its upper edge can rotate backward. Pin at least 4–5 cm of the blue ear base to the head while leaving the lower half free.
- Closed-eye mismatch: A difference of even 5 mm in eye length becomes obvious on a face with no open pupils. Mark both 2.5–3 cm curves with removable thread before embroidering them permanently.
- Foreleg stiffness: Dense stuffing in the upper three rounds prevents the paws from folding around the star. Concentrate filling in the first 7–8 rounds and leave the sewing end flexible.
- Head lift: Attaching the head too vertically makes the elephant appear alert rather than asleep. Tilt the face downward approximately 10–15 degrees before completing the neck seam.
- Toenail crowding: Three six-stitch nail bumps packed into a narrow paw can overlap. Position the center nail first and place the outer two approximately 6–8 mm away.
- Star rotation: A single central stitch allows the five-point star to twist while handled. Tack the back panel to both paws at two separate points spaced approximately 2 cm apart.
Shaping the Sleeping Head
The head is deliberately larger than the body. A 42-stitch plateau creates enough width for the trunk, broad ear attachments, embroidered lashes, cheeks, and the large forehead visible in the photograph.
Keep the stuffing density different across the head. The crown and sidewalls should be firm because they support the ears. The lower-front face can remain slightly softer so the trunk seam sits flush rather than forming a hard ridge.
The head angle matters after assembly. A horizontal face reads as resting; a slightly downward face reads as sleeping. Raising the face even a small amount changes the character immediately.
Building the Trunk Curve
Current sleeping-elephant competition sometimes uses pipe cleaners for additional trunk shaping. :contentReference[oaicite:15]{index=15} The photo reference does not require a rigid internal support because the trunk bends downward and rests against the front-leg area.
Control the curve with stuffing distribution instead.
Pack the first half of the trunk firmly. Reduce the amount as the circumference narrows from 18 to 12, eight, and six stitches.
Before sewing, curve the final section toward the center of the body. Add one concealed tack between the underside of the trunk and a nearby front leg if the tip repeatedly straightens.
Making the Oversized Layered Ears
The ears carry almost as much visual importance as the trunk.
Each outer blue ear reaches a 36-stitch circumference. The cream inner panel stops at 30, leaving a visible blue border after attachment.
Do not stuff either layer.
Pin the cream portion slightly forward rather than perfectly centered. The reference shows a stronger blue rim across the upper and outer edges.
Once the inner panel is attached, flatten the complete ear under a book or blocking mat for several hours if it twists. The fabric needs to remain broad and flat when sewn to the head.
Positioning the Embroidered Sleeping Eyes
This baby elephant crochet pattern depends on embroidery rather than hardware.
The closed eye should sit outside the trunk attachment and below the horizontal center of the head. Use a smooth black yarn thinner than the main DK yarn so the curve does not become bulky.
Three lashes are enough. More lashes can make the outer corner disproportionately dark.
Place the eyebrow above the inner half of each eye instead of directly over its entire length. That preserves the wide sleeping forehead visible in the image.
Creating the Reclined Body
The torso is smaller than the head and works to a 36-stitch maximum.
Unlike an upright amigurumi, the body does not need a flat base. Its primary role is to support the head, rear legs, forelegs, and tail while remaining mostly hidden behind those pieces.
Stuff the back half firmly enough that the elephant does not flatten after several hours on a shelf.
Keep the upper-front section slightly softer. That gives the head seam a larger contact area and allows the face to tilt down without forming a visible gap.
Arranging the Tucked Legs
The reference does not use four weight-bearing limbs.
The back legs lie forward and outward, while the front legs fold toward the center. This produces the curled sleeping silhouette.
Attach both hind legs before the arms. They establish the final width of the elephant.
Then pin the front legs with the yellow star between them. Their inner edges should nearly touch the star, but the star should remain visible beneath the trunk.
Do not sew the upper arm around its complete circumference. A flatter seam allows the arm to rotate inward naturally.
Constructing the Yellow Star
The star is small enough to remain an accessory rather than competing with the elephant’s head.
Two flat five-point panels create cleaner edges than working a deeply stuffed star as one spherical piece.
Use only a thin layer of fiberfill.
The center should rise slightly while the five points remain defined. Excess stuffing rounds off the points and produces a flower-like shape.
Attach the star only after both front legs have been pinned. Its final position depends on how far the forelegs fold inward.
Yarn and Hook Selection
Published elephant patterns vary from DK construction with a 2.5 mm hook to plush sleeping-elephant construction with a 6 mm hook. :contentReference[oaicite:16]{index=16}
The supplied image shows clear individual stitches and smoother fabric than a heavy velvet plush. DK or light worsted yarn with a 3.5 mm hook therefore gives a closer visual match.
Work the first seven head rounds as a gauge test.
If the 42-stitch fabric exposes filling under moderate stretch, reduce the hook to 3.25 mm. If the fabric becomes stiff enough that shaping the head is difficult, move to 3.75 mm.
Estimating Yarn Consumption
A current plush Sleeping Elephant pattern reports using slightly more than one skein of Alize Velluto for its main color, though the indexed listing does not state an exact gram total. :contentReference[oaicite:17]{index=17}
For this DK construction, weighing the completed head gives the most useful personal estimate.
If the head and trunk use 70 g of blue yarn, the body and four limbs will typically require substantially more because they contain greater total surface area.
Reserve additional blue yarn for both 36-stitch ears and the tail.
Buy all main-color balls together because powder blue shades can vary noticeably between dye lots.
Competition Gap
Current elephant amigurumi patterns cover seated elephants, standing elephants, loveys, snugglers, open-eyed plush toys, and dedicated sleeping elephants. Etsy alone currently indexes more than a hundred elephant sleep-toy related results. :contentReference[oaicite:18]{index=18}
The supplied design is more specific. Its oversized head is almost resting on the paws, both eyes are fully embroidered closed, the ears are lined with large cream panels, the toes carry twelve separate cream nail bumps, and the elephant holds a small yellow star directly beneath its curved trunk.
Those details create a useful gap for an elephant holding star crochet project rather than another standard upright elephant.
Finishing Checks
Place the finished elephant on a flat surface before burying the final sewing tails.
Both hind legs should rest naturally instead of lifting the body.
View the face directly from the front. The closed eyes need equal length, both cheek circles should sit at comparable heights, and the trunk should fall between them without leaning strongly left or right.
Check each ear next. Similar amounts of cream should remain visible.
Finally, look from above. The head should overlap the front body, the paws should frame the star, and the tail tuft should remain visible behind one side of the reclining body.
Conclusion
Complete the 42-stitch head, trunk, and layered ears before attaching the limbs because those pieces establish the scale and resting angle of this sleeping elephant amigurumi crochet pattern. Embroider both eyes before joining the head to the body, then place the hind legs, fold the softer front limbs inward, and secure the yellow star beneath the trunk. Record the finished ear width and head angle before making another version so the sleeping pose can be repeated accurately. Share the close-up face on Pinterest and the completed elephant on Instagram with #SleepingStarElephant. Would you keep the star golden yellow, or switch it to cream to match the inner ears?









