Introduction
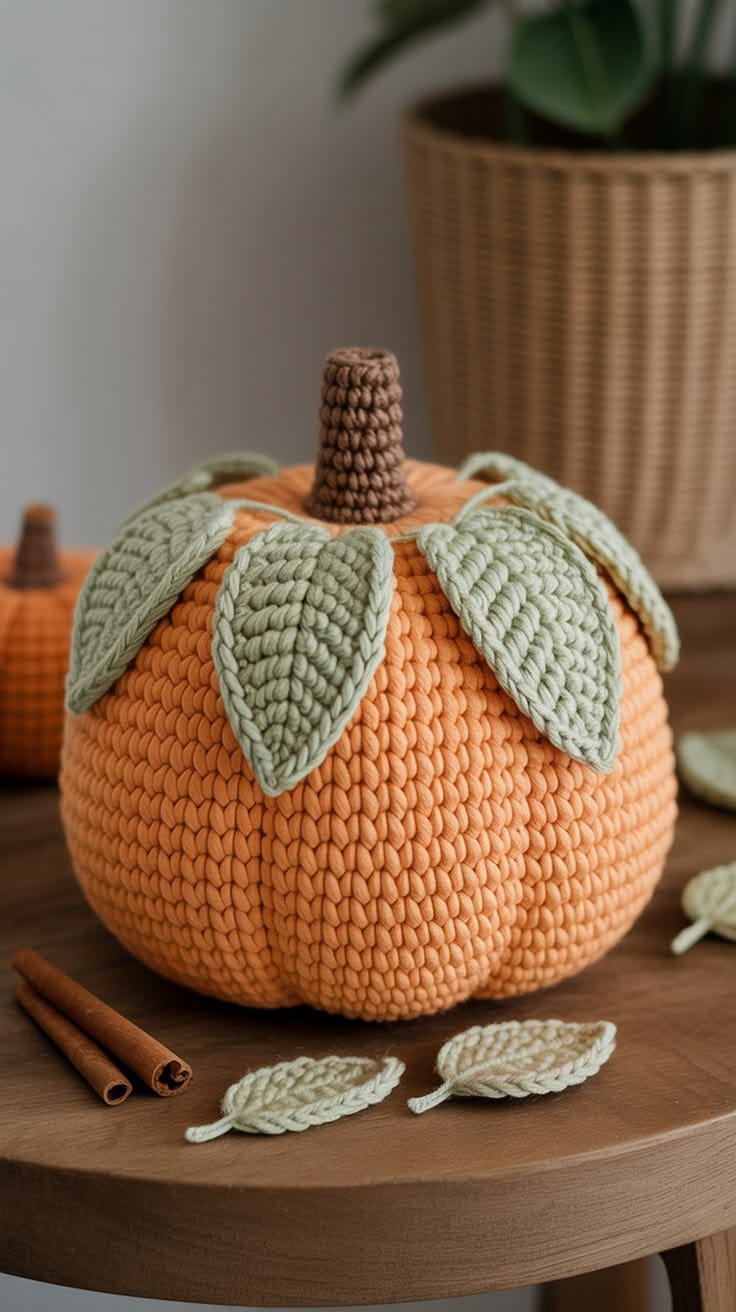
A pumpkin this round only reads correctly when six deep grooves pull the stuffed sphere inward from stem to base. This large crochet pumpkin pattern uses super-bulky yarn, a 7 mm hook, a 42-stitch body, six sage leaves, and a tall brown stem. The finished piece measures approximately 28–32 cm across. Its sectional shaping makes it useful as substantial autumn table, shelf, or entryway décor.
The Design: What Makes This Pumpkin Different
The body begins as one continuous stuffed form rather than six separate wedges. Its pumpkin shape comes later, when six long sculpting strands divide the sphere into equal sections and compress the surface into deep vertical grooves. The crown carries six oversized sage leaves, each wide enough to overlap the orange shoulder slightly. That proportion separates this chunky crochet pumpkin from patterns that use one small leaf or a thin tendril. A 12-stitch brown stem adds height without dominating the top. The orange body remains intentionally plain because the sculpted lobes provide the main texture. One frequent maker error is pulling the ridge strands before the body has been filled firmly. A soft center collapses around the thread and produces narrow dents rather than six rounded pumpkin sections.
Project Info at a Glance
| Skill Level | Time | Finished Size | Hook | Best For |
|---|---|---|---|---|
| Intermediate | 6–9 hours | Approx. 28–32 cm diameter | 7.0 mm | Autumn table décor, shelf display, centerpiece |
Materials and Tools
Yarn
- Pumpkin orange — #6 super-bulky yarn — approximately 300–380 g — main pumpkin body
- Sage green — #6 super-bulky or compatible bulky yarn — approximately 70–100 g — six leaves
- Medium brown — #6 super-bulky yarn — approximately 25–35 g — stem
- Orange strong yarn or upholstery thread — approximately 8–10 m — ridge sculpting
Tools
- 7.0 mm crochet hook
- Polyester fiberfill
- Long upholstery or doll-making needle
- Large-eye yarn needle
- Locking stitch marker
- Rust-resistant pins
- Sharp scissors
- Measuring tape
Abbreviations
MR — magic ring
sc — single crochet
inc — increase, 2 sc in one stitch
dec — invisible decrease
sl st — slip stitch
ch — chain
hdc — half double crochet
dc — double crochet
tr — treble crochet
BLO — back loop only
For an invisible decrease, pass the hook through the front loops of the next two stitches, draw up one loop, then complete a single crochet through the remaining loops.
Pattern — Step by Step
Work the stuffed body and stem in continuous spirals unless stated otherwise. Keep a marker in the first stitch of every round.
Large Pumpkin Body
Yarn: pumpkin orange.
R1: 6 sc in MR (6)
R2: inc ×6 (12)
R3: (sc, inc) ×6 (18)
R4: (2 sc, inc) ×6 (24)
R5: (3 sc, inc) ×6 (30)
R6: (4 sc, inc) ×6 (36)
R7: (5 sc, inc) ×6 (42)
R8: sc around (42)
R9: sc around (42)
R10: sc around (42)
R11: sc around (42)
R12: sc around (42)
R13: sc around (42)
R14: sc around (42)
R15: sc around (42)
R16: sc around (42)
R17: sc around (42)
R18: sc around (42)
R19: sc around (42)
R20: sc around (42)
Begin stuffing. Pack the lower center first, then add fiberfill evenly around the sides. Keep the shape slightly wider than tall.
R21: (5 sc, dec) ×6 (36)
R22: (4 sc, dec) ×6 (30)
R23: (3 sc, dec) ×6 (24)
Add more stuffing before the opening becomes narrow. Press the sides outward while keeping the top and bottom slightly flatter.
R24: (2 sc, dec) ×6 (18)
R25: (sc, dec) ×6 (12)
Finish filling firmly. The surface should resist a light finger press because the later sculpting will compress the body substantially.
R26: dec ×6 (6)
Fasten off with a 25 cm tail.
Thread the tail through the remaining six front loops and pull closed.
Sculpting the Six Pumpkin Ridges
Yarn: strong orange yarn or a matching strong thread.
Cut a strand approximately 140–160 cm long.
Thread the long needle.
Insert the needle through the bottom center and bring it out through the top center.
Run the strand down the outside of the pumpkin and re-enter through the bottom center.
Pull until one distinct groove forms.
Pass the needle through the center again and create the second groove directly opposite the first.
Divide each half into thirds.
Repeat until six evenly spaced sections surround the pumpkin.
Each outer section should occupy approximately one-sixth of the circumference.
Pull the strands in stages rather than tightening one ridge completely before forming the remaining five.
Once all six grooves match, knot securely at the bottom center and bury the ends inside the body.
Brown Stem
Yarn: medium brown.
R1: 6 sc in MR (6)
R2: inc ×6 (12)
R3: BLO sc around (12)
R4: sc around (12)
R5: sc around (12)
R6: sc around (12)
R7: sc around (12)
R8: sc around (12)
R9: sc around (12)
Stuff firmly enough to keep the stem upright but leave the final round flexible for sewing.
Fasten off with a 35 cm sewing tail.
Large Sage Leaves — Make 6
Yarn: sage green. Work around both sides of the foundation chain.
Ch 13.
Starting in the second ch from hook:
sl st in next ch,
sc in next ch,
hdc in next 2 ch,
dc in next 3 ch,
tr in next 2 ch,
dc in next ch,
hdc in next ch,
3 sc in final ch.
Continue along the opposite side of the foundation chain:
hdc in next ch,
dc in next ch,
tr in next 2 ch,
dc in next 3 ch,
hdc in next 2 ch,
sc in next ch,
sl st in final ch.
Ch 1.
Fasten off with a 30 cm sewing tail.
The leaf should measure approximately 14–17 cm long depending on yarn thickness.
Leaf Edging — Make on Each Leaf
Use the same sage yarn.
Join at the stem end.
Sl st evenly around the complete outer edge.
At the pointed tip, work:
(sl st, ch 1, sl st)
Continue down the second edge.
Fasten off.
Raised Leaf Vein
Cut approximately 35 cm of sage yarn.
Using a yarn needle, bring the strand from the back of the leaf to the front at the lower center.
Work one long surface line through the central foundation chain toward the tip.
Add three short diagonal stitches on each side if a stronger leaf-vein effect is wanted.
Secure both tails on the WS.
Optional Loose Decorative Leaves — Make 2
Yarn: light sage or cream-sage.
Ch 10.
Starting in second ch from hook:
sl st, sc, hdc, dc, dc, hdc, sc, sc, 3 sc in final ch.
Continue along the opposite side:
sc, sc, hdc, dc, dc, hdc, sc, sl st.
Ch 4 for a short stem.
Fasten off.
These loose leaves reproduce the small foreground accents visible beside the photographed pumpkin but are not attached to the main piece.
Assembly
- Finish the stuffed orange body and form all six sculpted ridges before attaching any crown components.
- Set the pumpkin on a flat table and adjust the ridge tension until the six lobes appear similar in width from directly above.
- Pin the brown stem over the top-center closure and check that it rises vertically rather than following one of the ridge channels.
- Sew the stem around its complete 12-stitch base using two passes through the orange fabric.
- Place the first sage leaf with its base tucked immediately beside the stem and its point extending down one pumpkin lobe.
- Place a second leaf approximately 60 degrees from the first, then continue until six leaves form a complete crown.
- Overlap neighboring leaf bases by approximately 1–2 cm while leaving the pointed lower halves free from the pumpkin body.
- Sew only the upper 4–5 cm of each leaf to the crown so the lower leaf tips remain dimensional rather than lying flat.
- Rotate the pumpkin and check that no large orange gap appears between adjacent crown leaves; reposition any leaf before burying its sewing tail.
- Weave all remaining tails into matching-color stitches, trim loose fibers, and place the optional leaves or cinnamon-stick props beside the finished pumpkin rather than attaching them.
The completed piece should have six rounded orange sections, a centered upright brown stem, and six sage leaves distributed evenly around the crown.
7 Technical Tips
- Shallow ridges: Sculpting thread that sits only on the surface will relax after handling. Pass every ridge strand completely through the top and bottom centers and pull until the groove measures approximately 2–3 cm deep.
- Collapsed center: A loosely stuffed 42-stitch body can fold inward when the six sculpting strands are tightened. Fill until the pumpkin resists a finger press by approximately 1 cm before beginning the ridge work.
- Uneven lobes: Placing the six strands by eye can create one wide section and several narrow ones. Mark the circumference into six equal points with locking markers before tightening any strand.
- Stem lean: A stem sewn beside the true top center will follow a groove and tilt. Mark the exact intersection of all six sculpting channels and center the 12-stitch stem over that point.
- Leaf curl: Working the slip-stitch border too tightly bends the leaf into a cup. Move to an 8 mm hook for the edging if the finished leaf loses more than 1 cm of width.
- Crown crowding: Six 15 cm leaves sewn completely flat can hide almost the entire pumpkin shoulder. Attach only the upper 4–5 cm and leave the pointed halves unsupported.
- Visible stuffing: Super-bulky yarn worked too loosely can open between the 42-stitch plateau rounds. Reduce the hook by 0.5 mm if stretched gaps approach approximately 3 mm.
How the Six-Lobe Pumpkin Shape Is Built
The body itself does not need complicated ridge stitches. It is essentially a large stuffed sphere made slightly squat by the long 42-stitch plateau.
The pumpkin silhouette appears during the sculpting stage.
A long strand passes vertically through the center of the stuffed form, travels down the outside, and returns through the middle. Pulling that strand compresses one narrow channel while the filling on either side expands outward.
Six channels divide the circumference into six lobes.
Do not work them sequentially around the pumpkin at full tension. Make the first groove, create the opposite groove second, then divide the remaining halves. This opposing sequence keeps the center from shifting sideways.
Stuffing for Deep Ridges
This ridged crochet pumpkin requires more filling than a plain spherical plush.
The sculpting strands compress a surprising amount of volume. A lightly filled body may look adequate before shaping but collapse once the channels are tightened.
Push fiberfill first into the lower circumference, then around the widest middle rounds. Add smaller pieces rather than one large wad.
The top needs enough stuffing to support the stem, but the exact top-center point should remain compressible so the ridge strands can pass through without distorting the crochet stitches.
After closing R26, roll the body gently between both hands. The filling should feel evenly distributed without obvious hollow pockets.
Choosing the Correct Pumpkin Proportions
The reference is broad rather than tall.
The orange body should measure roughly the same distance from side to side as it does from the upper shoulder to the lower curve, with the stem adding the final height.
If your body becomes elongated vertically, reduce the number of 42-stitch plateau rounds by two.
If it appears flattened before sculpting, add two extra 42-stitch rounds.
Do this on the unshaped body. Once the ridges are installed, their tension can alter the height by several centimeters.
Constructing the Tall Brown Stem
The photographed stem is much taller than the short knobs used on many crochet pumpkins.
Nine rounds at a 12-stitch circumference create a narrow cylinder that remains proportional to a 30 cm pumpkin.
The BLO round at R3 creates a slight lower edge where the stem begins to rise from its base.
Stuff the first six rounds firmly.
Use less filling near the open edge so the stem can sit flush against the curved pumpkin crown.
A flat rigid stem base leaves visible gaps between the brown and orange sections.
Making the Oversized Sage Leaves
The leaves are almost as important as the ridges in matching the photograph.
Small five-centimeter leaves would disappear against a pumpkin of this scale. Each main leaf should extend well past the upper shoulder and point downward along one orange section.
The stitch sequence grows from slip stitch through sc, hdc, dc, and tr before reversing. That progression creates a pointed oval without a separate decrease row.
Working around both sides of one foundation chain also makes the leaf symmetrical.
Six leaves are enough to surround the stem. More pieces would cover too much orange surface.
Creating a Defined Leaf Edge
The photo shows a strong sage outline around every leaf.
A final slip-stitch round produces that defined border without adding much width.
Keep the edging loose.
Before fastening off, place the leaf flat on the table. If its sides lift, undo several inches of edging and work them again with less tension.
The outer edge can also be made with single crochet for a thicker border, but that adds bulk where six leaves overlap near the stem.
Placing the Leaves Around the Crown
Think of the top of the pumpkin as a clock face.
Position the six leaf bases roughly at 12, 2, 4, 6, 8, and 10 o’clock around the stem.
They do not need to be mathematically exact, but the gaps should remain similar.
Angle each leaf so its tip follows one of the sculpted orange lobes rather than sitting directly inside a deep groove.
This makes the leaf and ridge geometry work together.
Pin every piece before sewing. Viewing the pumpkin from above is the fastest way to spot uneven spacing.
Choosing Yarn and Hook Size
Current chunky pumpkin patterns use a wide range of hook sizes. One contemporary bulky design specifies a 7 mm hook for a 22 cm pumpkin, while another #6 chenille design uses 4 mm for tighter amigurumi fabric. :contentReference[oaicite:15]{index=15}
The photographed pumpkin has large, visible stitches rather than extremely dense plush fabric. A 7 mm hook therefore suits the intended scale when paired with substantial #6 yarn.
Test six increasing rounds first.
If fiberfill becomes visible when the fabric is gently stretched, move to 6.5 mm.
If the hook repeatedly splits the yarn or the fabric becomes rigid, return to 7 mm.
Estimating Yarn for a Large Pumpkin
Published pumpkin yarn quantities vary sharply with size. A current 10 cm bulky-chenille pumpkin uses approximately 20 g of orange yarn, while larger chunky patterns increase diameter into the 20 cm range. :contentReference[oaicite:16]{index=16}
The supplied design is substantially larger and adds six oversized leaves.
A practical way to calculate personal consumption is to weigh the body after R20 but before decreasing.
If that partial body has used 230 g, reserve another 80–120 g for the decrease section, sewing, and gauge variation.
Weigh one completed sage leaf and multiply by six before cutting the remaining green yarn for decoration.
Using Strong Thread for Sculpting
The ridge yarn bears mechanical tension after the pumpkin is finished.
A loosely spun decorative yarn can break while passing repeatedly through dense fiberfill.
Use a strong matching yarn, doubled cotton, upholstery thread, or another durable strand that will disappear into the orange stitches.
A long needle is also important. It should travel through the complete pumpkin center without requiring the body to be folded sharply.
Every ridge strand needs to enter and exit at almost the same top and bottom points. Widely separated entry points produce diagonal grooves.
Competition Gap
Current pumpkin patterns use several common methods. Some crochet a BLO rectangle and gather it into a pumpkin. Others work a small amigurumi sphere, add a short stem, or use a green tendril. Recent patterns also emphasize miniature pumpkins and no-sew construction. :contentReference[oaicite:17]{index=17}
The supplied design occupies a different visual category. It is a large display piece with pronounced vertical channels, a tall straight stem, and six broad leaves that form an almost complete crown.
The absence of a face also keeps the design seasonal rather than specifically Halloween-themed.
That creates a useful gap for searches around a crochet pumpkin with leaves intended for autumn home décor.
Scaling the Pumpkin
The pattern can be resized without changing the sculpting method.
For a smaller pumpkin, stop the increase sequence at 36 stitches and work approximately nine to eleven plateau rounds.
For the photo-matched version, retain the 42-stitch maximum.
A larger version can reach 48 stitches by adding:
R8: (6 sc, inc) ×6 (48)
Then work the desired number of 48-stitch plateau rounds before reversing the increase sequence with matching decreases.
Keep six ridges regardless of size if matching the reference. Eight ridges produce a more deeply segmented traditional pumpkin silhouette.
Finishing Checks
Set the pumpkin on a hard, level surface.
The bottom should sit flat without rolling toward one ridge.
View the body from directly above. Six grooves should radiate from one center point with comparable spacing.
Check the stem next. Its axis should remain close to vertical.
Spread the six sage leaves outward and verify that no two tips stack directly on top of one another.
Finally, rotate the pumpkin through a complete turn. The orange lobes should remain rounded from every viewing angle without one compressed or overfilled section dominating the silhouette.
Conclusion
Finish and firmly stuff the 42-stitch body before adding any decorative pieces, because the six sculpted channels determine the final dimensions of this large crochet pumpkin pattern. Mark equal ridge positions, tighten them in opposing pairs, then center the brown stem and arrange the sage leaves around it. The next useful step is to weigh the completed orange body and record its diameter so a second pumpkin can be reproduced at the same scale. Share a crown close-up on Pinterest and the full autumn display on Instagram with #SageLeafCrochetPumpkin. Would you keep all six leaves sage green, or mix sage with a darker olive?









