Introduction
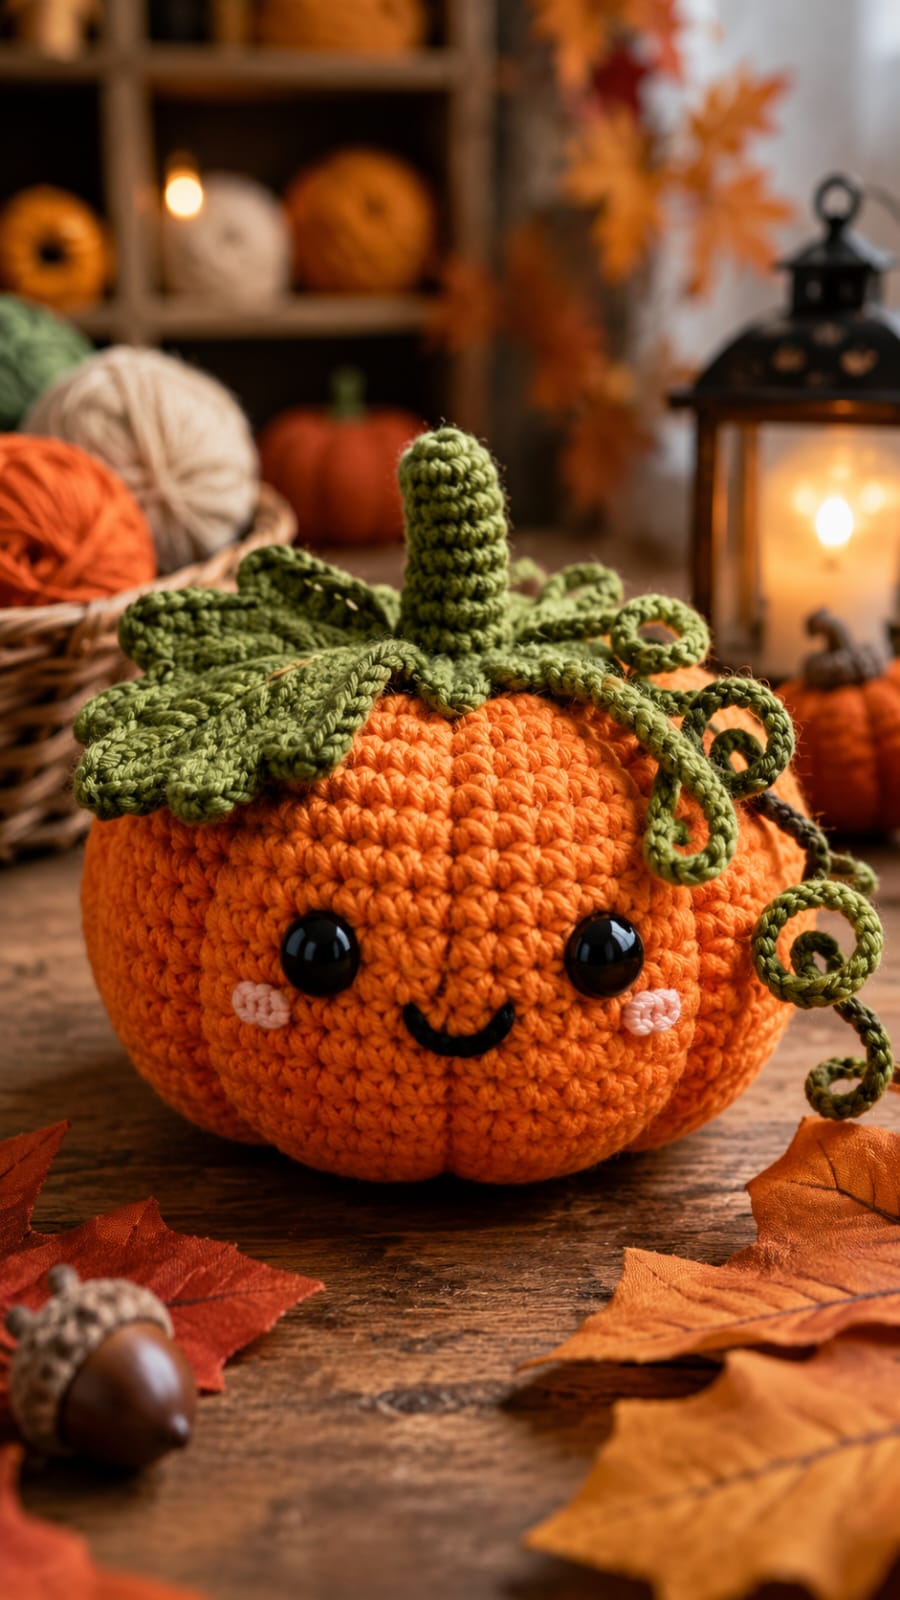
A pumpkin with eight deep lobes cannot be shaped by stuffing alone; the grooves have to be pulled through the center after the sphere is closed. This pumpkin amigurumi crochet pattern uses worsted yarn, a 4 mm hook, 18 mm eyes, six large leaves, and five spiral vines. The finished piece measures approximately 17–20 cm high and 20–23 cm wide, making it suitable for tabletop autumn décor.
The Design: What Makes This Pumpkin Different
The body begins as a 42-stitch sphere, then eight long sculpting strands pull the surface inward to create the pumpkin ribs visible in the photograph. This method produces deeper grooves than a simple BLO rectangle and keeps each orange section broadly rounded. The face is positioned on one lobe so the eyes do not disappear into a crease. Above it, a tall green stem supports a dense crown of overlapping leaves, while several crocheted spirals fall across the right side. That makes this cute crochet pumpkin pattern more dimensional than a basic fall pumpkin crochet pattern. A frequent construction mistake is sculpting the grooves before the body is fully stuffed. The wrapping strands then compress soft areas unevenly, producing narrow lobes on one side and wide lobes on the other.
Project Info at a Glance
| Skill Level | Time | Finished Size | Hook | Best For |
|---|---|---|---|---|
| Intermediate | 6–9 hours | Approx. 17–20 cm high × 20–23 cm wide | 4.0 mm | Autumn décor, Halloween display, seasonal centerpiece |
Materials and Tools
Yarn
- Pumpkin orange — worsted / medium #4 — approximately 140–180 g — main pumpkin body
- Olive green — worsted / medium #4 — approximately 45–60 g — stem, leaves, vines, and sculptural top details
- Blush pink — worsted / medium #4 — approximately 5–10 g — cheek patches
- Black — small amount — embroidered smile
Tools
- 4.0 mm crochet hook
- 18 mm safety eyes ×2
- Polyester fiberfill
- Long upholstery or doll needle for pumpkin sculpting
- Standard yarn needle
- Locking stitch markers
- Straight pins
- Sharp scissors
Replace plastic safety eyes with embroidered eyes when the finished item is intended for a child under three.
Abbreviations
MR — magic ring
sc — single crochet
inc — increase, 2 sc in one stitch
dec — invisible decrease
sl st — slip stitch
ch — chain
hdc — half double crochet
dc — double crochet
tr — treble crochet
BLO — back loop only
For an invisible decrease, insert the hook under the front loops of the next two stitches, draw up one loop, then complete one single crochet through both front loops.
Pattern — Step by Step
Work the pumpkin body in a continuous spiral. The body is crocheted as a sphere first and sculpted into lobes after stuffing and closing.
Pumpkin Body
Yarn: pumpkin orange — standard amigurumi sphere construction.
R1: 6 sc in MR (6)
R2: inc ×6 (12)
R3: (sc, inc) ×6 (18)
R4: (2 sc, inc) ×6 (24)
R5: (3 sc, inc) ×6 (30)
R6: (4 sc, inc) ×6 (36)
R7: (5 sc, inc) ×6 (42)
R8: sc around (42)
R9: sc around (42)
R10: sc around (42)
R11: sc around (42)
R12: sc around (42)
R13: sc around (42)
R14: sc around (42)
R15: sc around (42)
R16: sc around (42)
R17: sc around (42)
R18: sc around (42)
R19: sc around (42)
R20: sc around (42)
Insert 18 mm safety eyes between R13 and R14, approximately 8 visible stitches apart. Keep the eyes centered on one future lobe rather than placing either eye directly over a sculpting line.
R21: (5 sc, dec) ×6 (36)
R22: (4 sc, dec) ×6 (30)
R23: (3 sc, dec) ×6 (24)
Stuff firmly. Push filling toward the outer wall to create an evenly rounded circumference.
R24: (2 sc, dec) ×6 (18)
R25: (sc, dec) ×6 (12)
Add the final stuffing now. The body needs to feel firm because the sculpting strands will compress it.
R26: dec ×6 (6)
Fasten off and close the opening.
Pumpkin Sculpting — 8 Lobes
Yarn: pumpkin orange, doubled if the yarn is soft.
Cut a strand approximately 180–220 cm long.
Thread the long needle.
Insert the needle through the bottom center and bring it out through the top center.
Run the strand down the outside of the pumpkin and insert the needle through the bottom center again.
Bring the needle back through the top center.
Pull until a visible groove forms.
Repeat at seven evenly spaced positions around the body.
The finished pumpkin should have eight sections.
Work a second pass over any groove that is visibly shallower than its neighbors.
Secure the yarn at the top center, where the knot will later be covered by leaves.
Stem
Yarn: olive green.
R1: 6 sc in MR (6)
R2: inc ×6 (12)
R3: BLO sc around (12)
R4: sc around (12)
R5: sc around (12)
R6: sc around (12)
R7: sc around (12)
R8: sc around (12)
R9: (sc, dec) ×4 (8)
Stuff firmly enough to keep the stem upright.
Fasten off with a 30 cm sewing tail.
Large Crown Leaves — Make 6
Yarn: olive green. Work flat around both sides of the foundation chain.
Ch 13.
Starting in second ch from hook:
sl st, sc, hdc, dc, 4 tr, dc, hdc, sc, sl st.
Work 2 ch at the tip.
Continue down the opposite side of the foundation chain:
sl st, sc, hdc, dc, 4 tr, dc, hdc, sc, sl st.
Fasten off with a 25 cm sewing tail.
The finished leaf should be elongated with a pointed outer tip and a broad middle.
Small Crown Leaves — Make 4
Yarn: olive green.
Ch 9.
Starting in second ch from hook:
sl st, sc, hdc, dc, dc, hdc, sc, sl st.
Ch 2 at the tip.
Repeat the same stitch sequence down the opposite side.
Fasten off with a 20 cm sewing tail.
Long Curly Vines — Make 3
Yarn: olive green.
Ch 36.
Starting in second ch from hook, work 3 sc into every chain.
The strip will twist into a corkscrew as the stitches accumulate.
Fasten off with a 20 cm tail.
Short Curly Vines — Make 2
Yarn: olive green.
Ch 24.
Starting in second ch from hook, work 3 sc into every chain.
Fasten off with a 20 cm tail.
Pink Cheek Patches — Make 2
Yarn: blush pink.
R1: 6 sc in MR (6)
R2: inc ×6 (12)
Join with sl st.
Fasten off with a 20 cm tail.
Do not stuff.
Smile
Yarn: black.
Cut approximately 25 cm of black yarn.
Embroider a shallow U-shaped smile centered between the eyes and approximately 1.5–2 cm below their lower edges.
Use two anchor points and one small central tack stitch to keep the curve in place.
Shaping the Eight Pumpkin Lobes
The sculpting stage controls the final appearance more than any individual crochet round. A sphere with 42 stitches at its widest point provides sufficient diameter for eight distinct lobes, but the wraps need equal tension.
Mark the top opening mentally as a clock face. Place the first groove at 12 o’clock and its opposite at 6 o’clock. Add grooves at 3 and 9 o’clock next. Divide those four spaces again to create eight total sections.
This order is more accurate than working continuously around the circumference because each new strand can be positioned between two known reference grooves.
After every second groove, place the pumpkin on the table. The base should remain flat enough to sit without rolling.
Positioning the Face
The eyes belong inside one broad orange panel rather than on adjacent ribs.
Install the eyes before the pumpkin is closed, but plan the sculpting lines around them afterward.
The center of the face panel should line up with the smile. Keep each nearest sculpting groove at least two visible stitches beyond the outside edge of the corresponding eye.
The pink cheeks sit slightly lower than the eye centers and farther outward. This produces the same broad face area visible in the reference.
If a sculpting line pulls an eye toward the center, loosen that wrap and shift it several millimeters before tying it again.
Building the Leaf Crown
The top of the photographed pumpkin is not covered by a single leaf. It uses a layered crown.
Six large pointed leaves create the first radial layer. Four smaller leaves fill the spaces between them. The stem then rises from the center.
Begin by pinning the six large leaves before sewing any of them. Their points should extend beyond the top center and cover the orange gathering point.
Place the four smaller leaves above that first layer at alternating angles.
The leaf bases can overlap heavily because the stem will hide their attachment area.
Making the Curly Vines
Three single crochets in every foundation chain force the vine to twist naturally. No wire is needed.
The photograph shows several different coil diameters rather than identical spirals. This can be reproduced by stretching selected sections lightly after crocheting.
Leave one long vine tightly curled and allow another to hang with wider loops.
The longest vines should attach near the right-front side of the crown and fall past the upper third of the pumpkin. Shorter vines can remain around the top.
Do not stitch the entire vine to the body. Secure only the top 1–2 cm so the coils remain three-dimensional.
Assembly
- Complete and stuff the orange sphere, close the final six-stitch opening, and form eight evenly spaced grooves with the long sculpting strand.
- Rotate the pumpkin until one broad lobe faces forward, then check that both 18 mm eyes sit within that section rather than touching a groove.
- Sew the two pink cheek patches below and outside the eyes, then embroider the black U-shaped smile between them.
- Pin the six large green leaves radially around the top opening and stitch each base to the pumpkin while leaving the pointed ends free.
- Add the four smaller leaves between the first layer, overlapping their bases by approximately 1–2 cm.
- Sew the stuffed green stem vertically over the center of the leaf crown and pass the yarn through the pumpkin body twice for additional support.
- Attach the three long vines around the right and rear-right side of the stem, keeping their first 1–2 cm fixed and the remaining curls loose.
- Add the two shorter vines between the large leaves on the left and rear sections so the crown remains balanced from above.
- Set the pumpkin on a hard table and correct any sculpting strand that causes the base to rock or creates one lobe more than approximately 1 cm narrower than its neighbors.
- Weave every remaining tail through matching-color stitches, reshape the vines by hand, and lift the leaf tips away from the pumpkin surface.
The finished pumpkin should have eight distinct orange lobes, a centered upright stem, layered olive leaves, and loose spiral vines that extend beyond the crown.
7 Technical Tips
- Uneven lobes: Pulling the first sculpting strand as tight as possible makes later sections progressively smaller. Tighten all eight passes to moderate tension first, then make a second adjustment round after the spacing is established.
- Stuffing collapse: A body that feels soft before sculpting will flatten under the yarn wraps. Add enough fiberfill that pressing the center with one finger creates no more than approximately 1–1.5 cm of temporary indentation.
- Eye displacement: A groove that passes too close to an 18 mm eye can rotate the washer inside the fabric. Keep the nearest sculpting line at least two full stitches beyond the outer eye edge.
- Stem leaning: A 12-stitch stem attached only through the leaf layer can tilt. Sew through the leaf bases and into the orange body at four evenly spaced points around the stem.
- Leaf curling: Very tight edge stitches can make the pointed leaves fold upward. If a completed large leaf curls more than about 10 mm off a flat surface, remake it with a hook 0.5 mm larger.
- Vine stretching: Hanging the pumpkin by a corkscrew vine can permanently open the coils. Attach the vines decoratively only and keep all structural handling at the body or stem.
- Base rocking: A sculpting strand pulled harder across the bottom can create a raised center point. After forming every two grooves, set the pumpkin on the table and adjust the bottom tension before continuing.
Choosing Yarn for the Photo-Matched Texture
The reference shows visible plied stitches rather than the fuzzy surface associated with velvet yarn. A smooth worsted acrylic, cotton, or cotton-acrylic yarn is therefore the closer match.
A 4 mm hook keeps the fabric dense enough for stuffing while leaving the stitch definition visible across the orange lobes.
Crochet through R7 and stretch the 42-stitch section over two fingers before continuing. If the spaces expose filling, move down to a 3.5 mm hook. If the fabric becomes difficult to penetrate, return to 4 mm.
Use the same yarn weight for the green pieces. A thinner green yarn makes the crown look disconnected from the substantial orange body.
Why the Body Uses a 42-Stitch Plateau
The reference is broad rather than tall. A 42-stitch maximum gives the sphere enough circumference to create eight rounded panels after cinching.
A 30-stitch body would produce much narrower lobes with 18 mm eyes. A 36-stitch version can work for a smaller pumpkin, but the crown would also need to be reduced.
The long plateau from R8 through R20 creates the depth required for a squat pumpkin once the top-to-bottom sculpting strands compress the sphere.
Do not shorten that central section by several rounds unless a flatter result is specifically wanted.
Controlling the Final Pumpkin Shape
The body should become wider after sculpting, not noticeably taller.
Each yarn wrap compresses the top and bottom toward the center. That action pushes stuffing outward and increases the visual width of each lobe.
If the pumpkin becomes tall and narrow, the sphere was probably underfilled before sculpting.
If the lobes become extremely pronounced and the center openings pull deeply inward, loosen the wraps slightly. The grooves should be visible from the front without making the pumpkin resemble eight separate balls tied together.
Stem Proportion
The stem in the photograph is unusually tall for a small decorative pumpkin.
Nine rounds produce a vertical green element that remains visible above the dense leaf crown. The 12-stitch base gives it enough width to avoid looking like a thin cord.
Stuff the stem from R3 upward. Leave only the final opening slightly flexible for sewing.
After attaching it, view the pumpkin from the front and from both sides. A tilt of a few degrees looks natural, but a stem that leans enough to touch a leaf tip should be restitched at the base.
Leaf Placement and Scale
The large leaves should cover much of the orange top without falling over the eyes.
Position the frontmost leaf so its tip stops above the eye line. Longer leaves can extend sideways or toward the rear.
Because the body is approximately 20–23 cm wide, a large leaf around 8–10 cm long creates a similar proportion to the photograph.
Alternate leaf angles rather than placing every point directly between pumpkin grooves. The irregular crown creates a more natural silhouette and leaves openings for the vines.
Yarn Quantity Planning
Published pumpkin patterns show that material use varies sharply with size and fiber. A current 12 cm super-bulky chenille pumpkin uses roughly one 100 g skein, while large chunky versions can use around 85 g or more for the body alone.
For this worsted project, weigh the orange body after R20 but before decreasing. Compare that number with the remaining yarn.
The final decrease section uses much less material than the central plateau, but the sculpting strand also requires over 2 m of orange yarn.
A practical target is 140–180 g of orange and 45–60 g of green, with additional yarn available when larger leaves or extra vines are planned.
Competition Gap
Current pumpkin crochet competition falls into several groups: miniature amigurumi, flat BLO rectangles gathered into pumpkins, chenille no-sew décor, and character pumpkins with simple stems.
The supplied design combines features that are less commonly presented together. Its orange body is a fully stuffed and sculpted amigurumi sphere. The face uses large safety eyes and small cheek patches. Above that, the crown includes ten leaves, a tall stem, and five separate corkscrew vines.
This gives the project a different search angle from a standard ribbed pumpkin or minimalist farmhouse decoration. It targets readers looking for a character-based kawaii pumpkin amigurumi with substantial botanical detail.
Finishing Checks
Place the completed pumpkin on a level table.
Count all eight grooves from the top. Their spacing should appear consistent, and no lobe should be more than approximately 1 cm narrower than the neighboring section.
Check the face from directly in front. Both eyes should sit in the same orange panel, the cheek patches should be level, and the lowest point of the smile should align with the center of the stem.
View the crown from above next. Large and small leaves should alternate rather than stack in one direction.
Finally, separate the vines with the fingers so individual coils remain visible instead of tangling into one green mass.
Conclusion
Complete and firmly stuff the orange sphere before adding any decorative pieces, then divide it into eight equal lobes while the top remains accessible for hiding sculpting knots. Add the face only after the final groove positions are confirmed, followed by the layered leaves, stem, and loose vines. Record the finished circumference before making a second pumpkin amigurumi crochet pattern because even a small gauge change alters the sculpted proportions. Share a crown close-up on Pinterest and the finished front view on Instagram with #CurlyVinePumpkin. Which feature would you change first on another version: the number of vines or the depth of the eight pumpkin grooves?









