Introduction
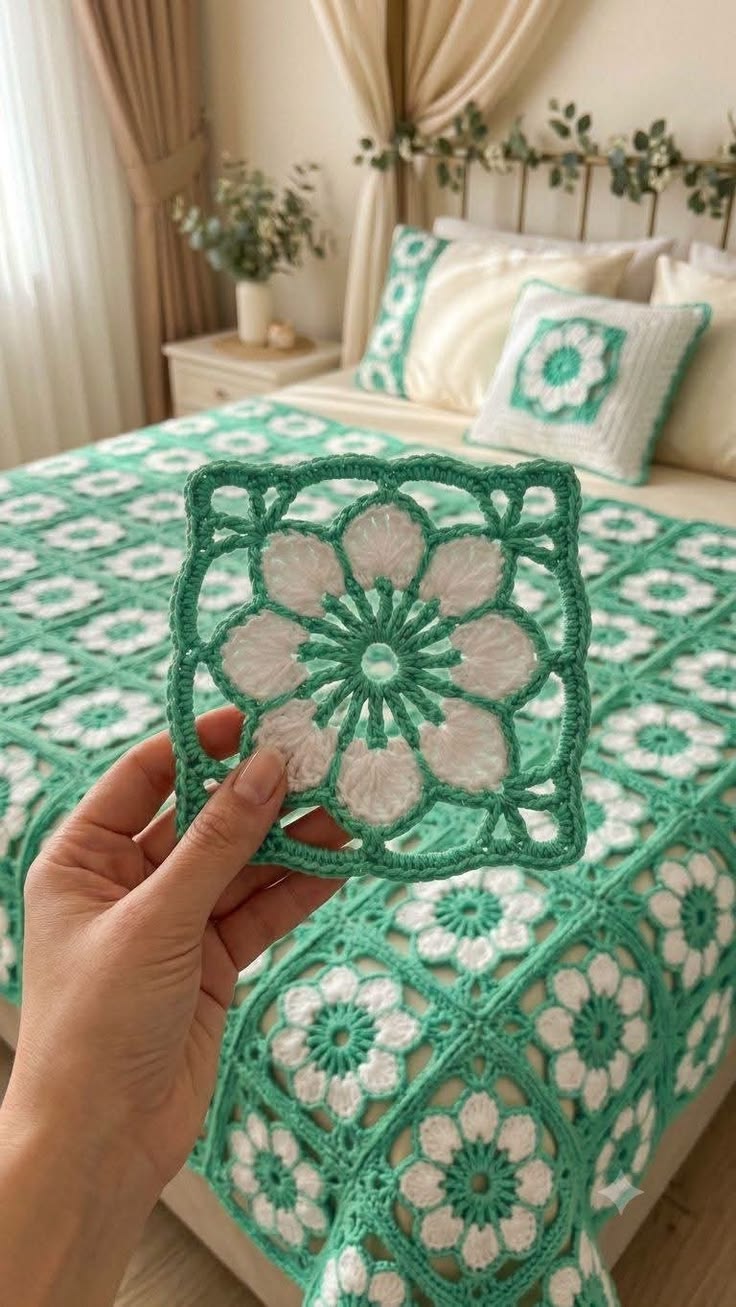
Eight white petals have to remain distinct after four mint corners pull the flower into a square. This mint flower granny square crochet pattern uses DK yarn and a 4.5 mm hook to produce approximately 20 cm blocked motifs. The intermediate design combines open petal spaces, mint framing, flat joining, a lace border, and a matching pillow, making the square practical for a full bedspread rather than a single decorative motif.
The Design: What Makes This Mint Flower Square Different
The flower is deliberately flatter and more open than a puff-flower block. Eight broad white petals form the main visual ring, while long mint spokes expose the background beneath the center. That negative space keeps a large bedspread from becoming visually dense. The squaring round then shifts from curved floral geometry to four defined corners using graduated stitch heights and corner chains. This white flower granny square also keeps all structural stitches mint, so the seams merge into the surrounding frames once the blocks are joined. The resulting mint granny square blanket reads as one continuous botanical grid rather than dozens of isolated squares. A common error is making the white petals too wide. When adjacent petals overlap at their widest points, the central openwork disappears and the motif loses the airy construction visible in the reference.
Project Info at a Glance
| Skill Level | Time | Finished Size | Hook | Best For |
|---|---|---|---|---|
| Intermediate | 65–90 hours | Approx. 175 × 215 cm with border | 4.5 mm | Full/queen bedspread, matching pillow, decorative throw |
Published flower blocks currently range around 23–24 cm with DK yarn, depending on stitch pattern and hook. The photo-matched motif here is intentionally targeted at 20 cm blocked so an 8 × 10 layout stays manageable on a bed.
Materials and Tools
Yarn
- Mint / seafoam green — DK #3 — approximately 1,500–1,800 g — square centers, petal outlines, frames, seams, and border
- Warm white / ivory — DK #3 — approximately 700–900 g — eight petals in every square and pillow flower
- Optional extra mint — 100–150 g — pillow back or repair allowance
Tools
- 4.5 mm crochet hook
- Yarn needle
- Sharp scissors
- Locking stitch markers
- Blocking mats
- T-pins
- Measuring tape
- 20 cm square blocking template
Abbreviations
MR — magic ring
sc — single crochet
hdc — half double crochet
dc — double crochet
tr — treble crochet
dtr — double treble crochet
sl st — slip stitch
ch — chain
sp — space
ch-sp — chain space
RS — right side
Invisible decreases are not required because this is a flat motif; all shaping comes from stitch height, chain spaces, and corner placement.
Pattern — Step by Step
The motif below is an original photo-matched construction. Published flower granny squares confirm the same general progression—center, petal formation, then square conversion—but the exact eight-petal geometry here is designed around the supplied image.
Mint Open Center
Yarn: mint — photo-matched original construction.
R1: 16 dc in MR (16)
Join with sl st to first dc.
Do not pull the magic ring completely tight. Leave an opening approximately 8–10 mm wide to reproduce the visible open center.
Fasten off only if preferred; otherwise carry mint into the spoke round.
Mint Radial Spokes
Yarn: mint.
R2: ch 5, skip 1 st, sl st in next st; repeat around to create 8 ch-5 loops.
(8 loops)
Each loop should radiate outward from the center without twisting.
White Petal Foundations
Yarn: white.
Join white into any ch-5 loop.
R3: in each ch-5 loop work:
(sc, hdc, 3 dc, hdc, sc)
Repeat in all 8 loops.
(8 petal foundations)
Join with sl st.
White Petal Height Round
Yarn: white.
R4: work around each R3 petal as follows:
sc in first sc, hdc in hdc, 2 dc in first dc, 3 tr in center dc, 2 dc in next dc, hdc in hdc, sc in final sc.
Repeat for all 8 petals.
Fasten off.
The widest point of each petal should remain below approximately one-quarter of the total motif width.
Mint Petal Outline and Connector Round
Yarn: mint.
Join mint between two petals.
R5: sc evenly around the outer edge of the first white petal, placing approximately 11–13 sc around the curved petal edge; ch 4 between petals.
Repeat around.
Join.
Keep the ch-4 connectors loose. They become the foundation for the square conversion.
First Mint Squaring Round
Yarn: mint.
Mark four ch-4 spaces at equal intervals as future corners.
At each corner ch-sp work:
(sc, hdc, dc, tr, ch 3, tr, dc, hdc, sc)
In each non-corner ch-4 space work:
(sc, hdc, 3 dc, hdc, sc)
Work sc across the exposed upper petal stitches between spaces as needed to maintain a flat round.
Join.
Second Mint Square Round
Yarn: mint.
R7: ch 3, dc in each stitch across the side.
At each corner ch-3 space work:
(2 dc, ch 2, 2 dc)
Continue around.
Join with sl st.
Openwork Frame Round
Yarn: mint.
R8: ch 1, sc in same stitch, *ch 3, skip 2 sts, sc in next st* across each side.
At each corner work:
(sc, ch 4, sc)
Repeat around.
Join.
Final Mint Frame Round
Yarn: mint.
R9: work 3 dc in each ch-3 space.
At each ch-4 corner work:
(3 dc, ch 2, 3 dc)
Join.
Firming Round
R10: sc in every stitch around.
At each corner work:
(2 sc, ch 2, 2 sc)
Join and fasten off.
Block the square to 20 × 20 cm.
Bedspread Motif Count
For a field approximately 160 × 200 cm before border:
Make 80 squares.
Arrange:
8 squares across × 10 squares long
At 20 cm blocked per square, the theoretical unjoined field is 160 × 200 cm.
The seams may alter that measurement slightly, so measure one assembled strip before completing the full grid.
Flat Join
Yarn: mint.
Place two blocked squares RS up.
Insert the hook through the outer loop of the corresponding corner stitch on each square.
Sl st through both loops.
Continue through matching outer loops along the entire edge.
Do not tighten each slip stitch against the hook shaft. The seam should remain nearly as long as the unjoined edge.
Make eight-square horizontal strips first, then join ten strips vertically.
Outer Border
Border Round 1
Yarn: mint.
Sc evenly around the complete joined field.
Work 3 sc into each blanket corner.
Count opposite edges before proceeding.
Border Round 2
Ch 3, dc around.
At each corner work:
(2 dc, ch 2, 2 dc)
Border Round 3
*ch 4, skip 2 sts, sc in next st* around.
At each corner use ch 6.
Border Round 4
Work 5 dc in each ch-4 loop.
Work:
(5 dc, ch 3, 5 dc)
in each corner ch-6 loop.
Border Round 5 — Scalloped Edge
*sl st in first dc, skip 1 dc, 5 dc in center dc, skip 1 dc, sl st in last dc*
Repeat across every shell.
Fasten off.
Block each scallop independently so the border hangs vertically rather than curling under the bedspread.
Matching Pillow Front
Work the flower square through R10.
Continue additional mint rounds until the panel measures approximately 45 cm.
Pillow Expansion Round 1
At each corner work:
(3 dc, ch 2, 3 dc)
Work 3 dc in every available side space.
Pillow Expansion Round 2
Repeat the granny-frame construction.
Pillow Expansion Round 3
Work an open ch-3 mesh around the square.
Pillow Expansion Round 4
Work 3 dc in every ch-3 space.
Repeat framing rounds until the required pillow size is reached.
The photo shows the pillow flower centered within a larger pale field rather than several small squares, so expansion should happen around one motif.
Pillow Back — Make 2 Panels
Yarn: white or mint.
Ch to match the pillow-front width.
Work rows of dc until each panel reaches approximately two-thirds of the total pillow height.
Make two identical pieces.
Overlap the back panels by 10–12 cm.
Sc around all four sides through the pillow front and back layers.
Add one mint sc round around the outer seam.
Fasten off.
Assembly
- Block all 80 flower squares to exactly 20 × 20 cm before joining; variations greater than 5 mm should be corrected first.
- Lay the full 8 × 10 grid on a clean floor and rotate motifs so all corner openings align in the same direction.
- Join each group of eight squares into horizontal strips using mint flat slip stitches.
- Connect the ten horizontal strips vertically, keeping four-square intersections flat rather than stacking extra seam stitches.
- Measure the assembled field before adding any border and record both width and length.
- Work the solid mint foundation rounds around the entire bedspread, correcting minor stitch differences on opposite sides.
- Add the open chain-loop border and shell round, checking all four corners after each completed round.
- Block the scalloped outer edge while keeping the white flower petals free from heavy pinning.
- Expand one flower motif for each pillow front and attach overlapping back panels.
- Weave all yarn tails through same-color sections, place the bedspread on the mattress, and reshape the eight petals in every visible edge motif.
The finished set should show uninterrupted mint grid lines surrounding repeating white eight-petal flowers.
7 Technical Tips
- Petal overlap: If adjacent white petals touch before R5, the motif will lose its open center. Keep at least 5–8 mm of visible mint space between the widest points of neighboring petals.
- Center collapse: Pulling the MR completely shut removes the radial opening visible in the reference. Leave an 8–10 mm center aperture and secure the tail around nearby stitches instead of closing the hole.
- Corner distortion: If one blocked diagonal differs by more than 5 mm, rework the first squaring round before adding the frame. A displaced corner compounds across the full blanket grid.
- Join puckering: A slip-stitch seam shorter than the square edge makes the bedspread ripple. Move to a 5 mm hook for joining if two connected 20 cm squares measure less than approximately 39.5 cm across.
- Border ruffling: Extra stitches added casually around the perimeter multiply through five rounds. Count opposite edges after Border R1 and keep their totals equal.
- Petal flattening: Heavy blocking pressure can erase the soft white petal relief. Pin the mint frame only and shape each white petal with the fingers after the square dries.
- Pillow distortion: An envelope overlap below 10 cm can gape when the cushion insert expands. Keep a 10–12 cm overlap and anchor the four overlap corners into the perimeter seam.
Why the Eight-Petal Structure Matters
Eight petals fit the supplied geometry better than a six-petal daisy or a dense twelve-petal flower. Four petals align approximately toward the square’s sides, while the remaining four help bridge the diagonal spaces.
The mint spoke round also remains visible between petals. That detail is important. If the white stitches cover the complete radial structure, the motif begins to resemble an ordinary solid flower rather than the open botanical square shown in the photograph.
You can alter petal color without rewriting the square. Changing white to blush, pale yellow, or lavender will preserve the geometry as long as the yarn weight remains matched.
Choosing the Yarn
DK yarn is the most practical starting point for this crochet flower bedspread because it provides definition around the open spaces without producing a blanket as heavy as bulky yarn.
A 4.5 mm hook works well with DK yarn for this type of flower-square blanket. Current floral granny-square references also use DK with hooks in the 4–4.5 mm range.
Cotton creates crisp petal edges but adds weight. Acrylic is lighter and usually gives a softer drape. A cotton-acrylic blend sits between the two.
Make one complete square before buying the full blanket quantity whenever dye-lot consistency permits.
Controlling the Open Spaces
The negative space is structural, not accidental.
Large chain loops around the flower allow the background fabric or bedding beneath the blanket to show through. The image depends on those openings to separate the white flower from the mint frame.
Avoid substituting extra dc stitches simply to make the square feel denser. Doing so changes both the appearance and the amount of yarn required.
When working the square conversion, keep each corner loop large enough for the next round to sit flat. A 4.5 mm hook should produce a relaxed ch-3 corner approximately 12–15 mm long in typical DK yarn.
Calculating a Different Bedspread Size
Use the blocked motif rather than mattress labels as the starting point.
- 6 squares = 120 cm
- 7 squares = 140 cm
- 8 squares = 160 cm
- 9 squares = 180 cm
- 10 squares = 200 cm
Add approximately 7–10 cm per side for the proposed border, depending on your tension.
A larger queen cover may therefore need 9 squares across rather than 8. Crochet one row, place it across the mattress, and decide before producing all remaining motifs.
Planning Yarn Quantity More Accurately
The project estimates above are intentionally generous because a full bedspread uses far more yarn than a throw.
For a tighter calculation, weigh one finished and blocked square.
Assume one square weighs 32 g total, with 20 g mint and 12 g white:
80 squares × 20 g mint = 1,600 g mint before border and joins.
80 squares × 12 g white = 960 g white.
The actual values will depend on yarn construction, so use the scale rather than those sample figures once your first motif is complete.
Add 12–15% mint for joins and the outer border.
Matching the Pillow to the Bedspread
A pillow made from four small motifs would repeat the blanket grid too literally. The photographed version instead enlarges one flower so the cushion becomes a focal companion piece.
Keep the flower itself at the original size.
Expansion belongs in the mint and light framing rounds around it. That approach leaves the eight-petal flower recognizable while producing enough fabric for a standard cushion.
A contrasting mint edge ties the pillow back to the bedspread seams.
Competition Gap
Current flower granny-square content is broad. Free pattern collections include puff flowers, buttercups, layered 3D motifs, daisy squares, and many multicolor designs.
What is less common is a complete article built around the restrained two-color architecture shown here: open radial center, eight white petals, mint framing, full bedspread calculations, matching pillow, and a border designed to preserve the airy square geometry.
That distinction should appear in the photography as well as the written instructions. Include one close-up showing the open center and one full-bed image showing how the mint grid repeats.
Conclusion
Complete one square, block it to 20 cm, and record the center opening, petal width, and diagonal measurements before making the remaining motifs. Those figures control the entire mint flower granny square crochet pattern once eighty blocks are joined. Build the bedspread field before adding the border, then adjust border width to the actual mattress rather than a nominal bed size. Repeat one enlarged flower for the matching pillow. Save a full-bed photograph to Pinterest and post a square close-up on Instagram with #MintFlowerBedspread. On your version, would you keep the petals white or replace them with a second pastel color?









