Introduction
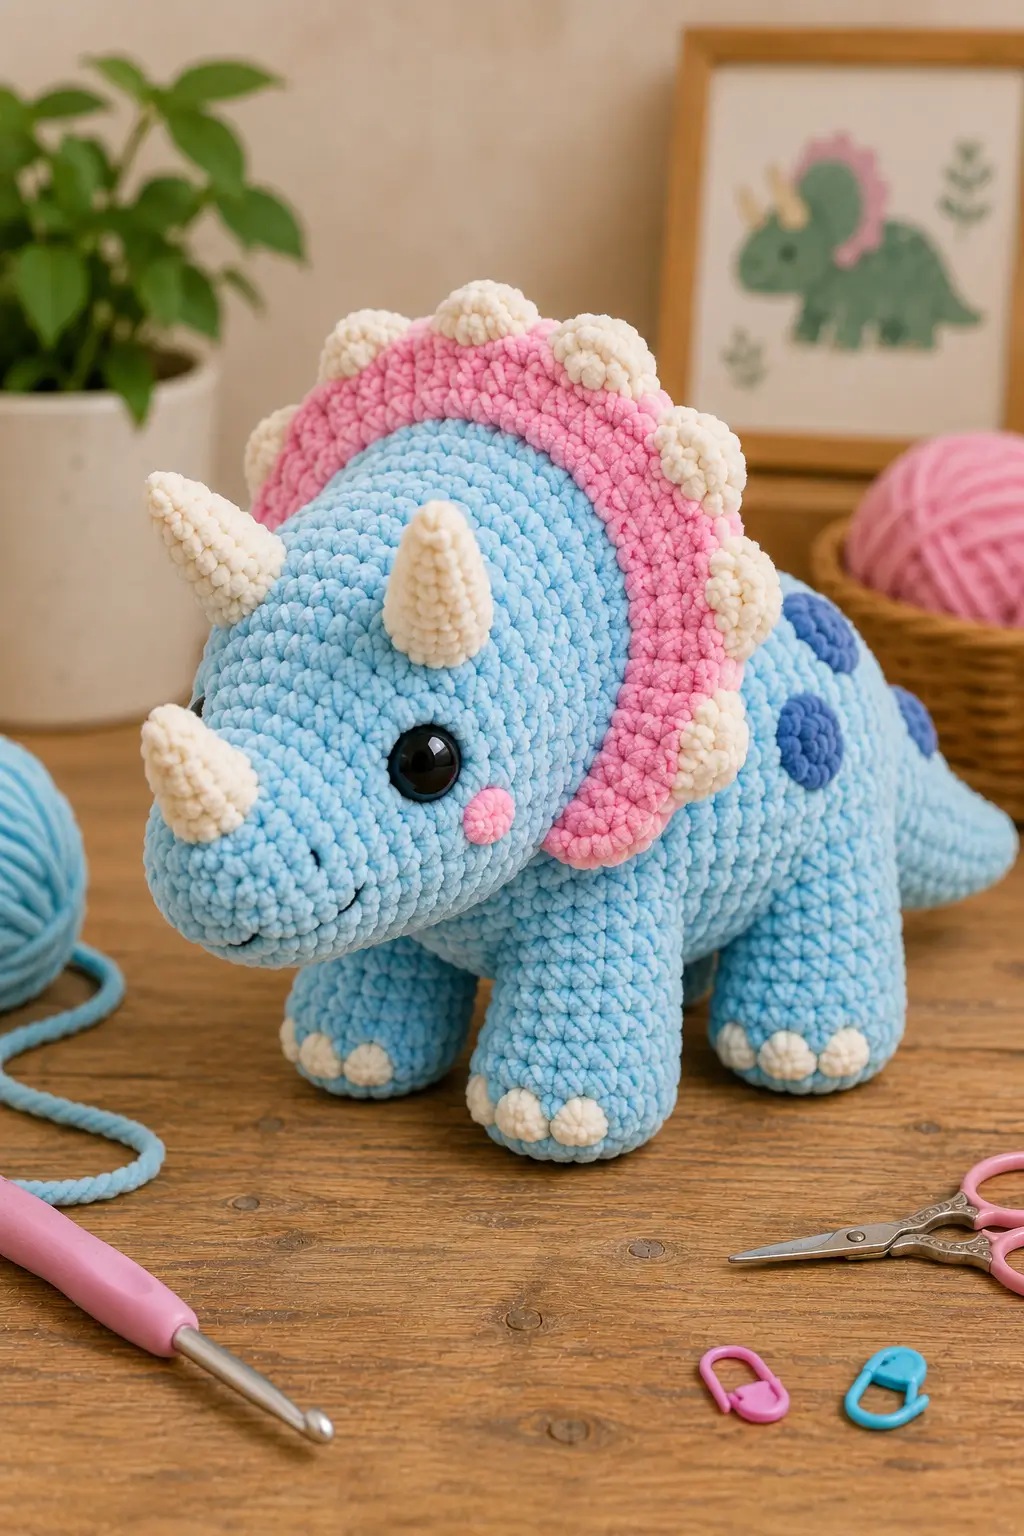
A Triceratops needs three horns in front of its frill, but the frill has to remain wider than the horn spread or the head stops reading correctly. This triceratops amigurumi crochet pattern uses super-bulky chenille and a 5 mm hook for a dinosaur approximately 40–46 cm long. Four wide legs, a tapered tail, pink frill, cream horns and blue spots reproduce the photographed plush at an intermediate skill level.
The Design: What Makes This Triceratops Different
The head is intentionally broad and low rather than spherical. That gives enough facial width for two long brow horns, a shorter nasal horn and the large safety eyes without crowding the muzzle. Behind it, the pink frill extends beyond both sides of the head and carries raised cream nodules around the outer edge, which gives the crochet triceratops plush its strongest color contrast. The body uses a long 42-stitch plateau instead of an upright pear shape because the animal stands on four short, thick legs. Royal-blue spots interrupt the pale body surface, while twelve individual cream toe bumps repeat the horn color close to the ground. One common failure is attaching the frill too low. If its upper edge disappears behind the head, the characteristic Triceratops silhouette becomes much weaker.
Project Information at a Glance
| Skill Level | Time | Finished Size | Hook | Best For |
|---|---|---|---|---|
| Intermediate | 9–12 hours | Approx. 40–46 cm long | 5.0 mm | Large dinosaur plush and nursery display |
Materials and Tools
Yarn
- Pastel sky blue — Super Bulky #6 chenille — approximately 250–320 g — head, body, legs and tail
- Bubblegum pink — Super Bulky #6 chenille — approximately 70–90 g — frill and cheeks
- Cream / ivory — Super Bulky #6 chenille — approximately 50–70 g — horns, frill bumps and toes
- Royal blue — matching chenille — approximately 15–25 g — body spots
- Black embroidery yarn — small amount — nostrils and optional mouth
Tools
- 5.0 mm crochet hook
- 16–18 mm safety eyes ×2
- Polyester fiberfill
- Large-eye yarn needle
- Long upholstery needle
- Locking stitch markers
- Rust-resistant pins
- Sharp scissors
For a toy intended for a child under three, replace plastic safety eyes with securely embroidered eyes.
Abbreviations
- MR — magic ring
- sc — single crochet
- inc — 2 sc in one stitch
- dec — decrease
- sl st — slip stitch
- ch — chain
- hdc — half double crochet
- dc — double crochet
- BLO — back loop only
Work an invisible decrease through the front loops of the next two stitches before completing them together as one single crochet.
Pattern — Step by Step
Work all stuffed pieces in continuous spirals unless a section specifically calls for rows. Move the stitch marker after every round.
Head
Yarn: pastel sky blue.
R1: 6 sc in MR (6)
R2: inc ×6 (12)
R3: (sc, inc) ×6 (18)
R4: (2 sc, inc) ×6 (24)
R5: (3 sc, inc) ×6 (30)
R6: (4 sc, inc) ×6 (36)
R7: (5 sc, inc) ×6 (42)
R8: sc around (42)
R9: sc around (42)
R10: sc around (42)
R11: sc around (42)
R12: sc around (42)
R13: sc around (42)
R14: sc around (42)
Insert 16–18 mm safety eyes between R10 and R11, approximately 9–10 visible stitches apart. Keep the eyes slightly above the horizontal center of the head to leave room for the nose horn.
R15: (5 sc, dec) ×6 (36)
R16: (4 sc, dec) ×6 (30)
R17: sc around (30)
R18: (3 sc, dec) ×6 (24)
Stuff firmly, adding extra fiberfill toward the cheeks and upper skull while keeping the muzzle blunt.
R19: (2 sc, dec) ×6 (18)
R20: (sc, dec) ×6 (12)
R21: dec ×6 (6)
Fasten off and close the remaining opening.
Body
Yarn: pastel sky blue.
R1: 6 sc in MR (6)
R2: inc ×6 (12)
R3: (sc, inc) ×6 (18)
R4: (2 sc, inc) ×6 (24)
R5: (3 sc, inc) ×6 (30)
R6: (4 sc, inc) ×6 (36)
R7: (5 sc, inc) ×6 (42)
R8: sc around (42)
R9: sc around (42)
R10: sc around (42)
R11: sc around (42)
R12: sc around (42)
R13: sc around (42)
R14: sc around (42)
R15: sc around (42)
R16: sc around (42)
R17: sc around (42)
R18: sc around (42)
Add stuffing in small pieces and stretch the body horizontally while filling. Do not shape it into a sphere.
R19: (5 sc, dec) ×6 (36)
R20: sc around (36)
R21: (4 sc, dec) ×6 (30)
R22: sc around (30)
R23: (3 sc, dec) ×6 (24)
R24: (2 sc, dec) ×6 (18)
R25: (sc, dec) ×6 (12)
R26: dec ×6 (6)
Fasten off and close.
Front Legs — Make 2
Yarn: pastel sky blue.
R1: 6 sc in MR (6)
R2: inc ×6 (12)
R3: (sc, inc) ×6 (18)
R4: (2 sc, inc) ×6 (24)
R5: sc around (24)
R6: sc around (24)
R7: (2 sc, dec) ×6 (18)
R8: sc around (18)
R9: sc around (18)
R10: sc around (18)
R11: (sc, dec) ×6 (12)
R12: sc around (12)
Stuff the lower two-thirds firmly and the upper section moderately.
Flatten the opening.
Fasten off with a 35 cm sewing tail.
Back Legs — Make 2
Yarn: pastel sky blue.
R1: 6 sc in MR (6)
R2: inc ×6 (12)
R3: (sc, inc) ×6 (18)
R4: (2 sc, inc) ×6 (24)
R5: (3 sc, inc) ×6 (30)
R6: sc around (30)
R7: sc around (30)
R8: (3 sc, dec) ×6 (24)
R9: sc around (24)
R10: (2 sc, dec) ×6 (18)
R11: sc around (18)
R12: (sc, dec) ×6 (12)
Stuff firmly through the foot and lower leg.
Flatten the upper opening.
Fasten off with a 35 cm sewing tail.
Tail
Yarn: pastel sky blue.
R1: 6 sc in MR (6)
R2: inc ×6 (12)
R3: (sc, inc) ×6 (18)
R4: (2 sc, inc) ×6 (24)
R5: sc around (24)
R6: sc around (24)
R7: (2 sc, dec) ×6 (18)
R8: sc around (18)
R9: sc around (18)
R10: (sc, dec) ×6 (12)
R11: sc around (12)
R12: sc around (12)
R13: sc around (12)
R14: sc around (12)
R15: sc around (12)
R16: sc around (12)
R17: (sc, dec) ×4 (8)
R18: sc around (8)
R19: sc around (8)
R20: sc around (8)
R21: sc around (8)
R22: dec ×4 (4)
Stuff the base firmly but reduce stuffing during the final third so the tail can taper naturally.
Fasten off with a long sewing tail.
Large Pink Frill
Yarn: bubblegum pink.
Ch 17.
Work around both sides of the foundation chain.
R1: starting in second ch, 15 sc, 3 sc in final ch, 14 sc along opposite side, 2 sc in first ch (34)
R2: inc, 14 sc, inc ×3, 14 sc, inc ×2 (40)
R3: (sc, inc), 14 sc, (sc, inc) ×3, 14 sc, (sc, inc) ×2 (46)
R4: sc around (46)
Fasten off with a long sewing tail.
Do not stuff. Block or hand-shape the oval until it extends at least 3–4 cm beyond both sides of the head.
Frill Opening
Mark a central oval approximately 8–10 cm wide where the back of the head will contact the frill.
Fold the frill lightly around the head rather than cutting any stitches.
During assembly, sew the central section firmly to the head and leave the outer 2–3 cm free so the frill projects outward.
Cream Frill Bumps — Make 8
Yarn: cream.
R1: 6 sc in MR (6)
R2: inc ×6 (12)
R3: sc around (12)
R4: dec ×6 (6)
Stuff very lightly.
Fasten off with a 15 cm tail.
Flatten the base before sewing.
Large Brow Horns — Make 2
Yarn: cream.
R1: 6 sc in MR (6)
R2: sc around (6)
R3: (sc, inc) ×3 (9)
R4: sc around (9)
R5: (2 sc, inc) ×3 (12)
R6: sc around (12)
R7: sc around (12)
R8: (3 sc, inc) ×3 (15)
R9: sc around (15)
Stuff firmly toward the base and lightly at the point.
Fasten off with a 25 cm sewing tail.
Nose Horn
Yarn: cream.
R1: 6 sc in MR (6)
R2: sc around (6)
R3: (sc, inc) ×3 (9)
R4: sc around (9)
R5: (2 sc, inc) ×3 (12)
R6: sc around (12)
Stuff lightly.
Fasten off with a 20 cm tail.
Royal-Blue Body Spots — Make 5
Yarn: royal blue.
Large spots — make 2:
R1: 6 sc in MR (6)
R2: inc ×6 (12)
R3: (sc, inc) ×6 (18)
Fasten off.
Small spots — make 3:
R1: 6 sc in MR (6)
R2: inc ×6 (12)
Fasten off.
Do not stuff.
Pink Cheek Patches — Make 2
Yarn: bubblegum pink.
R1: 6 sc in MR (6)
R2: inc ×6 (12)
Fasten off.
Cream Toe Bumps — Make 12
Yarn: cream.
R1: 6 sc in MR (6)
R2: sc around (6)
Fasten off.
Do not stuff.
Three bumps are used on each foot.
Assembly
- Sew the head to the front of the body so the muzzle projects forward and the eye line remains approximately parallel with the floor.
- Center the pink frill behind the head, keeping its top edge 3–4 cm above the skull and its sides visibly wider than the brow horns.
- Pin both brow horns above the eyes and the shorter horn on the center of the muzzle, then compare the face head-on before sewing them permanently.
- Attach the front legs below the shoulder/frill region and leave enough spacing for the head to sit between them without touching the floor.
- Sew the broader back legs below the rear half of the body and test all four feet on a flat surface before tightening the final seams.
- Attach the tail at the center rear with a full circular seam, placing its base between and slightly above the hind legs.
- Sew three cream toe bumps across the front of each foot, keeping approximately 5–8 mm between adjacent bump centers.
- Arrange eight cream bumps around the outside of the pink frill, concentrating several across the top and leaving visible pink sections between them.
- Sew the royal-blue spots irregularly along the upper sides of the body and attach the pink cheek patches below the eyes.
- Weave all tails through matching-color stitches, correct the four-leg stance, reshape the frill and horns by hand, and distribute the stuffing until the body remains level.
The completed Triceratops should stand on four broad feet with the frill visible from the front, all three horns projecting forward and the tail extending horizontally behind the body.
7 Technical Tips
- Frill collapse: If the top of the pink frill sits less than about 3 cm above the skull, it disappears in front view. Pin the center high behind the head before securing the lower edge.
- Horn asymmetry: A difference of even 1 cm between brow-horn positions is noticeable on a 40 cm plush. Measure from each eye center to the base of its horn before sewing.
- Head droop: The stuffed head and frill create significant forward weight. Use a head/body contact seam at least 6–7 cm wide and pass the sewing yarn through deeper body stitches.
- Leg rocking: One foot attached more than about 2 cm higher than its opposite partner produces a three-point stance. Pin all four legs and test the toy on a table before closing any seam.
- Tail sag: Full-density stuffing through the final 8–10 cm adds unnecessary weight. Reduce fiberfill progressively after the 12-stitch tail section.
- Frill-bump crowding: Cream nodules sewn edge-to-edge turn the pink frill into a solid white rim. Leave approximately 1–2 cm of visible pink between neighboring pieces.
- Spot puckering: Tight applique stitches pull chenille into a depression. Catch only the surface loops of the blue body and stop pulling as soon as the spot lies flat.
Shaping the Triceratops Head
The face has to support three separate focal points: the eyes, the brow horns and the nasal horn. A narrow head leaves no room between those elements, so this design reaches a 42-stitch circumference before holding that width through several rounds.
Pack the forehead firmly because it supports both long horns. The muzzle can remain slightly softer, which makes it easier to flatten into the broad rounded profile shown in the reference.
View the stuffed head from the side before attaching the horns. The forehead should rise gently from the snout rather than forming a spherical ball.
Constructing the Pink Frill
The neck shield is wider than the head and functions almost like a flat oval collar. Crochet it separately so it can be positioned after the head reaches its final stuffed shape.
The broadest section belongs above and beside the skull. Only the central portion should be sewn firmly against the head; leaving the perimeter free creates the projecting edge visible in the photograph.
Place all cream nodules before sewing any of them. Their spacing is intentionally irregular, but the top half should carry more visual weight than the lower sides.
Positioning the Three Horns
The brow horns are substantially longer than the nasal horn. Sew their bases above the eyes with the tips angled slightly forward rather than directly upward.
The shorter horn belongs on the center line of the muzzle. Its base should sit far enough below the eyes to leave a visible strip of blue between all three horns.
Pin the entire horn set first and rotate the head through front, side and three-quarter views. Chenille hides small stitch-position differences, but it does not hide an uneven horn silhouette.
Building the Low Four-Leg Stance
The photograph shows a quadruped whose body remains close to the table. Longer narrow legs would change the proportions substantially.
Front legs reach a 24-stitch foot, while the hind feet reach 30 stitches to support the heavier rear body and tail. Keep the upper sections narrower so the body does not look suspended above four cylinders.
After pinning all four legs, press lightly on the center of the back. The toy should remain stable without rocking diagonally.
Choosing Chenille Yarn and Hook Size
Super-bulky chenille gives the supplied dinosaur its rounded stitch surface and large finished scale. A 5 mm hook is a useful starting point because it creates firm amigurumi fabric while still allowing the thick yarn to move through decreases.
Make the first 42-stitch head section before committing to the complete yarn quantity. If stuffing shows between stitches, reduce the hook to 4.5 mm.
When the fabric becomes too rigid to shape, move back to 5 mm instead of adding excessive tension with the smaller hook.
Planning the Body Spots
The royal-blue circles appear only on the body and rear side of the dinosaur. They should not compete with the pink frill or cream horns.
Mix two diameters rather than making five identical circles. Position the larger spots around the upper-middle body, then use the smaller pieces closer to the tail.
Leave the legs and face clear. Concentrating the blue on the torso creates the same visual hierarchy as the reference.
Making the Raised Toes
Three small cream bumps on each foot create more depth than a flat embroidered claw. Because the pieces are only six stitches around, they need no stuffing.
Flatten each bump between the fingers and sew through the base. Place the middle toe first, then position the two outer toes at equal distances from it.
Do not wrap a full cream round around the foot. The photo shows individual claw forms against an otherwise blue leg.
Planning Yarn Quantity
The main blue yarn will account for most of the finished weight because it covers the head, body, four legs and tail. Buy the main color from one dye lot when possible.
Pink ranks second because the frill is a comparatively large flat component. Cream usage also adds up because twelve toes, eight frill bumps and three horns require twenty-three separate pieces.
For a closer estimate, weigh the completed head before starting the body. The body plus four legs and tail will typically require several times that amount of main-color chenille.
Competition and Design Position
Current Triceratops patterns include tiny 10 cm toys, 13–18 cm bulky versions, no-sew designs and larger multi-piece dinosaurs. The supplied design sits well above the miniature category in both length and component scale.
Its distinguishing feature is not simply the three horns. The wide bubblegum-pink frill with separate cream nodules creates a strong color block around the entire head, while the royal-blue spots introduce a second contrast on the torso.
The low body and oversized legs also make the finished silhouette closer to a walking quadruped than an upright baby-dinosaur character.
Finishing Checks
Set the Triceratops on a level surface and verify that all four feet carry weight. The belly should remain above the table rather than resting on it.
View the head straight-on. Both brow horns should begin at matching heights, and the nasal horn should sit on the center line between them.
Check the frill from behind next. Its oval edge should remain visible beyond both sides of the head and should not fold tightly around the neck.
Finish with the tail and body spots. The tail should continue the horizontal body line, while the spots should appear irregular without clustering into one large blue area.
Conclusion
Make the head, pink frill and two brow horns before producing the body so their proportions can be checked together. Those three components control the silhouette of this triceratops amigurumi crochet pattern more than the smaller surface details. Pin the four legs while the dinosaur stands on a table, then add the tail, cream toes and blue spots after the stance is stable. Photograph one front view to show the three-horn arrangement and one side view for the frill. Save the project to Pinterest and share it on Instagram with #PinkFrillTriceratops. Would you keep the frill pink on a second dinosaur or swap it for lavender?
Sources
- Amigurumis Crochet — No-Sew Triceratops Amigurumi, 2026; 18 cm tall, bulky yarn, 3.5 mm hook, 8 mm eyes, with a 5 mm hook suggested for Category 6 yarn.
- Sweet Creek Patterns — Triceratops video tutorial, January 2024; head, body, plate/frill, legs, horns, nails and assembly demonstrated step by step.
- Cuddly Stitches Craft — free Triceratops pattern, 2026; 23 cm seated / 31 cm standing in sport-weight yarn, with multiple yarn-weight substitutions described.
- DayDreamingMaker — Etsy Triceratops PDF; sport/worsted yarn, 2–3 mm hook and approximately 10 cm finished height with a 2.5 mm hook.
- TANATIcrochet — 11-in-1 Dinosaur collection; 13–16 cm bulky Triceratops, 4 mm hook and 6–8 mm safety eyes.
- Lauryn Power / Ravelry — Amigurumi Triceratops; worsted yarn, 4 mm hook and approximately 100–200 yd.
- Club Crochet — beginner Triceratops tutorial with body construction and video guidance.









