Introduction
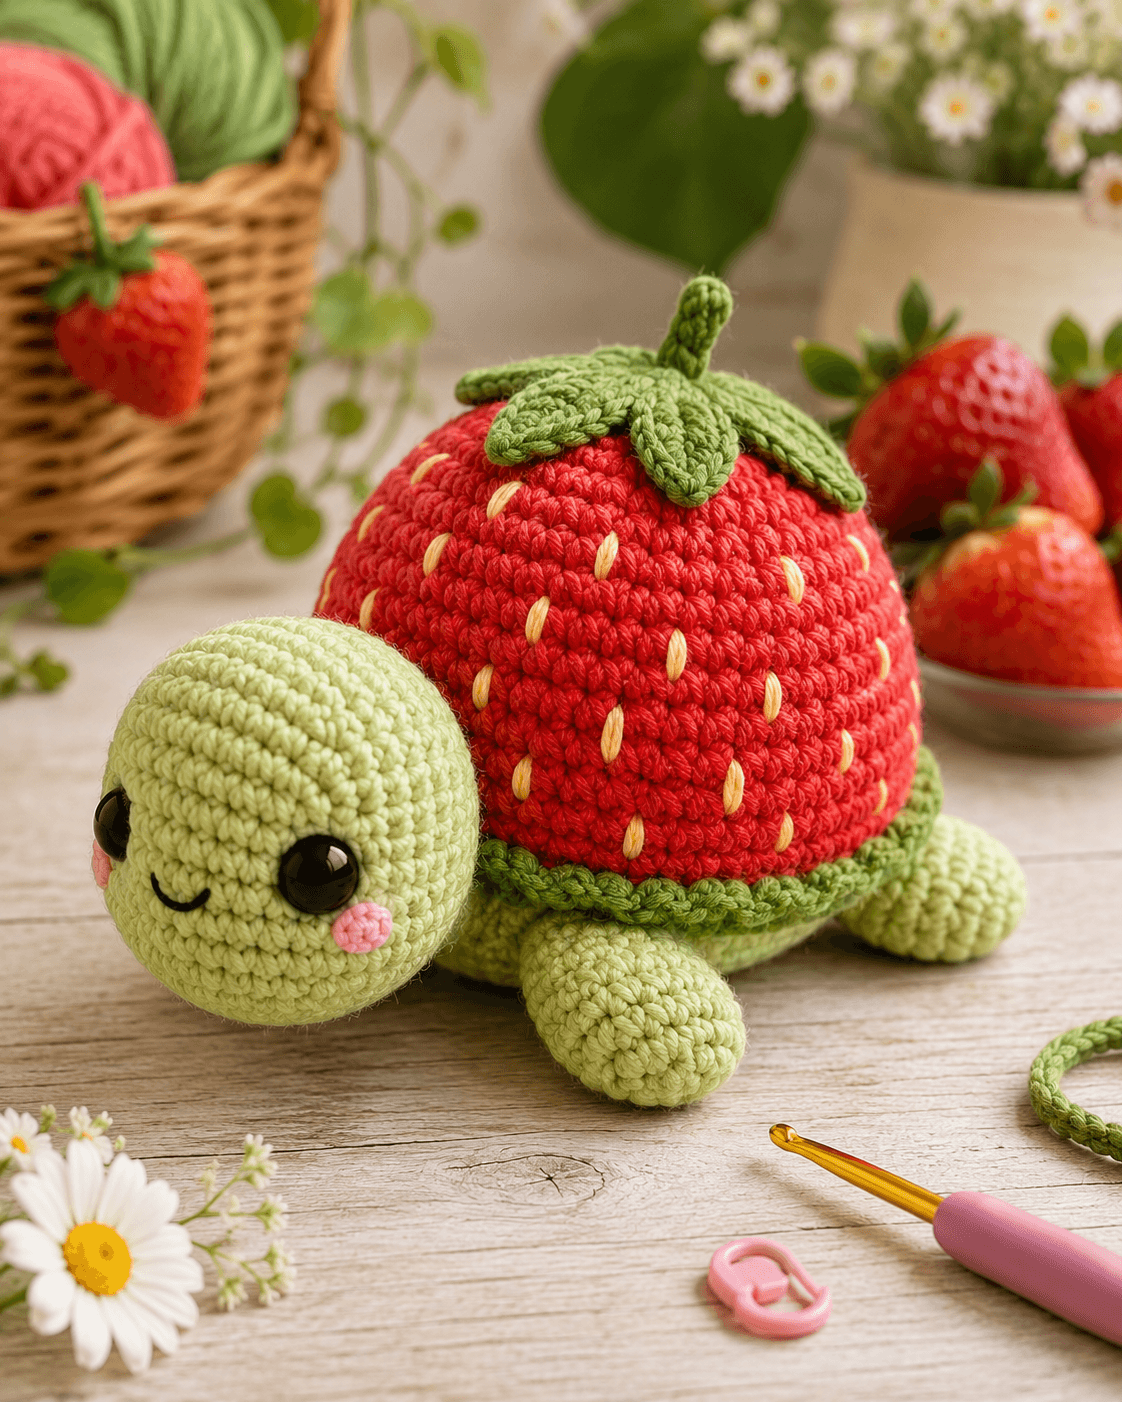
A turtle already carries a dome on its back; turning that dome into a strawberry changes where every shell decrease, seed and leaf has to sit. This strawberry turtle amigurumi crochet pattern uses DK cotton, a 3.5 mm hook and 16 mm safety eyes for a turtle approximately 20–24 cm long. The separate berry shell, five leaves and four rounded legs make it an intermediate display or gift project.
The Design: What Makes This Strawberry Turtle Different
The shell is the controlling shape. It rises higher than a conventional flat turtle shell so the red surface reads as a whole strawberry rather than a red disk. A 42-stitch maximum gives enough circumference for the embroidered seeds while keeping the body beneath it visible. Five dark-green leaves overlap the upper shell and meet around a short upright stem. The pale-green head stays deliberately large, using a 36-stitch plateau so the 16 mm eyes do not dominate the face. Four short rounded legs support the body without extending as far as sea-turtle flippers. This strawberry turtle crochet design also separates the green shell rim from the red dome. A frequent maker error is embroidering seeds before stuffing; their spacing changes when the shell expands into its final three-dimensional shape.
Project Information at a Glance
| Skill Level | Time | Finished Size | Hook | Best For |
|---|---|---|---|---|
| Intermediate | 6–8 hours | Approx. 20–24 cm long | 3.5 mm | Fruit-themed amigurumi, desk decor and handmade gifts |
Published strawberry turtles vary greatly with yarn choice. Current references range from about 6 cm with one bulky-yarn construction to 10–12 cm with sport cotton and 20–24 cm with chunky yarn. A current Etsy pattern also reaches roughly 9 inches wide and 10 inches long with size-6 yarn. The photo-matched target here sits near the larger end while retaining smooth cotton stitch definition.
Materials and Tools
Yarn
- Pale spring green — DK/light-worsted cotton — 70–85 g — head, belly and legs
- Strawberry red — matching cotton — 75–90 g — shell
- Dark leaf green — 20–25 g — shell rim, five leaves and stem
- Soft pink — 3–5 g — cheek patches
- Pale yellow — 2–3 g — embroidered strawberry seeds
- Black embroidery yarn — small amount — smile
Tools
- 3.5 mm crochet hook
- 16 mm safety eyes ×2
- Polyester stuffing
- Yarn needle
- Locking stitch markers
- Scissors
- Long pins for assembly
A current cotton strawberry-turtle pattern specifies weight-3 yarn, a 3 mm hook and 16 mm eyes, while Ravelry also indexes a bulky strawberry turtle using a 3.5 mm hook. Those references place this project specification within an established range.
Abbreviations
- MR — magic ring
- sc — single crochet
- inc — 2 sc in one stitch
- dec — decrease over two stitches
- sl st — slip stitch
- ch — chain
- hdc — half double crochet
- dc — double crochet
- BLO — back loop only
- FLO — front loop only
For an invisible decrease, catch only the front loops of the following two stitches and complete them together as one sc.
Pattern — Step by Step
Work all stuffed pieces in continuous spirals unless another method is stated. Mark the first stitch of every round.
Head
Yarn: pale green — standard amigurumi sphere math with a 36-stitch medium plateau.
R1: 6 sc in MR (6)
R2: inc ×6 (12)
R3: (sc, inc) ×6 (18)
R4: (2 sc, inc) ×6 (24)
R5: (3 sc, inc) ×6 (30)
R6: (4 sc, inc) ×6 (36)
R7–R11: sc around (36)
R12: (4 sc, dec) ×6 (30)
Insert 16 mm safety eyes between R8 and R9, approximately 8 stitches apart. Pin the pink cheek circles before locking the washers so the face can still be adjusted.
R13: sc around (30)
R14: (3 sc, dec) ×6 (24)
R15: (2 sc, dec) ×6 (18)
R16: (sc, dec) ×6 (12)
Stuff firmly, keeping the front surface smooth.
R17: dec ×6 (6)
Fasten off. Close the opening and leave a 30 cm tail for attaching the head to the body.
Pink Cheek Patches — Make 2
Yarn: soft pink.
R1: 6 sc in MR (6)
R2: inc ×6 (12)
Fasten off with a 15 cm tail.
Flatten each circle slightly while sewing. Position one below and outward from each eye.
Body / Belly
Yarn: pale green.
R1: 6 sc in MR (6)
R2: inc ×6 (12)
R3: (sc, inc) ×6 (18)
R4: (2 sc, inc) ×6 (24)
R5: (3 sc, inc) ×6 (30)
R6: (4 sc, inc) ×6 (36)
R7: (5 sc, inc) ×6 (42)
R8–R10: sc around (42)
Fasten off with a 45 cm tail.
This section forms the lower turtle body beneath the strawberry shell. Stuff only after the legs and shell position have been tested.
Front Legs — Make 2
Yarn: pale green.
R1: 6 sc in MR (6)
R2: inc ×6 (12)
R3: (sc, inc) ×6 (18)
R4–R6: sc around (18)
R7: (sc, dec) ×6 (12)
R8–R10: sc around (12)
Stuff the rounded end lightly.
Flatten the final round.
Fasten off with a 25 cm sewing tail.
Back Legs — Make 2
Yarn: pale green.
R1: 6 sc in MR (6)
R2: inc ×6 (12)
R3: (sc, inc) ×6 (18)
R4–R5: sc around (18)
R6: (sc, dec) ×6 (12)
R7–R9: sc around (12)
Stuff the first two-thirds lightly.
Flatten the open end.
Fasten off with a 25 cm tail.
Strawberry Shell
Yarn: strawberry red.
R1: 6 sc in MR (6)
R2: inc ×6 (12)
R3: (sc, inc) ×6 (18)
R4: (2 sc, inc) ×6 (24)
R5: (3 sc, inc) ×6 (30)
R6: (4 sc, inc) ×6 (36)
R7: (5 sc, inc) ×6 (42)
R8–R13: sc around (42)
R14: (5 sc, dec) ×6 (36)
R15: sc around (36)
R16: (4 sc, dec) ×6 (30)
Stuff the shell firmly enough to retain a strawberry dome but leave the final two centimeters at the opening flexible for joining.
R17: (3 sc, dec) ×6 (24)
Fasten off with a 50 cm tail.
Green Shell Rim
Yarn: dark green.
Ch 43.
Join carefully without twisting.
R1: sc around (42)
R2: sc around (42)
Fasten off with a long tail.
Pin the band around the junction between red shell and pale-green belly. The red dome should rise directly above it.
Strawberry Top Leaves — Make 5
Yarn: dark green. Work flat.
Ch 10.
Row 1: starting in second ch, sc, hdc, 4 dc, hdc, sc, sl st (9)
Continue around the opposite side of the foundation chain:
sl st, sc, hdc, 4 dc, hdc, sc.
Work 3 sc into the tip chain if extra point definition is needed.
Fasten off with a 20 cm tail.
Make five identical leaves.
Strawberry Stem
Yarn: dark green.
R1: 6 sc in MR (6)
R2–R7: sc around (6)
Stuff with a very narrow amount of fiberfill or leave unstuffed for a softer stem.
Fasten off with a 20 cm tail.
Strawberry Seeds
Yarn: pale yellow.
Cut a long embroidery strand.
Make approximately 24–30 vertical seed stitches across the red shell.
Each visible seed should measure approximately 6–8 mm.
Stagger them rather than placing them in straight vertical columns.
Do not pull the embroidery thread tightly enough to dent the shell.
Face Embroidery
Yarn: black.
Embroider a shallow curved smile between the eyes, approximately 2.5–3 cm wide.
The supplied image shows no separate nose, so keep the mouth line isolated rather than adding a muzzle.
Assembly
- Sew both pink cheek patches to the finished head, then embroider the black curved smile between the eyes.
- Pin the head to the front edge of the pale-green body so its lower rear quarter overlaps the body rather than sitting entirely outside it.
- Attach the two front legs beside the head, angling their rounded ends slightly forward and outward.
- Sew both back legs to the rear half of the body, keeping all four legs in contact with a flat table during pinning.
- Stuff the pale-green body moderately and position the red strawberry shell over it with its opening facing downward.
- Sew the shell securely around the body, then cover the joining seam with the two-round dark-green shell rim.
- Embroider 24–30 pale-yellow seeds across the stuffed red dome, checking the spacing from the front, side and rear.
- Overlap the five green strawberry leaves around the shell crown and sew their narrow bases near the center while leaving the pointed ends free.
- Insert the short green stem into the opening between the five leaves and stitch through the stem base, leaves and upper shell several times.
- Set the turtle on a level surface, adjust all four legs until the shell sits evenly, then weave every remaining yarn tail into the stuffed sections.
The completed turtle should rest on all four legs with the strawberry shell centered above the body and the green crown positioned at the shell’s highest point.
7 Technical Tips
- Shell flattening: Under-stuffing the 42-stitch dome creates a pancake profile instead of a berry shape. Add fiberfill in small pieces until the red shell rises approximately 7–9 cm above the body.
- Head rotation: A narrow sewing area lets the 36-stitch head turn sideways. Attach at least 10–12 consecutive head stitches to the body and reinforce the lower center twice.
- Eye-placement mismatch: One stitch of horizontal error is visible with 16 mm eyes. Insert both eyes before the washers are locked and count the stitches between their posts.
- Leg instability: Unequal attachment heights cause one leg to float above the table. Pin all four pieces with the turtle resting on a hard flat surface before sewing.
- Seed dents: Pulling embroidery yarn through firm stuffing can compress the red shell. Leave each 6–8 mm seed stitch lying against the surface without cinching the fabric.
- Leaf crowding: Five leaves sewn edge-to-edge can hide most of the strawberry dome. Overlap only the narrow bases and keep at least half of every pointed leaf visible.
- Rim rippling: A green rim longer than the shell circumference forms waves. Test the 42-stitch ring around the stuffed shell before final attachment and remove stitches if it hangs loosely.
Shaping the Strawberry Shell
The red shell has to read as both turtle anatomy and fruit. A conventional turtle dome can be relatively shallow, but this version needs enough height for a recognizable strawberry profile.
The six-round 42-stitch plateau supplies circumference. Keeping several plain rounds after the final increase creates side depth before decreases begin.
Do not make the final opening too small. A 24-stitch edge leaves enough room to seat the dome securely on the pale-green body and distribute the stuffing around the join.
Placing the Strawberry Seeds
Seed embroidery carries much of the fruit identity. Ribblr’s current strawberry-turtle pattern specifically lists light-yellow or beige yarn for the strawberry seeds, while other dedicated patterns use white details on the shell.
The supplied image uses narrow yellow stitches rather than round dots. Work every seed vertically and keep their lengths close to 6–8 mm.
Start near the shell center and move outward in offset rows. Stop frequently and turn the turtle; dense seeds at the front with empty areas at the rear look unbalanced once the piece is displayed.
Making the Five-Leaf Strawberry Crown
The crown has five broad pointed leaves. They are longer than the tiny calyx pieces used on many fruit amigurumi patterns, so they need to be made separately rather than worked as picots around one circle.
Place one leaf toward the front, two diagonally toward the sides and two toward the rear. Their bases may overlap, but the tips should remain independent.
The small stem sits above the central overlap. Sew through all layers at this point because the crown receives regular handling when the turtle is picked up.
Controlling the Turtle Head Proportions
A 36-stitch head matches the medium scale visible in the supplied image. Standard turtle references also use a 36-stitch head plateau, while smaller mini turtles often stop at 20–30 stitches.
The head should be noticeably smaller than the strawberry shell but large enough to project beyond the green rim.
Place the eyes relatively low on the sphere. Eyes fitted too near the crown make the face appear tilted upward rather than forward.
Choosing Hook, Yarn and Safety Eyes
Dedicated strawberry-turtle patterns currently cover several material systems. Llamascrochet uses weight-3 cotton, a 3 mm hook and 16 mm safety eyes. Megan Fetzer’s Ravelry-listed version uses bulky velvet or chenille with a 3.5 mm hook. A 2024 Sophie Tinie version uses bulky yarn, a 4 mm hook and 9 mm eyes.
The smooth cotton surface in the photograph favors DK or light-worsted yarn rather than chenille. A 3.5 mm hook produces tight enough stitches to contain stuffing while preserving the individual seed embroidery.
If substituting thicker yarn, scale the eye diameter with the head. Do not retain 16 mm eyes on a substantially enlarged plush version without testing their proportion first.
Planning Yarn Quantity
Published small strawberry turtles can use less than 10 g for individual colors, but larger patterns allocate much more. One Ribblr cotton design lists 100 m pink, 100 m red and 70 m dark green.
This project uses the largest amount of red in the 42-stitch strawberry shell and the largest amount of pale green in the head, body and four legs.
Crochet and weigh the red shell before making the other pieces if yarn supply is limited. Add approximately 10 percent to every calculated amount for sewing tails, embroidery corrections and tension variation.
Attaching the Four Legs
The photograph shows compact rounded legs rather than thin sea-turtle flippers. Both front and rear pairs reach 18 stitches at their broadest point before narrowing to 12.
The front pieces are one round longer because they project more clearly from beneath the head. Back legs stay slightly shorter and sit under the rear shell.
Do not overfill either pair. A densely packed leg becomes rigid and may lift the body instead of resting flat.
Creating the Green Shell Rim
The dark-green rim provides an important visual break between pale body and red shell. Without it, the red dome can look like a separate ball resting on the turtle.
Make the ring independently and test it around the stuffed shell/body junction. Cotton gauge changes after stuffing, so an exact chain count should be checked physically before sewing.
Attach the lower edge to the body first. Sew the upper edge to the red shell second while keeping the green band approximately the same width all around.
Finishing Checks
Place the turtle on a flat surface and inspect its body line from the front. Both front legs should touch the table, and the head should sit centrally between them.
View the shell from above. The five green leaves should radiate around the stem without hiding one another, and the stem should rise close to vertical.
Turn the turtle slowly to inspect the seed distribution. Add one or two stitches to any large empty section rather than overcrowding an already dense area.
Check the green rim last. Its width should remain consistent from the neck to the rear shell.
Conclusion
Crochet the 36-stitch head and 42-stitch red shell first, then test their scale together before making all four legs. Record the stuffed shell height and head width so the strawberry turtle amigurumi crochet pattern can be repeated with matching proportions. Add the yellow seeds only after the dome is fully stuffed, then position all five leaves before attaching the stem. Photograph one side view and one overhead view, save the finished turtle to Pinterest and share it on Instagram with #StrawberryTurtleAmigurumi. The next practical step is checking the 16 mm eye spacing before locking the washers. Would you keep the turtle pale green or make the body strawberry-blossom pink?
Sources
- Ribblr — KnottyMeow Strawberry Turtle Amigurumi Pattern: intermediate pattern, plush yarn, 4.5 mm hook, green strawberry stem and light-yellow/beige seed yarn.
- Ribblr — Llamascrochet Strawberry Turtle Amigurumi: weight-3 cotton, 3 mm hook, 16 mm safety eyes and listed yarn meterages.
- Sophie Tinie — 2024 no-sew Strawberry Turtle: bulky weight-5 yarn, 4 mm hook and 9 mm eyes.
- Red Ted Art / Craft Alotl — free Strawberry Turtle pattern with separate front legs, back legs, shell details and strawberry accents.
- The Turtle Hub — recent Strawberry Turtle tutorial: approximately 11.5 cm, four-ply cotton, 3.5 mm hook and 5 mm eyes.
- CrochetByGenna — strawberry turtle using size-6 yarn, 5 mm hook, 12 mm eyes and approximately 9 × 10 inch dimensions.
- Ravelry — Megan Fetzer Strawberry Turtle: bulky velvet/chenille and 3.5 mm hook.
- StringyDingDing — standard turtle amigurumi reference using a 36-stitch head plateau.









