Introduction
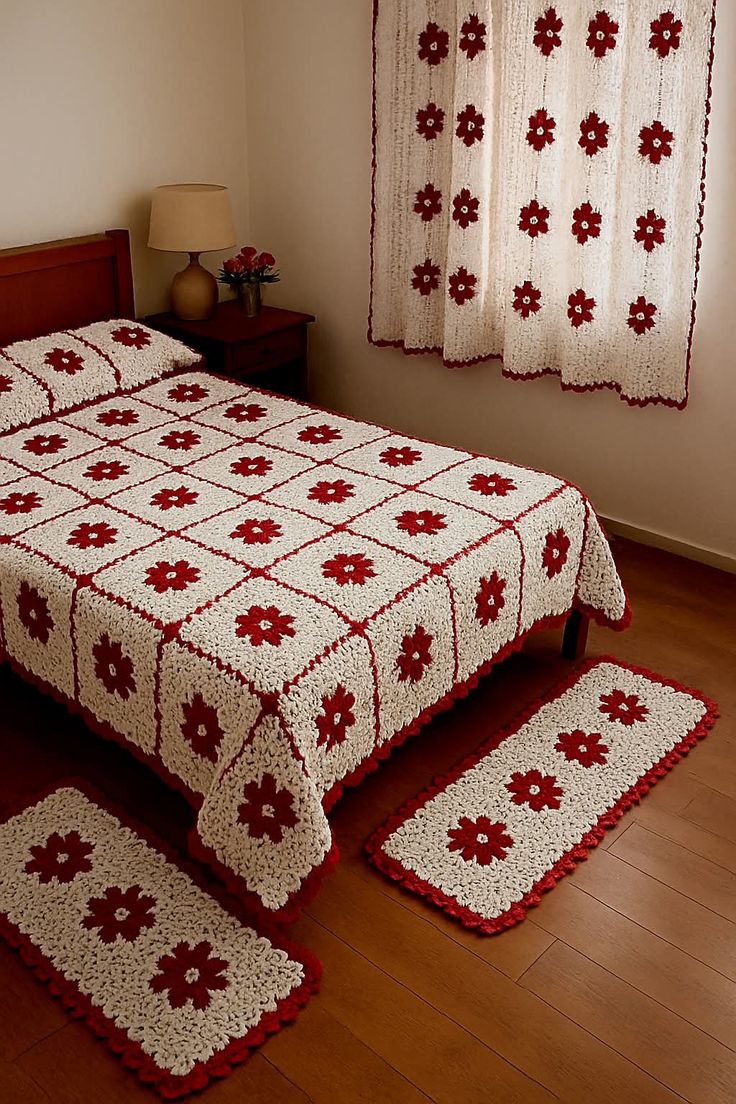
Eight crimson petals have to remain centered inside a cream square while every red joining line meets at a clean right angle. This red flower granny square crochet pattern uses worsted or Aran cotton-blend yarn with a 5 mm hook for approximately 23–25 cm motifs. Forty-eight squares build the main bedspread, while matching pillows, runners and a floral curtain extend the same two-color construction around the room.
The Design: What Makes This Red Flower Set Different
The flower itself is compact compared with the surrounding cream field. Eight broad crimson petals form a clear circular center, but several cream rounds create the actual square, giving each bloom substantial negative space. A second structural choice is the red joining yarn. Instead of hiding seams in cream, the join deliberately outlines every block and creates the narrow geometric grid visible across the bed. The red and white crochet bedspread therefore balances floral centers with rigid square divisions. Matching pillows repeat the grid, while the curtain spreads the flowers farther apart inside a lighter cream panel. Two narrow runners reduce the format to a single row of motifs. One common mistake is making the red join too thick; a raised seam wider than about 5 mm competes visually with the flower centers and makes the squares appear smaller.
Project Information at a Glance
| Skill Level | Time | Finished Size | Hook | Best For |
|---|---|---|---|---|
| Intermediate | 65–85 hours for complete set | Bedspread approx. 155–170 × 205–220 cm | 5.0 mm | Coordinated bedroom crochet and modular home decor |
Published red and floral granny squares demonstrate a broad size range. A current red flower motif on Etsy measures 12 cm, a solid Aran daisy square measures approximately 12.7 cm with a 5 mm hook, and larger floral afghan-block collections reach roughly 18–30.5 cm. The 23–25 cm target here is therefore appropriate for a bedspread made with relatively large motifs. :contentReference[oaicite:17]{index=17}
Materials and Tools
Yarn
- Warm cream / ivory — worsted or Aran cotton blend — approximately 2,100–2,600 g for the complete photographed set
- Deep crimson red — matching worsted or Aran yarn — approximately 850–1,050 g for flowers, joins and red accessory edging
Cotton and cotton-blend yarns in DK or worsted weights are currently recommended for flower granny squares where clear petal definition and shape retention are priorities. :contentReference[oaicite:18]{index=18} A 5 mm hook also matches a published Aran-weight flower-square reference. :contentReference[oaicite:19]{index=19}
Tools
- 5.0 mm crochet hook
- Large-eye yarn needle
- Sharp scissors
- Blocking mats
- Rust-resistant T-pins
- Locking stitch markers
- Measuring tape
- Optional curtain rod rings or fabric loops
Abbreviations
- MR — magic ring
- ch — chain
- sl st — slip stitch
- sc — single crochet
- hdc — half double crochet
- dc — double crochet
- tr — treble crochet
- sp — space
- ch-sp — chain space
- RS — right side
- WS — wrong side
No invisible decrease is required because the motif is constructed flat; stitch height, corner spaces and cluster placement produce all shaping.
Pattern — Step by Step
Make one complete square before starting the bedspread. Block it and confirm a finished measurement of approximately 23–25 cm. Use that blocked motif as the production template.
Cream Flower Center
Yarn: warm cream.
R1: 8 sc in MR (8)
Join with sl st to the first stitch.
Fasten off.
Red Flower Petals
Yarn: crimson red.
Join red in any center stitch.
R2: ch 3, 3 dc in same st, ch 3, sl st in same st; *sl st in next st, ch 3, 3 dc in same st, ch 3, sl st in same st* around.
Eight petals should surround the cream center.
Fasten off red.
Each petal should remain broad and rounded. Do not pull the final slip stitch tightly enough to pinch the petal base.
Cream Rear Foundation
Yarn: cream.
Join behind one petal at its base.
R3: ch 1, sc around the base of the petal, ch 3; *sc around the next petal base, ch 3* around.
Join.
You now have eight cream anchoring points and eight ch-3 spaces behind the flower.
Flower Expansion Round
R4: sl st into first ch-3 sp, ch 3, 3 dc in same space; ch 1; *4 dc in next ch-3 sp, ch 1* around.
Join.
Square-Shaping Round
Mark four spaces at equal 90-degree intervals.
R5: in each marked corner space work (3 dc, ch 3, 3 dc). In each remaining space work 3 dc. Ch 1 between every group.
Join.
Lay the motif flat. The red flower should sit precisely at the intersection of the two diagonals.
Cream Granny Round
R6: sl st into first corner; (ch 3, 2 dc, ch 2, 3 dc) in corner; *ch 1, 3 dc in each side ch-sp, ch 1, (3 dc, ch 2, 3 dc) in next corner* around.
Join.
Second Cream Expansion
R7: repeat R6, working one 3-dc group into every side ch-1 space and (3 dc, ch 2, 3 dc) in all four corners.
Openwork Cream Round
R8: ch 4, skip 1 st, dc in next; *ch 1, skip 1, dc in next* along each side. At corners work (dc, ch 3, dc).
Join.
Wide Cream Frame
R9: ch 1, sc in every dc and ch-1 sp; in each corner work (2 sc, ch 2, 2 sc).
Join.
Second Openwork Round
R10: ch 3, skip 2 sts, sc in next; *ch 3, skip 2, sc in next* along each side.
In each corner work (sc, ch 4, sc).
Join.
Final Cream Square Round
R11: work 3 dc into each ch-3 side loop. In each corner ch-4 loop work (3 dc, ch 2, 3 dc).
Fasten off.
Block to approximately 23–25 cm square.
Current published floral blocks range from 12 cm red motifs to floral afghan blocks exceeding 18 cm, so larger bedspread squares can be produced by adding background rounds without changing the central flower. :contentReference[oaicite:20]{index=20}
Blocking the Motifs
Pin all four corners to the final measurement.
Measure both diagonals.
Keep the difference below approximately 5 mm.
Add pins at each side midpoint.
Allow the squares to dry fully before joining.
Bedspread — Make Approximately 48 Squares
Arrange six motifs across and eight motifs long.
At a 24 cm blocked measurement, the main square field measures approximately 144 × 192 cm before seams and edging.
The joined grid and outer border increase those dimensions.
If more side drop is required, add one complete column rather than enlarging selected squares.
Red Vertical Joining
Yarn: crimson red.
Place two blocked squares RS up beside one another.
Insert the hook through corresponding outer loops.
Work loose slip stitches along the full seam.
Keep the red line narrow and flat.
Join all vertical columns first.
Red Horizontal Joining
Repeat the same flat slip-stitch method across every horizontal seam.
At four-square intersections, work through the existing corner loops without adding a bulky knot or cluster.
The red seam is intentionally visible, but it should remain significantly narrower than the red flower diameter.
Published tutorials demonstrate several valid granny-square joining methods, including crochet joins and sewn joins; flower-blanket tutorials also commonly assemble one direction before crossing with the second. :contentReference[oaicite:21]{index=21}
Bedspread Border Round 1
Yarn: cream.
R1: sc evenly around the complete perimeter, working 3 sc in each corner.
Count opposite sides before continuing.
Bedspread Border Round 2
R2: ch 3, dc in each stitch around; work (2 dc, ch 2, 2 dc) in each corner.
Openwork Border
R3: ch 4, skip 1, dc in next; *ch 1, skip 1, dc in next* around. Work (dc, ch 3, dc) at each corner.
Lace Border
R4: *sc in next ch-1 sp, ch 4* around.
Use ch 6 at the four corners.
Final Cream Scallops
R5: work 5 dc in one ch-4 loop, sl st in the next loop; repeat around.
At each corner, work one slightly larger 7-dc scallop if needed to turn cleanly.
Fasten off.
Scalloped borders are also used in published flower-granny blankets. :contentReference[oaicite:22]{index=22}
Matching Pillow Squares — Make Eight per Two Pillows
Make eight standard red flower granny squares.
Join four in a 2 × 2 grid for each pillow front.
Use the same red joining yarn as the bedspread.
Work two cream sc rounds around the outside.
Pillow Back Panels
Yarn: cream.
For each pillow, crochet two rectangular dc panels.
Each panel should equal the finished pillow width and approximately two-thirds of its height.
Overlap the two backs by approximately 10–12 cm.
Sc around all four edges to connect the front and overlapping back panels.
Bedroom Runner — Make Two
Make six standard flower squares.
Join three motifs end to end for each runner.
Join with cream rather than red if you want the field to appear continuous, or use narrow red joins to reproduce the stronger lines visible in the photograph.
Work:
Border R1: cream sc around.
Border R2: crimson sc around.
Border R3: crimson scallops — *skip 2, 5 dc in next, skip 2, sl st in next*.
Block each runner to approximately 25 cm wide × 75–80 cm long.
Curtain Flower Motifs — Make Approximately 20
The curtain uses the same crimson flower but a lighter surrounding field.
Make the cream center and red petals exactly as for the bedspread square.
Complete only the first two cream background rounds so the individual flower sections remain visually smaller.
Curtain Cream Mesh
For each vertical strip, work a cream mesh panel using:
Row 1: ch to desired curtain width.
Row 2: dc in sixth ch from hook, *ch 2, skip 2 ch, dc in next* across.
Following rows: ch 5, turn, dc in next dc, *ch 2, dc in next dc* across.
Continue until the strip reaches the required window length.
Insert or sew the red flower motifs at regular vertical intervals.
Curtain Layout
Arrange approximately five flower columns across and four flower levels down.
Keep the flower centers approximately 20–25 cm apart vertically.
Use cream mesh between motifs rather than joining the bedspread squares directly, because the photographed curtain is more translucent than the blanket.
Curtain Red Side Edging
Yarn: crimson.
Work one round or row of sc down each outer side.
At the lower edge, work a narrow scallop:
*skip 2 sts, 5 dc in next, skip 2, sl st in next*
Repeat across.
Curtain Hanging Loops
Using cream, make loops approximately 7–10 cm long at equal intervals across the top.
Space the loops about 10–12 cm apart.
Check the selected curtain rod diameter before fastening them permanently.
Granny-square curtain ideas remain an active crochet format, including modern floral curtain examples and discovery collections. :contentReference[oaicite:23]{index=23}
Assembly
- Block all 48 bedspread motifs to one fixed 23–25 cm template before placing any red joining stitches.
- Arrange six squares across and eight down, checking that every crimson flower faces the same direction and sits centrally inside its cream field.
- Join the vertical columns with thin crimson slip-stitch seams and compare each finished seam against the blocked motif height.
- Join the horizontal rows in red, keeping the four-square intersections flat and free from bulky knots.
- Work the five cream bedspread border rounds and correct any wave before the final scalloped round is added.
- Join four squares for each pillow front and attach the overlapping cream back panels.
- Assemble two one-by-three runners and finish them with cream and crimson perimeter edging.
- Make approximately 20 smaller curtain flowers and position them in five columns across the cream mesh panel.
- Add crimson side and lower curtain edging, then attach equally spaced cream hanging loops across the top.
- Block all finished pieces separately and record the bedspread, pillow, curtain and runner dimensions before laundering the full set.
The finished bedroom set should repeat the same crimson flower and ivory background while varying the motif spacing according to the function of each piece.
7 Technical Tips
- Red-grid bulking: A joining ridge wider than approximately 5 mm begins to dominate the cream squares. Use loose slip stitches through outer loops rather than dense double-layer sc seams.
- Flower misalignment: A center displaced by more than about 1 cm becomes obvious once several squares form a grid. Mark four corners immediately after the flower-transition round.
- Square-size drift: A difference greater than 5 mm can bend the long red seam. Block every motif to one reusable template before assembly.
- Petal pinching: Pulling the red petal-closing slip stitch too tightly creates pointed rather than rounded petals. Leave enough movement for the petal base to remain about 2–3 cm wide.
- Border ruffling: Excess stitches in the first cream border round cause waves by R3. Opposite edges should carry matching stitch totals before the openwork begins.
- Curtain sagging: Hanging loops spaced more than about 12–14 cm apart may concentrate too much weight between attachment points. Add another loop rather than stretching the top edge.
- Runner curling: A tight crimson final round can turn the runner edges upward. Compare the red-edge length with the cream foundation and move up 0.5 mm in hook size if needed.
Building the Eight-Petal Red Flower
The flower is intentionally simpler than a layered rose. Eight broad petals create a clear graphic shape that remains readable from across a bedroom.
A published Dainty Daisy granny square also uses an eight-petal structure, while other current flower blocks use five or twelve petals. That variation confirms that petal count is a design decision rather than a fixed granny-square rule. :contentReference[oaicite:24]{index=24}
Keep every petal attached to one center stitch. This maintains even spacing and makes it easier to place the cream foundation behind the flower.
Turning the Flower into a Large Cream Square
The central bloom occupies only part of the final 23–25 cm square. Most of the motif size comes from the surrounding cream rounds.
This is useful for resizing. If a sample flower looks correct but the block is too small, add another granny-style or openwork round instead of increasing the petal size.
Mama in a Stitch’s current 2026 flower square likewise notes that flower-square size can be altered through yarn and hook choice. :contentReference[oaicite:25]{index=25}
Choosing Yarn and Hook Size
Published flower squares span fine cotton through Aran-weight yarn. Primavera uses 125 m/50 g cotton with a 3.5 mm hook, while a solid Aran daisy square uses a 5 mm hook and finishes at about 12.7 cm. :contentReference[oaicite:26]{index=26}
The photograph shows comparatively substantial cream stitches and large blocks, so worsted or Aran yarn with a 5 mm hook is the more suitable starting point.
Adjust the hook by 0.5 mm after the first square if the fabric feels rigid or the chain spaces appear overly loose.
Creating the Contrasting Red Joining Grid
The join is one of the strongest features of the design. Crimson lines divide otherwise pale motifs and repeat the flower color between blocks.
Work the seam thinly. A flat slip-stitch join preserves the appearance of a drawn red outline rather than forming a heavy cord.
Current joining references document both crochet and sewn methods, and flower-blanket tutorials commonly join complete horizontal or vertical strips in sequence. :contentReference[oaicite:27]{index=27}
Planning a 48-Square Bedspread
At approximately 24 cm per motif, six blocks create a nominal 144 cm main width and eight produce roughly 192 cm of length before joins and border.
The final cream edging increases both measurements enough to produce the photographed side and foot drop on a medium-size bed.
For a wider bed, seven squares across will produce a cleaner result than disproportionately widening the border.
Making the Matching Pillows
The pillow fronts repeat four motifs in a 2 × 2 arrangement. This preserves the same square scale as the bed rather than shrinking the flowers for a smaller object.
Join the four blocks with red so their front grid aligns visually with the bedspread.
An envelope back keeps the cover removable and avoids introducing buttons or zippers into the photographed two-color design.
Adapting the Motif for the Curtain
The curtain cannot simply reproduce the dense bedspread fabric because the reference allows light through its cream background.
Use the same red flowers but embed them in a more open mesh. This preserves the visual connection without making the panel unnecessarily heavy.
Granny-square curtain designs remain a recognized format in current crochet discovery results. :contentReference[oaicite:28]{index=28}
Before finishing the curtain length, hang the partially completed panel for several hours. Cotton can lengthen under its own weight, and a long panel may gain several centimeters after hanging.
Constructing the Bedside Runners
The two floor pieces reduce the composition to a linear format. Three flowers in one row repeat the bedspread pattern without creating a large rug.
Use a firm cream outer round followed by crimson edging. The darker final border visually anchors the runner against the wood floor.
If the runners will be walked on, add a suitable non-slip backing appropriate to the floor surface; the crochet construction alone does not provide reliable grip.
Planning Yarn Quantity
Full bedroom sets consume substantially more neutral yarn than the flower color because cream appears in every square background, the border, pillow backs, curtain mesh and runners. Current flower-square guidance also notes that yarn use changes substantially with motif size and fiber. :contentReference[oaicite:29]{index=29}
Make one complete 24 cm bedspread motif and weigh the cream and red portions separately. Multiply those numbers by 48 before adding yarn for joins and edging.
Then calculate the curtain separately because its mesh construction consumes much less cream per square centimeter than the bedspread.
Finishing Checks
Spread the bedspread flat and examine the crimson grid first. Every horizontal and vertical line should continue across the blanket without obvious jogs at four-square intersections.
Inspect the flowers next. All eight petals should remain comparable in width and the cream center should stay visible.
Hang the curtain before its final blocking check. Flower rows should remain level, and the lower scalloped edge should clear the floor or window furniture.
Lay both runners beside the bed last and compare their final length and red edging.
Conclusion
Make and block one full-size square before calculating yarn for all 48 bedspread motifs. Record its width, red-flower diameter and cream-yarn weight so another red flower granny square crochet pattern can be resized without changing the central bloom. Build the bedspread grid first, then use the same measurements to coordinate the pillows and runners while keeping the curtain more open. Photograph one square close-up and one complete-room view, save the project to Pinterest and share it on Instagram with #CrimsonFlowerBedroom. Block the red joining grid before judging the final dimensions. Would you keep the flowers deep crimson, or use a darker burgundy red for the next set?
Sources
- Etsy — Red Flower Granny Square Crochet Pattern, finished size approximately 12 × 12 cm and advanced-beginner construction. :contentReference[oaicite:30]{index=30}
- Ravelry — Red Africa Flower Granny Square, free pattern published August 2024 using a 3 mm hook. :contentReference[oaicite:31]{index=31}
- Ravelry — JTcreations Flower Granny Square, free pattern published July 2024 with written, photo and video instruction. :contentReference[oaicite:32]{index=32}
- Adore Crea — Solid Daisy Granny Square using Aran yarn and a 5 mm hook; approximately 12.7 cm finished size. :contentReference[oaicite:33]{index=33}
- Dadá’s Place — Primavera Flowers Granny Square using 100% cotton, 125 m/50 g and a 3.5 mm hook. :contentReference[oaicite:34]{index=34}
- Just Be Crafty — Dainty Daisy Granny Square with eight petals and separate joining/scalloped-border guidance. :contentReference[oaicite:35]{index=35}
- Bethany Lynne Makes — 2024 tutorial covering multiple granny-square joining methods. :contentReference[oaicite:36]{index=36}
- Mama in a Stitch — April 2026 Flower Granny Square tutorial describing a four-round motif and resizing by changing yarn and hook. :contentReference[oaicite:37]{index=37}
- Pinterest — current red-and-white granny-square and crochet granny-square curtain discovery pages. :contentReference[oaicite:38]{index=38}









