Introduction
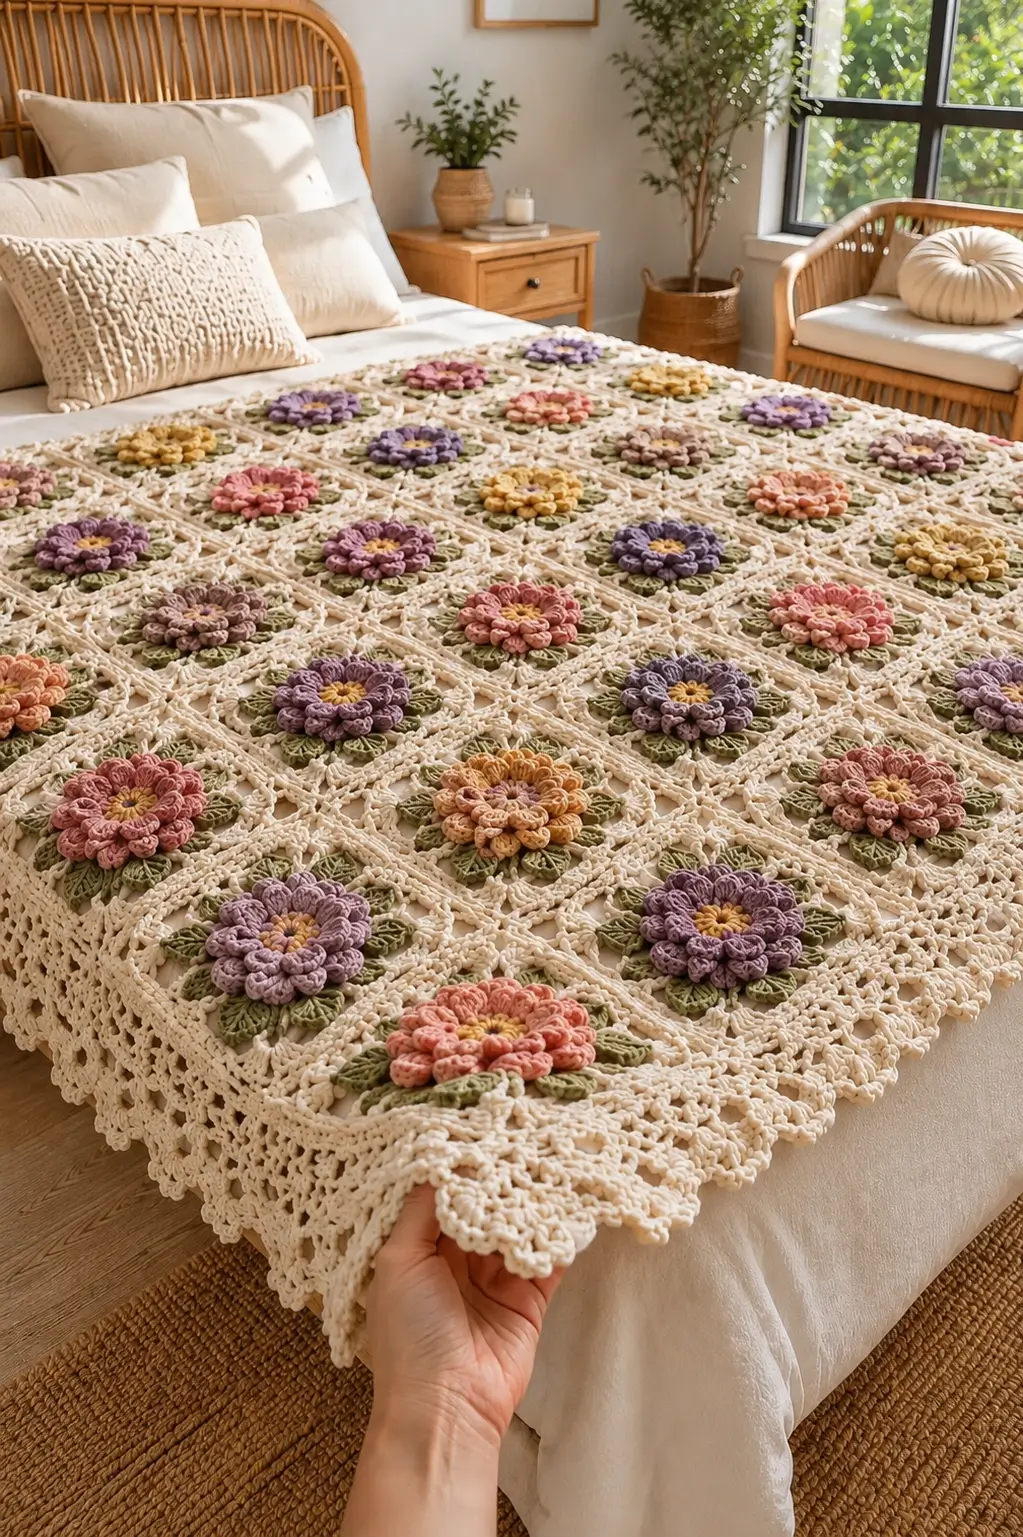
A chrysanthemum-style crochet flower needs enough room for two petal layers without forcing the surrounding cream square into a bowl. This 3D flower granny square crochet pattern uses light-worsted yarn and a 4.5 mm hook for 18–20 cm blocks. Approximately 80 motifs create the bedspread, combining coral, lavender, plum, mustard and rose flowers with sage leaves and an ivory lace framework.
The Design: What Makes This Flower Bedspread Different
The flower sits several centimeters above the cream background, so its construction has to be separated from the square foundation. A small ochre center supports ten compact inner petals and a second ring of larger petals. Sage leaves extend behind the flower in four directions and visually bridge the circular bloom with the square cream frame. The dimensional flower granny square then changes character completely: the floral center gives way to an open ivory lattice with defined corners and comparatively little surface texture. That contrast matters. The bedspread gets depth from the flowers, not from heavy seams or dense borders. Several flower colors repeat through the field while leaf and background colors remain fixed. One common mistake is tightening the foundation behind the second petal layer; this causes the center to dome and prevents neighboring squares from joining flat.
Project Information at a Glance
| Skill Level | Time | Finished Size | Hook | Best For |
|---|---|---|---|---|
| Intermediate | 65–85 hours | Approx. 175–190 × 210–225 cm | 4.5 mm | Full-size bedspreads and dimensional floral blankets |
Published 3D flower blocks range from approximately 10 cm in sport yarn to 16–20 cm in heavier constructions. A Ravelry flower block uses worsted yarn with a 5 mm hook for a 16 cm result, while another tutorial specifies worsted yarn and a 4.5 mm hook for about 20 cm. These references support the 18–20 cm photo-matched target used for this project. :contentReference[oaicite:16]{index=16}
Materials and Tools
Yarn
- Warm ivory or natural cream — light-worsted cotton blend — approximately 1,700–2,100 g — square backgrounds, joining and border
- Dusty rose / coral — matching yarn — approximately 180–220 g
- Muted lavender / plum — matching yarn — approximately 180–220 g
- Peach / terracotta — matching yarn — approximately 150–190 g
- Mustard / ochre — matching yarn — approximately 130–170 g
- Sage / olive green — matching yarn — approximately 350–450 g — leaves
- Golden yellow — matching yarn — approximately 80–120 g — flower centers
One published 14 cm DK 3D-flower square uses approximately 24 g of yarn, but the deeper flowers and larger cream backgrounds here require more material per block. Weigh one completed motif before purchasing the full quantity. :contentReference[oaicite:17]{index=17}
Tools
- 4.5 mm crochet hook
- Large-eye yarn needle
- Sharp scissors
- Locking stitch markers
- Blocking mats
- Rust-resistant T-pins
- Measuring tape
Abbreviations
- MR — magic ring
- ch — chain
- sl st — slip stitch
- sc — single crochet
- hdc — half double crochet
- dc — double crochet
- tr — treble crochet
- sp — space
- ch-sp — chain space
- FLO — front loop only
- BLO — back loop only
No invisible decrease is required because this is a flat modular project; shaping comes from petal height, skipped stitches, chain spaces and corner placement.
Pattern — Step by Step
Make one complete motif before starting production. Block it and record the finished measurement. The target is approximately 18–20 cm square.
Golden Flower Center
Yarn: golden yellow.
R1: 6 sc in MR (6)
R2: inc ×6 (12)
Join with sl st.
Fasten off yellow.
Inner Flower Petals
Yarn: selected flower color.
Join flower yarn in any stitch.
R3: ch 1, sc in same st; *ch 4, skip 1 st, sc in next st* around, ending with 10 ch-4 loops.
Join.
Work into each ch-4 loop:
(sl st, sc, hdc, 3 dc, hdc, sc, sl st)
Repeat for all 10 loops.
You now have ten compact raised petals.
Outer Flower Foundation
Do not cut the flower yarn.
Working behind the first petal layer:
R4: *sc around the base between two petals, ch 5* around (10 ch-5 loops).
Join.
Keep every chain relaxed. Tight chains pull the second petal layer inward.
Outer Flower Petals
Work into each ch-5 loop:
(sl st, sc, hdc, dc, 3 tr, dc, hdc, sc, sl st)
Repeat around for ten larger petals.
Fasten off.
Shape the outer petals so they alternate slightly with the inner layer rather than sitting directly on top of it.
Sage Leaf Foundation
Yarn: sage green.
Join behind the flower between two outer petals.
R5: *ch 5, sc around flower base, ch 5, sc around next section of flower base; ch 3, sc around next base section* repeat to form four paired leaf positions separated by shorter ch-3 spaces.
Join.
Leaf — Work Eight
Into each designated ch-5 leaf loop work:
sc, hdc, 3 dc, tr, ch 2, sl st in second ch from hook, tr, 3 dc, hdc, sc
Sl st into the leaf base.
Repeat for all eight leaves.
Point each pair diagonally toward a future square corner.
Cream Rear Foundation
Yarn: warm ivory.
Join behind the leaves.
R6: *sc around a leaf-base space, ch 4* around, creating 12 evenly distributed ch-4 spaces.
Join.
The cream fabric should sit behind the flower and leaves rather than crossing over their top surfaces.
Square-Shaping Round
Mark four cream spaces approximately 90 degrees apart for the corners.
Work:
R7: in each marked corner sp, (3 dc, ch 3, 3 dc); in each remaining ch-sp, 3 dc; ch 1 between groups.
Join.
Lay the motif flat before continuing.
Openwork Cream Round
R8: sl st to first corner; (ch 3, 2 dc, ch 3, 3 dc) in corner; *ch 2, 3 dc in each side sp, ch 2, (3 dc, ch 3, 3 dc) in next corner* around.
Join.
Lattice Round
R9: ch 4, skip 1 st, dc in next st; *ch 1, skip 1, dc in next* across each side. In each corner work (dc, ch 3, dc).
Join.
Cream Frame Round
R10: ch 1, sc in every dc and ch-1 sp; work (2 sc, ch 2, 2 sc) in each corner.
Join.
Final Openwork Round
R11: (ch 3, skip 2 sts, sc in next st) repeatedly across each side; work (sc, ch 3, sc) into each corner ch-2 sp.
Fasten off.
The finished motif should block to approximately 18–20 cm. Published 3D flower granny squares demonstrate substantial size variation—from about 10 cm with sport yarn to about 20 cm with worsted—so final cream rounds may be added or removed to match the intended bed size. :contentReference[oaicite:18]{index=18}
Color Distribution
For an 80-square bedspread, use a mixed layout rather than strict stripes.
A practical distribution is:
- 18 dusty-rose flowers
- 18 lavender/plum flowers
- 16 coral flowers
- 14 peach/terracotta flowers
- 14 mustard flowers
Keep every center golden yellow and every leaf section sage green.
Blocking the Squares
Pin the cream corners first.
Set each blocked side to the same 18–20 cm measurement.
Measure both diagonals.
A difference greater than approximately 5 mm should be corrected before drying.
Pin the cream lattice only. Do not flatten the dimensional petals beneath blocking pins.
Bedspread Layout
Arrange eight squares across and ten squares down for 80 motifs.
With 19 cm squares, the unbordered grid measures approximately 152 × 190 cm before joining.
The lace border increases both width and length.
Flat Cream Joining
Place two blocked motifs RS up beside one another.
Using cream yarn, work slip stitches through corresponding outer loops.
Keep the seam relaxed and compare it with the blocked edge after every square.
Join motifs into horizontal strips first, then connect the strips vertically.
Current dimensional-flower blanket patterns also use join-as-you-go construction, showing that floral blocks can be assembled without heavy raised seams. :contentReference[oaicite:19]{index=19}
Border Round 1
Yarn: cream.
R1: sc evenly around the complete bedspread; work 3 sc in each corner.
Count opposite edges.
Border Round 2
R2: ch 3, dc in every st; work (2 dc, ch 3, 2 dc) in each corner.
Border Openwork Round
R3: ch 5, skip 2 sts, sc in next; *ch 5, skip 2 sts, sc in next* around.
At each corner work ch 7 instead of ch 5.
Lace Expansion Round
R4: in each ch-5 loop work (sc, ch 3, sc); in each corner ch-7 loop work (sc, ch 3, 3 dc, ch 3, sc).
Second Lace Round
R5: *ch 4, sc in next ch-3 sp* around.
At corners work two ch-4 loops into the corner section.
Scalloped Final Edge
R6: work 5 dc in each alternate ch-4 loop and sl st in the following loop.
Repeat around the perimeter.
Fasten off and weave in all ends.
No tassels are added. The photograph uses a crocheted lace edge only.
Assembly
- Complete and block all 80 dimensional flower squares to one fixed 18–20 cm template before joining.
- Arrange the motifs in an 8 × 10 grid and distribute coral, lavender, plum, peach and mustard flowers without forming unintended color stripes.
- Join every horizontal row with cream flat slip stitches, keeping each seam equal to the blocked side measurement.
- Connect the completed rows vertically and check all four-square intersections for gaps larger than approximately 5 mm.
- Spread the full motif field flat and correct any twisted square before the perimeter border is added.
- Work the first cream sc border round and compare stitch totals on opposite sides.
- Add the dc and openwork rounds while checking that the border remains flat rather than curling inward.
- Work the two lace-expansion rounds and distribute extra corner space only at the four bedspread corners.
- Finish with the cream scalloped edge, then wet-block the border without pinning or crushing the raised flowers.
- Reshape every petal and sage leaf by hand after drying, then record the final bedspread dimensions and motif gauge.
The finished bedspread should lie flat at the cream joins while every colored bloom remains visibly raised above the ivory lattice.
7 Technical Tips
- Flower-center doming: If the back of a flower rises more than approximately 1 cm before the cream square begins, loosen the outer-petal foundation chains. A tight second layer pulls all ten petals toward the center.
- Petal overlap: Ten outer petals placed directly above ten inner petals create bulky ridges. Rotate the second layer slightly so its petals occupy the gaps between the inner petals.
- Leaf crowding: Eight leaves need clear space behind the bloom. Keep the tip of each leaf at least 5–8 mm from the next leaf after blocking.
- Square-size variation: A 1 cm difference across several adjoining motifs produces visible waves. Block every square against one physical template rather than measuring by eye.
- Joining contraction: A slip-stitch seam even 1 cm shorter than its square edge can gather an entire row. Lay each completed seam flat before continuing.
- Border ruffling: Too many stitches in the first perimeter round cause waves by R3. Opposite sides should have matching stitch totals before the lace rounds start.
- Flattened flowers: Heavy steaming directly over the petals removes their dimensional profile. Steam or wet-block only the cream framework, then shape every petal manually.
Constructing Two Layers of Flower Petals
The supplied bedspread has deeper flower centers than a conventional daisy granny square. Two separate petal rings reproduce that effect more accurately than a single row of puff stitches.
The inner ring stays compact around the yellow center. Its dc-based petals give the next layer enough room to project beyond them.
The second ring uses treble stitches in the middle of each petal. Those taller stitches enlarge the flower diameter without increasing the attachment circumference.
Current 3D flower-square designs use related approaches, including layered petals, bobbles and cluster stitches, while a 2026 3D daisy blanket uses a triple-cluster stitch to create raised petals. :contentReference[oaicite:20]{index=20}
Adding the Sage Leaves
The green shapes are structural as well as decorative. Their diagonal placement visually connects the circular flower with the four corners of the cream square.
Make four paired groups instead of spacing eight leaves as a continuous ring. The small gaps between pairs expose enough ivory fabric to keep the block from appearing crowded.
The pointed chain at each leaf tip should remain visible after blocking. If the leaf becomes round, pull that ch-2 picot outward while the yarn is damp.
Turning the Floral Center into a Square
The transition behind the leaves determines whether the motif becomes a usable blanket block. The flower itself remains circular, but the cream foundation introduces four evenly spaced corners.
Mark those corners before working R7. Moving a corner by only one foundation space can make the flower appear diagonally displaced once several motifs are joined.
Keep the first two cream square rounds relatively firm. Later chain-space rounds supply the open lace appearance.
Choosing Yarn and Hook Size
Published 3D flower squares demonstrate several workable combinations. Lucy Kate Crochet uses DK yarn and a 4 mm hook for about a 4-inch motif, while a Ravelry 16 cm design uses worsted yarn and a 5 mm hook. Another large tutorial specifies worsted yarn with a 4.5 mm hook for approximately 20 cm. :contentReference[oaicite:21]{index=21}
A 4.5 mm hook with light-worsted cotton blend is therefore a practical midpoint for the photographed scale. The correct fabric should hold the petals while letting the cream lattice drape across a bed.
If a test square measures under 18 cm, add one cream lattice round rather than enlarging the flower itself.
Planning Yarn Quantity
A published DK dimensional flower square reports approximately 24 g for a 14 cm block. :contentReference[oaicite:22]{index=22} The larger 18–20 cm square here, with two petal layers and leaves, should be budgeted more generously.
Make a complete test motif and weigh each color separately. Multiply the cream result by 80, then add at least 20 percent for joining and the six-round border.
The flower colors can be divided between several dye lots because different blooms intentionally use different shades. Keep the cream background in one dye lot whenever practical because a cream mismatch will be visible across the continuous lattice.
Creating the Open Ivory Lattice
The cream background needs enough empty space to separate one flower from the next. Dense solid squares would make the finished bedspread substantially heavier and reduce the contrast between petals and ground.
Chain-one and chain-three spaces create the open framework. The final stabilizing round provides a continuous edge that is easier to join accurately.
Keep the chain spaces consistent. Tight chains create inward-curving sides, while loose chains can produce oversized holes at square intersections.
Joining 80 Dimensional Squares
Dimensional motifs should be blocked before assembly because the flowers make it difficult to aggressively reshape the blanket after joining.
Flat slip-stitch seams suit the photograph better than thick raised ridges. They let the cream backgrounds merge while leaving the flowers as the highest points.
Current 3D flower blanket designs also use join-as-you-go systems, including a 2026 3D daisy blanket with 56-square and 99-square versions. :contentReference[oaicite:23]{index=23}
Building the Wide Lace Border
The photograph has a substantial border with several distinct textures. Start with firm rounds immediately beside the square field, then increase openness toward the outer edge.
This progression controls the large blanket perimeter. Beginning directly with long chain loops can magnify small inconsistencies in the joined square edges.
The final scallops should point outward without folding underneath the blanket. If they cup, add a small amount of spacing in the previous round rather than increasing the number of dc inside each scallop.
Color Planning for the Garden Effect
The flower colors are intentionally varied, but the palette remains muted. Dusty coral, lavender, plum, ochre and peach all sit against the same sage leaves and ivory background.
Avoid placing more than two identical flowers directly beside one another. Lay every finished motif on the bed before joining and photograph the arrangement from above.
Checking a photograph often reveals unintended color stripes that are harder to notice while standing beside the layout.
Finishing Checks
Spread the completed bedspread across a flat mattress and inspect the cream grid first. Long joining lines should stay straight from one side of the bed to the other.
Check the flowers second. Both petal layers should remain distinguishable, with the outer petals projecting beyond the inner ring and the green leaves visible between neighboring blooms.
Examine the border last. Each scallop should hang independently, and no corner should pull upward or flare excessively.
Conclusion
Block and weigh one completed square before producing the remaining 79 motifs. Record its flower diameter, blocked width and cream-yarn weight so another 3D flower granny square crochet pattern can be scaled without altering the layered bloom. Arrange all colors across the mattress before joining, then work the cream border only after the complete grid lies flat. Photograph one flower close-up and one full-bed view, save the project to Pinterest and share it on Instagram with #GardenBloomBedspread. Reshape the petals after the final wash. Which flower color would you repeat most often: dusty coral, muted lavender or mustard?
Sources
- Repeat Crafter Me — 2024 Granny Square Yarn 3D Crochet Flower; approximately 4 × 4 inches with three-dimensional layered petals. :contentReference[oaicite:24]{index=24}
- Lucy Kate Crochet — 3D Flower Granny Square using DK yarn and a 4 mm hook, approximately 4 inches before optional expansion rounds. :contentReference[oaicite:25]{index=25}
- Veronika Liachovic / Ravelry — 3D Flower Granny Square using worsted yarn, 5 mm hook and approximately 16 cm finished size. :contentReference[oaicite:26]{index=26}
- Hanna Kasatkina / Ravelry — 2025 sport-weight 3D flower square, approximately 10 cm, using a 3 mm hook. :contentReference[oaicite:27]{index=27}
- Just Be Crafty — 2026 free 3D Daisy Blanket with Join-As-You-Go assembly, 56-square and 99-square sizes and a scalloped border. :contentReference[oaicite:28]{index=28}
- Hooked by Robin — 2024 step-by-step 3D flower-square tutorial covering the flower, conversion to a square and completion of the motif. :contentReference[oaicite:29]{index=29}
- Ravelry — free 3D Flower Granny Square by The_sun_of_now, published in 2025 with written and photo instruction. :contentReference[oaicite:30]{index=30}
- Etsy and Pinterest — current dimensional flower-square competition and visual-discovery references. :contentReference[oaicite:31]{index=31}









