Introduction
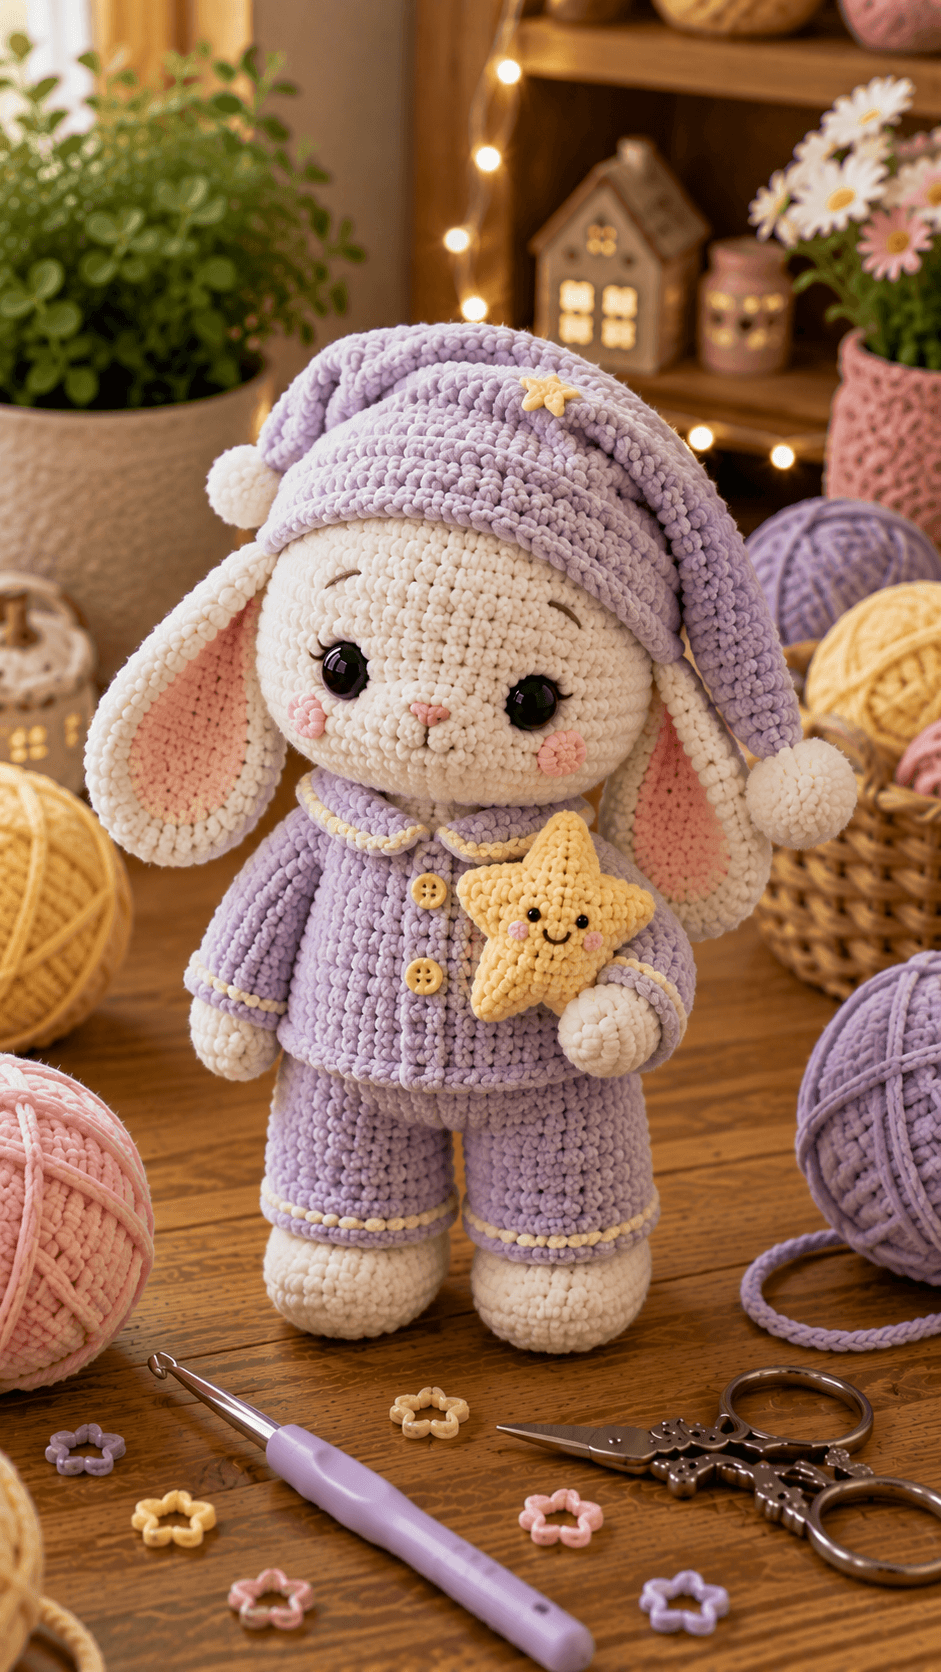
A sleeping cap on a rabbit has one structural problem: two long ears still need somewhere to go. This bunny in pajamas amigurumi crochet pattern uses super-bulky chenille, a 5 mm hook and 16 mm safety eyes for a bunny approximately 34–38 cm tall. Long pink-lined ears, fitted lavender pajamas and a stuffed yellow star create an intermediate bedtime-themed display plush.
The Design: What Makes This Bedtime Bunny Different
The bunny uses a 42-stitch head because the face has to support large eyes, a separate muzzle, two long ears and a substantial sleeping cap without becoming narrow at the crown. Each ear is worked as a flattened oval and remains outside the hat, which preserves the rabbit silhouette. The body reaches 36 stitches and stays narrower than the head so the pajama jacket can add visual width without producing an oversized torso. Cream paws and feet interrupt the lavender outfit at the cuffs and trouser hems. The sleepy bunny crochet pattern also includes a separate five-point stuffed star held against the chest. Its small scale matters; an accessory wider than the torso would hide the jacket buttons and front opening. One common mistake is mounting the ears after the cap, which makes symmetrical ear placement considerably harder.
Project Information at a Glance
| Skill Level | Time | Finished Size | Hook | Best For |
|---|---|---|---|---|
| Intermediate | 14–18 hours | Approx. 34–38 cm bunny; 40–45 cm with cap | 5.0 mm | Bedtime decor, nursery shelves and large chenille plush collections |
Published chenille bunny patterns demonstrate how strongly plush yarn changes scale. DIY Fluffies lists a 21 cm super-bulky chenille bunny made with a 5 mm hook and 16 mm safety eyes, while a current pajama bunny on Ravelry measures about 21.5 cm in super-bulky yarn with a 4 mm hook.
Materials and Tools
Yarn
- Warm cream — super-bulky chenille — approximately 180–220 g — head, body, ears, paws and feet
- Lavender — super-bulky chenille — approximately 150–190 g — pajama jacket, trousers and sleeping cap
- Blush pink — matching chenille — approximately 30–45 g — inner ears, cheeks and nose
- Pale yellow — matching chenille or chunky yarn — approximately 35–50 g — stuffed star and trim
- Mint green — chunky yarn — approximately 10–15 g — optional pajama trim detail
- Dark brown or black smooth yarn — small amount — eyelashes, eyebrows and star mouth
Tools
- 5.0 mm crochet hook
- Two 16 mm black safety eyes
- Two 6–8 mm black safety eyes or embroidered eyes for the star
- Polyester toy stuffing
- Large-eye yarn needle
- Locking stitch markers
- Dressmaking pins
- Scissors
- Two small yellow buttons or crocheted button substitutes
Use dense toy tension for all stuffed chenille parts. If stuffing remains visible through the 42-stitch head after filling, change to a 4.5 mm hook while retaining the same stitch totals.
Abbreviations
- MR — magic ring
- sc — single crochet
- inc — two single crochet stitches in one stitch
- dec — decrease over two stitches
- sl st — slip stitch
- ch — chain
- hdc — half double crochet
- dc — double crochet
- BLO — back loop only
- FLO — front loop only
An invisible decrease is worked through the front loops of the following two stitches before completing them together as one single crochet.
Pattern — Step by Step
Work stuffed pieces in continuous spirals unless stated otherwise. Place a stitch marker in the first stitch of every round and confirm the total in brackets before continuing.
Head
Yarn: warm cream — Source: standard six-stitch amigurumi sphere adapted to the supplied photograph.
R1: 6 sc in MR (6)
R2: inc × 6 (12)
R3: (sc, inc) × 6 (18)
R4: (2 sc, inc) × 6 (24)
R5: (3 sc, inc) × 6 (30)
R6: (4 sc, inc) × 6 (36)
R7: (5 sc, inc) × 6 (42)
R8–R13: sc around (42)
R14: (5 sc, dec) × 6 (36)
Insert 16 mm safety eyes between R10 and R11, approximately eight visible stitches apart. Check the eye line before fitting the washers because later ear and cap placement emphasizes any asymmetry.
R15: (4 sc, dec) × 6 (30)
R16: (3 sc, dec) × 6 (24)
R17: (2 sc, dec) × 6 (18)
R18: (sc, dec) × 6 (12)
R19: dec × 6 (6)
Stuff firmly after R14. Pack small pieces around the eye washers before filling the crown.
Fasten off. Leave a 25 cm tail and close the remaining six stitches through their front loops.
Body
Yarn: warm cream — standard amigurumi math.
R1: 6 sc in MR (6)
R2: inc × 6 (12)
R3: (sc, inc) × 6 (18)
R4: (2 sc, inc) × 6 (24)
R5: (3 sc, inc) × 6 (30)
R6: (4 sc, inc) × 6 (36)
R7–R12: sc around (36)
R13: (4 sc, dec) × 6 (30)
R14: sc around (30)
R15: (3 sc, dec) × 6 (24)
R16: sc around (24)
R17: (2 sc, dec) × 6 (18)
R18: (sc, dec) × 6 (12)
R19: dec × 6 (6)
Pack the lower half firmly so the standing legs have a stable torso to support. Leave the shoulder section slightly softer where the head will be sewn on.
Fasten off with a 45 cm structural sewing tail.
Cream Muzzle
Yarn: warm cream.
R1: 6 sc in MR (6)
R2: inc × 6 (12)
R3: (sc, inc) × 6 (18)
R4–R5: sc around (18)
R6: (sc, dec) × 6 (12)
Stuff lightly. The muzzle should project from the face but remain softer than the head.
Fasten off with a 30 cm sewing tail.
Pink Nose
Yarn: blush pink.
R1: 6 sc in MR (6)
Fasten off with a 12 cm tail.
Fold the small circle into a shallow triangle while sewing it to the upper center of the muzzle.
Cheek Patches — Make Two
Yarn: blush pink.
R1: 6 sc in MR (6)
Fasten off with a 12 cm tail.
Stretch each piece into a low oval during attachment.
Outer Ears — Make Two
Yarn: warm cream. Bunny ears are commonly worked separately and left unstuffed.
R1: 6 sc in MR (6)
R2: inc × 6 (12)
R3: (sc, inc) × 6 (18)
R4: (2 sc, inc) × 6 (24)
R5–R11: sc around (24)
R12: (2 sc, dec) × 6 (18)
R13–R16: sc around (18)
R17: (sc, dec) × 6 (12)
R18–R22: sc around (12)
Do not stuff.
Flatten the opening and sc through both layers across six stitches.
Fasten off with a 40 cm sewing tail.
Pink Inner Ears — Make Two
Yarn: blush pink.
R1: 6 sc in MR (6)
R2: inc × 6 (12)
R3: (sc, inc) × 6 (18)
R4–R9: sc around (18)
R10: (sc, dec) × 6 (12)
R11–R14: sc around (12)
Fasten off and flatten.
Sew one pink panel centrally to each cream ear, leaving a cream border at least one visible stitch wide.
Arms — Make Two
Begin with cream for the paws.
R1: 6 sc in MR (6)
R2: inc × 6 (12)
R3: (sc, inc) × 6 (18)
R4–R5: sc around (18)
R6: (sc, dec) × 6 (12)
Change to lavender.
R7–R10: sc around (12)
R11: dec × 6 (6)
Stuff the cream paw firmly and the lavender upper arm only lightly.
Fasten off with a 30 cm sewing tail.
Legs — Make Two
Begin with warm cream for the feet.
R1: 6 sc in MR (6)
R2: inc × 6 (12)
R3: (sc, inc) × 6 (18)
R4: (2 sc, inc) × 6 (24)
R5–R7: sc around (24)
R8: (2 sc, dec) × 6 (18)
Change to lavender.
R9–R13: sc around (18)
R14: (sc, dec) × 6 (12)
R15: sc around (12)
R16: dec × 6 (6)
Stuff the cream foot densely. Add moderate filling to the lavender trouser section so each leg remains cylindrical rather than spherical.
Fasten off with a 40 cm sewing tail.
Pajama Jacket Front
Yarn: lavender. Work in rows.
Ch 25.
Row 1: starting in second ch from hook, sc across (24)
Rows 2–8: ch 1, turn, sc across (24)
Row 9: ch 1, turn, dec, 20 sc, dec (22)
Rows 10–12: sc across (22)
Row 13: dec, 18 sc, dec (20)
Rows 14–16: sc across (20)
Fasten off.
Pin the panel to the front torso. The lower edge should sit just above the top of the legs.
Pajama Jacket Back
Repeat the front panel through Row 16.
Join the front and back around the side seams, leaving openings for both arms.
Leave the upper front partially open so the collar can frame the neck.
Pajama Collar
Yarn: lavender with pale-yellow trim.
Ch 17.
Row 1: sc across (16)
Row 2: ch 1, turn, (sc, inc) × 8 (24)
Row 3: sc across (24)
Fasten off lavender.
Join pale yellow and work one relaxed row of sl st along the curved outer edge.
Make two collar halves and sew them symmetrically around the neckline.
Jacket Cuff Trim — Make Two
Yarn: pale yellow.
Surface slip stitch around the transition between each lavender sleeve and cream paw.
Keep the trim one stitch wide.
Pajama Buttons — Make Two
Yarn: pale yellow, or use two small craft buttons.
R1: 6 sc in MR (6)
Fasten off and sew vertically down the jacket front.
Trouser Hem Trim — Make Two
Yarn: pale yellow.
Surface slip stitch around each lavender-to-cream leg transition.
Keep the two trim lines at equal height.
Sleeping Cap
Yarn: lavender.
R1: 6 sc in MR (6)
R2: inc × 6 (12)
R3: (sc, inc) × 6 (18)
R4: (2 sc, inc) × 6 (24)
R5: (3 sc, inc) × 6 (30)
R6: (4 sc, inc) × 6 (36)
R7–R11: sc around (36)
Now taper toward the hanging point:
R12: (4 sc, dec) × 6 (30)
R13–R15: sc around (30)
R16: (3 sc, dec) × 6 (24)
R17–R19: sc around (24)
R20: (2 sc, dec) × 6 (18)
R21–R23: sc around (18)
R24: (sc, dec) × 6 (12)
R25–R28: sc around (12)
R29: dec × 6 (6)
R30–R34: sc around (6)
Fasten off.
Do not stuff the cap. Fold the long tapered section toward one side so it falls beside an ear.
White Cap Pom-Pom
Yarn: cream.
R1: 6 sc in MR (6)
R2: inc × 6 (12)
R3: sc around (12)
R4: dec × 6 (6)
Stuff lightly and close.
Sew to the six-stitch tip of the sleeping cap.
Tiny Cap Star
Yarn: pale yellow.
Make a tiny five-point star using five repeated points:
*ch 3, sl st in second ch, sc in next ch, sl st into center* ×5.
Fasten off and sew near the crown fold of the hat.
Yellow Star — Front Panel
Yarn: pale yellow.
R1: 6 sc in MR (6)
R2: inc × 6 (12)
R3: (sc, inc) × 6 (18)
Do not fasten off.
Make five points around the circle. For each point work over the next three to four stitches:
ch 5, starting in second chain from hook work sl st, sc, hdc, dc, sl st into the next available base stitch.
Repeat until five points are evenly distributed.
Fasten off.
Yellow Star — Back Panel
Repeat the front panel without facial details.
Fasten off with a 50 cm joining tail.
Star Face
Insert two 6–8 mm safety eyes into the front panel or embroider two small black circles.
Embroider one shallow black smile between and below the eyes.
Add two tiny pink cheek stitches outside the eyes.
Join and Stuff the Star
Place both star panels WS together.
Sc around the complete perimeter through both layers.
Add a small amount of stuffing before closing the final point.
The finished star should remain about 2–3 cm thick rather than becoming spherical.
Eyebrows and Eyelashes
Yarn: dark brown or black smooth yarn.
Embroider one curved eyebrow approximately 1–1.5 cm above each eye.
Add two or three short lashes to the outer edge of each eye.
Assembly
- Sew each pink inner panel onto a cream outer ear, leaving a visible cream border, then attach both complete ears high on the head before positioning the sleeping cap.
- Pin the cream muzzle centrally beneath the eyes, add a final small amount of stuffing, then sew it securely to the face and attach the pink nose.
- Add the two pink cheek patches outside the muzzle and embroider eyebrows and eyelashes after comparing both sides from directly in front.
- Sew the head to the body with two full passes around the neck seam, adding extra stuffing before closing if the head moves more than approximately 1 cm laterally.
- Attach both legs beneath the body and test the bunny on a level table. Position the cream feet directly beneath the torso rather than splaying them outward.
- Sew the arms high on the torso, leaving enough space between the paws for the yellow star to rest against the jacket front.
- Fit the lavender jacket around the torso, add the collar, buttons and pale-yellow cuff trim, then check that the lower jacket edge clears the trouser legs.
- Place the sleeping cap over the crown without covering the ear bases. Fold its taper to one side, sew the pom-pom at the tip and tack the tiny yellow star near the front fold.
- Position the stuffed yellow star between the bunny’s paws and secure it with two or three hidden stitches through each hand into the rear star panel.
- Set the finished bunny upright and correct ear angle, foot placement, cap drape, collar symmetry and star position before weaving all structural tails through several stitch directions.
The finished bunny should stand independently with both long ears visible, the sleeping cap falling beside one ear and the smiling yellow star centered against the lavender pajama jacket.
7 Technical Tips
- Ear collapse: A 24-stitch chenille ear sewn through fewer than about five head stitches can fold forward. Spread each ear attachment across approximately 4–5 cm.
- Hat slippage: A long unstuffed cap can rotate around a smooth chenille head. Add two hidden tacking stitches near the crown and one near the folded side.
- Head wobble: The 42-stitch head is heavy relative to the 36-stitch torso. Pack the neck seam until lateral movement remains below approximately 1 cm.
- Pajama bunching: A jacket more than about 2 cm wider than the torso circumference forms folds beneath the arms. Pin the side seams directly on the stuffed bunny before closing them.
- Star distortion: Heavy stuffing rounds off the five points. Keep the star approximately 2–3 cm thick and push filling into each point individually.
- Foot imbalance: One leg sewn 5 mm higher than the other can make the standing bunny lean. Pin both feet and test the toy on a hard surface first.
- Decrease holes: Chenille can expose stuffing around standard reductions. Work head, body, arm and leg decreases through the two front loops before completing the stitch.
Shaping the Oversized Bunny Head
The head reaches 42 stitches before any facial components are added. That width provides enough room for large 16 mm eyes, the projecting muzzle and two wide ear attachments without compressing the forehead.
Six plain rounds at 42 stitches form the rounded central section. The decreasing rounds then narrow the lower half in regular six-stitch steps.
Pack stuffing behind the eyes before filling the rest of the head. A soft eye area can indent after the heavy sleeping cap and ears are attached.
Constructing the Long Floppy Ears
Published bunny patterns frequently work ears separately in spiral rounds and leave them unstuffed. That construction also suits the supplied chenille bunny because the ears need to hang beside the face rather than stand upright.
The outer ear reaches 24 stitches, stays at maximum width for seven rounds and then tapers to twelve stitches. The narrower lower portion creates a manageable head seam.
Do not stuff either layer. Sew the pink panel to the cream ear first, flatten the finished piece and only then attach it to the head.
Positioning the Face
The safety eyes sit above and outside the muzzle rather than directly beside it. Leave enough central space for the cream muzzle and small pink nose.
Place the cheeks slightly below the horizontal eye line. Raising them too high can crowd the eyelashes and make the face visually dense.
Embroider the eyebrows last. Their shallow upward curves should follow the head surface rather than forming straight horizontal lines.
Building the Lavender Pajamas
The photograph reads as clothing rather than a lavender body color. Separate jacket panels preserve that distinction and allow cream wrists and feet to remain clearly visible.
The front and back panels narrow toward the shoulders. This reduces excess fabric beneath the collar and creates the fitted appearance shown in the reference.
Keep the jacket side seams away from the arm attachment points. If the garment has to be removed later, use small snaps instead of permanently sewing the upper opening shut.
Adding the Pajama Trim
Thin pale-yellow lines appear at the collar, wrists and trouser hems. Surface slip stitch reproduces that detail without adding another bulky fabric layer.
Work the trim after the limbs are attached. That makes it easier to place both wrist lines and both trouser lines at matching heights.
A contrasting mint stitch can be added sparingly around the collar if matching the pastel color variation in the photograph more closely.
Making the Sleeping Cap
The cap begins at 36 stitches, wide enough to sit on the head without stretching over the ears. Regular decrease sections taper it from crown circumference to a six-stitch hanging tip.
Keep the entire piece unstuffed. Chenille already gives the fabric enough thickness to hold the folds visible in the reference.
Position the brim behind the forehead but in front of the ear attachment bases. The long tip can then fall naturally to one side without forcing an ear downward.
Constructing the Smiling Star
The yellow star functions as a separate plush rather than a flat appliqué. Two matching panels create a shallow cavity for stuffing while preserving five visible points.
Add the face before joining the panels. Once the edges are closed, reaching the eye backs or embroidering a centered smile becomes harder.
Stuff each point with a tiny amount of filling first, then fill the center. Stop before the front panel begins rounding into a ball.
Attaching the Star to the Paws
Place the star against the right side of the jacket front so both yellow buttons remain partly visible. The accessory should overlap one arm more than the other, matching the asymmetry in the photograph.
Use hidden stitches through the rear star layer rather than piercing the front face. Two or three stitches per paw are enough for a display toy.
Check the star angle before knotting the thread. Its top point should remain roughly upright rather than leaning toward the floor.
Choosing Yarn, Hook and Eye Size
A verified DIY Fluffies bunny made with super-bulky chenille uses a 5 mm hook and 16 mm safety eyes and finishes around 21 cm. A current Ravelry pajama bunny uses super-bulky YarnArt Dolce or Himalaya Dolphin Baby with a 4 mm hook and measures about 21.5 cm.
The supplied bunny appears larger because the head, ears, clothing and cap use expanded proportions. A 5 mm hook remains a practical starting point for many super-bulky chenille brands.
If your yarn creates loose gaps, reduce the hook to 4.5 mm before altering any stitch counts.
Planning Yarn Quantity
Chenille consumption varies substantially with construction. One extra-large chenille bunny documented by Crafty Bunny Bun required nearly two 100 g skeins for the animal itself, while smaller designs can be made from one skein.
This pattern allocates 180–220 g of cream because the head and ears contain considerable surface area. The lavender total is also high because it covers both limbs, jacket and sleeping cap.
Make the star and trim only after the major body pieces are complete. Small pastel accents are easier to substitute if one color runs short.
Adjusting the Finished Size
A super-bulky chenille bunny can become much larger than the same stitch geometry worked in DK yarn. Published bunny examples range from tiny 8–12 cm toys in DK to 21–27 cm chenille designs.
For a smaller bedtime bunny, keep the round counts and change to worsted yarn with an appropriately smaller hook. Reduce the safety-eye diameter and star dimensions at the same time.
For an even larger plush, use thicker blanket yarn rather than adding another head increase round unless the body, ears, clothing and accessory are also recalculated.
Finishing Checks
Place the bunny on a hard level surface and inspect the feet first. Both cream soles should contact the table while the lavender legs remain vertical beneath the torso.
View the head directly from the front. The ears need comparable attachment heights, the muzzle should remain centered and neither cap edge should cover an eye.
Check the clothing and accessory last. Both yellow buttons should remain visible, the collar halves should meet evenly and the smiling star should rest securely between the paws.
Conclusion
Measure the completed bunny from its feet to the crown and record the sleeping-cap length separately before storing your project notes. Those dimensions make another bunny in pajamas amigurumi crochet pattern easier to reproduce with a different chenille brand. Photograph the toy from the front and three-quarter side to check ear length, cap drape, pajama fit and star position. Save the project to Pinterest and share the finished bunny on Instagram with #SleepyStarBunny. Reshape both ears and the star points before taking the final photograph. Would you keep the lavender pajamas shown here or make the next bunny a mint-green bedtime set?
Sources
- DIY Fluffies — Free Bunny Amigurumi: 21 cm super-bulky chenille bunny, 5 mm hook and 16 mm safety eyes.
- DIY Fluffies — Crochet Materials: 5 mm hook recommendations for several super-bulky chenille yarns including Himalaya Dolphin Baby, YarnArt Dolce and Hobbii Honey Bunny.
- Ravelry — Bunny in Pajamas by Tatiana Didichenko: 21.5 cm, super-bulky YarnArt Dolce/Himalaya Dolphin Baby and 4 mm hook.
- Ravelry — Bunny in Pajamas by Nightly Crafter: approximately 25 cm finished size.
- Craft Passion — Sleep Hat & Pajamas: free 2024 two-piece sleepwear and sleeping-cap construction for amigurumi.
- Supergurumi — Bunny Amigurumi: separate spiral-round floppy-ear construction and standard limb shaping.
- Etsy and Pinterest — current pajama bunny and sleeping-bunny competition references.









