Introduction
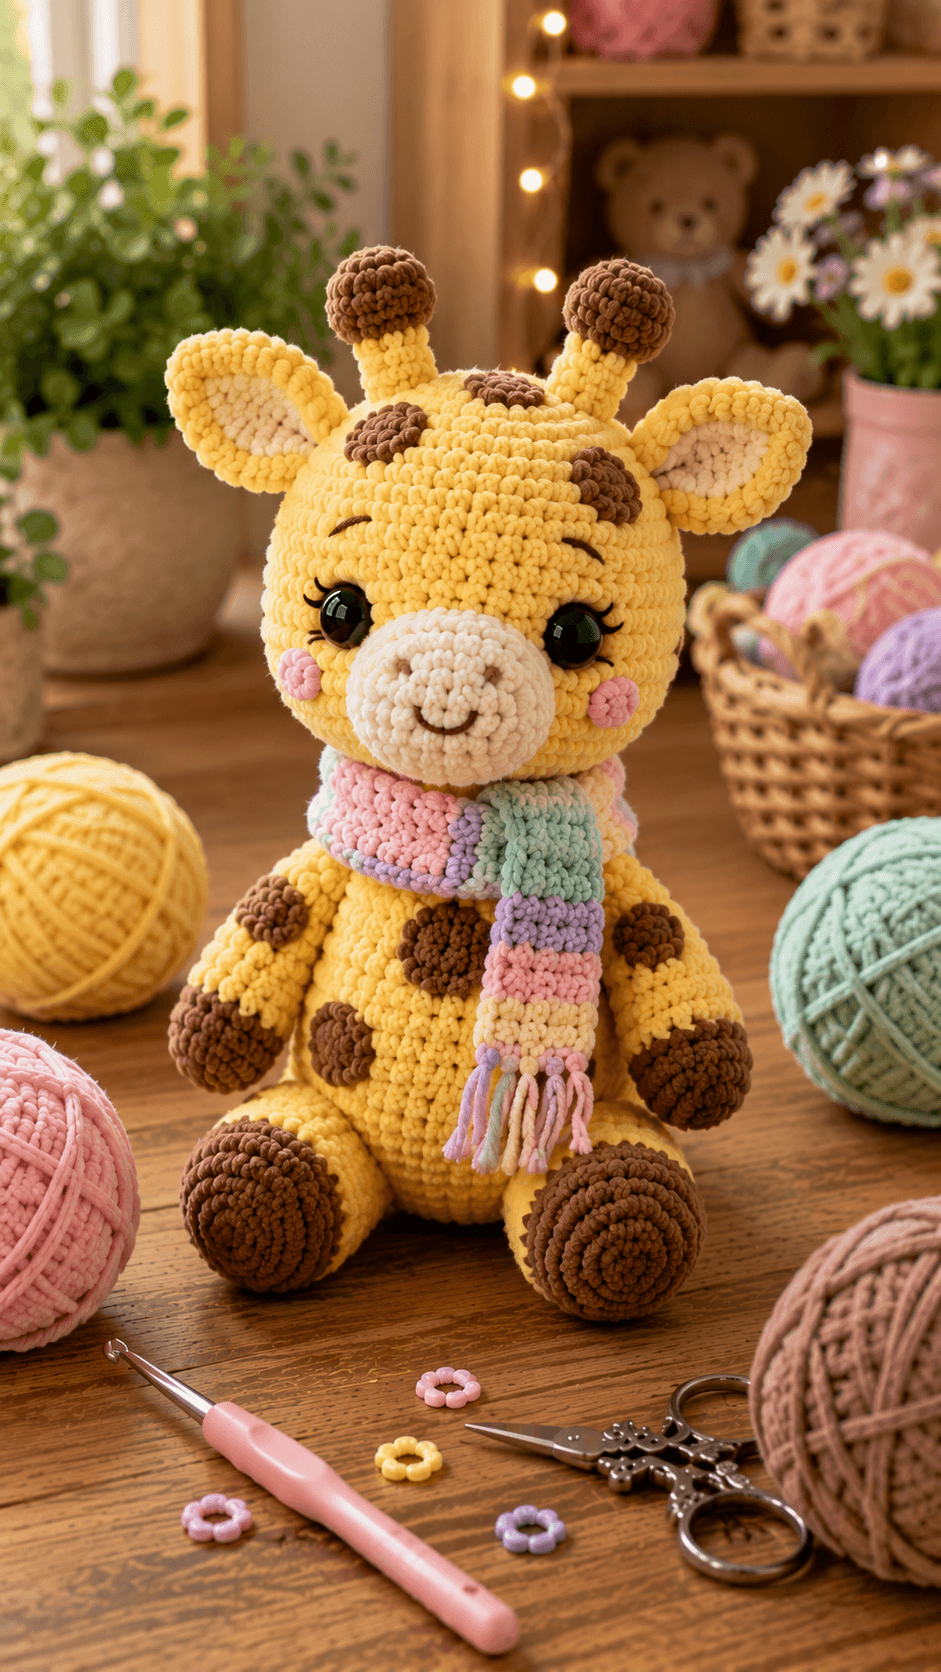
A giraffe’s ossicones cannot disappear behind its ears just because the head is oversized. This giraffe amigurumi crochet pattern uses super-bulky chenille, a 5 mm hook and 15 mm safety eyes to create a seated giraffe approximately 38–41 cm high. Brown spots, a cream muzzle and a striped pastel scarf make the intermediate project especially useful as a winter display plush.
The Design: What Makes This Giraffe Different
The head expands to 42 stitches because the photographed giraffe uses a deliberately oversized face rather than a narrow anatomical skull. Two large ears and separate brown-tipped ossicones sit across the crown, so the extra width prevents those pieces from crowding one another. The muzzle is a separate cream oval with enough depth to project beyond the eyes, while small raised brown patches break up the yellow surface without requiring frequent color changes inside the main rounds. A 36-stitch body supports two oversized seated legs, and the arms angle downward beside the torso. The plush giraffe crochet pattern also uses a broad striped scarf instead of a narrow neck band. That accessory visually shortens the neck while adding pink, lavender and mint accents. One common giraffe mistake is placing the ossicones too far apart; they should sit between the ears rather than directly above them.
Project Information at a Glance
| Skill Level | Time | Finished Size | Hook | Best For |
|---|---|---|---|---|
| Intermediate | 12–16 hours | Approx. 38–41 cm including ossicones | 5.0 mm | Winter decor, nursery shelves and large plush collections |
A published giraffe made from super-bulky chenille reaches approximately 40 cm with a 5 mm hook and 15 mm safety eyes. That combination is the closest verified technical reference for the scale and texture visible in this project.
Materials and Tools
Yarn
- Golden yellow — super-bulky chenille — approximately 180–230 g — head, body, arms, legs, ears and ossicone stalks
- Chocolate brown — matching chenille — approximately 65–90 g — spots, hooves and ossicone caps
- Cream — matching chenille — approximately 35–50 g — muzzle and inner ears
- Blush pink — chunky yarn — approximately 25–35 g — scarf and cheek patches
- Mint green — chunky yarn — approximately 15–20 g — scarf
- Lavender — chunky yarn — approximately 15–20 g — scarf
- Dark brown smooth yarn — small amount — mouth, nostrils, eyebrows and eyelashes
Tools
- 5.0 mm crochet hook
- Two 15 mm black safety eyes
- Polyester toy stuffing
- Large-eye yarn needle
- Locking stitch markers
- Dressmaking pins
- Scissors
Keep the stuffed pieces dense enough that polyester filling cannot be seen between the stitches. Chenille varies noticeably between brands, so reduce the hook by 0.5 mm if the fabric opens after stuffing.
Abbreviations
- MR — magic ring
- sc — single crochet
- inc — two single crochet stitches in one stitch
- dec — decrease over two stitches
- sl st — slip stitch
- ch — chain
- hdc — half double crochet
- BLO — back loop only
- FLO — front loop only
An invisible decrease is made through the front loops of the following two stitches before completing those loops together as one single crochet.
Pattern — Step by Step
Work all stuffed parts in continuous spirals unless a section states otherwise. Move a stitch marker at the beginning of every round and confirm each bracketed count before continuing.
Head
Yarn: golden yellow.
R1: 6 sc in MR (6)
R2: inc × 6 (12)
R3: (sc, inc) × 6 (18)
R4: (2 sc, inc) × 6 (24)
R5: (3 sc, inc) × 6 (30)
R6: (4 sc, inc) × 6 (36)
R7: (5 sc, inc) × 6 (42)
R8–R13: sc around (42)
R14: (5 sc, dec) × 6 (36)
Insert 15 mm safety eyes between R10 and R11. Leave approximately eight visible stitches between the eye stems.
R15: (4 sc, dec) × 6 (30)
R16: (3 sc, dec) × 6 (24)
R17: (2 sc, dec) × 6 (18)
R18: (sc, dec) × 6 (12)
R19: dec × 6 (6)
Stuff firmly after R14. Add small pieces of stuffing behind the eye washers before filling the remaining crown.
Fasten off. Leave a 25 cm tail and close the remaining six stitches.
Body
Yarn: golden yellow.
R1: 6 sc in MR (6)
R2: inc × 6 (12)
R3: (sc, inc) × 6 (18)
R4: (2 sc, inc) × 6 (24)
R5: (3 sc, inc) × 6 (30)
R6: (4 sc, inc) × 6 (36)
R7–R12: sc around (36)
R13: (4 sc, dec) × 6 (30)
R14: sc around (30)
R15: (3 sc, dec) × 6 (24)
R16: sc around (24)
R17: (2 sc, dec) × 6 (18)
R18: (sc, dec) × 6 (12)
R19: dec × 6 (6)
Pack the lower half firmly. Keep the upper third slightly softer because the scarf will compress the neck area after assembly.
Fasten off and leave a 45 cm sewing tail.
Cream Muzzle
Yarn: cream.
R1: 6 sc in MR (6)
R2: inc × 6 (12)
R3: (sc, inc) × 6 (18)
R4: (2 sc, inc) × 6 (24)
R5–R6: sc around (24)
R7: (2 sc, dec) × 6 (18)
Stuff lightly. The muzzle should project from the face without forming a hard sphere.
Fasten off and leave a 35 cm tail.
Nostrils and Mouth
Yarn: dark brown smooth yarn.
Embroider two nostril stitches approximately 2–2.5 cm apart across the upper half of the muzzle.
Add one shallow curved mouth below them. Keep the mouth approximately 2.5–3 cm wide.
Outer Ears — Make Two
Yarn: golden yellow.
R1: 6 sc in MR (6)
R2: inc × 6 (12)
R3: (sc, inc) × 6 (18)
R4: (2 sc, inc) × 6 (24)
R5–R6: sc around (24)
Fasten off with a 35 cm tail. Do not stuff.
Inner Ear Panels — Make Two
Yarn: cream.
R1: 6 sc in MR (6)
R2: inc × 6 (12)
R3: (sc, inc) × 6 (18)
Fasten off with a 20 cm sewing tail.
Stretch each cream disk into an oval before sewing it inside the yellow ear. Leave approximately one yellow stitch visible around the perimeter.
Ossicones — Make Two
Begin with chocolate brown.
R1: 6 sc in MR (6)
R2: inc × 6 (12)
R3–R4: sc around (12)
R5: dec × 6 (6)
Change to golden yellow.
R6–R10: sc around (6)
Stuff the brown cap firmly and add only a narrow amount of stuffing to the yellow stalk.
Fasten off with a 25 cm attachment tail.
Front Arms — Make Two
Begin with chocolate brown.
R1: 6 sc in MR (6)
R2: inc × 6 (12)
R3: (sc, inc) × 6 (18)
R4–R5: sc around (18)
R6: (sc, dec) × 6 (12)
Change to golden yellow.
R7–R11: sc around (12)
R12: dec × 6 (6)
Stuff the brown hoof firmly and the yellow arm lightly.
Fasten off with a 30 cm tail.
Back Legs — Make Two
Begin with chocolate brown.
R1: 6 sc in MR (6)
R2: inc × 6 (12)
R3: (sc, inc) × 6 (18)
R4: (2 sc, inc) × 6 (24)
R5–R7: sc around (24)
Change to golden yellow.
R8: (2 sc, dec) × 6 (18)
R9–R11: sc around (18)
R12: (sc, dec) × 6 (12)
R13–R14: sc around (12)
R15: dec × 6 (6)
Stuff the brown foot densely and continue with moderate stuffing through the upper leg. Flatten each finished piece into the broad oval seated posture shown in the photograph.
Fasten off with a 40 cm tail.
Small Brown Spots — Make Four to Six
Yarn: chocolate brown.
R1: 6 sc in MR (6)
Fasten off with a 12 cm sewing tail.
Medium Brown Spots — Make Five to Seven
R1: 6 sc in MR (6)
R2: inc × 6 (12)
Fasten off with a 15 cm tail.
Large Brown Spots — Make Three to Five
R1: 6 sc in MR (6)
R2: inc × 6 (12)
R3: (sc, inc) × 6 (18)
Fasten off with a 20 cm sewing tail.
Do not make every spot perfectly circular. Stretch selected motifs into low ovals while sewing them down.
Pink Cheek Patches — Make Two
Yarn: blush pink.
R1: 6 sc in MR (6)
Fasten off with a 12 cm tail.
Flatten horizontally while attaching.
Eyebrows and Eyelashes
Yarn: dark brown smooth yarn.
Embroider one curved eyebrow approximately 1.5 cm above each eye.
Add two or three short eyelash stitches to the outer side of each safety eye.
Pastel Scarf
Use blush pink, lavender and mint green. Work in turned rows.
Ch 13.
Row 1: starting in second ch from hook, sc across (12)
Rows 2–7: ch 1, turn, sc across (12) — pink
Rows 8–11: ch 1, turn, sc across (12) — lavender
Rows 12–17: ch 1, turn, sc across (12) — mint
Rows 18–21: ch 1, turn, sc across (12) — lavender
Rows 22–27: ch 1, turn, sc across (12) — pink
Rows 28–32: ch 1, turn, sc across (12) — pale yellow or cream
Rows 33–36: ch 1, turn, sc across (12) — lavender
Rows 37–40: ch 1, turn, sc across (12) — mint
Continue repeating pastel blocks until the scarf measures approximately 52–58 cm.
Fasten off.
Scarf Fringe
Cut pastel yarn strands approximately 16–20 cm long.
Fold each strand in half and pull the fold through the scarf end with the crochet hook.
Pass both loose ends through the loop and tighten.
Attach five to seven fringe bundles to each end.
Trim the finished fringe to approximately 8–10 cm.
Assembly
- Sew the cream inner panels into the two yellow ears, then flatten each complete ear into a broad oval before pinning it to the sides of the head.
- Attach both ossicones between the ears. Keep their centers approximately 5–7 cm apart and check that the brown caps rise to comparable heights.
- Pin the cream muzzle centrally below the eyes and sew around its 18-stitch opening, adding a final small amount of stuffing before closing the seam.
- Attach the two pink cheek patches outside the muzzle and embroider the brown eyebrows, eyelashes, nostrils and mouth.
- Sew the head to the body with two complete passes around the neck seam. Add extra stuffing through the opening before closing if the head moves more than about 1 cm from side to side.
- Attach the two front arms high on the torso, then sew the two large hind legs low and forward so the brown hooves face the viewer.
- Arrange the brown spots across the forehead, crown, torso, shoulders and limbs. Alternate small, medium and large patches rather than forming even rows.
- Wrap the pastel scarf once around the neck and let one end fall farther down the chest. Keep the scarf loose enough that the neck fabric remains visible at the top.
- Add one or two hidden stitches beneath the rear scarf layer if the accessory will stay permanently attached. Do not sew through the visible front end.
- Place the giraffe on a hard level surface and check head balance, foot rotation, ear height, ossicone spacing and scarf alignment before weaving in every structural tail.
The completed giraffe should sit independently with the oversized feet forward, ears spread laterally, brown-tipped ossicones upright and the striped scarf hanging below the chest.
7 Technical Tips
- Head wobble: A 42-stitch chenille head can overpower a softly stuffed neck. Pack the upper torso firmly enough that sideways movement at the head seam stays under approximately 1 cm.
- Ossicone tilt: A six-stitch stalk sewn through only two head stitches can lean after handling. Spread each attachment seam across approximately 2–2.5 cm.
- Ear collapse: A 24-stitch ear attached at one narrow point folds forward. Flatten the base and sew across approximately 4–5 cm of head fabric.
- Hoof rotation: One back leg rotated more than roughly 10 degrees from the other makes the seated pose look uneven. Pin both legs and test the giraffe on a flat table before closing either seam.
- Spot puckering: Tight appliqué tails compress the yellow chenille around a brown patch. Sew each spot with enough tension to hold its perimeter down without reducing the body circumference.
- Scarf bulk: A scarf wider than about 8 cm can hide the muzzle and shoulders on this scale. Keep the finished width near 7–8 cm and wrap it only once around the neck.
- Decrease holes: Standard decreases can expose stuffing through super-bulky chenille. Work all major head, body and limb decreases through the front loops of the following two stitches.
Shaping the Oversized Giraffe Head
The supplied giraffe uses a much rounder head than a realistic giraffe. Reaching a 42-stitch plateau gives the face enough width for 15 mm eyes, a 24-stitch muzzle, large ears and two ossicones without forcing the details into one crowded area.
Six rounds at maximum circumference create the broad forehead. The following decreases reduce the underside gradually so the head remains spherical instead of developing a flat jaw.
Stuff around the eye washers first. Then fill the side sections where the ears and ossicones will attach, because those additions can distort a head that remains soft near its crown.
Constructing the Cream Muzzle
The muzzle should project beyond the face as a separate oval. A completely flat appliqué would lose the rounded snout visible in the photograph.
Stop the expansion at 24 stitches, work two plain rounds and then reduce to 18 before attachment. That produces enough depth for the embroidered mouth without creating an oversized sphere.
Pin the muzzle before sewing. Its center should sit directly between the eyes, while its upper edge remains below the lower edge of each safety eye.
Positioning the Ears and Ossicones
Published giraffe patterns consistently treat the ears and ossicones as separate crown components. Jess Huff, for example, spaces the ears farther apart than the ossicones, placing the latter between them.
Follow the same relationship here. The ears should extend laterally from the head, while the ossicones rise more vertically near the crown center.
Compare the head from directly in front before tightening any seam. One ossicone placed even 1 cm farther outward than its partner becomes conspicuous because the scarf and muzzle emphasize the central axis.
Making the Brown-Tipped Ossicones
The rounded tops require more width than the yellow stalks. Begin with a 12-stitch brown ball, reduce to six stitches and continue vertically in yellow.
Published miniature giraffe patterns use the same basic principle, including separate brown caps and narrow stalks worked in spiral rounds.
Do not pack the yellow portion densely. A rigid stalk is difficult to position, while lightly stuffed chenille can be adjusted after attachment.
Building the Seated Body
The 36-stitch body is narrower than the 42-stitch head, which creates the exaggerated plush proportions visible in the reference. Large 24-stitch back legs then widen the lower silhouette again.
Keep the belly rounded. Pulling the lower stuffing too tightly toward the base creates a tapered torso that no longer sits naturally between the legs.
The arms are smaller than the back legs because they hang beside the body rather than carrying the toy’s weight.
Creating the Oversized Brown Hooves
Color changes occur after the broad foot sections are established. The hind feet expand to 24 stitches in brown before narrowing into the yellow upper legs.
This arrangement produces the dark circular soles visible from the front. It also moves more stuffing toward the lower body, helping the finished giraffe remain seated.
Shape both feet while stuffing. Compress the upper surfaces slightly and keep the bottom halves broad enough to touch the table.
Adding Giraffe Spots
Separate appliqués are practical for chenille because frequent in-round color changes can create bulky carried strands inside the toy. Three spot sizes prevent the surface from looking mechanically repeated.
Place the largest patches on the torso and upper legs. Medium spots work across the head and shoulders, while small six-stitch circles fill remaining gaps.
Do not arrange the patches symmetrically. The two sides should feel related without placing identical circles in matching positions.
Making the Pastel Striped Scarf
The scarf is the main accessory and changes the visual proportion of the giraffe. Pink, lavender and mint blocks soften the yellow-brown palette while covering much of the neck seam.
A 12-stitch width produces approximately 7–8 cm in chunky yarn. Keep the row count flexible until the finished length wraps once around the neck and leaves two hanging ends.
Work the scarf more loosely than the amigurumi pieces. Dense toy tension can make a rectangular scarf too rigid to drape around the neck.
Adding Scarf Fringe
Use several pastel colors rather than matching every fringe strand to the final stripe. The supplied image mixes pink, lavender, mint and pale yellow at the end.
Cut the strands about twice the desired finished length because each piece is folded during attachment.
After attaching every bundle, trim the fringe together to approximately 8–10 cm. Cutting each bundle separately before mounting creates uneven final lengths.
Choosing Yarn, Hook and Eye Size
A particularly useful published comparison comes from DIY Fluffies: the same giraffe pattern measures about 18 cm in sport cotton with a 2.5 mm hook and 8 mm eyes, but around 40 cm in super-bulky chenille with a 5 mm hook and 15 mm eyes.
That larger specification closely matches the proportions in the supplied photograph. A separate 25.5 cm worsted giraffe also uses 15 mm eyes, showing that eye size is determined by head scale as much as overall height.
If a different chenille yarn makes the head noticeably larger, test the eyes against the stuffed piece before locking the washers.
Planning Yarn Quantity
Jess Huff’s 41 cm worsted giraffe provides a documented baseline of 137 g main color, 24 g dark color and 8 g light accent. Chenille has different meterage and density, so the project quantities above are intentionally larger allocations rather than direct conversions.
Complete both legs, the head and the body before using leftover yellow for any optional decoration. Those four components consume most of the main yarn.
The scarf colors require comparatively little yarn and can be worked from coordinating remnants if their thickness is consistent.
Adjusting Finished Size
The same giraffe geometry can change substantially in scale without rewriting the stitch totals. A published pattern grows from 18 cm in sport cotton to 40 cm in super-bulky chenille simply by changing yarn, hook and eye size.
For a smaller version, move to DK or sport cotton and reduce the hook accordingly. Scale the safety eyes, scarf width and fringe at the same time.
For a larger blanket-yarn giraffe, keep the written rounds but select a hook that produces a dense stuffed fabric rather than increasing only the head or body counts.
Finishing Checks
Set the giraffe on a hard surface and inspect the back legs first. Both brown hooves should face forward while the body remains upright without leaning onto one arm.
View the head directly from the front. The ears need comparable height, the two ossicones should remain between them, and the cream muzzle must stay centered beneath the eyes.
Check the scarf last. At least two pastel color blocks should remain visible on the wrapped portion, one hanging end should extend below the arms and the fringe should remain clear of the floor.
Conclusion
Measure the finished giraffe from the sitting base to the top of the ossicones and record the scarf width separately before storing the project notes. Those dimensions make the next version easier to reproduce with another chenille brand. Photograph the giraffe from the front and three-quarter side to check hoof rotation, ear spacing, spot distribution and scarf drape. Save this giraffe amigurumi crochet pattern to Pinterest and share the finished project on Instagram with #PastelScarfGiraffe. Reshape both ears and ossicones before the final photograph. Would you keep the mint-and-lavender scarf shown here or change the next giraffe to a pink-and-cream striped scarf?
Sources
- DIY Fluffies / Mariska Vos-Bolman — Mini Cute Giraffe Amigurumi: 18 cm sport-cotton version with 2.5 mm hook and 8 mm eyes; 40 cm super-bulky chenille version with 5 mm hook and 15 mm eyes.
- Jess Huff — Ginnie the Giraffe: 41 cm standing height, 3.5 mm hook, worsted yarn, 15 mm safety eyes and published yarn quantities of 137 g main, 24 g dark and 8 g light accent.
- Storyland Amis — Gerald the Giraffe: 25.5 cm worsted giraffe using a 3.75 mm hook and 15 mm safety eyes.
- Supergurumi — Amigurumi Crochet Giraffe: separate muzzle, ears, ossicones, arms, legs and body construction with six-stitch magic-ring starts.
- StringyDingDing — BRRR-affe the Winter Giraffe: 2024 giraffe pattern using a scarf as a dedicated winter accessory.
- Ravelry — Gregory the Giraffe and Cute Mini Giraffe Amigurumi: current DK and scalable giraffe pattern references.
- Etsy and Pinterest — current plush giraffe pattern competition and giraffe crochet discovery references.









