Introduction
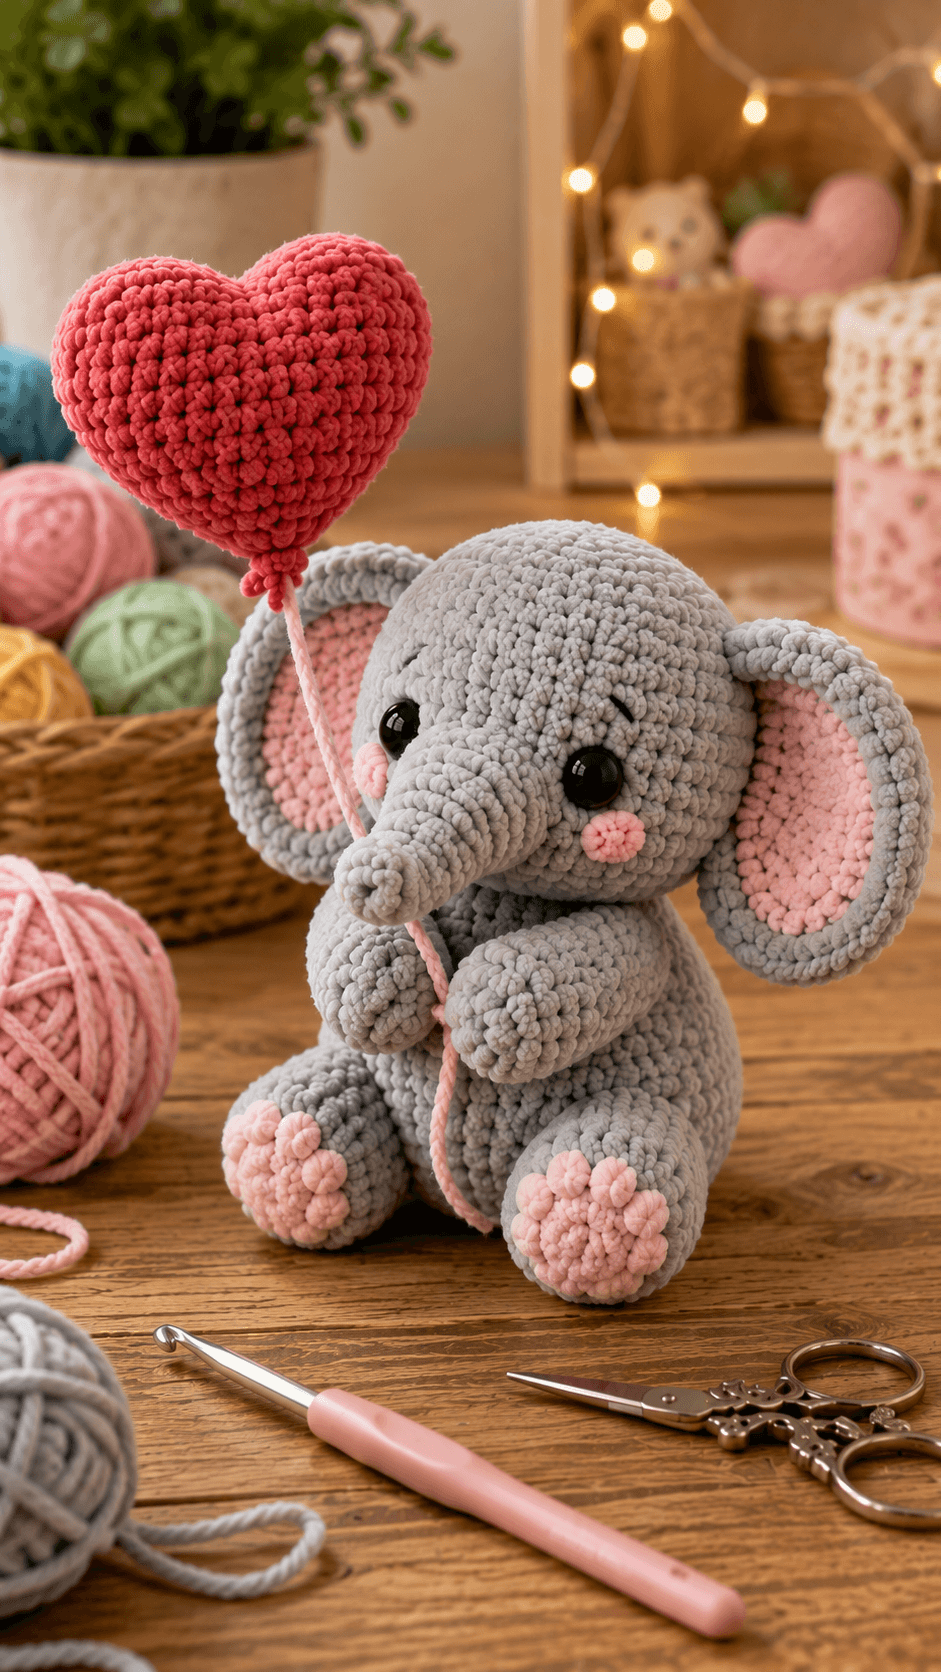
An elephant holding a balloon needs its forearms to grip the cord without hiding the trunk between them. This elephant amigurumi crochet pattern uses chunky chenille, a 4.5 mm hook and 10–12 mm safety eyes for a seated elephant approximately 23–27 cm tall. Oversized pink-lined ears, padded feet and a stuffed red heart balloon create an intermediate display designed around a stable seated pose.
The Design: What Makes This Heart Balloon Elephant Different
The elephant uses a 42-stitch head because the trunk, large eyes and oversized ears require a broad facial structure. Its body reaches 36 stitches, creating a smaller pear-shaped torso beneath the head while leaving enough room for two large seated legs. The trunk grows from six stitches at the tip to twelve near the face, so it tapers instead of reading as a straight tube. Both front arms turn inward around a pink balloon cord. The heart is constructed separately from two upper lobes joined into one narrowing body, allowing it to remain visibly three-dimensional above the elephant. Large pink-lined ears frame the head, while pink paw pads and six raised toe bumps repeat the accent color lower in the design. One common mistake with an elephant with heart crochet pattern is making the balloon too heavy; dense stuffing can pull the arms forward.
Project Information at a Glance
| Skill Level | Time | Finished Size | Hook | Best For |
|---|---|---|---|---|
| Intermediate | 12–16 hours | 23–27 cm elephant; 37–43 cm with balloon | 4.5 mm | Valentine displays, nursery shelves and gift photography |
Published elephant amigurumi sizes vary substantially with material. A Dolphin Baby chenille elephant is listed at approximately 17 cm using a 4 mm hook and 10 mm eyes, while Esther the Elephant reaches 36 cm in worsted yarn with a 3.5 mm hook. :contentReference[oaicite:17]{index=17}
Materials and Tools
Yarn
- Soft gray — chunky/plush chenille — approximately 140–175 g — head, body, trunk, outer ears, arms and legs
- Blush pink — matching chenille — approximately 35–50 g — inner ears, cheeks, foot pads, toes and balloon cord
- Deep red/coral red — chunky chenille — approximately 40–60 g — heart balloon
- Black smooth embroidery yarn — small amount — eyebrows
Tools
- 4.5 mm crochet hook
- Two 10–12 mm black safety eyes
- Polyester toy stuffing
- Large-eye yarn needle
- Locking stitch markers
- Dressmaking pins
- Scissors
A 4.5 mm hook sits between current chenille elephant examples using 4 mm and 5 mm hooks. The correct working gauge should produce dense plush fabric without large gaps around the stuffing. :contentReference[oaicite:18]{index=18}
Abbreviations
- MR — magic ring
- sc — single crochet
- inc — two single crochet stitches in one stitch
- dec — decrease over two stitches
- sl st — slip stitch
- ch — chain
- hdc — half double crochet
- dc — double crochet
- BLO — back loop only
- FLO — front loop only
An invisible decrease is worked through the front loops of the next two stitches before completing both loops together as one single crochet.
Pattern — Step by Step
Work stuffed pieces in continuous spirals unless stated otherwise. Mark the first complete stitch of every round and verify each bracketed total before continuing.
Head
Yarn: soft gray — Source: standard six-stitch amigurumi sphere adapted to the photograph.
R1: 6 sc in MR (6)
R2: inc × 6 (12)
R3: (sc, inc) × 6 (18)
R4: (2 sc, inc) × 6 (24)
R5: (3 sc, inc) × 6 (30)
R6: (4 sc, inc) × 6 (36)
R7: (5 sc, inc) × 6 (42)
R8–R13: sc around (42)
R14: (5 sc, dec) × 6 (36)
Insert the 10–12 mm safety eyes between R10 and R11. Place them approximately eight visible stitches apart, leaving a broad central area for the trunk.
R15: (4 sc, dec) × 6 (30)
R16: (3 sc, dec) × 6 (24)
R17: (2 sc, dec) × 6 (18)
R18: (sc, dec) × 6 (12)
R19: dec × 6 (6)
Stuff firmly after R14. Pack small pieces around the safety-eye washers before filling the crown.
Fasten off. Pull a 25 cm tail through the six remaining front loops and close.
Body
Yarn: soft gray — Source: standard amigurumi math, photo-proportion adaptation.
R1: 6 sc in MR (6)
R2: inc × 6 (12)
R3: (sc, inc) × 6 (18)
R4: (2 sc, inc) × 6 (24)
R5: (3 sc, inc) × 6 (30)
R6: (4 sc, inc) × 6 (36)
R7–R13: sc around (36)
R14: (4 sc, dec) × 6 (30)
R15: sc around (30)
R16: (3 sc, dec) × 6 (24)
R17: (2 sc, dec) × 6 (18)
R18: (sc, dec) × 6 (12)
R19: dec × 6 (6)
Stuff the lower body firmly to support the seated legs. Keep the upper section slightly softer where the head will attach.
Fasten off and leave a 45 cm structural tail.
Trunk
Yarn: soft gray. Published elephant patterns also use tapered trunks beginning at six stitches and widening toward the head. :contentReference[oaicite:19]{index=19}
R1: 6 sc in MR (6)
R2–R5: sc around (6)
R6: (2 sc, inc) × 2 (8)
R7–R8: sc around (8)
R9: (3 sc, inc) × 2 (10)
R10–R11: sc around (10)
R12: (4 sc, inc) × 2 (12)
R13–R15: sc around (12)
Stuff the 12-stitch end moderately. Reduce the filling toward the tip so the trunk retains a soft downward curve.
Fasten off and leave a 35 cm sewing tail.
Outer Ears — Make Two
Yarn: soft gray.
R1: 6 sc in MR (6)
R2: inc × 6 (12)
R3: (sc, inc) × 6 (18)
R4: (2 sc, inc) × 6 (24)
R5: (3 sc, inc) × 6 (30)
R6: sc around (30)
Fasten off with a 40 cm tail. Do not stuff.
Large elephant-ear patterns attach broad ears through several head stitches rather than one narrow point, which reduces forward folding. :contentReference[oaicite:20]{index=20}
Pink Inner Ears — Make Two
Yarn: blush pink.
R1: 6 sc in MR (6)
R2: inc × 6 (12)
R3: (sc, inc) × 6 (18)
R4: (2 sc, inc) × 6 (24)
Fasten off and leave a 25 cm tail.
Stretch the pink disks into broad ovals before sewing them inside the gray ears. Keep approximately one visible gray stitch around the pink edge.
Front Arms — Make Two
Yarn: soft gray.
R1: 6 sc in MR (6)
R2: inc × 6 (12)
R3: (sc, inc) × 6 (18)
R4–R6: sc around (18)
R7: (sc, dec) × 6 (12)
R8–R10: sc around (12)
R11: dec × 6 (6)
Stuff the paw ends firmly and leave the upper arm softer. The hands must bend inward around the balloon cord.
Fasten off with a 30 cm tail.
Back Legs — Make Two
Yarn: soft gray.
R1: 6 sc in MR (6)
R2: inc × 6 (12)
R3: (sc, inc) × 6 (18)
R4: (2 sc, inc) × 6 (24)
R5–R8: sc around (24)
R9: (2 sc, dec) × 6 (18)
R10: (sc, dec) × 6 (12)
R11: sc around (12)
R12: dec × 6 (6)
Stuff firmly and flatten each leg into an oval with the widest part facing forward.
Fasten off and leave a 35 cm sewing tail.
Pink Foot Pads — Make Two
Yarn: blush pink.
R1: 6 sc in MR (6)
R2: inc × 6 (12)
R3: (sc, inc) × 6 (18)
Fasten off with a 20 cm tail.
Flatten each disk into a broad oval while sewing it centrally onto the front of a hind foot.
Pink Toe Bumps — Make Six
Yarn: blush pink. Make three per hind foot.
Ch 2. Work 5 hdc into the second chain from the hook. Sl st into the first hdc.
Fasten off with a 10 cm tail.
Cheek Patches — Make Two
Yarn: blush pink.
R1: 6 sc in MR (6)
Fasten off with a 12 cm tail. Stretch into a low oval during attachment.
Eyebrows
Yarn: smooth black embroidery yarn.
Embroider one short shallow curve approximately 1–1.5 cm above each eye.
Keep each outer end slightly higher than the inner end.
Heart Balloon — Lobe One
Yarn: deep red. The heart is a photo-matched accessory using standard six-stitch shaping.
R1: 6 sc in MR (6)
R2: inc × 6 (12)
R3: (sc, inc) × 6 (18)
R4–R5: sc around (18)
Fasten off. Leave the piece open.
Heart Balloon — Lobe Two and Join
R1: 6 sc in MR (6)
R2: inc × 6 (12)
R3: (sc, inc) × 6 (18)
R4–R5: sc around (18)
Do not fasten off.
Join to Lobe One and continue:
R6: sc around both lobes (36)
R7: sc around (36)
R8: (4 sc, dec) × 6 (30)
R9: sc around (30)
R10: (3 sc, dec) × 6 (24)
R11: sc around (24)
R12: (2 sc, dec) × 6 (18)
Begin stuffing. Fill the upper lobes first and shape the centre indentation with your fingers.
R13: (sc, dec) × 6 (12)
R14: dec × 6 (6)
Add the final stuffing before closing.
Fasten off and pull the tail through the six front loops.
Heart Balloon Knot
Yarn: red.
Ch 4. Starting in second chain from hook, work 3 sc.
Fasten off with a 15 cm tail. Fold the strip and sew directly beneath the heart point to imitate the tied balloon neck.
Balloon Cord
Yarn: blush pink.
Ch approximately 48–55, or enough to measure about 28–32 cm when relaxed.
Sl st back along the full chain for a firmer cord.
Fasten off with long tails at both ends.
The cord should run from the balloon knot, between the elephant’s front paws and downward past the hands as shown in the reference.
Assembly
- Sew each pink inner-ear panel onto a gray outer ear first, maintaining a visible gray border. Attach both complete ears to the sides of the head across seams approximately 5–6 cm wide.
- Pin the trunk centrally between and below the safety eyes. Sew the 12-stitch opening firmly to the face, leaving the softer tip free to curve downward.
- Attach the two pink cheek patches outside the trunk and beneath the eyes. Embroider the short black eyebrows after comparing the eye heights from directly in front.
- Sew the head onto the body with two complete passes around the neck area. Angle the face slightly forward rather than straight upward.
- Attach both large back legs low on the body and slightly forward. Add one 18-stitch pink foot pad and three small pink toe bumps to each visible foot.
- Pin the front arms to the upper sides of the torso. Rotate the rounded hand ends inward until a narrow channel remains between them for the balloon cord.
- Thread the pink cord between the hands before closing the arm seams. Add two or three hidden stitches from each hand into the cord so it cannot slide sideways.
- Attach the upper end of the cord to the knot beneath the red heart. Keep the heart approximately 10–14 cm above the top of the elephant’s head.
- Check the balloon alignment from the front. Move the heart slightly toward one side so the cord passes beside the trunk rather than directly over the elephant’s face.
- Set the complete elephant on a hard surface, correct foot rotation and head angle, then weave every structural tail through at least three stitch directions.
The completed elephant should sit independently with both hind feet forward, its front paws closed around the pink balloon cord and the red heart floating visibly above one side of the head.
7 Technical Tips
- Ear folding: A broad 30-stitch ear attached through fewer than about five head stitches can fall forward. Spread each seam across approximately 5–6 cm.
- Trunk droop: Packing the entire six-stitch tip creates excess weight. Leave the narrow final 3–4 cm lightly stuffed and concentrate filling near the 12-stitch attachment.
- Arm separation: A gap wider than about 2 cm between the hands makes the balloon cord look disconnected. Pin both arms simultaneously around the cord before sewing.
- Heart distortion: Filling the 36-stitch join before shaping both lobes can erase the centre indentation. Stuff each upper lobe independently before filling the lower heart.
- Foot rocking: One hind foot attached 5 mm higher than its partner can tilt the seated body. Pin both legs and test the elephant on a level table first.
- Decrease holes: Chenille can expose stuffing at head, body and heart reductions. Work each decrease through the front loops of the following two stitches.
- Balloon tilt: A cord fixed at only one hand can rotate under the heart’s weight. Tack the cord to both paws and place its upper attachment directly under the heart point.
Shaping the Oversized Elephant Head
The large head is central to this elephant amigurumi crochet pattern. Seven increase rounds produce a 42-stitch circumference, leaving enough facial width for the trunk and large eye spacing without forcing either eye against an ear seam.
The design then holds 42 stitches for six rounds. Those plain rounds create a broad forehead and enough side area for large ear attachments.
Pack the head firmly around the eye washers. A soft side wall allows the ears to pull the fabric outward, which can distort the eye position after assembly.
Building the Tapered Trunk
Published elephant patterns commonly treat the trunk as a separate narrowing cylinder. Supergurumi, for example, begins its trunk at six stitches and increases toward twelve at the face. :contentReference[oaicite:21]{index=21}
The same principle fits the photograph. The narrow tip needs flexibility, while the broader upper section needs enough surface area for a strong facial seam.
Do not insert wire. The plush trunk can be shaped with variable stuffing density, leaving the tip soft and the facial end firm.
Constructing the Pink-Lined Ears
Separate gray and pink pieces give the ear a visible border without complicated mid-round color changes. The gray outer circle reaches 30 stitches, while the inner pink section stops at 24.
Large crochet elephant ears are often fixed through several head stitches to control their position. A published large-ear technique attaches each ear across six head stitches. :contentReference[oaicite:22]{index=22}
Pin the ears before sewing. Their upper edges should finish at comparable heights, while the lower edges sit near the cheek line.
Making the Seated Body Stable
The 36-stitch body is deliberately smaller than the head. Large hind legs expand the lower silhouette and form the primary support points.
Stuff the torso base firmly before attaching either leg. Once both legs are pinned, place the elephant upright and adjust them until the body rests without rolling backward.
The feet should project forward. Rotating them sideways reduces the base depth and makes the elephant more dependent on the hidden rear body for balance.
Building the Heart Balloon
The balloon is made from two separate 18-stitch domes. Joining them at 36 stitches produces the two upper lobes without requiring complicated short-row shaping.
Shape the centre groove before the lower reductions become narrow. Press the stuffing outward into both lobes and keep the central join slightly less dense.
The lower section narrows through 30, 24, 18, 12 and six stitches. That sequence creates a defined heart point that can connect cleanly to the small balloon knot.
Controlling Balloon Weight
The heart should be visibly padded but not packed as firmly as the elephant head. Its cord and arms are decorative supports rather than a rigid internal frame.
Use small pieces of stuffing through the lobes and stop when the red stitches regain their shape after light pressure. Adding extra filling at the lower point makes the heart bottom-heavy.
If your chosen chenille produces a very heavy heart, shorten the cord by 3–5 cm. A shorter suspended distance places less rotational force on the elephant’s hands.
Attaching the Balloon Cord
A plain chain can stretch substantially in plush yarn. Slip stitching back along the chain creates a denser cord while preserving the narrow appearance.
Run the cord between both hands before finishing the arm seams. Tack it directly to the inner paw surfaces with matching pink yarn.
Leave the lower end hanging beneath the hands as in the reference. A short free end helps the cord read as an actual balloon string instead of a rigid stem.
Positioning the Arms
Both arms bend inward rather than hanging down the body. Their attachment points should sit high enough that the hands meet near the upper chest.
Stuff only the lower paw portion firmly. A softer arm base can be compressed against the torso during sewing, which helps both hands reach the balloon cord.
Compare the hands from the front before tightening the seams. One hand positioned a full round higher will make the cord angle visibly across the chest.
Adding the Pink Foot Pads and Toes
Each hind foot carries one large pink pad and three smaller raised bumps. These details repeat the inner-ear and cheek color at the bottom of the composition.
Sew the large pad first. Centre it on the forward-facing portion of the foot and keep its lower edge inside the gray outline.
Add the three smaller toe pieces above the main pad. Leave a small gray gap between neighboring bumps so their shapes remain individually readable.
Choosing Safety-Eye Size
A 17 cm Dolphin Baby elephant pattern specifies 10 mm safety eyes, while other medium elephant projects use eye sizes around 9 mm. :contentReference[oaicite:23]{index=23}
The photographed chenille elephant has a comparatively large 42-stitch head, so test both 10 mm and 12 mm before fitting the washers. Twelve millimetres gives the stronger glossy-eye proportion visible in the reference.
For a recipient for whom plastic hardware is inappropriate, replace the safety eyes with embroidered black circles.
Working with Chunky Chenille
Current plush elephant references use 4 mm hooks with Dolphin Baby and 5 mm hooks with weight-5 chenille, so hook choice depends heavily on the specific plush yarn. :contentReference[oaicite:24]{index=24}
Keep the stitch marker through both top loops of the first stitch. Fuzzy fibers can conceal the start of a round, especially through the six plain 42-stitch head rounds.
If the fabric shows stuffing after the head is filled, reduce the hook by 0.5 mm rather than changing the stitch totals.
Adjusting Finished Size
Elephant amigurumi patterns show a broad size range. Current examples include approximately 17–18 cm elephants and a 36 cm design in worsted yarn. :contentReference[oaicite:25]{index=25}
For a smaller version, keep the written stitch counts and switch to worsted yarn with approximately a 3–3.5 mm hook. Make the balloon from the same weight so its proportions remain consistent.
For a larger plush, change to thicker blanket yarn instead of increasing only the head. The body, ears, feet, arms and balloon must grow at the same rate.
Planning Yarn Quantities
Yarn consumption is highly dependent on scale. Esther reaches 36 cm in worsted yarn, while a smaller 17 cm elephant is designed around a 100 g/120 m chenille yarn. :contentReference[oaicite:26]{index=26}
The 140–175 g gray allocation here is a project estimate for the larger seated chenille proportions in the supplied image. The oversized ears and hind legs account for much of that amount.
Reserve the full red quantity before beginning the heart. Using two different red dye lots would be particularly visible across the two upper balloon lobes.
Finishing Checks
Place the elephant on a hard level surface and inspect the hind feet first. Both should touch the table while the body remains upright.
View the face directly from the front. The safety eyes need comparable height, the trunk must remain centred and the pink cheeks should sit outside the trunk seam.
Check the balloon last. Both heart lobes should remain similar in size, the centre indentation needs to stay visible and the cord should pass naturally between the elephant’s two front paws.
Conclusion
Measure the finished elephant from the sitting base to the crown, then record the heart width and total balloon height separately. Those measurements make a second version easier to reproduce when changing chenille brands. Photograph the finished project from the front and three-quarter side to check ear symmetry, trunk angle and balloon alignment. Save this elephant amigurumi crochet pattern to Pinterest and share the finished plush on Instagram with #HeartBalloonElephant. Reshape both heart lobes before taking the final photograph. Would you keep the red heart balloon shown here or make the next elephant hold a dusty-pink heart?
Sources
- Jess Huff — Esther the Elephant: 36 cm worsted elephant with a 3.5 mm hook and detailed assembly information. :contentReference[oaicite:27]{index=27}
- Amigurumi.com / Knitfriends — Plushie Elephant: approximately 17 cm, Himalaya Dolphin Baby, 4 mm hook and 10 mm safety eyes. :contentReference[oaicite:28]{index=28}
- Supergurumi — Elephant Amigurumi: separate trunk expanding from 6 to 12 stitches and separately crocheted ears. :contentReference[oaicite:29]{index=29}
- Look At What I Made — Large Crochet Elephant Ears: large-ear attachment spread across multiple head stitches. :contentReference[oaicite:30]{index=30}
- Hooked by Kati — Elephants in Love: Valentine-oriented elephant crochet competition featuring heart-shaped presentation. :contentReference[oaicite:31]{index=31}
- Ravelry — Esther the Elephant and Elwis Elephant: current elephant pattern listings and project/size references. :contentReference[oaicite:32]{index=32}









