Introduction
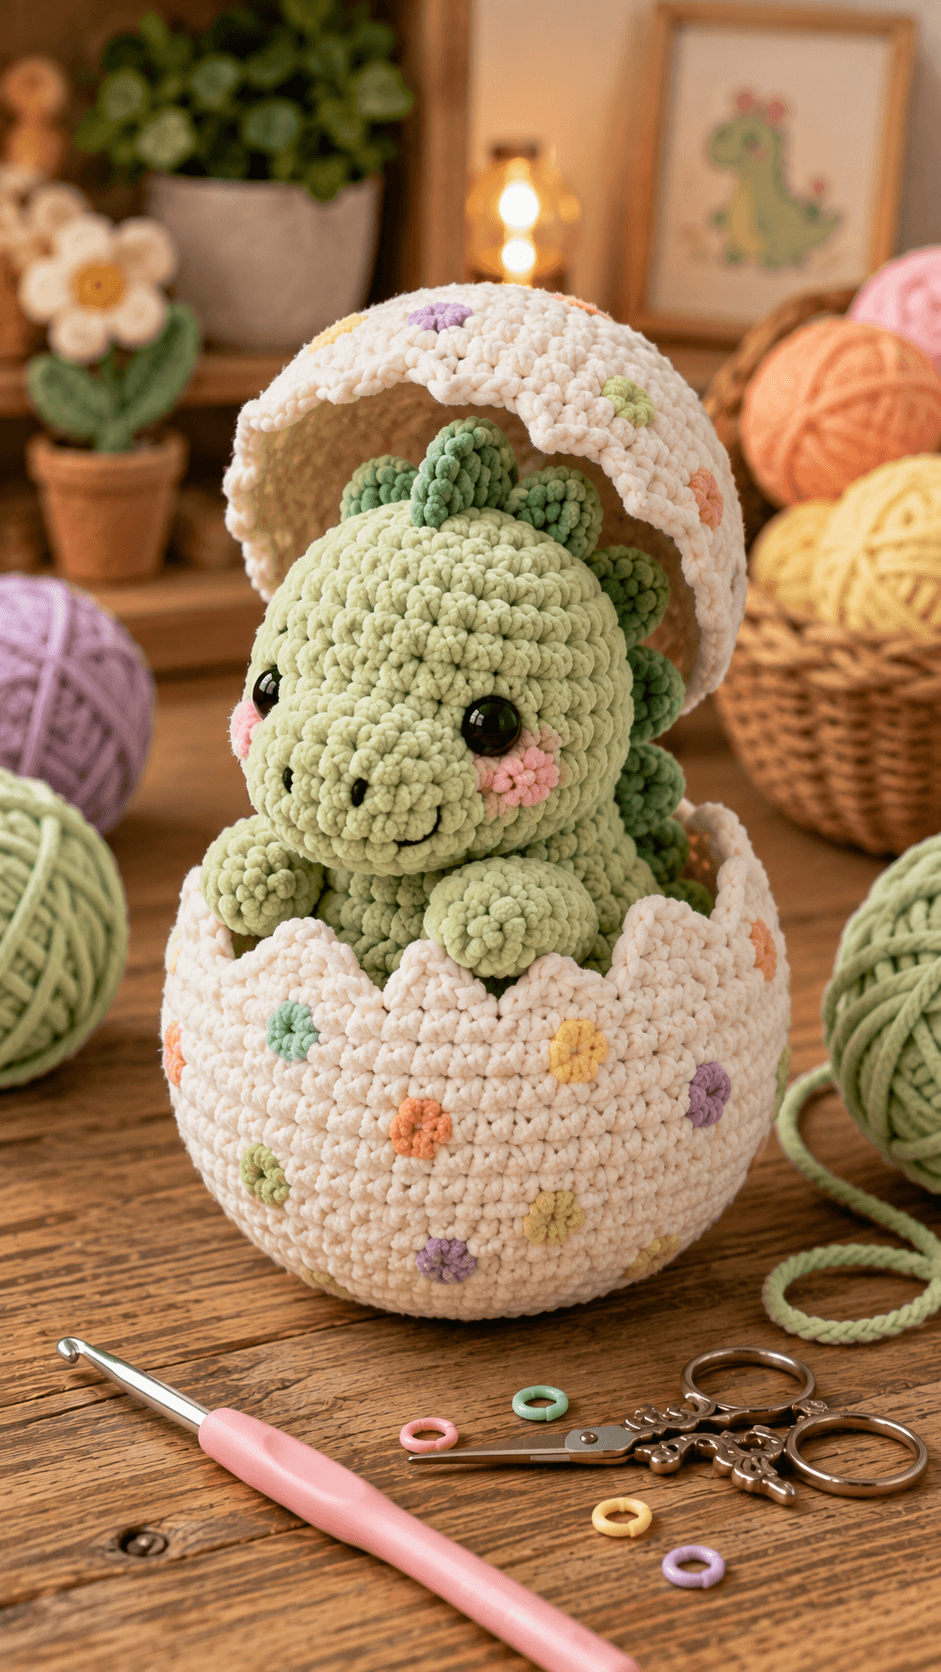
A hatching Stegosaurus needs enough dorsal plates above the eggshell to remain recognizable before its legs or tail can even be seen. This stegosaurus egg amigurumi crochet pattern uses chunky chenille, a 4.5 mm hook and 10–12 mm eyes for an approximately 25–29 cm display. A sage hatchling, seven green plates and two decorated broken-shell sections form the intermediate construction.
The Design: What Makes This Hatching Stegosaurus Different
The dinosaur head reaches 42 stitches because it has to dominate a wide 60-stitch lower shell without disappearing inside it. A separate 24-stitch snout adds the rounded baby-dinosaur profile while leaving most of the face spherical. Seven dark-green dorsal plates begin behind the crown and continue down the concealed back, creating a recognizable Stegosaurus line even though the tail is hidden. The lower egg is deep enough to contain the body and hidden rear supports, while a second shell section arches behind the head like a hinged lid. Small pastel circles break up the large cream surfaces. This hatching dinosaur amigurumi differs from a standard freestanding Stegosaurus because the egg controls the final pose. One common mistake is raising the lower broken rim too high; the front paws and most of the chest must remain visible above it.
Project Information at a Glance
| Skill Level | Time | Finished Size | Hook | Best For |
|---|---|---|---|---|
| Intermediate | 14–18 hours | Approx. 25–29 cm tall | 4.5 mm | Dinosaur decor, nursery shelves and spring displays |
Materials and Tools
Yarn
- Pale sage green — chunky chenille — approximately 130–160 g — head, body, snout and paws
- Medium/dark sage green — chunky chenille — approximately 35–50 g — dorsal plates
- Cream/white — chunky chenille — approximately 180–220 g — lower and upper egg shell
- Blush pink — matching yarn scrap — cheeks and shell dots
- Lavender — yarn scrap — shell dots
- Pale yellow — yarn scrap — shell dots
- Peach — yarn scrap — shell dots
- Mint — yarn scrap — shell dots
- Black smooth embroidery yarn — nostrils and smile
Tools
- 4.5 mm crochet hook
- Two 10–12 mm black safety eyes
- Polyester toy stuffing
- Large-eye yarn needle
- Locking stitch markers
- Dressmaking pins
- Scissors
- Optional flexible plastic-canvas oval for the lower egg base
Current Stegosaurus patterns use considerably different hook sizes because available designs range from fine sport-weight toys through worsted and super-bulky plush versions. The 4.5 mm specification here targets the dense chenille texture visible in the supplied image.
Abbreviations
- MR — magic ring
- sc — single crochet
- inc — two single crochet stitches in one stitch
- dec — decrease over two stitches
- sl st — slip stitch
- ch — chain
- hdc — half double crochet
- dc — double crochet
- BLO — back loop only
- FLO — front loop only
An invisible decrease is worked through the front loops of the following two stitches before completing both loops together as one single crochet.
Pattern — Step by Step
Work stuffed pieces in continuous spirals unless a section states otherwise. Mark the first full stitch of every round and check each bracketed count before continuing.
Head
Yarn: pale sage green — large 42-stitch amigurumi sphere.
R1: 6 sc in MR (6)
R2: inc × 6 (12)
R3: (sc, inc) × 6 (18)
R4: (2 sc, inc) × 6 (24)
R5: (3 sc, inc) × 6 (30)
R6: (4 sc, inc) × 6 (36)
R7: (5 sc, inc) × 6 (42)
R8–R13: sc around (42)
R14: (5 sc, dec) × 6 (36)
Insert the safety eyes between R10 and R11, approximately seven visible stitches apart. Test both 10 mm and 12 mm eyes against the stuffed head before locking the washers.
R15: (4 sc, dec) × 6 (30)
R16: (3 sc, dec) × 6 (24)
R17: (2 sc, dec) × 6 (18)
R18: (sc, dec) × 6 (12)
R19: dec × 6 (6)
Stuff firmly after R14. Build the crown first, then add smaller pieces around the eye washers and lower face.
Fasten off and leave a 25 cm tail. Pass it through the six remaining front loops and close.
Body
Yarn: pale sage green.
R1: 6 sc in MR (6)
R2: inc × 6 (12)
R3: (sc, inc) × 6 (18)
R4: (2 sc, inc) × 6 (24)
R5: (3 sc, inc) × 6 (30)
R6: (4 sc, inc) × 6 (36)
R7–R12: sc around (36)
R13: (4 sc, dec) × 6 (30)
R14: sc around (30)
R15: (3 sc, dec) × 6 (24)
R16: (2 sc, dec) × 6 (18)
Stuff the lower body firmly because this section carries the head and dorsal plates inside the shell.
R17: (sc, dec) × 6 (12)
R18: dec × 6 (6)
Fasten off and leave a 45 cm structural tail.
Rounded Snout
Yarn: pale sage green. Work around both sides of a foundation chain.
Ch 7.
R1: starting in second ch from hook, 5 sc, 3 sc in final ch; continue along opposite side with 4 sc, inc in final ch (14)
R2: inc, 4 sc, inc × 3, 4 sc, inc × 2 (20)
R3: (4 sc, inc) × 4 (24)
R4–R5: sc around (24)
Add a shallow layer of stuffing. Flatten the attachment side so the muzzle projects forward rather than downward.
Fasten off and leave a 30 cm sewing tail.
Front Paws — Make Two
Yarn: pale sage green.
R1: 6 sc in MR (6)
R2: inc × 6 (12)
R3: (sc, inc) × 6 (18)
R4–R6: sc around (18)
R7: (sc, dec) × 6 (12)
R8–R9: sc around (12)
R10: dec × 6 (6)
Stuff firmly through R6 and leave the upper attachment end softer.
Fasten off and leave a 30 cm tail.
Hidden Rear Supports — Make Two
Yarn: pale sage green. These compact pieces sit inside the lower shell and are not intended to show.
R1: 6 sc in MR (6)
R2: inc × 6 (12)
R3: (sc, inc) × 6 (18)
R4–R5: sc around (18)
R6: (sc, dec) × 6 (12)
R7: dec × 6 (6)
Stuff firmly. Fasten off and leave a 25 cm tail.
Cheek Patches — Make Two
Yarn: blush pink.
R1: 6 sc in MR (6)
Slip stitch to the first stitch and fasten off with a 12 cm tail. Stretch each circle sideways during sewing to create a low oval.
Nostrils and Smile
Yarn: smooth black embroidery yarn.
Embroider two short nostril stitches near the lower centre of the snout, approximately 8–10 mm apart.
Add a shallow curved smile beneath them. Keep the mouth approximately 2–2.5 cm wide.
Large Dorsal Plates — Make Three
Yarn: medium/dark sage green.
R1: 6 sc in MR (6)
R2: inc × 6 (12)
R3: (sc, inc) × 6 (18)
R4–R7: sc around (18)
R8: (sc, dec) × 6 (12)
R9: dec × 6 (6)
Stuff with only a thin central layer. Flatten the base completely.
Fasten off and leave a 30 cm sewing tail.
Medium Dorsal Plates — Make Two
Yarn: medium/dark sage green.
R1: 6 sc in MR (6)
R2: inc × 6 (12)
R3: (sc, inc) × 6 (18)
R4–R5: sc around (18)
R6: (sc, dec) × 6 (12)
R7: dec × 6 (6)
Stuff lightly. Flatten the attachment edge and leave a 25 cm tail.
Small Dorsal Plates — Make Two
Yarn: medium/dark sage green.
R1: 6 sc in MR (6)
R2: inc × 6 (12)
R3–R4: sc around (12)
R5: dec × 6 (6)
Do not pack firmly. Fasten off and leave a 20 cm tail.
Lower Egg Shell
Yarn: cream/white.
R1: 6 sc in MR (6)
R2: inc × 6 (12)
R3: (sc, inc) × 6 (18)
R4: (2 sc, inc) × 6 (24)
R5: (3 sc, inc) × 6 (30)
R6: (4 sc, inc) × 6 (36)
R7: (5 sc, inc) × 6 (42)
R8: (6 sc, inc) × 6 (48)
R9: (7 sc, inc) × 6 (54)
R10: (8 sc, inc) × 6 (60)
R11: BLO sc around (60)
R12–R20: sc around (60)
Insert an optional flexible plastic-canvas base after R14 if the shell needs more stability. Keep the wall unstuffed.
Lower Egg Broken Rim
Continue in cream/white. The jagged rim is worked in joined rows over short sections rather than one flat final round.
Divide the 60 stitches into ten groups of six.
For alternating groups, work:
Peak A: sc, hdc, dc, dc, hdc, sc.
Peak B: sc, hdc, 2 dc in next st, hdc, sc, sl st.
Repeat the two peak types around the opening until ten irregular shell points are formed.
Fasten off and weave in the yarn tail.
Upper Egg Shell Dome
Yarn: cream/white.
R1: 6 sc in MR (6)
R2: inc × 6 (12)
R3: (sc, inc) × 6 (18)
R4: (2 sc, inc) × 6 (24)
R5: (3 sc, inc) × 6 (30)
R6: (4 sc, inc) × 6 (36)
R7: (5 sc, inc) × 6 (42)
R8: (6 sc, inc) × 6 (48)
R9: (7 sc, inc) × 6 (54)
R10: (8 sc, inc) × 6 (60)
R11–R15: sc around (60)
Do not stuff. The upper shell remains hollow and should curve naturally behind the dinosaur.
Upper Egg Broken Edge
Divide the 60 stitches into ten groups of six.
Work alternating broken-edge sections:
Peak A: sl st, sc, hdc, dc, hdc, sc.
Peak B: sc, 2 hdc in next st, dc, hdc, sc, sl st.
Continue around. Fasten off and weave in the end.
Pastel Egg Spots — Make 12–16
Use pink, lavender, yellow, peach and mint in mixed quantities.
Small spot:
R1: 6 sc in MR (6)
Medium spot:
R1: 6 sc in MR (6)
R2: inc × 6 (12)
Fasten off with a 12–15 cm sewing tail. Do not stuff.
Optional Upper-Shell Hinge Tabs — Make Two
Yarn: cream/white.
Ch 9.
Starting in second chain from hook, sc across (8).
Fasten off with a 20 cm tail.
These tabs can connect the upper shell to the rear inside edge of the lower shell while still allowing the dome to tilt backward.
Assembly
- Sew the snout to the lower front of the head first, then embroider the nostrils and curved smile before the body and shell restrict access.
- Attach the two pink cheek patches outside the snout and below the eye line. Compare both sides from directly in front before tightening the final stitches.
- Sew the head to the body with two complete passes around the neck seam. Position the head slightly forward so the face projects beyond the lower eggshell rim.
- Attach both front paws to the upper sides of the body with their rounded ends pointing forward. Sew the hidden rear support pieces low on the body to widen its base inside the shell.
- Pin the seven dark-green dorsal plates from the head crown down the concealed back. Use the three largest pieces near the head, then reduce the sizes toward the lower rear body.
- Place the assembled dinosaur inside the lower shell. Raise or lower the body until both front paws and most of the chest remain visible above the broken cream rim.
- Sew the hidden rear supports and lower body to the shell base at four structural points. Do not fix the visible paws to the shell unless the display will remain permanently assembled.
- Position the hollow upper shell behind the dinosaur and angle it backward approximately 30–45 degrees. Attach it to the rear lower shell with two reinforced seams or the optional hinge tabs.
- Distribute the pastel spots across both shell sections. Keep the colors irregular and leave substantial cream space between neighboring circles.
- Set the completed hatching Stegosaurus on a hard surface, check shell balance, plate alignment and face visibility, then weave all structural tails through at least three stitch directions.
The finished display should show the dinosaur rising clearly above the broken lower shell, with its front paws visible and the hollow upper egg section framing the dorsal plates from behind.
7 Technical Tips
- Head sinking into the egg: A dinosaur positioned more than about 3–4 cm below the front broken rim loses most of its chest. Test the body height with temporary stuffing beneath it before sewing the hidden supports to the shell.
- Upper-shell collapse: A hollow 60-stitch dome can fold inward if its hinge seam is too narrow. Spread each rear attachment across at least 4–5 cm of shell edge.
- Plate rotation: A dorsal plate attached through fewer than four stitches can twist sideways. Flatten every base and spread the seam across approximately 2–3 cm.
- Decrease gaps: Plush chenille can expose filling around the head and body shaping. Work each decrease through the front loops of the next two stitches.
- Snout droop: More than roughly 1.5–2 cm of stuffing depth makes the muzzle heavy. Keep the 24-stitch snout shallow and anchor its upper edge securely.
- Egg rim distortion: Pulling the jagged edge stitches tightly can reduce the 60-stitch opening and squeeze the dinosaur. Keep the final peak stitches at the same tension as the shell wall.
- Top-heavy display: The upper shell and large head can shift the centre of gravity backward. Fix the dinosaur to at least four points on the lower shell base and keep the upper dome tilted no farther back than required for face clearance.
Shaping the Oversized Hatchling Head
The head uses a 42-stitch maximum because the lower egg is substantially wider than a normal amigurumi torso. Current Stegosaurus patterns vary widely in geometry; published designs include 36-stitch body sections as well as asymmetric one-piece constructions. The larger 42-stitch head here is a photo-matched adaptation rather than a copied round sequence from those patterns.
Six plain rounds at 42 stitches create the deep juvenile forehead. That height also gives the first large dorsal plate a stable attachment area behind the crown.
Stuff the head firmly but do not stretch the front fabric. The separate snout supplies facial projection, so the underlying sphere should remain round.
Constructing the Rounded Snout
The reference does not show a narrow reptilian muzzle. Instead, the front of the face projects as a broad oval with two small nostrils.
Working around both sides of a chain creates that low horizontal profile more efficiently than a circular magic-ring piece. The 24-stitch maximum gives enough width to sit beneath both eyes.
Keep the stuffing shallow. Pin the upper snout edge first and check the side profile before completing the lower seam.
Making the Dorsal Plates
Stegosaurus crochet patterns treat back plates in several ways. Current designs include separate plates, all-in-one scales and flat blade-style constructions. :contentReference[oaicite:17]{index=17}
The supplied image uses seven rounded stuffed lobes, so the plate pattern follows that softer plush geometry. Three large pieces establish the crown and upper-back height, two medium pieces continue the row and two small plates finish the visible sequence.
Stuff each piece sparingly. The plate should have depth, but the two sides still need to compress into one narrow sewing base.
Aligning the Plate Row
Mark a centre line on the dinosaur before placing the first plate. The surrounding egg hides much of the back, making it harder to judge alignment after assembly.
Pin the first large plate behind the crown and the smallest plate near the lower rear body. Distribute the five middle pieces between those anchors.
Viewed from the front, only portions of several plates should project around the head. From the side, the row should read as one continuous ridge.
Building the Lower Broken Egg
The lower shell expands to 60 stitches before turning upward through a back-loop round. That creates a broad base capable of containing the 36-stitch dinosaur body and hidden support pieces.
Nine plain wall rounds give the egg enough depth to conceal the lower torso. Test the dinosaur before adding the broken rim because chenille gauge can change the physical height by several centimetres.
The top edge alternates low and tall stitch groups to simulate broken shell points. Perfectly equal triangles are unnecessary; slightly different peak shapes produce a more credible cracked outline.
Constructing the Upper Egg Shell
The top begins with the same six-stitch expansion and reaches the same 60-stitch width as the lower shell. It then stops after only five straight rounds, producing a shallow cap instead of another deep basket.
Leave the dome completely unstuffed. Its crocheted fabric supplies enough curvature when the rear edge is attached at an angle.
If the shell folds sharply across the crown, steam blocking is unsuitable for many chenille fibers. Reshape it by hand and add a loose internal yarn brace between two interior points instead.
Attaching the Upper Shell
The upper section should appear to have broken away from the lower egg while remaining positioned behind the hatchling. Two short hinge zones are more useful than sewing the entire rear circumference together.
Place the dome after the dinosaur is fixed into the bottom shell. Angle it until the upper edge frames the head without touching the safety eyes or compressing the first dorsal plate.
Reinforce both hinge locations several times. The combined weight of a 60-stitch chenille dome can pull a single narrow seam out of shape.
Decorating the Egg with Pastel Spots
The shell decoration uses small flat circles rather than embroidery. Mix pink, lavender, peach, yellow and mint to reproduce the scattered appearance in the photograph.
Use more six-stitch circles than 12-stitch circles. Too many large spots can compete with the dinosaur and make the shell visually busy.
Pin all motifs before sewing. Keep some spots partly toward the side surfaces so the decoration continues around the egg instead of appearing only on its front panel.
Positioning the Front Paws
The paws are important because the lower shell hides the dinosaur’s rear anatomy. Both rounded front pieces tell the viewer that the hatchling is leaning over the broken rim.
Attach the upper paw seams to the body before placing the dinosaur inside the egg. Once the shell surrounds the chest, adjusting those seams becomes difficult.
Leave the lower half of each paw free. They should project above the broken edge rather than lying flat against the torso.
Using Hidden Rear Supports
The supplied image does not expose full hind legs, so the two rear pieces act as structural supports rather than visible anatomy. Their 18-stitch width spreads the body load inside the egg.
Sew them low on opposite sides of the torso. Once the dinosaur is placed in the shell, their lower surfaces can be fixed directly to the base.
This approach also reduces head wobble because the upper body is supported at three broad zones: body base plus the two hidden rear pieces.
Choosing Safety-Eye Size
A current 18 cm worsted Stegosaurus design specifies 10 mm safety eyes, while smaller sport-weight versions use 6 mm. :contentReference[oaicite:18]{index=18} The photographed chenille head is proportionally larger, so 10–12 mm is a practical test range.
Place both sizes against the completed head before fitting the washers. Ten millimetres leaves more visible green between the eye and snout; 12 mm more closely reproduces the glossy oversized expression in the image.
For recipients for whom detachable plastic hardware is unsuitable, replace the safety eyes with embroidered black circles.
Working with Chunky Chenille
Published Stegosaurus patterns demonstrate how widely materials vary: sport cotton versions can use hooks near 2.2 mm, worsted designs around 4 mm, and super-bulky constructions larger hooks. :contentReference[oaicite:19]{index=19}
For this project, check every plateau round manually. Fuzzy chenille can conceal a missed stitch until the head or shell begins to spiral out of alignment.
If a magic ring sheds when tightened, chain two and place the first six single crochets into the second chain from the hook.
Adjusting Finished Size
Current Stegosaurus patterns range from tiny four-inch dinosaurs through approximately 18 cm and 23 cm examples, with other designs reaching much larger sizes. :contentReference[oaicite:20]{index=20}
For a smaller hatchling, keep the written stitch totals and switch to worsted yarn with a 3–3.5 mm hook. Make both shell halves from the same yarn weight so the dinosaur-to-egg ratio stays consistent.
For a larger display, increase yarn thickness before adding more rounds. Expanding only the egg beyond 60 stitches can make the dinosaur look undersized inside it.
Planning Yarn Quantities
Published small Stegosaurus patterns can use only a few grams per color, while larger worsted versions specify dozens of metres and plush designs consume considerably more. :contentReference[oaicite:21]{index=21}
The egg is the largest yarn consumer in this project because two separate cream sections both reach 60 stitches. Purchase the full cream allocation before starting if matching dye lots matters.
Make one large dorsal plate and one medium pastel shell spot before dividing accent yarn. Their actual weight gives a better estimate than yardage when working with dense chenille.
Balancing the Finished Display
The head, dinosaur body and upper shell all add weight above the lower egg base. Keep the bottom shell broad and stable rather than compressing it into a tall narrow oval.
Place the display on a hard surface after the dinosaur is fixed but before attaching the upper shell. Mark the stable rear hinge position while the lower section still sits flat.
If the piece tips backward afterward, reduce the upper-shell angle before adding more filling or weight to the bottom.
Finishing Checks
Set the completed egg on a flat table and inspect the lower shell first. Its base should contact the surface evenly without rocking from side to side.
View the dinosaur directly from the front. Both eyes should remain level, the snout needs to sit centrally and both front paws must stay visible above the broken rim.
Inspect the side profile last. The upper shell should frame the head rather than touch it, and all seven dorsal plates should progress cleanly down the visible back.
Conclusion
Measure the finished display from the bottom of the egg to the highest upper-shell point, then record the lower shell diameter and dinosaur head width separately. Those measurements make a second hatchling easier to reproduce when changing chenille brands. Photograph the project from both the front and side to check broken-rim height, shell angle and dorsal-plate alignment. Save this stegosaurus egg amigurumi crochet pattern to Pinterest and share the finished piece on Instagram with #HatchingStegosaurus. Reshape the upper shell before the final photograph. Would you keep the pastel-spotted egg shown here or make the next one cream with larger lavender spots?
Sources
- The Kindness Company — 2024 free Stegosaurus pattern with video tutorial, sport-weight yarn, 6 mm eyes and published yarn amounts.
- Storyland Amis — Sammy the Stegosaurus: worsted yarn, 4 mm hook, 10 mm safety eyes and approximately 18 cm × 13 cm finished size.
- DIY Fluffies — Brodie the Stegosaurus: current free pattern with full video walkthrough.
- Ravelry — Spin a Yarn Crochet Stegosaurus Amigurumi: current pattern listing with separate construction and photo tutorial.
- Ravelry — All in One Dinosaur by Criss Wall: one-piece Stegosaurus format with approximately 14 metres of each color and 6 mm eye option.
- Etsy — current Stegosaurus crochet marketplace showing strong competition from no-sew and plush dinosaur PDFs.









