Introduction
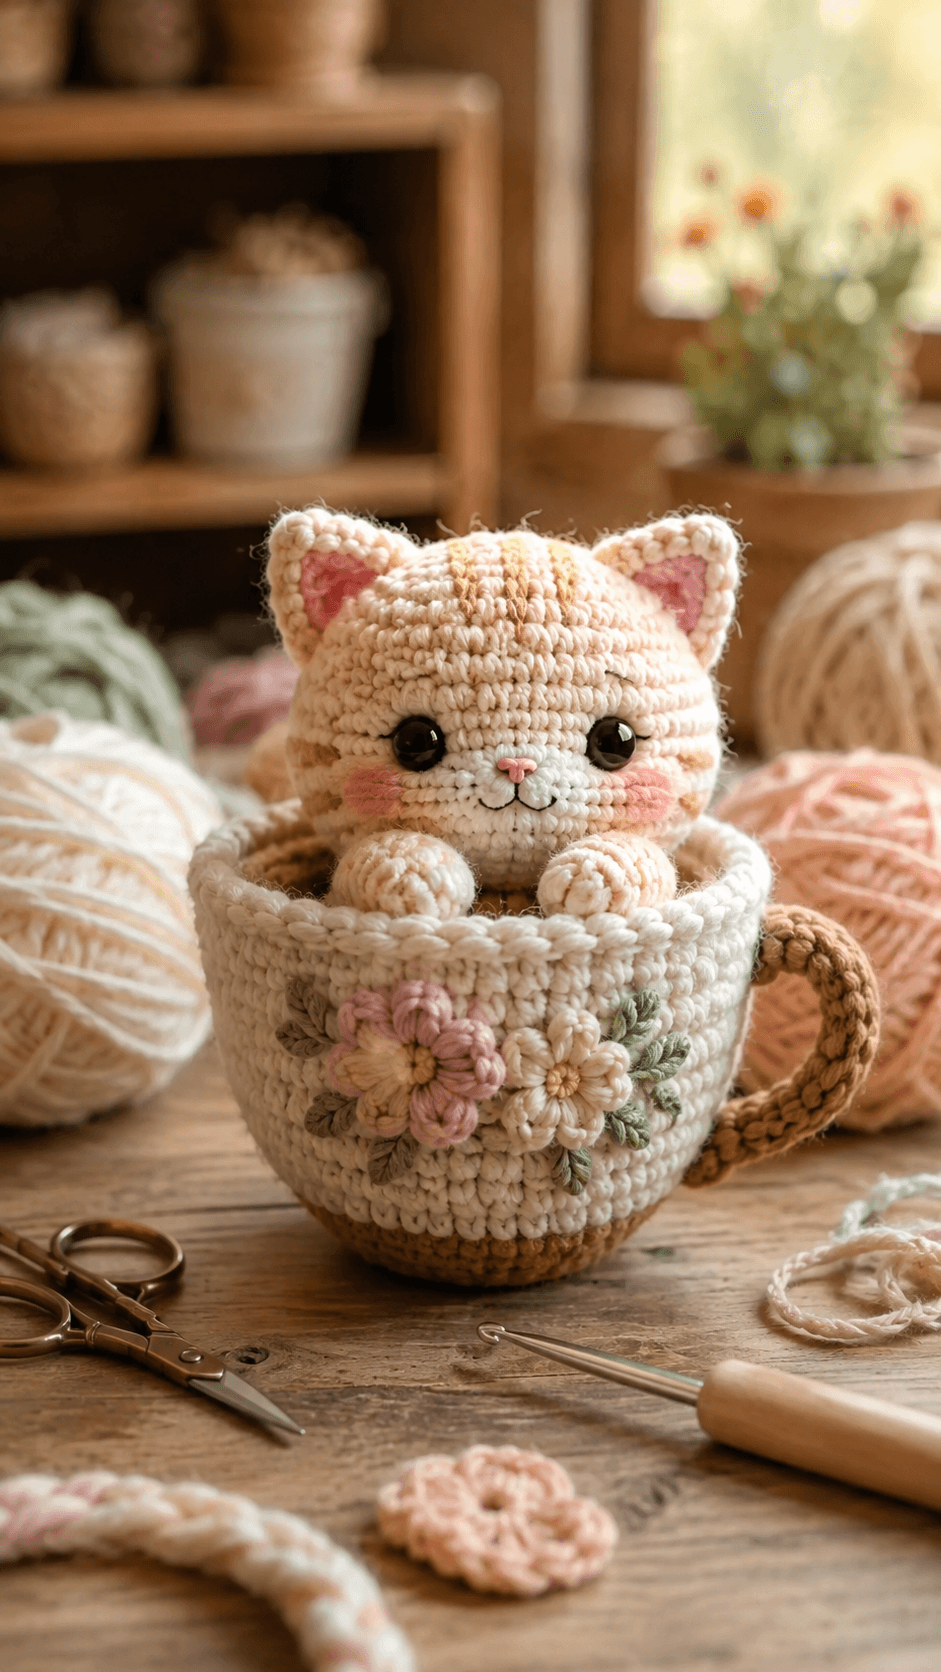
A kitten inside a teacup has to clear the rim with both paws while its striped cheeks remain fully visible above the cup. This cat amigurumi crochet pattern uses worsted yarn, a 3.5 mm hook and 12 mm safety eyes for a cream tabby approximately 15–18 cm tall. An oversized floral cup, curved handle, embroidered stripes and two rounded paws create the complete intermediate display.
The Design: What Makes This Teacup Kitten Different
The kitten uses a 36-stitch head but only a 30-stitch hidden body, shifting most of the visual weight above the cup rim. Two broad triangular ears extend from the crown, while small pink inner panels repeat the blush used on the cheeks and nose. The white muzzle is split into two low circles so the pink nose can sit between them without producing a large projecting snout. Caramel stripes cross the forehead and outer cheeks, giving this cream tabby amigurumi enough contrast against the ivory cup. The cup itself reaches 60 stitches and uses a separate brown handle plus a darker base band. Three raised flowers and six leaves decorate only one front section. A frequent mistake is making the cup too deep; the rim should stop below the kitten’s paws rather than covering the lower face.
Project Information at a Glance
| Skill Level | Time | Finished Size | Hook | Best For |
|---|---|---|---|---|
| Intermediate | 12–16 hours | Approx. 21–24 cm overall | 3.5 mm cat / 4 mm cup | Tea-themed decor, craft-room display and handmade markets |
Materials and Tools
Yarn
- Warm cream — worsted/light Aran — approximately 70–85 g — kitten head, body, ears and paws
- White — worsted yarn — approximately 10–15 g — muzzle
- Soft caramel — worsted yarn — approximately 10–15 g — tabby stripes
- Blush pink — worsted yarn — approximately 10–15 g — inner ears, nose, cheeks and flowers
- Ivory — worsted/Aran yarn — approximately 130–160 g — cup body and rim
- Warm brown — worsted/Aran yarn — approximately 35–45 g — cup base and handle
- Sage green — worsted yarn — approximately 10–15 g — leaves
- Cream and dusty pink scraps — flowers and centres
- Black embroidery thread — mouth and optional whisker dots
Tools
- 3.5 mm crochet hook for kitten
- 4 mm crochet hook for cup
- Two 12 mm black safety eyes
- Polyester toy stuffing
- Large-eye yarn needle
- Locking stitch markers
- Dressmaking pins
- Scissors
- Optional plastic-canvas disc for cup base
Use a dense gauge for the cat because the face contains several sewn details. The cup can be worked slightly looser, but its wall must remain firm enough to support the kitten and the curved handle.
Abbreviations
- MR — magic ring
- sc — single crochet
- inc — two single crochet stitches in one stitch
- dec — decrease over two stitches
- sl st — slip stitch
- ch — chain
- hdc — half double crochet
- dc — double crochet
- tr — treble crochet
- BLO — back loop only
- FLO — front loop only
An invisible decrease is worked through the front loops of the following two stitches before those loops are completed together as one single crochet.
Pattern — Step by Step
Work all stuffed pieces in continuous spirals unless a section states otherwise. Place a locking marker in the first complete stitch and confirm every bracketed stitch total before beginning the next round.
Head
Yarn: warm cream.
R1: 6 sc in MR (6)
R2: inc × 6 (12)
R3: (sc, inc) × 6 (18)
R4: (2 sc, inc) × 6 (24)
R5: (3 sc, inc) × 6 (30)
R6: (4 sc, inc) × 6 (36)
R7–R12: sc around (36)
R13: (4 sc, dec) × 6 (30)
Insert the 12 mm safety eyes between R9 and R10 with approximately seven visible stitches between the stems. Check both positions from directly in front before locking the washers.
R14: sc around (30)
R15: (3 sc, dec) × 6 (24)
R16: (2 sc, dec) × 6 (18)
R17: (sc, dec) × 6 (12)
R18: dec × 6 (6)
Stuff after R13. Fill the crown firmly but leave the muzzle area slightly softer.
Fasten off. Pass a 25 cm tail through the final six front loops and pull closed.
Hidden Body
Yarn: warm cream.
R1: 6 sc in MR (6)
R2: inc × 6 (12)
R3: (sc, inc) × 6 (18)
R4: (2 sc, inc) × 6 (24)
R5: (3 sc, inc) × 6 (30)
R6–R11: sc around (30)
R12: (3 sc, dec) × 6 (24)
R13: sc around (24)
R14: (2 sc, dec) × 6 (18)
R15: sc around (18)
R16: (sc, dec) × 6 (12)
R17: dec × 6 (6)
Stuff firmly through R13. This piece will be concealed inside the cup and acts mainly as the structural support for the head and paws.
Fasten off and leave a 40 cm head-attachment tail.
Outer Ears — Make Two
Yarn: warm cream.
R1: 6 sc in MR (6)
R2: (sc, inc) × 3 (9)
R3: (2 sc, inc) × 3 (12)
R4: (3 sc, inc) × 3 (15)
R5: (4 sc, inc) × 3 (18)
R6: sc around (18)
Do not stuff. Flatten each piece and pinch the first round toward the top to strengthen the triangular profile.
Fasten off with a 25 cm sewing tail.
Pink Inner Ears — Make Two
Yarn: blush pink. Work in rows.
Row 1: ch 2, 2 sc in second ch from hook (2)
Row 2: ch 1, turn, inc × 2 (4)
Row 3: ch 1, turn, inc, 2 sc, inc (6)
Row 4: ch 1, turn, sc across (6)
Row 5: ch 1, turn, dec, 2 sc, dec (4)
Fasten off with a 15 cm tail.
Sew one pink panel onto each outer ear while retaining approximately 5–7 mm of visible cream border.
Muzzle Circles — Make Two
Yarn: white.
R1: 6 sc in MR (6)
R2: inc × 6 (12)
Fasten off with a 20 cm sewing tail.
Do not stuff. The two circles overlap slightly beneath the nose.
Pink Nose
Yarn: blush pink.
R1: 6 sc in MR (6)
Fasten off with a 12 cm tail. Shape the circle into a small triangle while sewing by pulling the lower attachment point downward.
Cheek Patches — Make Two
Yarn: blush pink.
R1: 6 sc in MR (6)
Fasten off with a 12 cm tail. Compress each circle horizontally while attaching it.
Front Paws — Make Two
Yarn: warm cream.
R1: 6 sc in MR (6)
R2: inc × 6 (12)
R3: (sc, inc) × 6 (18)
R4–R6: sc around (18)
R7: (sc, dec) × 6 (12)
R8: sc around (12)
R9: dec × 6 (6)
Stuff the rounded end firmly. Leave the narrow attachment end softer so the paw can rest against the cup rim.
Fasten off with a 30 cm tail.
Hidden Support Legs — Make Two
Yarn: warm cream. These remain inside the cup.
R1: 6 sc in MR (6)
R2: inc × 6 (12)
R3: (sc, inc) × 6 (18)
R4–R5: sc around (18)
R6: (sc, dec) × 6 (12)
R7: dec × 6 (6)
Stuff firmly. Fasten off with a 25 cm tail.
Tabby Forehead Stripes
Yarn: soft caramel.
Cut three lengths of yarn approximately 25 cm each.
Embroider one central vertical stripe from the upper forehead toward the eye line. Add one shorter stripe on either side, angling them slightly outward.
Keep every stripe approximately 3–5 mm wide after the yarn settles into the stitches.
Side Face Stripes
Yarn: soft caramel.
Embroider two short horizontal stripes on each outer cheek, beginning approximately 1–1.5 cm outside the safety eye and extending toward the ear.
Do not cross the pink cheek patch.
Mouth
Yarn: black embroidery thread.
From the lower point of the pink nose, work one short vertical stitch approximately 6–8 mm long. Add two shallow outward curves below it.
Teacup Base
Yarn: warm brown. Use 4 mm hook.
R1: 6 sc in MR (6)
R2: inc × 6 (12)
R3: (sc, inc) × 6 (18)
R4: (2 sc, inc) × 6 (24)
R5: (3 sc, inc) × 6 (30)
R6: (4 sc, inc) × 6 (36)
R7: (5 sc, inc) × 6 (42)
R8: (6 sc, inc) × 6 (48)
R9: (7 sc, inc) × 6 (54)
R10: (8 sc, inc) × 6 (60)
The finished circle should measure approximately 18–20 cm before the cup walls begin.
Teacup Walls
Change to ivory/cream.
R11: BLO sc around (60)
R12–R22: sc around (60)
Place the completed kitten inside after R19. The final rim should reach approximately the lower third of the paws.
R23: BLO sc around (60)
R24: sc around (60)
Fasten off.
Rolled Cup Rim
Fold R24 outward along the R23 back-loop ridge.
Tack the folded rim at ten equally spaced points, passing the needle through both layers without pulling the circumference inward.
Teacup Handle
Yarn: warm brown.
R1: 6 sc in MR (6)
R2: inc × 6 (12)
R3–R28: sc around (12)
Stuff very lightly as you work. The finished tube should bend into a broad C rather than remain rigid.
Fasten off with a 45 cm tail.
Handle Shaping
Curve the tube into a C measuring approximately 11–13 cm from the upper to lower cup attachment.
Use the working tail to run one loose shaping stitch along the inner curve. Tighten only until the handle holds its arc.
Large Pink Cup Flower
Yarn: dusty pink.
R1: 10 sc in MR, join with sl st (10)
For each of five petals:
sl st in next st, ch 2, 2 dc in same st, 3 tr in next st, 2 dc in same st, ch 2, sl st in same st.
Repeat five times.
Fasten off with a 25 cm attachment tail.
Medium Cream Flower
Yarn: cream.
R1: 5 sc in MR (5)
In each stitch work:
sl st, ch 2, 3 dc, ch 2, sl st.
Repeat five times.
Fasten off with a 20 cm tail.
Small Blush Flower
Yarn: blush pink.
R1: 5 sc in MR (5)
In each stitch work:
sl st, ch 1, hdc, dc, hdc, ch 1, sl st.
Repeat five times.
Fasten off with a 15 cm sewing tail.
Flower Centres — Make Three
Yarn: pale cream or muted yellow.
R1: 6 sc in MR (6)
Fasten off with a 10 cm tail and sew one centre over the middle of each flower.
Leaves — Make Six
Yarn: sage green.
Ch 7.
Starting in second ch from hook:
sl st, sc, hdc, dc, sc, sl st.
Work 3 sc in the final chain and continue down the opposite side:
sl st, sc, hdc, dc, sc, sl st.
Fasten off with a 15 cm attachment tail.
Optional Cup Base Reinforcement
Cut a plastic-canvas disc approximately 5 mm smaller than the completed 60-stitch base.
Place it inside the cup before the kitten is permanently attached. Cover the disc with a matching crochet circle if the interior will remain visible.
Assembly
- Sew the head centrally to the hidden body, making two complete passes around the neck contact area and adding one rear anchor stitch to reduce rotation.
- Attach the pink inner-ear panels to the cream ears, then pin both ears high on the head. Sew each ear base across approximately 6–7 head stitches.
- Position the two white muzzle circles below the eyes with approximately 5–8 mm of central overlap. Sew the pink nose above their meeting point and embroider the mouth.
- Attach the pink cheek patches outside the muzzle, then embroider the three forehead stripes and two caramel side stripes on each cheek.
- Sew the front paws to the upper body with their rounded ends facing forward. Attach the two hidden support legs low on the body.
- Place the kitten inside the cup and adjust its height until the paws extend approximately 2–4 cm above the folded rim. Tack the body and support legs to the cup base.
- Rest each visible paw against the upper rim and add one concealed stitch beneath it when the project will remain permanently assembled.
- Curve the brown handle and sew its lower end near the lower third of the cup wall and its upper end approximately 2 cm below the rim. Reinforce both joins through several neighboring stitches.
- Arrange the six sage leaves and three flowers on one front section of the cup. Sew leaves first, then attach the flowers through their centres and inner petal bases.
- Set the finished display on a hard surface, check cup roundness, handle angle, kitten height and facial alignment, then weave all structural tails through several stitch directions.
The finished teacup should stand independently with the kitten centred, both paws visible above the rim, the handle forming a clear side loop and the floral cluster concentrated across the front.
7 Technical Tips
- Kitten sinking: A body fixed only to the soft cup floor can settle below the rim. Keep each paw approximately 2–4 cm above the folded edge after the final attachment.
- Ear rotation: Triangular ears sewn across fewer than five head stitches can twist backward. Spread each base across approximately 6–7 stitches.
- Muzzle crowding: More than about 8 mm of overlap between the two muzzle circles makes the nose area bulky. Pin both circles before sewing either one completely.
- Eye mismatch: A one-round vertical difference is obvious on the 36-stitch head. Mark both 12 mm eye positions before fitting either washer.
- Cup collapse: A 60-stitch wall can deform under the kitten and handle. Use a rigid base disc if the lower wall loses its circular shape.
- Handle sag: A heavily stuffed 12-stitch handle pulls against its upper seam. Use only a thin line of filling and reinforce each attachment across approximately 4–5 cup stitches.
- Flower droop: A five-petal flower sewn only through its centre can fold away from the cup. Add one hidden anchoring stitch beneath at least three inner petal bases.
Shaping the Kitten Head
The head carries most of the visual information in this cat amigurumi crochet pattern. A 36-stitch maximum gives the face enough width for large eyes, two muzzle circles, cheek patches and multiple tabby stripes without forcing those details together.
Keep the forehead rounded but avoid excessive stuffing directly behind the muzzle area. The two white circles already add projection to the lower face.
After stuffing, roll the head gently between the hands and flatten the lower front by a few millimetres. That gives the muzzle a more stable sewing surface.
Creating the Cream Tabby Markings
The reference uses sparse stripes rather than a full color-change pattern. Embroidery therefore gives better placement control than crocheting caramel sections directly into the head rounds.
Three forehead marks create the main tabby cue. Make the central stripe longest and keep the two outer stripes slightly shorter and angled away from the centre.
Place the side stripes after the cheek patches are attached. Their ends should stop before the pink area so each facial element remains readable.
Building the Split Cat Muzzle
Two small white circles create the divided muzzle visible beneath the pink nose. Their lower edges remain separate while the upper inner edges overlap slightly.
Do not add stuffing. The doubled crochet fabric already provides enough thickness against the cream face.
Sew the pink nose last. Its lower point can cover the narrow seam where both muzzle circles meet.
Positioning the Pointed Ears
The ear pattern grows in groups of three rather than six, creating a triangular form instead of a round disk. Pink inner panels reinforce that geometry.
Keep the ears unstuffed. Stuffing makes the bases thick and tends to rotate the tips outward.
Pin both pieces before sewing. Their outer tips should reach similar heights, but a small outward angle prevents the crown from looking too narrow.
Constructing the Oversized Teacup
The cup begins with a 60-stitch flat base because it must support a complete stuffed kitten rather than function as a thin decorative vessel.
A back-loop round turns the wall upward while preserving the full circumference. Eleven plain wall rounds then build the depth before the folded rim is added.
Test the cat before finishing the final rounds. Yarn gauge changes physical height more than stitch count alone suggests, and the most important measurement is where the rim meets the paws.
Making the Rolled Cup Rim
The doubled rim makes the top edge visually heavier and gives the front paws a substantial surface to rest against.
Fold only the last round outward. Folding several rounds reduces the cup opening and can make the kitten look squeezed inside.
Tack the rim at ten points before filling the spaces between. That staged attachment reduces the risk of pulling the opening into an oval.
Shaping the Curved Handle
The handle is a narrow stuffed tube rather than a flat chain. Twelve stitches provide enough thickness to match the heavy cup rim.
Keep filling minimal. The tube needs to curve through more than 180 degrees without developing hard bends.
Attach the lower seam first, form the C shape and then pin the upper seam. This makes it easier to adjust the opening before fixing both ends.
Building the Floral Cup Decoration
Three flower sizes create a more natural composition than repeating one identical motif. The large dusty-pink flower forms the anchor, while cream and blush pieces fill the neighboring space.
Attach the leaves before the blossoms. Their lower sections disappear under the petals, leaving the tapered green tips visible around the flower cluster.
Keep the decoration on one side of the cup front. Spreading flowers evenly around the entire circumference would reduce the asymmetrical cottage-style arrangement visible in the reference.
Keeping the Cat at the Correct Height
The hidden body should not determine its own final position. Complete the kitten first, place it inside the cup and temporarily raise it with scrap stuffing until the paws clear the rim correctly.
Once the height is established, attach the hidden support legs to the cup base. They carry the vertical load while the paw stitches mainly control the visible pose.
Check the head from the side. The chin should remain well above the rim rather than appearing to rest directly on it.
Balancing the Cup and Handle
A large side handle changes the display’s centre of mass even though it weighs much less than the kitten. The effect becomes noticeable if the cup base is soft.
Set the empty cup on a table immediately after attaching the handle. If it leans toward the handle, flatten the base again and add the internal support disc before installing the cat.
Place the floral cluster toward the front rather than directly opposite the handle. Its role is visual and does not need to compensate mechanically for the handle.
Choosing Yarn and Hook Size
Worsted or light Aran yarn gives enough stitch definition for the stripes, muzzle and floral details while retaining the soft rounded appearance of the reference.
Use the 3.5 mm hook for the kitten and begin the cup with 4 mm. If the cup wall feels too loose after five plain rounds, return to 3.5 mm rather than adding internal stuffing.
Keep the flower yarn close to the cup yarn in thickness. Oversized floral motifs can cover too much of the front wall and compete with the kitten.
Adjusting Finished Size
For a smaller display, retain the written counts and use DK yarn with approximately a 2.75–3 mm hook for the cat. Make the cup from the same weight or one step heavier.
For a larger version, increase yarn thickness before expanding the head beyond 36 stitches. A 42-stitch kitten head would also need a wider 66- or 72-stitch cup to preserve the photographed proportions.
Complete the cat first whenever finished dimensions matter. The cup can then be scaled around the actual stuffed body rather than an estimated gauge.
Finishing Checks
Place the display on a hard, level surface. The brown base should contact the table evenly, and the handle should remain raised without pulling the upper cup wall outward.
View the kitten directly from the front. Both safety eyes need comparable height, the pink nose must align with the face centre and the tabby stripes should remain balanced without being perfectly mirrored.
Inspect the floral cluster last. All three flowers should remain visible, several sage leaf tips should project beyond the petals and the decoration should stop before reaching the handle.
Conclusion
Measure the completed cup diameter, kitten height above the rim and total display height before fixing any final hidden stitches. Those three measurements make another version easier to reproduce because the visual balance depends more on kitten placement than on the cup height alone. Photograph the finished piece straight from the front and once from the handle side to check ear alignment, paw height and cup shape. Save this cat amigurumi crochet pattern to Pinterest and share the finished project on Instagram with #FloralTeacupKitten. Reshape the flower petals before the final photograph. Would you keep the cream tabby shown here or make the next teacup kitten in calico colors?
Sources
- DIY Fluffies — Cat Crochet Pattern: published 17 cm cat, 12 mm safety eyes and approximately 60 g main cotton reference.
- Storyland Amis — Free Cat Crochet Pattern: approximately 18 cm finished cat reference.
- Crochet to Play — Amigurumi Hook Guide: light worsted/Aran with approximately 3.5 mm hook reference.
- Ravelry — Molly the Cat: 2026 pattern producing 11 cm sport-weight and 14 cm bulky cats from the same instructions.
- Supergurumi — Amigurumi Cat: separate ear and tail construction reference.
- Etsy — current Cat Amigurumi marketplace showing strong competition in standalone kitten, loaf-cat and low-sew patterns.









