Introduction
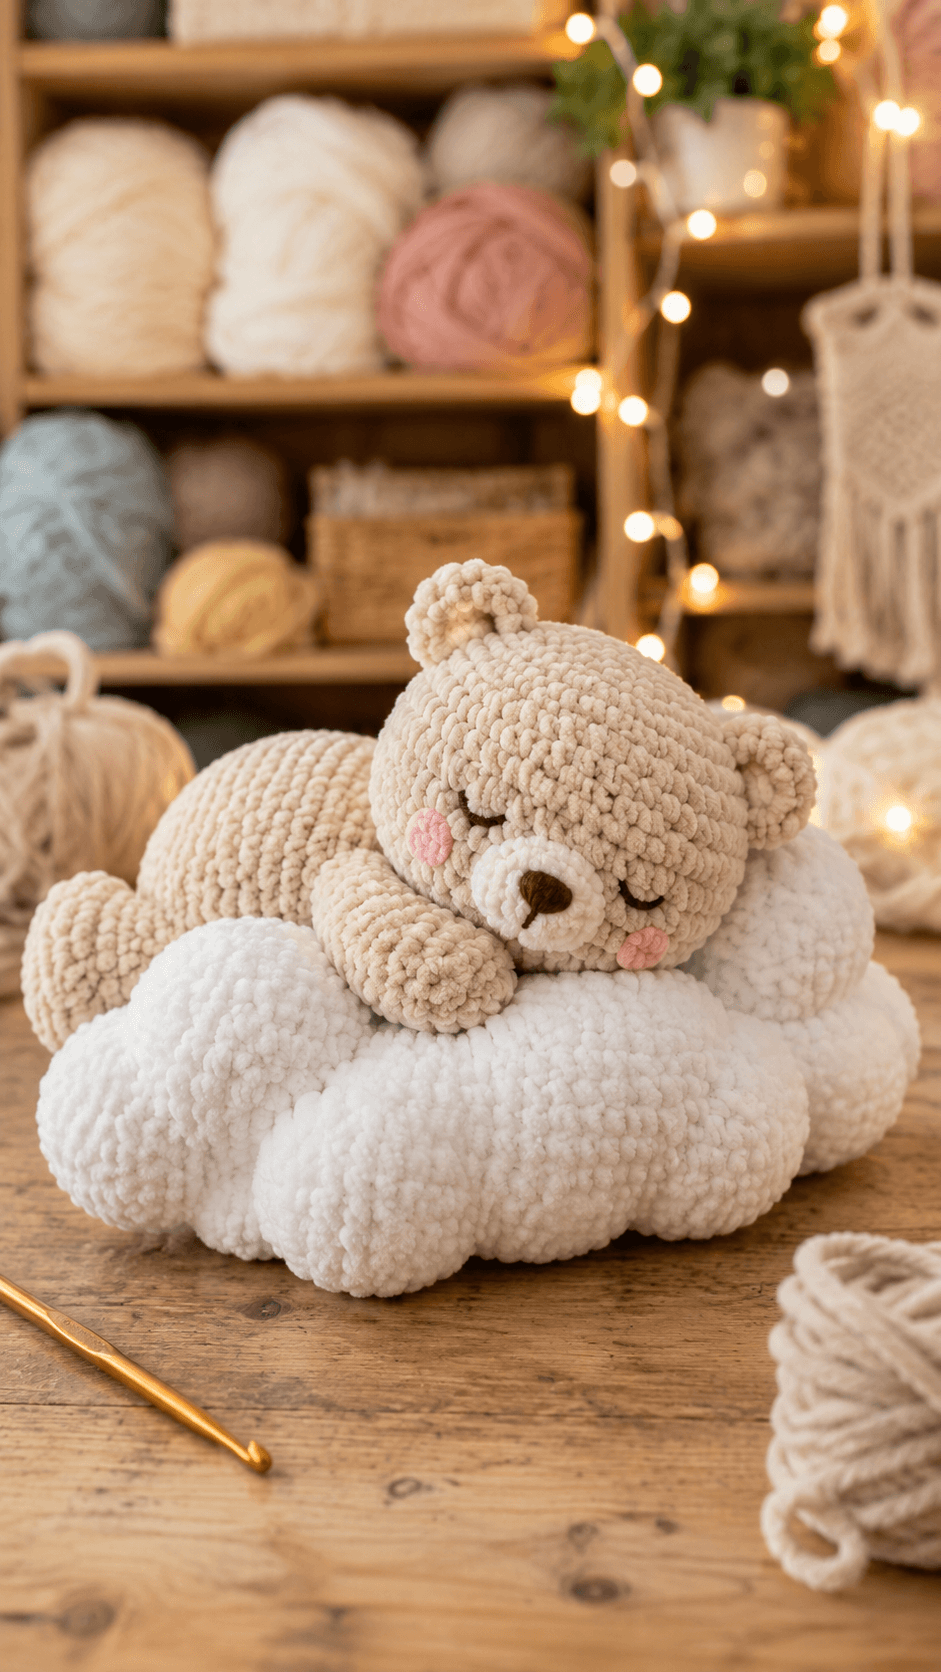
A sleeping bear cannot hold its head upright; the muzzle, paws and cloud must create the pose instead. This sleeping bear amigurumi crochet pattern uses chunky chenille, a 4.5 mm hook and embroidered closed eyes to build a reclining teddy approximately 23–26 cm long. Round ears, a white muzzle, four low limbs and a dimensional cloud base make the project intermediate and strongly dependent on assembly.
The Design: What Makes This Sleeping Bear Different
The head reaches 36 stitches but is attached at a forward angle instead of vertically above the torso. That single change establishes the sleeping posture before the limbs are added. The body also reaches 36 stitches, then holds its width long enough to create a horizontal torso behind the head. Both front paws extend toward the front of the cloud, while the rear legs sit farther apart and remain partly concealed by the body. Closed embroidered eyes are important because plastic eyes would change the expression completely. The cloud uses a firm central core with overlapping stuffed puffs around it, giving this reclining bear amigurumi a stable surface rather than a loose collection of white balls. A common mistake is placing the head too high; the lower muzzle should sit close to the front paw line.
Project Information at a Glance
| Skill Level | Time | Finished Size | Hook | Best For |
|---|---|---|---|---|
| Intermediate | 11–15 hours | Bear 23–26 cm long; cloud 28–32 cm wide | 4.5 mm bear / 5 mm cloud | Shelf display, nursery decor and sleepy-animal collections |
Materials and Tools
Yarn
- Warm oatmeal/beige — chunky chenille — approximately 120–150 g — head, body, ears, legs and tail
- White — chunky chenille — approximately 140–180 g — muzzle and cloud
- Blush pink — smooth or chenille yarn scrap — cheeks
- Dark brown — smooth embroidery yarn — closed eyes, nose and mouth
Tools
- 4.5 mm crochet hook for the bear
- 5.0 mm crochet hook for the cloud
- Polyester toy stuffing
- Large-eye yarn needle
- Locking stitch markers
- Dressmaking pins
- Scissors
No safety eyes are required for the photo-matched version. The closed expression is embroidered after the head has been stuffed so both curves can be aligned before the stitches are tightened.
Abbreviations
- MR — magic ring
- sc — single crochet
- inc — two single crochet stitches in one stitch
- dec — decrease over two stitches
- sl st — slip stitch
- ch — chain
- hdc — half double crochet
- dc — double crochet
- BLO — back loop only
- FLO — front loop only
An invisible decrease is worked through the front loops of the following two stitches before those loops are completed together as one single crochet.
Pattern — Step by Step
Work all stuffed pieces in continuous spiral rounds unless a section states otherwise. Place a marker through the first complete stitch of each round and check every bracketed total before continuing.
Head
Yarn: warm oatmeal/beige.
R1: 6 sc in MR (6)
R2: inc × 6 (12)
R3: (sc, inc) × 6 (18)
R4: (2 sc, inc) × 6 (24)
R5: (3 sc, inc) × 6 (30)
R6: (4 sc, inc) × 6 (36)
R7–R12: sc around (36)
R13: (4 sc, dec) × 6 (30)
R14: (3 sc, dec) × 6 (24)
Begin stuffing after R14. Keep the lower front slightly softer because the muzzle will sit over this area.
R15: (2 sc, dec) × 6 (18)
R16: (sc, dec) × 6 (12)
R17: dec × 6 (6)
Fasten off. Leave a 30 cm tail, pass it through the front loops of the six remaining stitches and close the opening.
Body
Yarn: warm oatmeal/beige.
R1: 6 sc in MR (6)
R2: inc × 6 (12)
R3: (sc, inc) × 6 (18)
R4: (2 sc, inc) × 6 (24)
R5: (3 sc, inc) × 6 (30)
R6: (4 sc, inc) × 6 (36)
R7–R13: sc around (36)
R14: (4 sc, dec) × 6 (30)
R15–R16: sc around (30)
R17: (3 sc, dec) × 6 (24)
R18: (2 sc, dec) × 6 (18)
Stuff the main torso firmly through R15. Use less filling toward the final end so the rear section can settle into the cloud.
R19: (sc, dec) × 6 (12)
R20: dec × 6 (6)
Fasten off and leave a 45 cm structural sewing tail.
Ears — Make Two
Yarn: warm oatmeal/beige.
R1: 6 sc in MR (6)
R2: inc × 6 (12)
R3: (sc, inc) × 6 (18)
R4–R5: sc around (18)
R6: (sc, dec) × 6 (12)
Do not fill firmly. Add only a small amount of stuffing to the outer curve, then flatten the lower edge.
Fasten off and leave a 25 cm sewing tail.
White Muzzle
Yarn: white.
R1: 6 sc in MR (6)
R2: inc × 6 (12)
R3: (sc, inc) × 6 (18)
R4: sc around (18)
R5: (sc, dec) × 6 (12)
Add a shallow layer of stuffing. Flatten the piece slightly so it projects forward without becoming spherical.
Fasten off and leave a 30 cm sewing tail.
Front Legs — Make Two
Yarn: warm oatmeal/beige.
R1: 6 sc in MR (6)
R2: inc × 6 (12)
R3: (sc, inc) × 6 (18)
R4–R7: sc around (18)
R8: (sc, dec) × 6 (12)
R9–R11: sc around (12)
R12: dec × 6 (6)
Stuff firmly through R7 and lightly above that point. Press each lower end into a rounded paw shape.
Fasten off and leave a 35 cm attachment tail.
Back Legs — Make Two
Yarn: warm oatmeal/beige.
R1: 6 sc in MR (6)
R2: inc × 6 (12)
R3: (sc, inc) × 6 (18)
R4: (2 sc, inc) × 6 (24)
R5–R6: sc around (24)
R7: (2 sc, dec) × 6 (18)
R8: (sc, dec) × 6 (12)
R9: sc around (12)
R10: dec × 6 (6)
Stuff to medium firmness and flatten slightly. The rear feet should look broader than the front paws.
Fasten off and leave a 35 cm tail.
Tail
Yarn: warm oatmeal/beige.
R1: 6 sc in MR (6)
R2: inc × 6 (12)
R3: sc around (12)
R4: dec × 6 (6)
Stuff lightly. Fasten off and leave a 20 cm tail.
Cheek Patches — Make Two
Yarn: blush pink.
R1: 6 sc in MR (6)
Slip stitch to the first stitch and fasten off with a 12 cm tail. Pull each small circle sideways during attachment to form a low oval.
Closed Eyes
Yarn: smooth dark-brown embroidery yarn.
Mark two eye curves between approximately Head R9 and R10. Each curve should measure about 2–2.5 cm from inner to outer end.
Embroider a shallow downward arc on each side of the face. Use two passes only if the first line is too thin against the chenille.
Keep approximately 5–6 cm between the outer ends of the two eye curves, depending on your actual head diameter.
Nose and Mouth
Yarn: dark brown.
Embroider a small triangular nose approximately 1.2–1.5 cm wide on the centre of the white muzzle.
Run one vertical stitch approximately 8 mm downward from the nose point. Add a very short mouth curve if desired; the reference keeps this detail minimal.
Cloud Core
Yarn: white. Use 5 mm hook.
R1: 6 sc in MR (6)
R2: inc × 6 (12)
R3: (sc, inc) × 6 (18)
R4: (2 sc, inc) × 6 (24)
R5: (3 sc, inc) × 6 (30)
R6: (4 sc, inc) × 6 (36)
R7: (5 sc, inc) × 6 (42)
R8: (6 sc, inc) × 6 (48)
R9–R12: sc around (48)
R13: (6 sc, dec) × 6 (42)
R14: (5 sc, dec) × 6 (36)
R15: (4 sc, dec) × 6 (30)
R16: (3 sc, dec) × 6 (24)
R17: (2 sc, dec) × 6 (18)
R18: (sc, dec) × 6 (12)
R19: dec × 6 (6)
Stuff firmly. Before closing, flatten the sphere into a broad oval rather than leaving it round.
Fasten off and close the final six stitches.
Large Cloud Puffs — Make Six
Yarn: white.
R1: 6 sc in MR (6)
R2: inc × 6 (12)
R3: (sc, inc) × 6 (18)
R4: (2 sc, inc) × 6 (24)
R5–R7: sc around (24)
R8: (2 sc, dec) × 6 (18)
R9: (sc, dec) × 6 (12)
Stuff to medium firmness. Fasten off with a 30 cm tail.
Medium Cloud Puffs — Make Four
Yarn: white.
R1: 6 sc in MR (6)
R2: inc × 6 (12)
R3: (sc, inc) × 6 (18)
R4–R6: sc around (18)
R7: (sc, dec) × 6 (12)
R8: dec × 6 (6)
Stuff lightly and leave a 25 cm sewing tail.
Assembly
- Attach the white muzzle to the lower centre of the head first. Add the dark-brown nose and short mouth line before other pieces restrict access to the face.
- Pin both ears across the upper sides of the head. Spread each lower seam across approximately 6–7 head stitches and angle the ears slightly outward.
- Mark and embroider the two closed eye curves. Add the pink cheek patches below and outside the eye ends, keeping their vertical placement approximately equal.
- Sew the head to the front of the body at a downward angle rather than directly above it. The muzzle should finish close to the future front-paw height.
- Attach the two front legs beneath the shoulders and bring their paws forward. Leave approximately 2–3 cm between the rounded paw ends.
- Sew the back legs farther down the torso and angle them outward slightly. Attach the small tail near the rear centre between or just above the hind-leg line.
- Arrange the six large white cloud puffs around the 48-stitch core. Sew every puff to the core and to at least one neighboring puff.
- Place the four medium puffs into visible upper or side gaps. Keep the central top area slightly lower so the bear can settle into the cloud.
- Position the completed bear stomach-down across the cloud. Sew the lower body to the structural core, then add hidden attachment stitches beneath both front legs and near one rear-body point.
- Set the finished piece on a level surface and inspect the sleeping angle. Correct a raised head, twisted paw or rotating cloud puff before weaving all structural tails through several stitch directions.
The completed bear should lie low across the cloud with the muzzle near the front paws, the hind body extending behind it and both embroidered eyes clearly reading as closed.
7 Technical Tips
- Head sitting too upright: A vertical neck seam makes the teddy look awake. Rotate the head forward approximately 20–30 degrees before pinning the final seam.
- Eye mismatch: A difference of even 5 mm between the two embroidered curves is visible on a plain beige face. Mark all four eye endpoints before making the first permanent stitch.
- Decrease gaps: Chenille can expose white stuffing at shaping rounds. Work every decrease through the front loops of the next two stitches.
- Muzzle projection: More than roughly 1.5 cm of stuffing depth produces a long snout. Keep the white muzzle shallow and flatten it before sewing.
- Front-paw crowding: Paws positioned less than 2 cm apart merge into one shape. Pin both limbs at the same time and leave visible cloud or chest between them.
- Cloud separation: A puff sewn only to the structural core can rotate away from its neighbors. Add one lateral seam connecting every exterior puff to at least one adjacent puff.
- Bear rolling sideways: One central attachment point creates a pivot. Fix the bear to the cloud at three or more zones: torso, front-body area and rear body.
Shaping the Sleeping Bear Head
The head reaches a 36-stitch plateau and holds that width through six rounds. This gives the face enough height for closed eyes, pink cheeks and the separate muzzle without making the crown unusually tall.
Stuff the upper half more firmly than the lower front. The embroidered eyes need a stable surface, but the muzzle area benefits from slight compression when the white oval is attached.
Do not shape the face into a strong vertical oval. A near-round head works better because the sleeping posture comes from assembly angle rather than from an elongated skull.
Creating the Sleeping Expression
Closed eyes are the most important facial detail in this version. Two shallow dark-brown arcs match the supplied image more closely than plastic safety eyes.
Mark the inside and outside endpoints before stitching. Both outer ends can dip fractionally lower than the inner ends to create the downward sleepy curve.
The pink cheeks sit outside the muzzle and beneath the eye ends. Keep them small; large circles would compete with the restrained embroidered face.
Constructing the White Muzzle
The muzzle reaches only 18 stitches before immediately narrowing. That short construction produces a shallow padded oval instead of a separate spherical snout.
Add the filling in a thin layer. Concentrate most of it behind the nose area and leave the outer edge relatively flat.
Pin the piece before embroidering the nose. The nose should align with the vertical centre of the face even if the reclining head appears tilted when viewed from above.
Building the Reclining Body
The torso reaches the same 36-stitch maximum as the head but stays there for seven rounds. Extra length matters because a sleeping bear requires visible distance from the shoulders to the rear legs.
Keep the body firm through the middle and slightly softer at the rear. That difference lets the torso settle into the cloud without collapsing beneath the head.
Test the body horizontally before closing it. If the rear end rises sharply rather than resting flat, remove a small amount of stuffing from the final third.
Positioning the Front Legs
The front paws establish the resting pose. They point forward instead of hanging vertically at the sides of the body.
Attach each shoulder slightly behind the head seam. Bring the lower paws inward, but retain a narrow gap between them.
The muzzle can touch the inner paw line or hover a few millimetres above it. A gap of several centimetres makes the head appear unsupported.
Building the Rear Legs and Tail
The rear legs are broader than the front pair because they represent the heavier hindquarters. A 24-stitch maximum creates that extra width without requiring a separate foot pad.
Attach both legs low on the reclining body. Their exact upper seams can disappear partly beneath the torso once the bear is placed on the cloud.
The small tail belongs near the rear centre and should remain subtle. Stuff it lightly so it does not lift the body away from the cloud.
Constructing the Cloud Core
The cloud needs a load-bearing centre because ten separate puffs alone can shift under the bear. A 48-stitch stuffed core distributes the weight and gives every exterior lobe a structural sewing surface.
Flatten the completed core by hand before adding puffs. A round core raises the bear too high and makes the final object resemble a teddy sitting on a ball.
Use firmer stuffing in the core than in the exterior pieces. The outside puffs need rounded volume, while the centre carries the reclining body.
Arranging the Cloud Puffs
Six large puffs establish the outer silhouette. Position two across the front, two toward the sides and two toward the rear before filling gaps with the smaller pieces.
Avoid a strict alternating pattern. Slight differences in placement create the irregular cloud shape visible in the photograph.
Leave a shallow central depression. If every puff reaches the same height, the bear balances on top rather than settling into the cloud.
Controlling Chenille Tension
Chenille hides the top loops more than smooth cotton or acrylic. Keep the stitch marker through the complete first stitch rather than clipping a loose fuzzy strand.
Feel for both loops before every increase and decrease. Missing one stitch in the head can shift the embroidered face centre, while an error in a leg changes its finished length.
If the magic ring sheds when tightened, replace the adjustable centre with two chains and work the six starting stitches into the second chain from the hook.
Attaching the Bear to the Cloud
Finish the bear and cloud independently before choosing the final position. Move the body forward and backward until the head sits low without the rear legs extending beyond the cloud edge.
Pin the torso first, followed by one front-leg contact and one rear-body contact. Check the silhouette from both sides before sewing.
Keep the visible parts of the limbs free. Structural stitches should sit underneath the bear where they cannot flatten the rounded paw surfaces.
Adjusting Finished Size
Use yarn substitution rather than adding increase rounds when scaling this sleeping bear amigurumi crochet pattern. A thinner worsted yarn with a 3–3.5 mm hook produces a smaller version while preserving the same head-to-body ratios.
For a larger plush, change to thicker blanket yarn and a matching hook. Expanding the head to 42 stitches without enlarging the cloud, limbs and muzzle would change the proportions substantially.
Make one large cloud puff before committing to the complete base. Its finished diameter should remain well below one-third of the planned cloud width.
Stuffing Strategy
The head requires the firmest stuffing because embroidered features look uneven when the fabric collapses beneath the needle. Work in small pieces around the crown and cheeks.
The torso should remain firm in the centre but softer toward the rear. Front paws need firm rounded ends and flexible upper sections.
Cloud filling follows the opposite pattern: a firm structural core with medium or light stuffing in the exterior puffs creates the thick lobed form without turning every piece into a hard sphere.
Finishing Checks
Place the completed cloud on a hard level surface first. Several outer lobes should contact the table, and the structure should not rock around one central point.
View the bear from the front. Both closed eyes need similar curvature, the white muzzle must sit centrally and the cheek patches should remain at comparable heights.
Inspect the profile last. The head should angle toward the paws, the torso should remain nearly horizontal and the rear leg and tail area should stay supported by the cloud rather than hanging beyond it.
Conclusion
Measure the finished bear from the front of the muzzle to the rear body and record the widest cloud diameter beside the yarn and hook sizes used. Photograph the project from a low side angle next; that view reveals a head sitting too high, a front paw positioned too far back or a cloud with an uneven centre. Save this sleeping bear amigurumi crochet pattern to Pinterest and share the finished piece on Instagram with #SleepyCloudBear. Reshape the cloud puffs and lower the muzzle toward the paws before the final photograph. Would you keep the oatmeal bear shown here or make the next cloud sleeper in pale brown?
Sources
- Squirrel Picnic — Sleepy Bear Crochet Pattern: continuous-round sleeping-bear construction.
- Ravelry — Sleeping Bear by Banga Vaicekauskienė: approximately 16 cm, DK yarn and 3 mm hook.
- Ravelry — Sleeping Bear by MoonlitShop Patterns: approximately 10 inches long, medium #4 yarn and 3.5–4 mm hooks.
- Amiguroom Toys — Lying Bear: approximately 22 cm long reclining bear.
- Etsy — Sleeping Bear marketplace: current competition across reclining, pillow, blanket and pajama bear patterns.









