Introduction
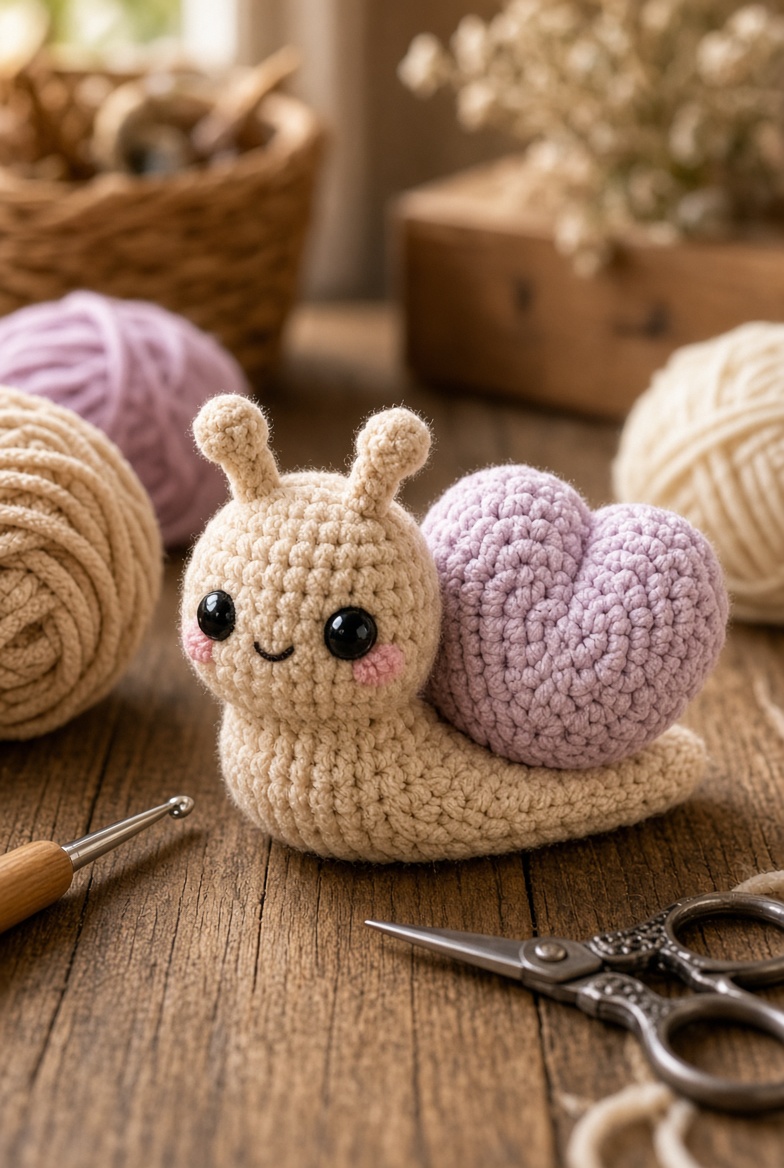
A snail shell normally curls inward; this one has to hold two rounded heart lobes upright without tipping the body sideways. This snail amigurumi crochet pattern uses worsted yarn, a 3.5 mm hook and 10 mm eyes to make a cream snail approximately 17–20 cm long. Two antennae, pink cheeks and a stuffed lavender heart shell create the intermediate multi-piece construction.
The Design: What Makes This Heart-Shell Snail Different
The head expands to 36 stitches so the face stays broad beside a shell that is nearly as tall as the snail itself. Below the head, the construction narrows quickly into an 18-stitch body tube; that low profile keeps the shell visually dominant. The tail then stretches behind the heart rather than ending directly under it. Two separate antennae use rounded bulb tips and narrow stalks so they stand above the forehead without competing with the shell. The lavender shell is not a spiral disc. Two matching heart panels are sewn together, lightly stuffed and mounted vertically to create a deep padded form. This heart snail crochet pattern therefore needs a broader shell attachment seam than a conventional flat spiral. One common mistake is sewing the heart too high; its bottom point should sit close to the snail’s back rather than floating above it.
Project Information at a Glance
| Skill Level | Time | Finished Size | Hook | Best For |
|---|---|---|---|---|
| Intermediate | 6–9 hours | Approx. 17–20 cm long | 3.5 mm | Desk decor, market plush and heart-themed displays |
Materials and Tools
Yarn
- Warm beige/cream — worsted/Aran yarn — approximately 70–90 g — head, body and antennae
- Soft lavender — worsted/Aran yarn — approximately 45–60 g — heart shell
- Blush pink — worsted yarn scrap — cheek patches
- Black embroidery yarn — small amount — smile
Tools
- 3.5 mm crochet hook
- Two 10 mm black safety eyes
- Polyester toy stuffing
- Large-eye yarn needle
- Locking stitch marker
- Dressmaking pins
- Scissors
Published snail patterns use substantially different hook and eye sizes according to yarn. Spring Snail uses DK yarn, a 2.5 mm hook and 8 mm eyes, while Circulo’s larger snail uses 10 mm eyes and a 4 mm hook in its main body section. The 3.5 mm and 10 mm combination here targets the middle of that scale range.
Abbreviations
- MR — magic ring
- sc — single crochet
- inc — two single crochet stitches in one stitch
- dec — decrease over two stitches
- sl st — slip stitch
- ch — chain
- hdc — half double crochet
- dc — double crochet
- tr — treble crochet
- BLO — back loop only
An invisible decrease is worked through the front loops of the following two stitches before completing them together as one single crochet.
Pattern — Step by Step
Work the head and body in one continuous spiral. Mark the first stitch of every round and check each bracketed total before moving to the next round.
Head and Body
Yarn: warm cream — standard six-stitch amigurumi expansion.
R1: 6 sc in MR (6)
R2: inc × 6 (12)
R3: (sc, inc) × 6 (18)
R4: (2 sc, inc) × 6 (24)
R5: (3 sc, inc) × 6 (30)
R6: (4 sc, inc) × 6 (36)
R7–R11: sc around (36)
R12: (4 sc, dec) × 6 (30)
Insert the 10 mm safety eyes between R8 and R9, approximately seven visible stitches apart. Lock the washers before the opening becomes narrower.
R13: (3 sc, dec) × 6 (24)
R14: (2 sc, dec) × 6 (18)
Stuff the head firmly. Do not carry the same stuffing density into the long body.
R15–R24: sc around (18)
R25: (sc, dec) × 6 (12)
R26–R34: sc around (12)
R35: dec × 6 (6)
R36–R44: sc around (6)
Stuff R15–R22 moderately. Leave most of the tail section from R26 onward lightly filled or unstuffed so it can curve along the table surface.
R45: dec × 3 (3)
Fasten off and pull the final opening closed.
Antennae — Make Two
Yarn: warm cream.
R1: 6 sc in MR (6)
R2: inc × 6 (12)
R3: sc around (12)
R4: dec × 6 (6)
R5–R10: sc around (6)
Stuff the rounded bulb at the top. Leave the narrow stalk almost unstuffed.
Fasten off and leave a 25 cm sewing tail.
Cheek Patches — Make Two
Yarn: blush pink.
R1: 6 sc in MR (6)
Slip stitch into the first stitch and fasten off with a 10 cm tail. Pull each small circle sideways while sewing to create a low oval.
Smile
Yarn: smooth black embroidery yarn.
Embroider a shallow U-shaped smile approximately 1.5 cm wide between and below the eyes. Keep the mouth centred on the vertical line of the head.
Heart Shell — Panel One
Yarn: lavender. Work in rows.
Row 1: ch 2, 2 sc in second ch from hook (2)
Row 2: ch 1, turn, inc × 2 (4)
Row 3: ch 1, turn, inc, 2 sc, inc (6)
Row 4: ch 1, turn, inc, 4 sc, inc (8)
Row 5: ch 1, turn, inc, 6 sc, inc (10)
Row 6: ch 1, turn, inc, 8 sc, inc (12)
Row 7–Row 10: ch 1, turn, sc across (12)
Divide for the first upper lobe:
Row 11A: ch 1, turn, sc across first 6 sts (6)
Row 12A: ch 1, turn, dec, 2 sc, dec (4)
Row 13A: ch 1, turn, dec × 2 (2)
Row 14A: ch 1, turn, dec (1)
Fasten off.
Rejoin yarn in the remaining six stitches:
Row 11B: sc across remaining 6 sts (6)
Row 12B: ch 1, turn, dec, 2 sc, dec (4)
Row 13B: ch 1, turn, dec × 2 (2)
Row 14B: ch 1, turn, dec (1)
Fasten off.
Heart Shell Border
Join lavender yarn at the lower point.
Work one round of sc evenly around the full outer edge. Place 3 sc in the bottom point and approximately 2 sc into each row-end space along the curved sides.
At the inner dip between the two top lobes, work one slip stitch instead of an increase so the indentation remains defined.
Fasten off.
Heart Shell — Panel Two
Repeat the complete heart instructions to make a second matching panel.
Lay both pieces together before assembly. If one panel is more than approximately 5 mm wider, block them to matching dimensions before sewing.
Join and Stuff the Heart Shell
Place both heart panels wrong sides together.
Join lavender yarn near the lower side edge and sc through both panels around the perimeter.
Stop approximately 5–6 cm before completing the seam.
Add polyester stuffing in small amounts, concentrating it in the two upper lobes first. Keep the central indentation clearly visible.
Finish single crocheting the opening closed.
Fasten off with a 35 cm tail for attaching the shell to the snail.
Optional Heart Edge Ridge
For a deeper shell outline, surface slip stitch around the front edge of the completed heart approximately 5 mm inside the seam.
Use the same lavender yarn and keep the tension loose so the panel does not cup.
Assembly
- Shape the completed head and body first. The head should sit upright while the 18-stitch body extends horizontally behind it.
- Pin the two antennae across the crown approximately 5–6 head stitches apart. Sew each base through a 5–6 stitch area so the stalk does not rotate.
- Attach the two blush cheek patches below and outside the eyes, then embroider the small black smile between them.
- Place the stuffed lavender heart vertically on the snail’s back with its lower point close to the upper body line.
- Move the heart backward until the snail remains balanced when set on a flat surface. The shell should not push the head downward.
- Pin the lower half of the heart across the 18-stitch body section. Leave the upper lobes completely free.
- Sew the shell to the body using a broad curved attachment line approximately 7–9 cm long rather than one small central tack.
- Add two hidden reinforcement stitches from the rear lower heart into the body so the shell cannot rotate sideways.
- Curve the unstuffed tail gently behind the shell. Add one hidden shaping stitch if the last 5–6 cm refuses to lie flat.
- Check eye level, antenna height, heart symmetry and body balance from the front and both sides, then weave all structural tails through at least three stitch directions.
The completed snail should rest along its full lower body with the head upright, both antennae visible and the padded heart shell standing vertically without leaning to either side.
7 Technical Tips
- Shell rotation: A heart attached through only 2–3 body stitches can twist sideways. Spread the main shell seam across approximately 7–9 cm of the back.
- Heart-lobe collapse: Stuffing the centre before the two upper lobes leaves them flat. Fill each lobe separately until it retains a rounded depth of roughly 2.5–3.5 cm.
- Head droop: A loosely filled head can bend where the 36-stitch section narrows to 18. Keep R7–R14 firm enough that finger pressure compresses the fabric by only about 5 mm.
- Antenna rotation: A stalk attached through fewer than four stitches can tip forward. Anchor each base across approximately 5–6 head stitches.
- Decrease gaps: Conventional decreases can expose stuffing around the lower head. Work R12–R14 through the front loops of the next two stitches.
- Tail stiffness: Dense stuffing through the 6-stitch tail prevents it from resting on the table. Leave the last 8–10 rounds unstuffed or use only a trace of filling.
- Heart asymmetry: Two panels differing by more than about 5 mm produce a twisted shell seam. Block and compare the panels before joining them.
Shaping the Snail Head
The head uses a 36-stitch maximum because it needs enough width for 10 mm eyes and a visible expression without becoming larger than the shell. Published snail constructions range from 30-stitch heads in small DK projects to 42-stitch sections in larger pieces, so 36 stitches is a practical middle scale for this photographed form.
Five plain rounds at maximum circumference create the rounded forehead. The decreases then narrow the head into an 18-stitch neck/body section rather than closing it like a conventional sphere.
Stuff firmly before R15. Once the body tube extends backward, reaching the crown with additional filling becomes difficult.
Building the Long Snail Body
The low body distinguishes the snail silhouette from a standing animal. Spring Snail similarly transitions from a stuffed head into a body that is not filled to the same density, while other published snails flatten or shape the rear section under the shell.
Keep the first 18-stitch portion substantial enough to support the heart. The later 12- and 6-stitch stages form the long tail rather than another rounded body segment.
Set the work on a table during stuffing. If the rear half rises noticeably away from the surface, remove some filling before closing it.
Making the Heart-Shaped Shell
The heart is the defining feature of this snail amigurumi crochet pattern. Unlike a spiral shell worked in rounds, it is built from two flat shaped panels that become three-dimensional only after seaming and stuffing.
The heart grows from the lower point upward. After reaching 12 stitches across, the top divides into two six-stitch sections so each lobe can decrease independently.
The border round smooths the row ends before the panels are joined. Preserve the central dip by using a low slip stitch there rather than filling the indentation with several tall stitches.
Stuffing the Heart Shell
The two upper lobes need more deliberate shaping than the lower point. Push small pieces of filling toward each rounded section before filling the central and lower areas.
Do not overfill the heart. A hard-packed shell loses the central notch and can stretch the outer single-crochet seam into visible gaps.
Before closing the last 5–6 cm, hold the shell upright. Both lobes should project by similar amounts and the lower point should remain centred beneath them.
Attaching the Shell Securely
Most conventional snail patterns attach a spiral shell across a broad side or back area. A heart shell needs the same principle because its upper mass creates rotational force around the seam.
Pin the shell in at least four places before sewing. Check the snail from the front; equal amounts of lavender should remain visible to the left and right of the body centre line.
Sew the lower third firmly while allowing the upper lobes to remain free. Additional stitches too high on the heart will flatten the front panel against the body.
Making the Antennae Stand Upright
Each antenna begins with a 12-stitch bulb and narrows to a six-stitch stalk. The large tip makes the feature visible without needing a separate bead or wire.
Stuff only the bulb. Leaving the stalk mostly empty keeps it narrow and reduces weight at the top.
For firmer antennae, pull the sewing tail through the stalk once from base to tip and back down again. Keep that internal reinforcement loose enough that the stalk does not shorten.
Choosing Eye Size and Placement
Published snail patterns demonstrate a useful range: Spring Snail uses 8 mm eyes, Circulo’s larger 21.5 cm project uses 10 mm, and some worsted novelty snails use 12 mm. The 10 mm specification here suits the medium-scale face.
Set the eyes around R8–R9 before the head begins narrowing. Leave enough space above them for the antennae and below them for the cheek patches.
Check the stems from the side before locking the washers. One eye placed even a single round farther forward can make the face look rotated.
Working with Worsted Yarn
Worsted snail patterns commonly use hooks around 4–4.5 mm, while amigurumi makers often move slightly smaller to keep stuffing concealed. A 3.5 mm hook gives this project a dense fabric while retaining enough flexibility for the heart panels.
Make a six-round head sample if your yarn is unusually thick. If polyester fibers show through when the sample is stretched lightly, move down by 0.5 mm.
The heart can use the same hook as the body. Changing only the shell hook alters its scale relative to the snail and may make the final attachment unstable.
Adjusting Finished Size
Current snail patterns vary substantially with yarn substitution. DIY Fluffies reports about 16 cm in sport-weight cotton and notes that super-bulky yarn turns the same design into a giant plush, while other patterns explicitly offer multiple yarn-based sizes.
For a smaller snail, retain all stitch counts and use DK yarn with a 2.5–3 mm hook. Reduce the eye size after completing the head rather than automatically using 10 mm.
For a larger plush, move to bulky yarn before adding another head increase. The heart should scale from the same yarn family so its width remains proportionate to the body.
Finishing Checks
Set the finished snail on a flat surface and check the lower body first. The head should remain upright while most of the long foot and tail touch the table.
View the shell from directly behind. The heart point should align approximately with the body centre, and both lobes should reach similar heights.
Inspect the face last. Both safety eyes need comparable height, the cheek patches should sit outside the smile and the two antenna bulbs should remain clearly separated above the crown.
Conclusion
Measure the finished snail from the front of the head to the tail tip, then record the heart width and height beside the yarn and hook used. Photograph the project from the side next; that angle exposes a shell that sits too high, rotates backward or pushes the head off balance. Save this snail amigurumi crochet pattern to Pinterest and share the finished plush on Instagram with #HeartShellSnail. Reshape both heart lobes before the final photograph. For another snail, would you keep the lavender heart shell shown here or switch it to dusty pink?
Sources
- DIY Fluffies — Suzan the Snail: approximately 16 cm in sport-weight cotton and scalable with thicker yarn.
- Stitch by Fay — Spring Snail: DK yarn, 2.5 mm hook, 8 mm safety eyes and 30-stitch head/body construction.
- Circulo Yarns — Snail: approximately 21.5 cm, 10 mm safety eyes and body expansion to 42 stitches.
- Ravelry — Snail Amigurumi by Drew Hill: worsted yarn, 4.5 mm hook and approximately 6 × 6 inch finished size.
- Etsy — current Crochet Snails marketplace showing high competition in spiral-shell, no-sew and giant snail patterns.









