Introduction
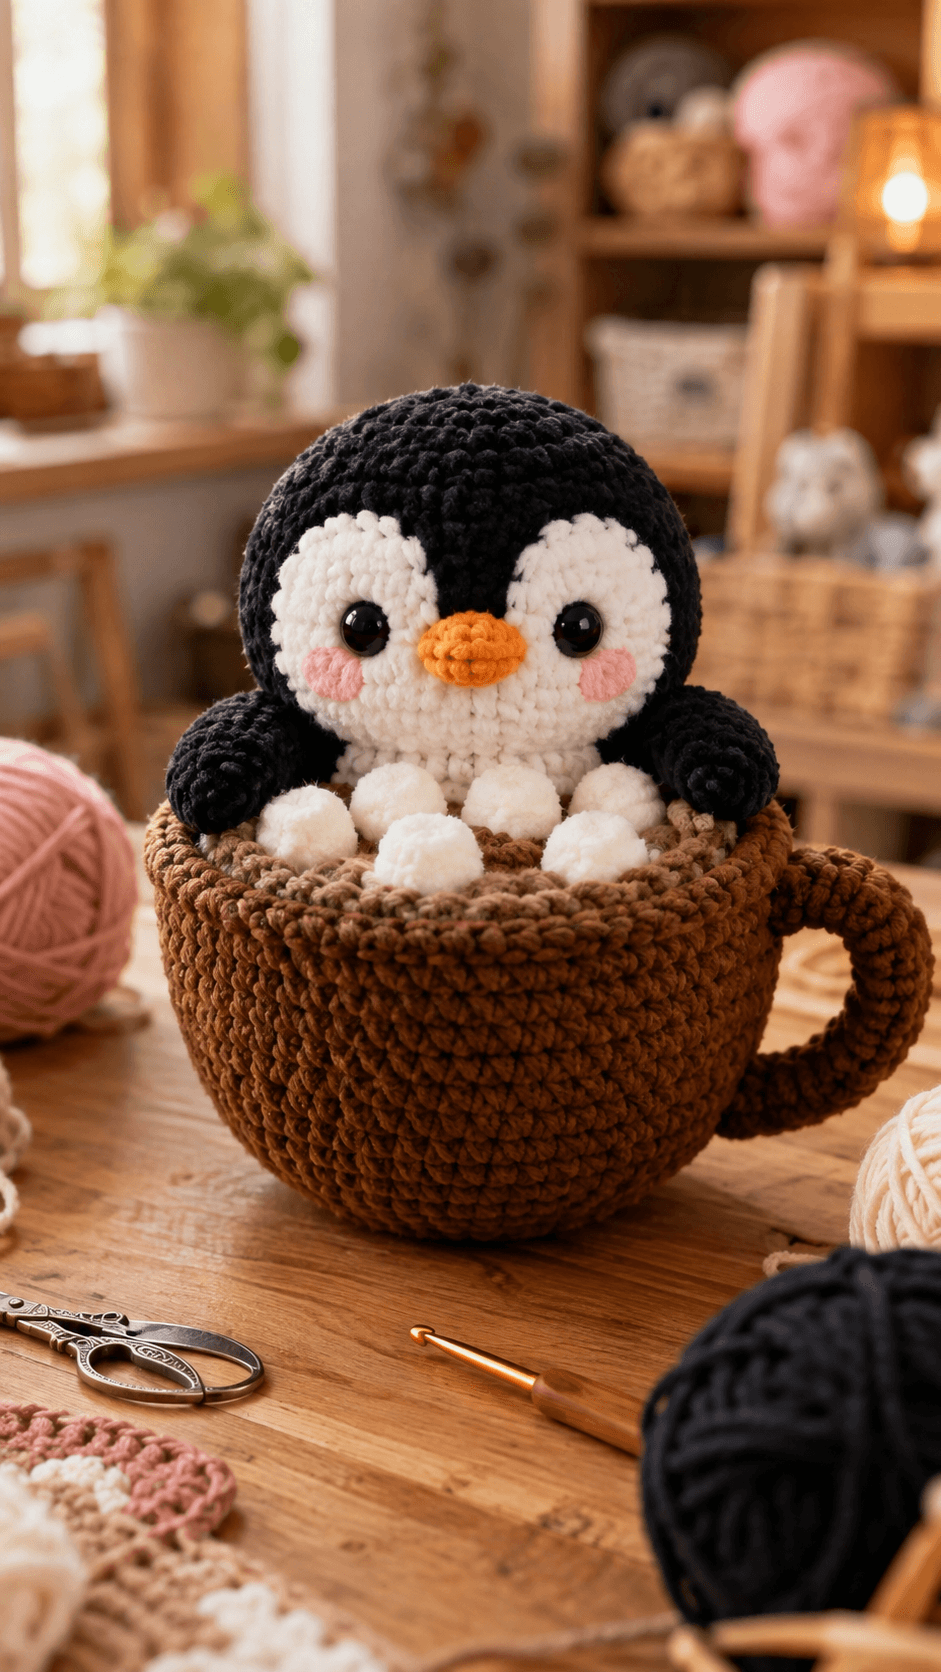
A penguin’s white face patches meet above the beak but should never erase the black wedge running down from the crown. This penguin amigurumi crochet pattern uses chunky chenille, a 4.5 mm hook and 12–14 mm safety eyes to make a rounded penguin inside a brown cocoa mug. The intermediate display includes wings, marshmallows and a structural mug handle.
The Design: What Makes This Penguin Different
The black head reaches a 42-stitch plateau because the supplied penguin has an unusually broad, nearly spherical crown. Two separate cream face panels overlap near the center without covering the narrow black forehead wedge, which is the most important color-shaping decision in this plush penguin crochet pattern. The body uses a smaller 36-stitch plateau because most of the lower torso disappears inside the mug. Wings remain short and thick so they can rest across the mug rim without pulling the head downward. The mug is not just a prop. It acts as the penguin’s seated base, so its wall must be firm enough to support the toy and six marshmallows. One common mistake is filling the mug completely with stuffing; that leaves no cavity for positioning the bird and makes the cocoa surface bulge above the rim.
Project Info at a Glance
| Skill Level | Time | Finished Size | Hook | Best For |
|---|---|---|---|---|
| Intermediate | 9–11 hours | Approximately 22–26 cm overall | 4.5 mm | Winter display, desk decor and seasonal plush photography |
Materials and Tools
Yarn
- Black — chunky chenille/plush yarn — approximately 70–90 g — used for the penguin head, body and wings.
- Warm white — matching chunky yarn — approximately 40–50 g — used for the facial panels, belly and marshmallows.
- Orange — chunky or doubled DK yarn — approximately 8–10 g — used for the beak.
- Blush pink — chunky or doubled DK yarn — approximately 3–5 g — used for the cheeks.
- Chocolate brown — chunky or heavy-worsted yarn — approximately 100–130 g — used for the mug, handle and cocoa surface.
Tools
- 4.5 mm crochet hook
- 12–14 mm safety eyes
- Polyester stuffing, approximately 80–100 g
- Yarn needle
- Locking stitch markers
- Dressmaking pins
- Scissors
- Optional plastic canvas circle for reinforcing the mug base
Use embroidered eyes instead of plastic fittings when the finished penguin will be handled by a child under three.
Abbreviations
- MR — magic ring
- sc — single crochet
- inc — two single crochet stitches in one stitch
- dec — invisible single crochet decrease
- sl st — slip stitch
- ch — chain
- hdc — half double crochet
- dc — double crochet
- BLO — back loop only
- FLO — front loop only
An invisible decrease is worked through the front loops of the next two stitches before completing one single crochet through both loops.
Pattern — Step by Step
Work stuffed pieces in a continuous spiral unless a joined round or row is specified. Mark the first stitch of every round and move the marker only after checking the final stitch count.
Head
Yarn: black — Source: standard six-stitch amigurumi math.
R1: 6 sc in MR (6)
R2: inc ×6 (12)
R3: (sc, inc) ×6 (18)
R4: (2 sc, inc) ×6 (24)
R5: (3 sc, inc) ×6 (30)
R6: (4 sc, inc) ×6 (36)
R7: (5 sc, inc) ×6 (42)
R8–R13: sc around (42)
R14: (5 sc, dec) ×6 (36)
R15: (4 sc, dec) ×6 (30)
R16: (3 sc, dec) ×6 (24)
R17: (2 sc, dec) ×6 (18)
R18: (sc, dec) ×6 (12)
R19: dec ×6 (6)
Insert the safety eyes between R10 and R11 after the cream face panels have been pinned temporarily. Begin stuffing after R14 and pack small pieces around both eye washers before filling the center.
Fasten off. Leave a 25 cm tail and close the remaining six front loops.
Body
Yarn: black — Source: standard medium-body amigurumi math.
R1: 6 sc in MR (6)
R2: inc ×6 (12)
R3: (sc, inc) ×6 (18)
R4: (2 sc, inc) ×6 (24)
R5: (3 sc, inc) ×6 (30)
R6: (4 sc, inc) ×6 (36)
R7–R12: sc around (36)
R13: (4 sc, dec) ×6 (30)
R14–R15: sc around (30)
R16: (3 sc, dec) ×6 (24)
R17: (2 sc, dec) ×6 (18)
R18: sc around (18)
R19: (sc, dec) ×6 (12)
R20: dec ×6 (6)
Stuff R1–R15 firmly. The lower body does not need a flat seated base because it will be anchored inside the mug.
Fasten off. Leave a 35 cm sewing tail.
White Face Panels (Make 2)
Yarn: warm white — original flat-mask construction.
R1: 6 sc in MR (6)
R2: inc ×6 (12)
R3: (sc, inc) ×6 (18)
R4: (2 sc, inc) ×6 (24)
Do not stuff. Stretch each circle vertically into a soft oval. Overlap the inner edges slightly beneath the black forehead wedge.
Fasten off. Leave a 25 cm sewing tail on each panel.
White Belly Patch
Yarn: warm white.
R1: 6 sc in MR (6)
R2: inc ×6 (12)
R3: (sc, inc) ×6 (18)
R4: (2 sc, inc) ×6 (24)
Flatten completely. Only the upper portion needs to remain visible above the mug rim.
Fasten off. Leave a 25 cm sewing tail.
Wings (Make 2)
Yarn: black — original short-fin construction.
R1: 6 sc in MR (6)
R2: inc ×6 (12)
R3: (sc, inc) ×6 (18)
R4–R6: sc around (18)
R7: (sc, dec) ×6 (12)
R8–R9: sc around (12)
Stuff R1–R5 lightly. Flatten the final rounds so the wings can lie across the mug rim.
Fasten off. Leave a 25 cm sewing tail.
Beak
Yarn: orange — original compact beak shaping.
R1: 6 sc in MR (6)
R2: (sc, inc) ×3 (9)
R3: sc around (9)
R4: (2 sc, inc) ×3 (12)
Add only a pinch of stuffing. Flatten the final opening horizontally so the beak remains wider than it is tall.
Fasten off. Leave a 20 cm sewing tail.
Cheek Patches (Make 2)
Yarn: blush pink — Source: standard flat-circle math.
R1: 6 sc in MR (6)
R2: inc ×6 (12)
Do not stuff. Flatten both patches.
Fasten off. Leave a 15 cm sewing tail.
Mug Base
Yarn: chocolate brown — original flat-circle construction.
R1: 6 sc in MR (6)
R2: inc ×6 (12)
R3: (sc, inc) ×6 (18)
R4: (2 sc, inc) ×6 (24)
R5: (3 sc, inc) ×6 (30)
R6: (4 sc, inc) ×6 (36)
R7: (5 sc, inc) ×6 (42)
R8: (6 sc, inc) ×6 (48)
The base must lie completely flat. If using plastic canvas, cut a disc approximately 5 mm smaller than the finished circle.
Do not fasten off.
Mug Sides
Continue with chocolate brown.
R9: BLO sc around (48)
R10–R20: sc around (48)
R21: (6 sc, dec) ×6 (42)
R22–R24: sc around (42)
The slight decrease near the top gives the cup a rounded cocoa-mug profile. Do not stuff the wall itself.
Fasten off. Leave a 30 cm tail.
Mug Rim
Yarn: chocolate brown.
Join yarn to any stitch of R24.
R1: sc around (42)
R2: reverse sc around (42)
The reverse-single-crochet round produces a thicker lip that supports the wings and marshmallows.
Fasten off and weave in the tail.
Cocoa Insert
Yarn: chocolate brown.
R1: 6 sc in MR (6)
R2: inc ×6 (12)
R3: (sc, inc) ×6 (18)
R4: (2 sc, inc) ×6 (24)
R5: (3 sc, inc) ×6 (30)
R6: (4 sc, inc) ×6 (36)
Keep this disc flat. Cut a narrow opening in the visual center by leaving approximately six stitches unattached when sewing it into the mug; the penguin body will occupy that area.
Fasten off. Leave a 35 cm sewing tail.
Mug Handle
Yarn: chocolate brown — original reinforced tube construction.
R1: 6 sc in MR (6)
R2: inc ×6 (12)
R3–R22: sc around (12)
Stuff lightly as you work. Curve the finished tube into a C shape approximately 10–12 cm tall.
Fasten off. Leave a 40 cm sewing tail.
Marshmallows (Make 6)
Yarn: warm white.
R1: 6 sc in MR (6)
R2: inc ×6 (12)
R3–R4: sc around (12)
R5: dec ×6 (6)
Add a small pinch of stuffing. Keep the pieces rounded but not spherical.
Fasten off. Leave a 15 cm sewing tail on each piece.
Assembly
- Pin both cream face panels onto the black head first, preserving a narrow black wedge between their upper inner edges, then install the eyes through both head and panel layers.
- Sew the panels flat, position the orange beak over their lower intersection and attach the pink cheek patches beside the eyes.
- Sew the head to the body, then attach the cream belly patch to the front torso before any part of the penguin is fixed inside the mug.
- Attach both wings to the upper body and leave their lower halves free so they can rest naturally on the mug rim.
- Insert optional base reinforcement into the brown mug, then add a shallow layer of stuffing across the bottom rather than filling the complete cup.
- Place the cocoa insert approximately 3–4 cm below the rim and sew most of its circumference to the inside wall, leaving the center area open for the penguin.
- Lower the penguin into the mug until approximately half of the body is hidden, then anchor the lower torso to the mug base and cocoa insert with several hidden stitches.
- Sew the mug handle to one side, attaching both ends through at least 3 cm of cup wall so the handle cannot rotate under its own weight.
- Arrange the six marshmallows across the cocoa surface around the penguin and secure each with two or three hidden stitches.
- Rest the black wings over the mug rim, add one concealed stitch through each wing and rim, then weave all structural tails through at least 4 cm of dense fabric.
The completed display should stand level with the penguin centered in the mug, both wings resting on the rim and the handle remaining upright without twisting the cup wall.
7 Technical Tips
- Lost forehead wedge: Overlapping the white face panels by more than approximately 1 cm removes the narrow black strip above the beak. Pin both panels and check the center line from directly in front before sewing.
- Flattened head: A 42-stitch chenille head can dent around large eye washers. Add stuffing in portions smaller than about 3 cm and fill the cheek areas before packing the crown.
- Visible decrease gaps: Conventional decreases can expose white stuffing through black chenille. Work through the two front loops and keep the decrease tension equal to adjacent single crochet stitches.
- Wing lift: Stuffing all nine wing rounds firmly makes the fins point away from the mug. Stop dense filling after R5 and leave the final four rounds compressible.
- Mug collapse: A soft 48-stitch cup wall can fold where the handle is attached. Use tight tension, keep the 4.5 mm hook or move down 0.5 mm for the mug, and reinforce both handle attachment zones across at least 3 cm.
- Uneven marshmallows: Identical placement at equal intervals makes the cocoa surface look mechanical. Space the six pieces irregularly while keeping at least 1–2 cm between neighboring centers.
- Penguin lean: Anchoring only the belly to the cocoa insert allows the heavy head to tip forward. Add one lower fixing point through the body into the mug base and a second hidden connection at the back of the cocoa disc.
Conclusion
Check the white face panels before fixing the penguin permanently inside the mug because the cup rim makes later head rotation difficult. Next, place the display on a level surface and photograph the front and both three-quarter views. Those angles reveal an off-center beak, uneven marshmallow spacing or a handle pulling the cup sideways. Share the finished penguin amigurumi crochet pattern project on Pinterest with a vertical photograph, then post the cocoa-rim detail on Instagram using #HotCocoaPenguin. For this penguin specifically, would you keep all six marshmallows white or add one pale-pink marshmallow to match the cheeks?









