Introduction
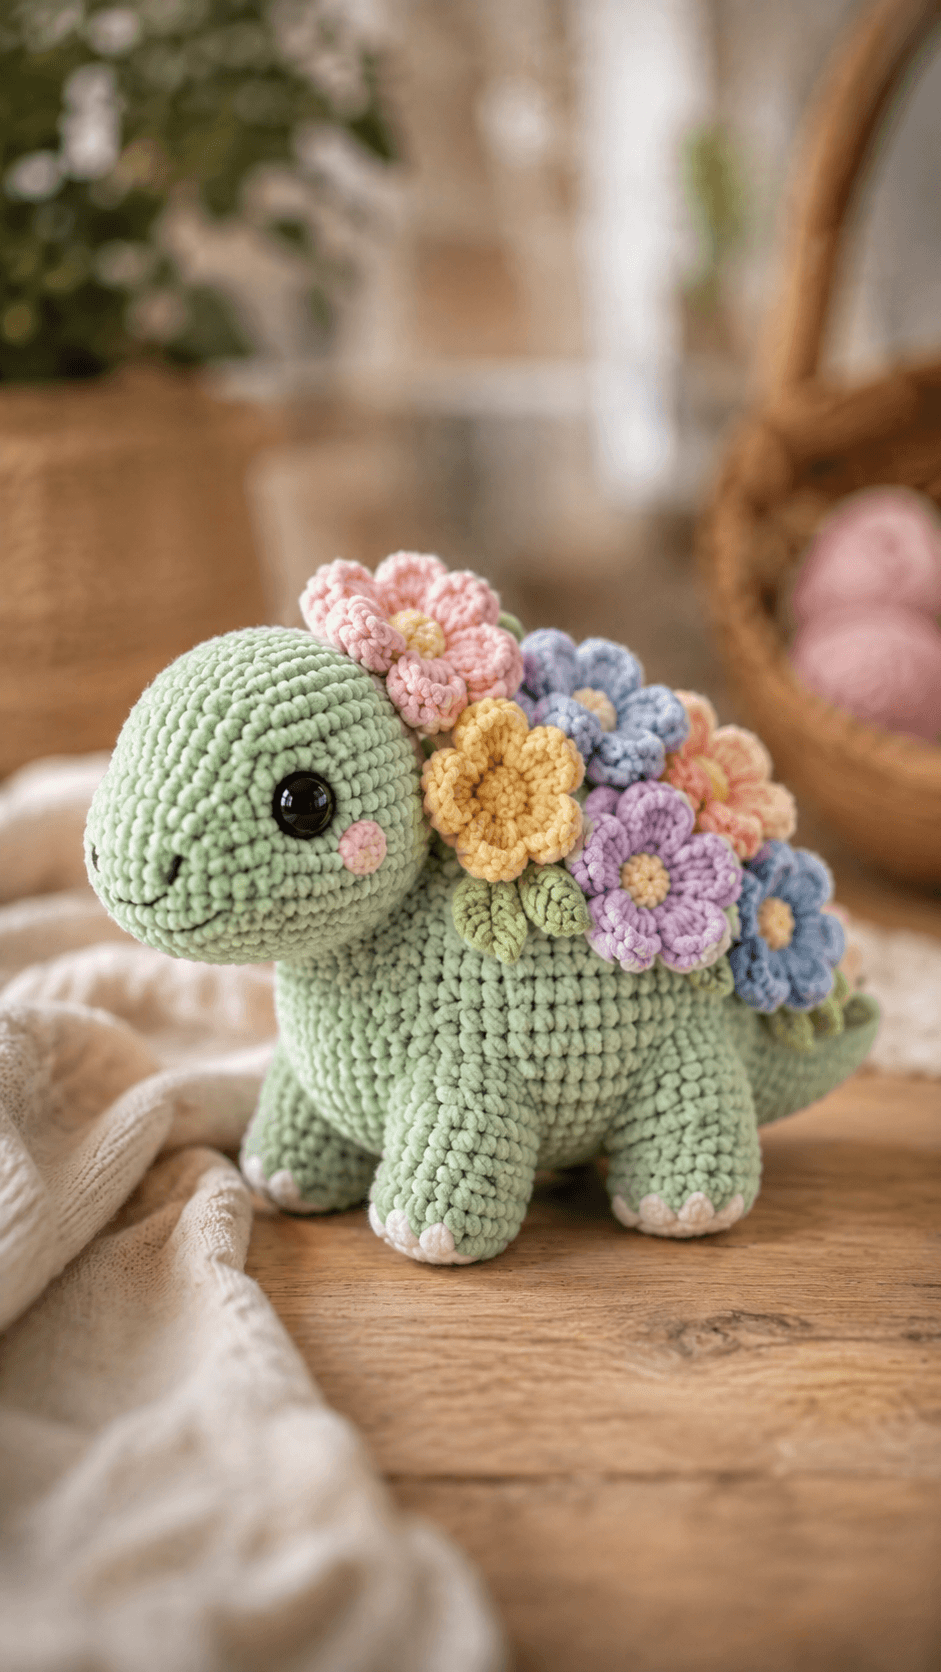
A dinosaur normally carries spikes or plates along its back; this one replaces that entire ridge with seven raised flowers. This dinosaur amigurumi crochet pattern uses super-bulky chenille, a 5 mm hook and a 36-stitch head to create a mint plush approximately 22 cm in scale. Four sturdy legs, a tapered tail, white toes and layered pastel flowers make the construction intermediate rather than basic.
The Design: What Makes This Flower Dinosaur Different
The dinosaur uses a round 36-stitch head attached to a longer 36-stitch body, keeping the face large while extending the torso far enough for four separated legs. A short neck transition lifts the head slightly above the shoulders without creating the exaggerated proportions of a full sauropod. The tail narrows behind the rear legs and counterbalances the rounded head. Most important, the dorsal decoration is botanical rather than prehistoric: seven flowers in pink, yellow, blue, lavender and peach cover the upper back, while raised green leaves fill the gaps. This flower dinosaur crochet pattern also keeps the face minimal with one small cheek patch and a curved embroidered smile. A common failure with this body type is attaching the front and back legs too close together, which shortens the visible torso and crowds the floral spine.
Project Information at a Glance
| Skill Level | Time | Finished Size | Hook | Best For |
|---|---|---|---|---|
| Intermediate | 9–12 hours | Approx. 22 cm | 5.0 mm | Decorative plush and floral dinosaur display |
Materials and Tools
Yarn
- Mint/sage green — super-bulky chenille — approximately 130–170 g — head, body, neck, legs and tail
- White — matching chenille — approximately 10 g — toe details
- Blush pink — bulky or super-bulky yarn — approximately 8–10 g — flowers and cheeks
- Pale yellow — bulky yarn — approximately 8–10 g — flowers and centres
- Powder blue — bulky yarn — approximately 8–10 g — flowers
- Lavender — bulky yarn — approximately 8–10 g — flowers
- Peach — bulky yarn — approximately 5–8 g — flowers
- Leaf green — bulky yarn — approximately 15–20 g — leaves
- Black smooth embroidery yarn — small amount — smile
Tools
- 5.0 mm crochet hook
- Two 12 mm black safety eyes
- Polyester toy stuffing
- Large-eye yarn needle
- Locking stitch marker
- Dressmaking pins
- Scissors
Fit the eyes before the head opening becomes too small to reach the washers. Embroidered eyes can replace plastic hardware when detachable components are unsuitable for the finished toy.
Abbreviations
- MR — magic ring
- sc — single crochet
- inc — two single crochet stitches in one stitch
- dec — decrease over two stitches
- sl st — slip stitch
- ch — chain
- hdc — half double crochet
- dc — double crochet
- tr — treble crochet
- BLO — back loop only
An invisible decrease is worked through the front loops of the following two stitches before completing them together as one single crochet.
Pattern — Step by Step
Work in continuous spiral rounds unless a section states otherwise. Mark the first stitch of each round and verify the number in brackets before continuing.
Head
Yarn: mint green — original six-stitch sphere calculation.
R1: 6 sc in MR (6)
R2: inc × 6 (12)
R3: (sc, inc) × 6 (18)
R4: (2 sc, inc) × 6 (24)
R5: (3 sc, inc) × 6 (30)
R6: (4 sc, inc) × 6 (36)
R7–R11: sc around (36)
R12: (4 sc, dec) × 6 (30)
Place the 12 mm safety eyes between R8 and R9. Keep approximately seven visible stitches between the stems. Begin stuffing after the eye placement has been checked from the front.
R13: (3 sc, dec) × 6 (24)
R14: (2 sc, dec) × 6 (18)
R15: sc around (18)
R16: (sc, dec) × 6 (12)
R17: dec × 6 (6)
Fasten off. Leave a 25 cm tail, pass it through the six remaining front loops and close the opening.
Body
Yarn: mint green.
R1: 6 sc in MR (6)
R2: inc × 6 (12)
R3: (sc, inc) × 6 (18)
R4: (2 sc, inc) × 6 (24)
R5: (3 sc, inc) × 6 (30)
R6: (4 sc, inc) × 6 (36)
R7–R14: sc around (36)
R15: (4 sc, dec) × 6 (30)
R16: sc around (30)
R17: (3 sc, dec) × 6 (24)
R18: (2 sc, dec) × 6 (18)
Stuff firmly through R14. Keep the final upper section slightly softer where the neck and tail seams will meet the torso.
R19: (sc, dec) × 6 (12)
R20: dec × 6 (6)
Fasten off and leave a 45 cm structural sewing tail.
Neck
Yarn: mint green.
R1: 6 sc in MR (6)
R2: inc × 6 (12)
R3: (sc, inc) × 6 (18)
R4–R7: sc around (18)
R8: (sc, dec) × 6 (12)
R9: sc around (12)
R10: dec × 6 (6)
Stuff lightly. The neck should remain firm enough to support the head but compressible at both attachment ends.
Fasten off and leave a 35 cm sewing tail.
Front Legs — Make Two
Yarn: white and mint green.
R1: with white, 6 sc in MR (6)
R2: inc × 6 (12)
R3: (sc, inc) × 6 (18)
R4: change to mint, sc around (18)
R5–R7: sc around (18)
R8: (sc, dec) × 6 (12)
R9–R10: sc around (12)
R11: dec × 6 (6)
Stuff firmly through R7. Press the white portion into a low oval so it resembles a short row of pale toes rather than a spherical foot.
Fasten off and leave a 35 cm attachment tail.
Back Legs — Make Two
Yarn: white and mint green.
R1: with white, 6 sc in MR (6)
R2: inc × 6 (12)
R3: (sc, inc) × 6 (18)
R4: change to mint, sc around (18)
R5–R8: sc around (18)
R9: (sc, dec) × 6 (12)
R10–R11: sc around (12)
R12: dec × 6 (6)
Stuff the lower two-thirds firmly. Back legs can contain slightly more filling than the front pair because they support the tail end of the torso.
Fasten off and leave a 35 cm sewing tail.
Individual White Toes — Make Twelve
Optional for a closer photo match. Yarn: white.
R1: 6 sc in MR (6)
Slip stitch into the first stitch and fasten off with a 10 cm tail.
Sew three small toe bumps across the front edge of each foot. Keep the bumps low and close together.
Tail
Yarn: mint green.
R1: 6 sc in MR (6)
R2: inc × 6 (12)
R3: (sc, inc) × 6 (18)
R4–R7: sc around (18)
R8: (sc, dec) × 6 (12)
R9–R12: sc around (12)
R13: dec × 6 (6)
R14–R17: sc around (6)
Stuff firmly near R1–R7, then reduce the amount through the narrow section. Bend the tip slightly upward while sewing rather than packing it rigidly.
Fasten off and leave a 35 cm attachment tail.
Cheek Patches — Make Two
Yarn: blush pink.
R1: 6 sc in MR (6)
Slip stitch to the first stitch and fasten off with a 12 cm tail. Pull each small circle into a horizontal oval during attachment.
Large Five-Petal Flowers — Make Three
Use blush pink, lavender and powder blue.
R1: 6 sc in MR (6)
R2: inc × 6 (12)
For five evenly spaced petals, work around the centre as follows, adjusting the last placement with a slip stitch:
Petal: sl st in next st, ch 2, 2 dc in next st, 2 tr in same st, 2 dc in same st, ch 2, sl st in next st.
Repeat until five petals are formed.
Fasten off and leave a 25 cm sewing tail.
Medium Five-Petal Flowers — Make Three
Use pale yellow, peach and a second blue or pink.
R1: 6 sc in MR (6)
Work five petals around the ring:
Petal: sl st into ring, ch 2, 2 dc into ring, ch 2, sl st into ring.
Repeat five times. Fasten off and leave a 20 cm tail.
Small Crown Flower — Make One
Use blush pink.
R1: 6 sc in MR (6)
Into the ring work five compact petals:
(sl st, ch 2, hdc, dc, hdc, ch 2, sl st)
Fasten off and leave a 20 cm tail.
Flower Centres — Make Seven
Use pale cream or yellow.
R1: 6 sc in MR (6)
R2: inc × 6 (12)
Fasten off and leave a 15 cm sewing tail. Sew one centre over each flower middle.
Leaves — Make Eight
Yarn: leaf green.
Ch 7.
Starting in the second chain from the hook:
sl st, sc, hdc, dc, sc, sl st.
Work 3 sc in the final chain and continue along the opposite side:
sl st, sc, hdc, dc, sc, sl st.
Fasten off and leave a 15 cm sewing tail.
Fold each leaf lightly along the starting chain so the centre ridge remains visible.
Smile
Yarn: smooth black embroidery yarn.
Embroider a shallow curved smile approximately 2.5–3 cm wide on the lower front of the head. Add one short upward stitch at the outer corner if a stronger smile curve is wanted.
Assembly
- Attach the neck to the front upper body first. Keep its centre line aligned with the torso and sew around the 12–18 stitch contact area twice.
- Pin the head to the neck so the eye line remains horizontal. Sew around the neck opening and add one hidden lower anchor stitch to reduce head rotation.
- Attach the front legs beneath the shoulder section and the back legs beneath the rear torso. Leave a clear body section between the pairs so the dinosaur does not look compressed.
- Position the two cheek patches below the eyes and embroider the curved smile. Keep the facial decoration clear of the neck seam.
- Sew the tail to the rear body with its wider 18-stitch section against the torso. Angle the tip slightly upward and away from the rear leg.
- Pin all seven flowers along the crown and upper spine before attaching any one permanently. Place the larger flowers near the shoulder and middle back and smaller flowers near the head and tail.
- Sew the green leaves beneath and between the flowers. Attach mainly through each leaf centre so its outer edges remain raised.
- Secure every flower through its centre first, then add one hidden stitch at the base of each petal. Leave the rounded outer petal edges free.
- Attach three white toe bumps to each foot if using the separate-toe version. Check that all four foot fronts touch the surface at similar angles.
- Set the dinosaur on a hard level surface, correct any leg or tail imbalance, then weave all structural yarn tails through at least three stitch directions.
The finished dinosaur should stand on four legs with the head slightly raised, the tail extending behind the rear pair and the seven flowers forming one continuous botanical ridge.
7 Technical Tips
- Head droop: A neck stuffed too softly can fold beneath the 36-stitch head. Fill the centre until the neck compresses no more than approximately 5 mm under the head’s weight.
- Leg imbalance: A 5 mm height difference between corresponding leg seams can make the dinosaur rock diagonally. Pin all four legs before sewing any one seam completely.
- Decrease holes: Conventional decreases can expose stuffing in thick chenille. Work each shaping decrease through the front loops of the following two stitches.
- Late eye installation: A 12 mm safety-eye washer becomes difficult to reach once the head opening drops below 24 stitches. Lock both eyes before completing Head R13.
- Flower sag: A large flower attached only through its centre can rotate against the plush body. Add one hidden anchoring stitch at the base of all five petals while leaving the outer half of each petal free.
- Tail rotation: Sewing the tail through only four or five body stitches lets it twist downward. Distribute its attachment across approximately 8–10 torso stitches.
- Floral crowding: Flowers placed with no green fabric visible between them merge into one heavy mass. Leave roughly 5–10 mm of visible body or leaf between most neighboring blooms.
Shaping the Dinosaur Head
The head reaches 36 stitches and remains there for five full rounds. That plateau gives the dinosaur a rounded juvenile profile instead of a narrow reptilian skull. The face depends more on proportion than on added pieces.
Keep the eyes in the upper-middle portion of the sphere. The cheeks and smile need room below them, while the floral crown begins behind and above the eye line.
Add stuffing in small pieces. A single dense bundle behind the eyes can push both stems forward and flatten the sides of the head. Shape the cheeks separately before the final decrease rounds close the opening.
Building the Four-Legged Body
The body uses the same 36-stitch maximum as the head but holds that width for eight rounds. The additional length produces the horizontal torso visible in the reference without increasing the circumference beyond the medium-size plateau.
Front and back legs differ only slightly in length. The rear pair carries more stuffing because it supports the tail and the densest part of the flower arrangement.
Do not position all four legs beneath the centre line. Move the front pair toward the shoulders and the back pair toward the tail base. A visible gap between the pairs makes the long torso readable.
Constructing the Tail
The tail expands from six to 18 stitches before narrowing back to six. This method gives the attachment end enough width to join the body without producing a thin cord emerging from a large torso.
Keep the first half firm and the final six-stitch section light. Too much stuffing at the tip makes the tail rigid and can raise one rear foot away from the table.
Pin the piece after all four legs are provisionally positioned. The tail should add rear visual length without becoming a fifth support point.
Building the Floral Spine
The floral ridge is the defining feature of this dinosaur amigurumi crochet pattern. Seven flowers form an irregular sequence from the head toward the tail rather than a row of identical evenly spaced motifs.
Use the three largest flowers around the head, shoulders and central back. Medium flowers fill the remaining body area, while the smallest bloom works near the crown or tail transition.
Pin the full arrangement before sewing. A flower that looks correctly placed on an empty body may crowd the neighboring petals once the remaining six pieces are added.
Making Raised Leaves
Leaves serve two functions: they introduce a second green tone and they separate neighboring flower colors. Eight pieces are enough to produce visible foliage without covering the mint body.
Work along both sides of the starting chain so every leaf has a clear centre ridge. Fold lightly along that ridge before sewing.
Attach the inner half more firmly than the tip. The free pointed edge should lift slightly from the dinosaur and remain visible beneath the flowers.
Color Planning for the Flowers
The reference uses a garden palette rather than a strict repeat. Blush, yellow, blue, lavender and peach appear at different points along the back, while pale centres unify the group.
Avoid placing the two blue flowers directly beside each other. Distributing cool and warm colors produces a clearer individual outline for each bloom.
Keep the dinosaur itself in one mint tone. Additional body color changes would compete with the already complex floral surface.
Working with Chenille Yarn
Chenille obscures stitch tops, particularly around decreases and the closed ends of legs. Insert the locking marker through both loops of the complete first stitch rather than clipping a loose surface fiber.
Feel for both top loops with the hook tip before making an increase or decrease. A missed stitch in the head changes the facial centre, while one in a leg can alter its finished height.
If the magic ring sheds when tightened, pass a smooth scrap strand through the starting loop and pull that stronger strand instead. Hide it inside the stuffed component.
Controlling Flower Weight
Seven flowers plus leaves add more material to the upper body than conventional spikes. That weight needs to be distributed rather than concentrated at one point.
Sew larger flowers partly across the head-to-body area and centre back instead of attaching all heavy pieces on one side. Keep the smaller flowers near the tail.
After assembly, hold the dinosaur by the torso rather than by a flower. The petal seams are intended to control orientation, not to act as carrying points.
Adjusting Finished Size
Keep the written stitch totals and switch yarn thickness when scaling the toy. Bulky yarn with a 4–4.5 mm hook produces a smaller version while preserving the head-to-body and flower-to-back ratios.
For a larger plush, change to thicker blanket yarn before adding another increase round. Increasing the head to 42 stitches without enlarging the flowers and limbs would alter the proportions.
Make one flower after choosing the yarn. If a large flower covers more than roughly one-third of the visible back width, use a thinner accent yarn for the botanical pieces.
Finishing Checks
Place the completed dinosaur on a flat surface and check all four feet first. The body should remain approximately level from shoulders to tail base without rocking diagonally.
View the head from the front. Both eyes need comparable height, the cheek patches should remain below them and the smile must sit clear of the neck seam.
Inspect the floral arrangement from above last. The colors should alternate irregularly, leaf tips should remain visible between several blooms and no flower should obscure the eye or tail completely.
Conclusion
Measure the finished dinosaur from nose to tail and record the standing height beside the yarn, hook and eye size used. Photograph it from above next; that angle reveals uneven floral spacing, leaves hidden beneath the petals or a tail attached off-centre. Save this dinosaur amigurumi crochet pattern to Pinterest and share the finished plush on Instagram with #PastelFlowerDinosaur. Reshape the petals and lift each leaf tip before the final photograph. For another version, would you keep the seven mixed pastel flowers shown here or replace the yellow and blue blooms with an all-pink garden along the spine?
Sources
- DIY Fluffies — Brodie the Stegosaurus: 22 cm super-bulky chenille version using a 5.0 mm hook.
- StringyDingDing / Ravelry — Brontosaurus Dinosaur Amigurumi: intermediate dinosaur using 12 mm safety eyes.
- Jess Huff — Dan the Dinosaur: 10.5-inch dinosaur with separately shaped tail and 15 mm eye reference.
- Etsy — current Flower Dino Crochet marketplace and flower-dinosaur amigurumi listings.









