Introduction
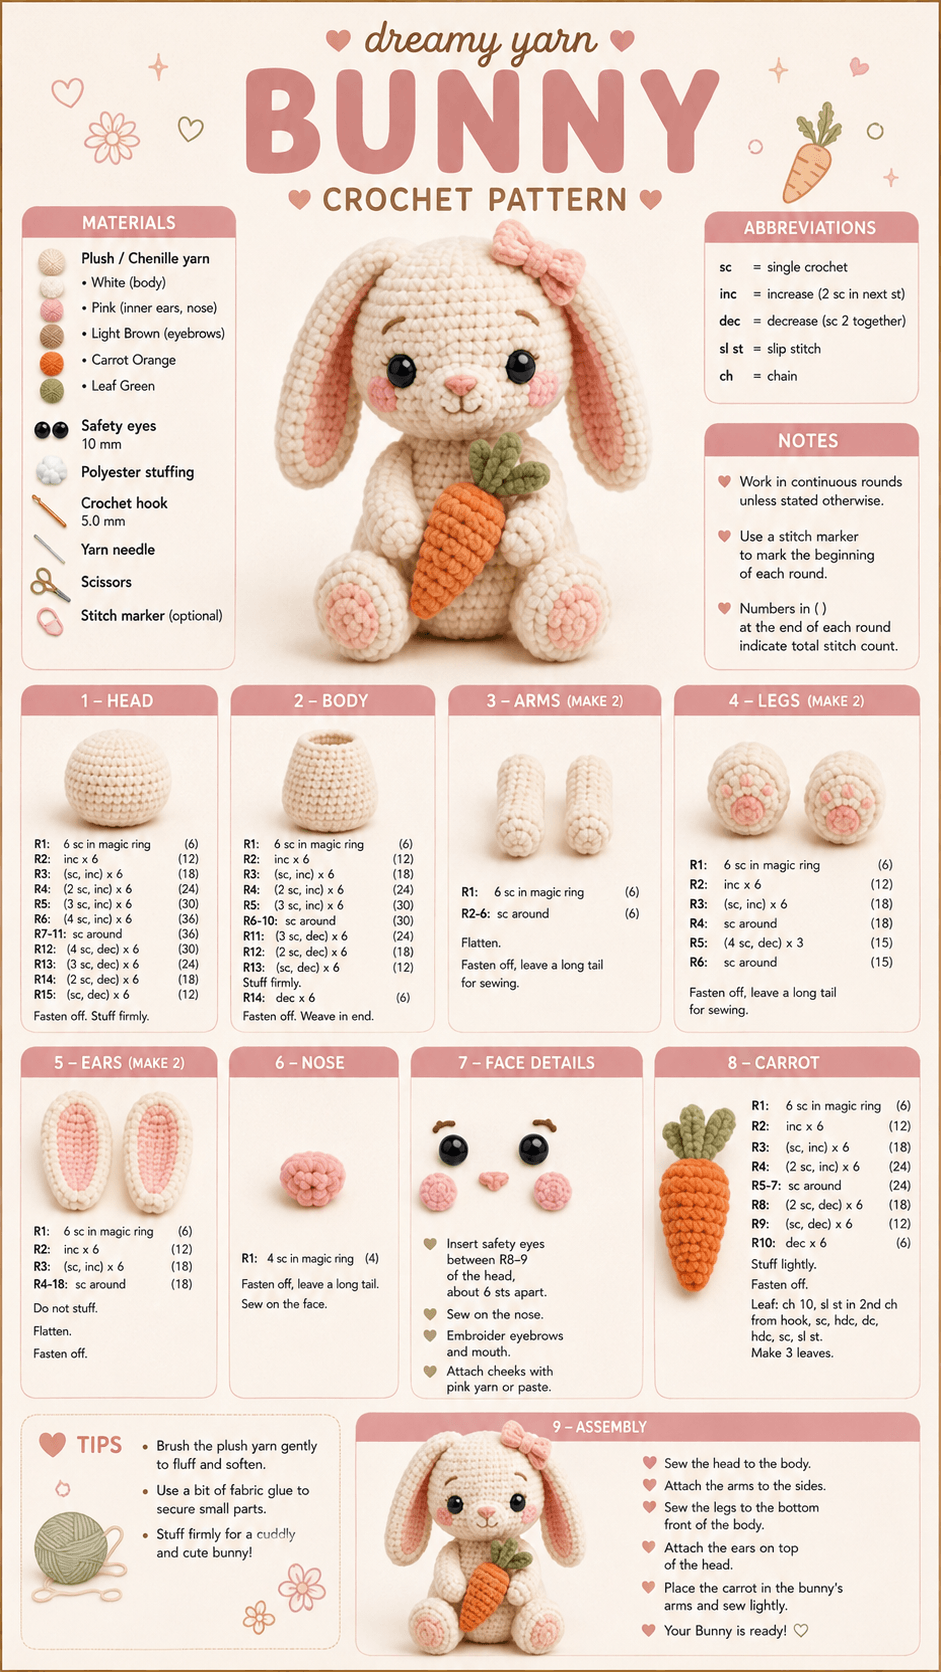
A rabbit’s ears can hang below its jaw while the head remains upright, so their attachment line matters as much as their length. This bunny amigurumi crochet pattern uses super-bulky chenille, a 5 mm hook and 10 mm safety eyes to make a seated bunny approximately 20–22 cm tall. The intermediate project includes layered ears, paw pads, a bow and a removable-looking crocheted carrot held between the arms.
The Design: What Makes This Floppy Ear Bunny Different
The head stops at a 36-stitch plateau rather than expanding into an oversized sphere. That proportion leaves enough room for large eyes and a projecting muzzle while allowing the long ears to remain visually dominant. Each ear is constructed as a narrow tube with a separate pink inner panel, then flattened before attachment so it falls beside the cheek instead of projecting outward.
The body also uses a 36-stitch maximum, creating the rounded seated torso required to support two broad back feet. Pink circular sole panels break up the cream surface and repeat the inner-ear color. The crochet bunny with carrot accessory adds a third vertical element between the arms, so its width is deliberately limited. One common error with a floppy ear bunny crochet pattern is stuffing the ears. Even a small amount of filling can make the lower half rigid and prevent the characteristic downward hang.
Project Info at a Glance
| Skill Level | Time | Finished Size | Hook | Best For |
|---|---|---|---|---|
| Intermediate | 8–10 hours | Approx. 20–22 cm seated | 5 mm | Spring displays, Easter projects and supervised play |
Materials and Tools
Yarn
- Cream or ivory — super-bulky chenille — approximately 120–150 g — Premier Parfait Chunky, YarnArt Dolce or comparable plush yarn
- Dusty pink — super-bulky chenille — approximately 15 g — for inner ears, cheeks, foot pads, nose and bow
- Carrot orange — super-bulky chenille — approximately 15–20 g — for the carrot
- Leaf green — bulky or super-bulky yarn — less than 10 g — for carrot leaves
- Light brown — embroidery yarn — approximately 1 m — for eyebrows and mouth
Tools
- 5 mm crochet hook
- Two 10 mm safety eyes
- Polyester stuffing
- Yarn needle
- Locking stitch marker
- Dressmaking pins
- Scissors
Replace plastic eyes with embroidered eyes when the finished bunny is intended for a child under three.
Abbreviations
- MR — magic ring
- sc — single crochet
- inc — two single crochet stitches in one stitch
- dec — invisible single crochet decrease
- sl st — slip stitch
- ch — chain
- hdc — half double crochet
- BLO — back loop only
- FLO — front loop only
An invisible decrease is made through the front loops of the next two stitches before completing both loops together as one single crochet.
Pattern — Step by Step
Work three-dimensional pieces in a continuous spiral unless another method is specified. Mark the first stitch of each round before continuing.
Head
Yarn: cream — original medium-size amigurumi construction using a 36-stitch plateau.
R1: 6 sc in MR (6)
R2: inc ×6 (12)
R3: (sc, inc) ×6 (18)
R4: (2 sc, inc) ×6 (24)
R5: (3 sc, inc) ×6 (30)
R6: (4 sc, inc) ×6 (36)
R7–R14: sc around (36)
Insert the 10 mm safety eyes between R10 and R11, leaving approximately six visible stitches between their inner edges. Pin the muzzle temporarily before fitting the washers.
R15: (4 sc, dec) ×6 (30)
R16: (3 sc, dec) ×6 (24)
R17: (2 sc, dec) ×6 (18)
Stuff the forehead and areas behind the eye washers firmly. Keep the lower centre slightly softer so the muzzle can sit flush.
R18: (sc, dec) ×6 (12)
R19: dec ×6 (6)
Fasten off. Close the final opening and weave the end through the head.
Muzzle
Yarn: cream.
R1: 6 sc in MR (6)
R2: inc ×6 (12)
R3: (sc, inc) ×6 (18)
R4: sc around (18)
R5: (sc, dec) ×6 (12)
Add a small amount of stuffing. Fasten off and leave a 25 cm sewing tail.
Pin the muzzle beneath the eyes with its upper edge approximately one round below the eye posts. Keep the centre aligned with the midpoint between both eyes.
Nose
Yarn: dusty pink.
R1: 6 sc in MR (6)
R2: inc ×6 (12)
Fasten off with a 15 cm tail. Fold the circle into a shallow triangular oval while sewing it to the upper centre of the muzzle.
Use light-brown embroidery yarn to add one short vertical line beneath the nose and two curved mouth stitches.
Outer Ears — Make 2
Yarn: cream.
R1: 6 sc in MR (6)
R2: inc ×6 (12)
R3: (sc, inc) ×6 (18)
R4–R12: sc around (18)
R13: (sc, dec) ×6 (12)
R14–R17: sc around (12)
R18: dec ×6 (6)
Do not stuff. Flatten the entire ear, then flatten the six-stitch opening across three stitches.
Fasten off and leave a 30 cm sewing tail. Each finished ear should hang freely when held from its upper edge.
Inner Ear Panels — Make 2
Yarn: dusty pink.
Ch 12.
Row 1: sc in second ch from hook and across, ch 1, turn (11)
Row 2: inc, 9 sc, inc, ch 1, turn (13)
Rows 3–7: sc across, ch 1, turn (13)
Row 8: dec, 9 sc, dec, ch 1, turn (11)
Row 9: dec, 7 sc, dec, ch 1, turn (9)
Row 10: dec, 5 sc, dec (7)
Fasten off and leave a 25 cm tail. Pin the panel centrally on the front of the cream ear, leaving approximately 5 mm of cream visible around the edge.
Body
Yarn: cream — original 36-stitch medium construction.
R1: 6 sc in MR (6)
R2: inc ×6 (12)
R3: (sc, inc) ×6 (18)
R4: (2 sc, inc) ×6 (24)
R5: (3 sc, inc) ×6 (30)
R6: (4 sc, inc) ×6 (36)
R7–R12: sc around (36)
R13: (4 sc, dec) ×6 (30)
R14–R15: sc around (30)
R16: (3 sc, dec) ×6 (24)
R17: (2 sc, dec) ×6 (18)
Stuff the lower body firmly. Add slightly less stuffing near the neck so the head can sit evenly on the top surface.
R18: (sc, dec) ×6 (12)
R19: dec ×6 (6)
Fasten off and close the opening.
Arms / Front Legs — Make 2
Yarn: cream.
R1: 6 sc in MR (6)
R2: inc ×6 (12)
R3–R5: sc around (12)
R6: (2 sc, dec) ×3 (9)
R7–R12: sc around (9)
Stuff the lower half lightly. Leave the upper 3 cm unstuffed so each arm can curve around the carrot.
Flatten the opening and crochet through both layers with 4 sc. Fasten off with a 25 cm sewing tail.
Back Legs — Make 2
Yarn: cream.
R1: 6 sc in MR (6)
R2: inc ×6 (12)
R3: (sc, inc) ×6 (18)
R4–R6: sc around (18)
R7: (sc, dec) ×6 (12)
R8–R11: sc around (12)
R12: dec ×6 (6)
Stuff firmly through the foot and moderately through the upper leg. Fasten off and leave a 25 cm attachment tail.
Pink Foot Pads — Make 2
Yarn: dusty pink.
R1: 6 sc in MR (6)
R2: inc ×6 (12)
R3: (sc, inc) ×6 (18)
Fasten off with a 20 cm tail. Sew one circle to the rounded front surface of each back foot before attaching the leg to the body.
Cheek Patches — Make 2
Yarn: dusty pink.
R1: 6 sc in MR (6)
R2: inc ×6 (12)
Fasten off and leave a 15 cm tail. Flatten each circle and position it below the outside half of the nearest eye.
Eyebrows
Yarn: light brown embroidery yarn.
Work one shallow curved line above each eye. Keep each eyebrow approximately 12–15 mm long and position it about one crochet round above the eye.
Use two or three short stitches rather than one long strand so the line follows the curvature of the head.
Tail
Yarn: cream.
R1: 6 sc in MR (6)
R2: inc ×6 (12)
R3: (sc, inc) ×6 (18)
R4: sc around (18)
R5: (sc, dec) ×6 (12)
R6: dec ×6 (6)
Stuff lightly. Fasten off and leave a 20 cm sewing tail.
Pink Bow
Yarn: dusty pink.
Ch 7.
Row 1: sc in second ch from hook and across, ch 1, turn (6)
Rows 2–5: sc across, ch 1, turn (6)
Fasten off. Weave the short tail into the rectangle.
Cut a separate 25 cm length of pink yarn and wrap it five times around the centre of the rectangle. Pull firmly enough to gather the middle without folding the outer edges inward.
Use the remaining strand to sew the bow near the upper base of one ear.
Carrot
Yarn: carrot orange.
R1: 6 sc in MR (6)
R2–R3: sc around (6)
R4: inc ×6 (12)
R5–R6: sc around (12)
R7: (sc, inc) ×6 (18)
R8–R9: sc around (18)
R10: (2 sc, inc) ×6 (24)
R11–R13: sc around (24)
R14: (2 sc, dec) ×6 (18)
R15: sc around (18)
R16: (sc, dec) ×6 (12)
Stuff from the widest end toward the tip, using small pieces so the narrow point stays defined.
R17: dec ×6 (6)
Fasten off and close the opening.
Carrot Leaves — Make 3
Yarn: leaf green.
Ch 9.
Row 1: sl st in second ch from hook, sc, 4 hdc, sc, sl st (8)
Fasten off and leave a 15 cm tail. Repeat twice more.
Overlap the three leaf bases and sew them into the closed upper end of the carrot. Angle the centre leaf vertically and the other two outward.
Assembly
- Sew the head centrally to the body using two complete passes around the neck seam.
- Pin the ears to the upper sides of the head so the inner pink panels face forward and both ear tips finish at approximately the same height.
- Attach the muzzle beneath the eyes, sew on the pink nose and embroider the mouth and eyebrows.
- Add the two cheek patches, keeping their upper edges approximately one round below the eye centres.
- Position the arms on opposite sides of the upper torso and leave enough forward movement for them to wrap around the carrot.
- Pin the back legs to the lower front of the body with both pink foot pads facing toward the viewer, then test the seated balance before sewing.
- Attach the tail centrally to the rear body between approximately R7 and R10.
- Sew the bow near the upper outside edge of one ear, passing the attachment yarn through the head fabric rather than only the ear surface.
- Place the carrot diagonally between the arms with its widest section at chest height, then secure it with two hidden stitches if permanent attachment is required.
- Compare ear length, paw-pad angle and carrot position from directly in front, then weave every structural yarn tail through at least five internal stitches.
The completed bunny should sit without external support while both ears hang freely and the carrot remains centred between the front legs.
7 Technical Tips
- Ear twisting: A one-stitch rotation at the attachment edge can turn the pink liner toward the back. Pin the upper 25 mm of both ears flat against the head before making the first permanent stitch.
- Overstuffed ears: Filling inside an 18-stitch ear prevents a clean downward fold. Leave both ears completely unstuffed and flatten them from R18 toward the widest section before attachment.
- Eye-placement drift: A one-round height difference becomes obvious beside the centred nose. Insert both 10 mm eye posts between the same two rounds and count the six visible stitches between their inner edges.
- Visible decrease bars: Standard decreases can produce raised lines across the lower head. Work front-loop invisible decreases from head R15 through R19.
- Rotated foot pads: A back leg turned 10 mm inward can point its pink sole toward the floor. Mark the top centre of each foot before pinning the legs to the body.
- Carrot displacement: Arms attached more than one round apart vertically can force the carrot to lean sharply sideways. Pin both arms first and place the carrot between them before sewing either shoulder.
- Loose structural tails: Chenille ends can work back through a short seam after repeated handling. Pass each attachment tail through five internal stitches, reverse direction and weave through at least three more before trimming.
Conclusion
Check the ears and carrot before trimming the final yarn tails because those three vertical shapes control the front silhouette. Set the bunny on a level surface and compare ear-tip height, eye alignment, paw-pad angle and the position of the carrot leaves. Crochet one outer ear next and confirm that it falls below the jaw without stuffing before making its matching piece. Save this bunny amigurumi crochet pattern to Pinterest and share the finished version on Instagram with #CarrotBunnyAmigurumi. For this bunny, would you place the pink bow on the same ear as the reference or move it to the opposite side?









