Introduction
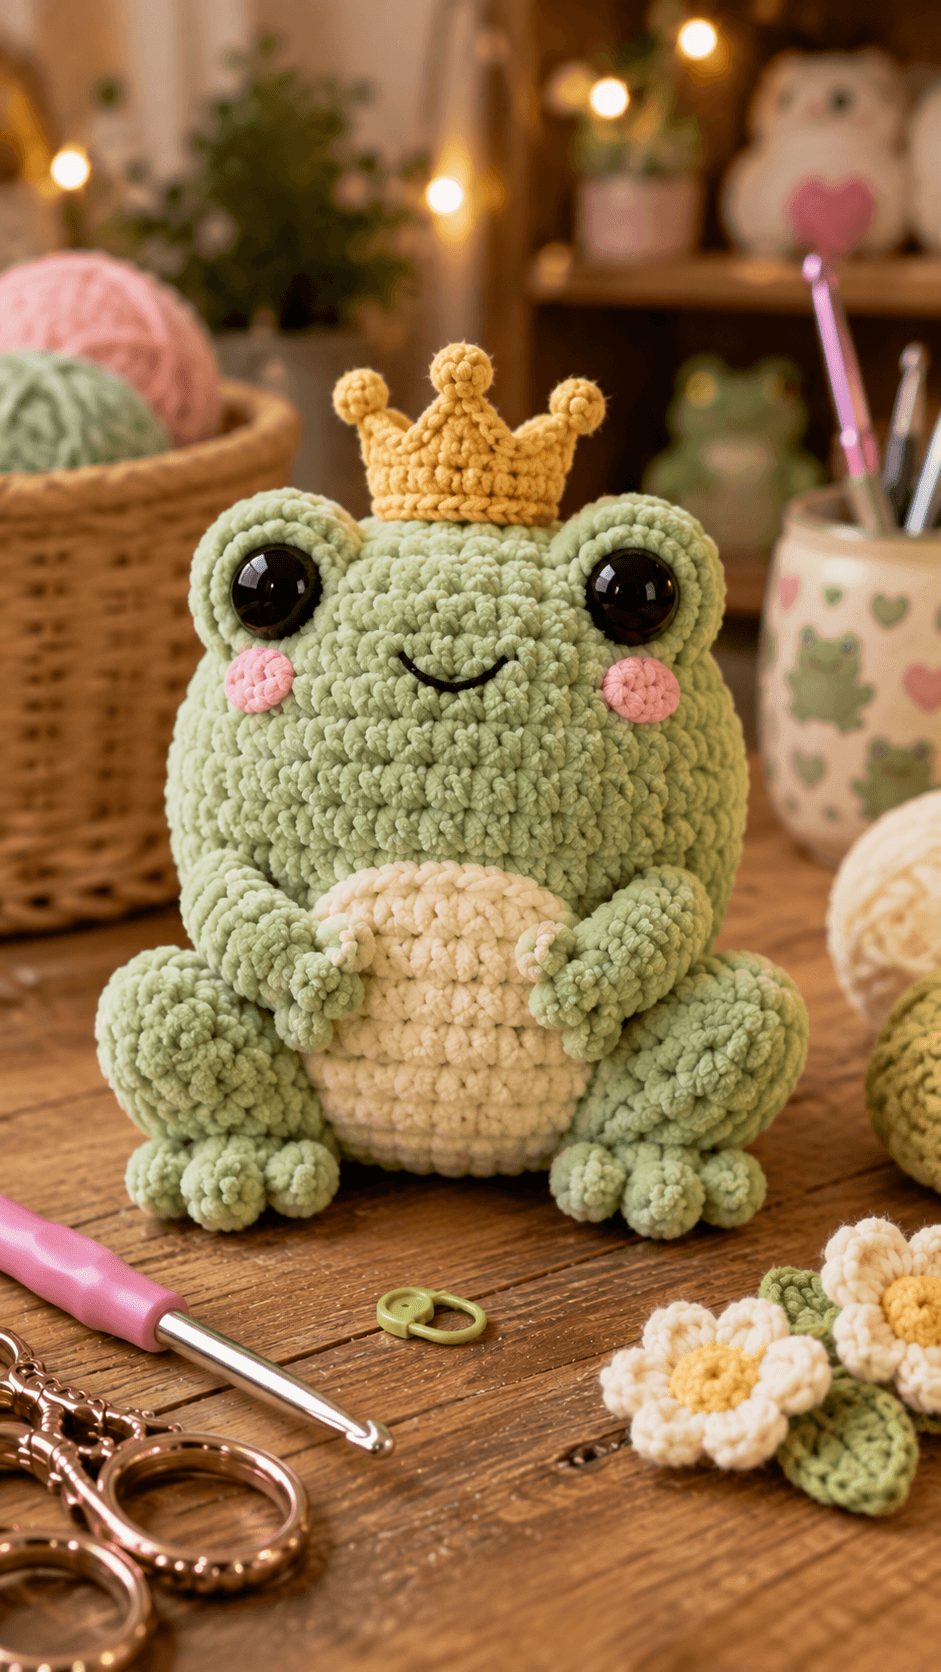
A frog’s eyes need to rise above its skull; flatten them into the face and the entire amphibian silhouette changes. This frog amigurumi crochet pattern uses super-bulky chenille, a 5 mm hook and separate eye lobes to create a seated frog prince approximately 25–28 cm tall. The project includes a cream belly, bent hind legs, projecting toes and structured gold crown. Intermediate shaping and sewn assembly are required.
The Design: What Makes This Frog Prince Different
The head reaches a 42-stitch plateau because the eyes sit on separate raised lobes and need enough horizontal space to remain distinct. A 36-stitch body keeps the torso narrower, leaving room for the large folded hind legs that establish the sitting position. Those legs matter more than length: the broad thighs turn outward while three small toes project forward from each foot. The cream belly supplies contrast through the centre without interrupting the structural body rounds. Above the face, a three-point mustard crown changes the silhouette again and gives this frog prince crochet pattern its defining accessory. One common maker error is placing the eye lobes too far apart. Their inner edges should remain close to the head centre so the safety eyes point forward rather than sideways.
Project Information at a Glance
| Skill Level | Time | Finished Size | Hook | Best For |
|---|---|---|---|---|
| Intermediate | 9–12 hours | Approx. 25–28 cm including crown | 5 mm | Large plush and character display |
Published frog patterns vary from small pocket figures to designs measuring 20, 25, 28 and even 43 cm, depending on yarn, hook and construction. :contentReference[oaicite:15]{index=15} The target here is based primarily on the photographed chenille proportions rather than on another designer’s finished measurement.
Materials and Tools
Yarn
- Sage green — super-bulky chenille or velvet — approximately 140–180 g — head, body, eye lobes and limbs
- Cream — matching chenille — approximately 35–45 g — belly patch
- Mustard gold — bulky or super-bulky yarn — approximately 15–20 g — crown
- Blush pink — matching yarn scrap — cheek patches
- Black smooth embroidery yarn — mouth
Tools
- 5 mm crochet hook
- Two 18–20 mm black safety eyes
- Polyester toy stuffing
- Large-eye yarn needle
- Locking stitch marker
- Dressmaking pins
- Scissors
The eye diameter is a photo-based estimate for this large plush; smaller published frogs commonly use 6–12 mm safety eyes. :contentReference[oaicite:16]{index=16} Test the eyes against the completed lobes before locking their washers. Use embroidered eyes instead when detachable plastic components are inappropriate for the intended recipient.
Abbreviations
- MR — magic ring
- sc — single crochet
- inc — two single crochet stitches in one stitch
- dec — decrease over two stitches
- sl st — slip stitch
- ch — chain
- hdc — half double crochet
- dc — double crochet
- BLO — back loop only
- FLO — front loop only
An invisible decrease is worked through the front loops of the following two stitches before completing them together as one single crochet.
Pattern — Step by Step
Work in continuous spiral rounds unless a section specifies rows or joined rounds. Place a locking marker through the first complete stitch after every round and confirm each bracketed total before continuing.
Head
Yarn: sage green — original six-stitch sphere calculation.
R1: 6 sc in MR (6)
R2: inc × 6 (12)
R3: (sc, inc) × 6 (18)
R4: (2 sc, inc) × 6 (24)
R5: (3 sc, inc) × 6 (30)
R6: (4 sc, inc) × 6 (36)
R7: (5 sc, inc) × 6 (42)
R8–R13: sc around (42)
R14: (5 sc, dec) × 6 (36)
R15: (4 sc, dec) × 6 (30)
R16: (3 sc, dec) × 6 (24)
Begin stuffing with small pieces, keeping the front evenly rounded. The safety eyes are installed through the separate eye lobes rather than directly into this head.
R17: (2 sc, dec) × 6 (18)
R18: (sc, dec) × 6 (12)
R19: sc around (12)
R20: dec × 6 (6)
Fasten off. Leave a 20 cm tail, pass it through the remaining front loops and pull the opening closed.
Eye Lobes — Make Two
Yarn: sage green.
R1: 6 sc in MR (6)
R2: inc × 6 (12)
R3: (sc, inc) × 6 (18)
R4–R5: sc around (18)
R6: (sc, dec) × 6 (12)
Insert one safety eye through the front centre of each lobe between R3 and R4. Lock the washer before stuffing. Add enough filling to create a raised dome without making the base spherical.
R7: dec × 6 (6)
Fasten off and leave a 30 cm sewing tail. Do not cinch the base completely closed; retain enough surface area for attachment to the head.
Body
Yarn: sage green.
R1: 6 sc in MR (6)
R2: inc × 6 (12)
R3: (sc, inc) × 6 (18)
R4: (2 sc, inc) × 6 (24)
R5: (3 sc, inc) × 6 (30)
R6: (4 sc, inc) × 6 (36)
R7–R12: sc around (36)
R13: (4 sc, dec) × 6 (30)
R14–R15: sc around (30)
R16: (3 sc, dec) × 6 (24)
R17: (2 sc, dec) × 6 (18)
Stuff the lower torso to medium-firm density. Keep the final section softer so it compresses neatly beneath the oversized head.
R18: (sc, dec) × 6 (12)
R19: dec × 6 (6)
Fasten off and leave a 45 cm tail for joining the body to the head.
Cream Belly Patch
Yarn: cream.
R1: 6 sc in MR (6)
R2: inc × 6 (12)
R3: (sc, inc) × 6 (18)
R4: (2 sc, inc) × 6 (24)
R5: (3 sc, inc) × 6 (30)
Fasten off and leave a 35 cm sewing tail. Stretch the circle vertically into a broad oval while pinning it to the body.
Front Arms — Make Two
Yarn: sage green.
R1: 6 sc in MR (6)
R2: inc × 6 (12)
R3: (sc, inc) × 6 (18)
R4–R5: sc around (18)
R6: (sc, dec) × 6 (12)
R7–R10: sc around (12)
R11: dec × 6 (6)
Stuff the rounded hand through R6. Leave R7–R11 flexible so the arm can bend inward over the cream belly.
Fasten off and leave a 30 cm attachment tail.
Front Fingers — Make Six
Yarn: sage green.
R1: 6 sc in MR (6)
R2: sc around (6)
Fasten off and leave a 10–12 cm tail. Add three low finger bumps to the rounded end of each front arm.
Back Legs — Make Two
Yarn: sage green.
R1: 6 sc in MR (6)
R2: inc × 6 (12)
R3: (sc, inc) × 6 (18)
R4: (2 sc, inc) × 6 (24)
R5–R8: sc around (24)
R9: (2 sc, dec) × 6 (18)
R10–R11: sc around (18)
R12: (sc, dec) × 6 (12)
R13: dec × 6 (6)
Stuff firmly through R8. Press each leg into a broad oval and bend the narrow attachment end inward to create the characteristic frog squat.
Fasten off and leave a 40 cm sewing tail.
Back Toes — Make Six
Yarn: sage green.
R1: 6 sc in MR (6)
R2: sc around (6)
R3: dec × 3 (3)
Fasten off and leave a 12 cm tail. Stuff only when the chenille collapses completely; otherwise leave each toe unfilled.
Cheek Patches — Make Two
Yarn: blush pink.
R1: 6 sc in MR (6)
R2: inc × 6 (12)
Slip stitch into the next stitch. Fasten off and leave a 15 cm sewing tail. Pull each circle into a shallow horizontal oval during attachment.
Golden Crown Base
Yarn: mustard gold. Work in joined rounds.
R1: ch 36, join carefully with sl st to first chain (36)
R2: ch 1, sc around, join (36)
R3: ch 1, sc around, join (36)
R4: ch 1, sc around, join (36)
Do not fasten off. Continue directly into the crown points.
Crown Points
Continue in mustard gold. The 36-stitch edge is divided into three 12-stitch sections.
Point 1 Row 1: sc across next 12 sts (12)
Point 1 Row 2: ch 1, turn, dec, 8 sc, dec (10)
Point 1 Row 3: ch 1, turn, dec, 6 sc, dec (8)
Point 1 Row 4: ch 1, turn, dec, 4 sc, dec (6)
Point 1 Row 5: ch 1, turn, dec, 2 sc, dec (4)
Point 1 Row 6: ch 1, turn, dec × 2 (2)
Point 1 Row 7: ch 1, turn, dec (1)
Fasten off. Rejoin at the next unused 12-stitch section and repeat Rows 1–7 for Point 2, then repeat again for Point 3.
Crown Tip Balls — Make Three
Yarn: mustard gold.
R1: 6 sc in MR (6)
R2: inc × 6 (12)
R3: sc around (12)
R4: dec × 6 (6)
Add only a tiny amount of stuffing.
Fasten off with a 15 cm tail and attach one ball to each crown point.
Smile
Yarn: smooth black embroidery yarn.
Embroider a shallow upward curve approximately 4–5 cm wide across the front centre of the head. Keep the line below the eye lobes and above the upper edge of the cream belly.
Assembly
- Centre the head above the body and sew around the neck twice with the 45 cm body tail. Add a hidden rear anchor to limit forward rotation.
- Pin the two stuffed eye lobes across the upper head with approximately 1–2 cm between their inner edges. Rotate both safety eyes toward the front before sewing the lobe bases completely.
- Attach the two blush cheek patches below and slightly outside the eye lobes. Embroider the curved black smile centrally between them.
- Pin the cream belly from approximately Body R7 to R16. Sew around its full perimeter without stretching the green body inward.
- Attach the front arms across Body R9–R14 and angle their hands toward the belly centre. Add three small finger bumps to the visible end of each arm.
- Sew the large back legs across Body R4–R10, rotating their broad ends outward. Test the sitting position on a hard surface before tightening either seam.
- Attach three rounded toes to the front of each hind foot. Keep all six toe tips facing the viewer rather than downward toward the table.
- Fit the 36-stitch crown base around the top of the head. Centre one point at the front and place the other two symmetrically behind it.
- Tack the crown to the head at six or more points around its base, then attach one stuffed gold ball to the tip of each crown point.
- Check eye direction, leg height, toe placement and crown centring from the front and side views, then weave each structural tail through at least three stitch directions.
The completed frog should sit on the lower body and both broad hind legs while the six toes, cream belly and three crown points remain visible from the front.
7 Technical Tips
- Eye-lobe rotation: A six-stitch attachment can twist after the head is handled. Sew each lobe through at least 8–10 head stitches and check that both safety eyes still face forward before knotting the tails.
- Head overstuffing: Excess fiberfill opens chenille stitch gaps and changes the round frog face into a rigid ball. Stop when firm finger pressure creates an indentation of approximately 5 mm.
- Decrease holes: Standard reductions may expose stuffing through plush yarn. Work every head, body and limb decrease through the front loops of the next two stitches.
- Uneven back legs: A difference of 5 mm at the upper attachments is enough to tilt the sitting body. Pin both 24-stitch hind legs simultaneously and test the plush on a level surface.
- Toe crowding: Six toe bumps attached too tightly merge into two single foot masses. Leave approximately 5–8 mm between neighboring toe centres when the yarn thickness permits.
- Crown collapse: A crown base attached at only three points can buckle between the tips. Tack the 36-stitch base to the head at six or more evenly distributed positions.
- Chenille marker loss: The plush pile can hide a round transition and shift every later decrease. Count all 42 stitches at Head R8, R11 and R13 before moving the locking marker.
Building the Raised Frog Eyes
The eye lobes are the main anatomical marker in this frog amigurumi crochet pattern. Each lobe reaches 18 stitches independently from the 42-stitch head, creating a visible rise above the forehead rather than relying on eye placement alone.
Install the plastic eye through the centre of the lobe before stuffing. The washer belongs inside that lobe, not through the main head. This construction lets the black dome face forward even while the crocheted eye base curves upward.
Pin both lobes before sewing either one. Their inner sides should sit close enough that the smile remains centred beneath the combined eye area. Moving them toward the head edges changes the expression and makes the frog look side-eyed.
Shaping the Frog Body
The body reaches 36 stitches rather than matching the 42-stitch head. That reduction in width keeps the head visually dominant and leaves room for the large hind legs beside the torso.
Use firmer stuffing through the lower body because the crown and head add weight above it. The shoulder area should remain more compressible. A hard neck creates a visible gap between the body and head.
The cream patch belongs on the front surface rather than being built into the structural rounds. This keeps every green body decrease mathematically consistent and lets the belly be adjusted after stuffing.
Constructing the Hind Legs and Toes
Frog anatomy depends on powerful back legs, so the rear pair is broader than the front arms. A 24-stitch maximum produces enough volume for the outer thigh while still allowing the attachment end to narrow to six stitches.
Bend the completed leg near its upper third instead of folding the foot itself. That placement creates the crouched profile visible in the photograph. Both large leg sections should project to either side of the body.
The toes are separate low tubes. Three per foot create the six rounded projections visible along the table edge. Sew them to the front face of each leg only after the main sitting position has been tested.
Making the Front Arms
The front arms are smaller and less heavily stuffed than the back legs. Their purpose is to frame the cream belly rather than support the figure.
Leave the upper arm rounds flexible so each piece can curve inward. A fully packed 12-stitch tube projects straight forward and hides the belly edge.
Add three small finger bumps to each arm after sewing the arms to the body. This order lets the finger direction be adjusted to match the final hand angle.
Constructing the Frog Prince Crown
The crown is built from a 36-stitch circular band divided into three equal sections. Each 12-stitch section narrows row by row into a separate point, keeping all three tips connected to one stable base.
The centre front point should remain clearly visible between the other two. Rotate the finished crown before sewing until the spacing appears balanced from a direct front view.
Small stuffed balls soften each point and match the rounded chenille style of the frog. Keep their stuffing light. Dense balls become disproportionately large and pull the tips outward.
Working with Chenille Yarn
Published frog patterns use everything from sport and DK cotton to chenille and velvet, and current long-legged frog instructions specifically recommend chenille or velvet when a plush finish is wanted. :contentReference[oaicite:17]{index=17} The thick pile in the supplied image is consistent with that plush category.
Insert the stitch marker through the complete first stitch rather than clipping one fuzzy surface strand. Feel for both top loops with the hook before every decrease because chenille fibers can visually merge neighboring stitches.
If the yarn core strips while tightening a magic ring, run a smooth scrap strand through the initial loop and use that stronger strand to close the centre. Hide the reinforcing yarn inside the stuffed piece.
Eye and Cheek Placement
The large black eyes occupy most of their green lobes, so a small positional error becomes visible quickly. Mark the eye centres before installing either washer and compare the lobes side by side.
Place both blush patches below the eye line. They should remain well outside the black smile and should not touch the lower edges of the eye lobes.
The mouth is intentionally simple. Use smooth black embroidery yarn rather than chenille so the curved line remains thin against the dense green pile.
Adjusting Finished Size
Published frog patterns demonstrate large differences in finished scale: Patrick the Frog measures about 20 cm in sport yarn and 25 cm in DK, while a Ravelry Frog Amigurumi offers 28 cm and 43 cm sizes. :contentReference[oaicite:18]{index=18} The supplied frog sits near the medium-large plush category.
For a smaller version, retain the written stitch totals and switch to bulky rather than super-bulky yarn. A 4–4.5 mm hook can be used when it produces fabric dense enough to hide stuffing.
To scale upward, change yarn thickness before adding another increase round. Expanding the head from 42 to 48 stitches would also require larger eye lobes, a wider crown and different body proportions.
Competition Gap: Why the Crown Matters
Current marketplace results emphasize low-sew frogs, floppy frogs, wizard frogs and quick no-sew market plushies. :contentReference[oaicite:19]{index=19} That leaves the crown as more than decoration in this design: it creates a strong frog-prince search angle while preserving a conventional sitting frog body.
The photographed crown is also structurally different from a flat appliqué. Its base wraps around the top of the head, and three raised points remain visible from the front. Rounded tip balls make the accessory read clearly even in thick chenille.
Keep the gold section visually separate from the eyes. Dropping the crown too low onto the forehead compresses the green space between the front point and eye lobes.
Finishing Checks
Set the frog on a flat, hard surface before hiding the final structural tails. Both rear legs should touch at matching heights while the lower body rests between them.
View the face directly from the front. The eye centres need to remain level, the smile should sit on the vertical centre line and neither cheek should touch an eye lobe.
Inspect the crown from above last. All three points should lean outward at similar angles, and the circular base should remain centred around the crown of the head.
Conclusion
Measure the completed frog from the seated base to the highest gold crown tip and record the result beside the yarn, hook and eye size used. Photograph the character straight from the front next; that view exposes rotated eye lobes, uneven hind legs or a crown shifted away from centre. Save this frog amigurumi crochet pattern to Pinterest and share the finished prince on Instagram with #CrownedFrogPrince. Keep all six toes facing forward when setting the final seated pose. For another frog, would you keep the mustard three-point crown shown here or replace it with a smaller crown tilted over one eye?
Sources
- Tiny Curl — Fancy Frog: documented 42-stitch body/head section.
- DIY Fluffies — Frog: 17 cm sport-weight version with published yarn amounts and 12 mm eyes.
- Amigurumi.com — Patrick the Frog: 20 cm sport and 25 cm DK size references.
- Ravelry — Frog Amigurumi: 28 cm and 43 cm size references.









