Introduction
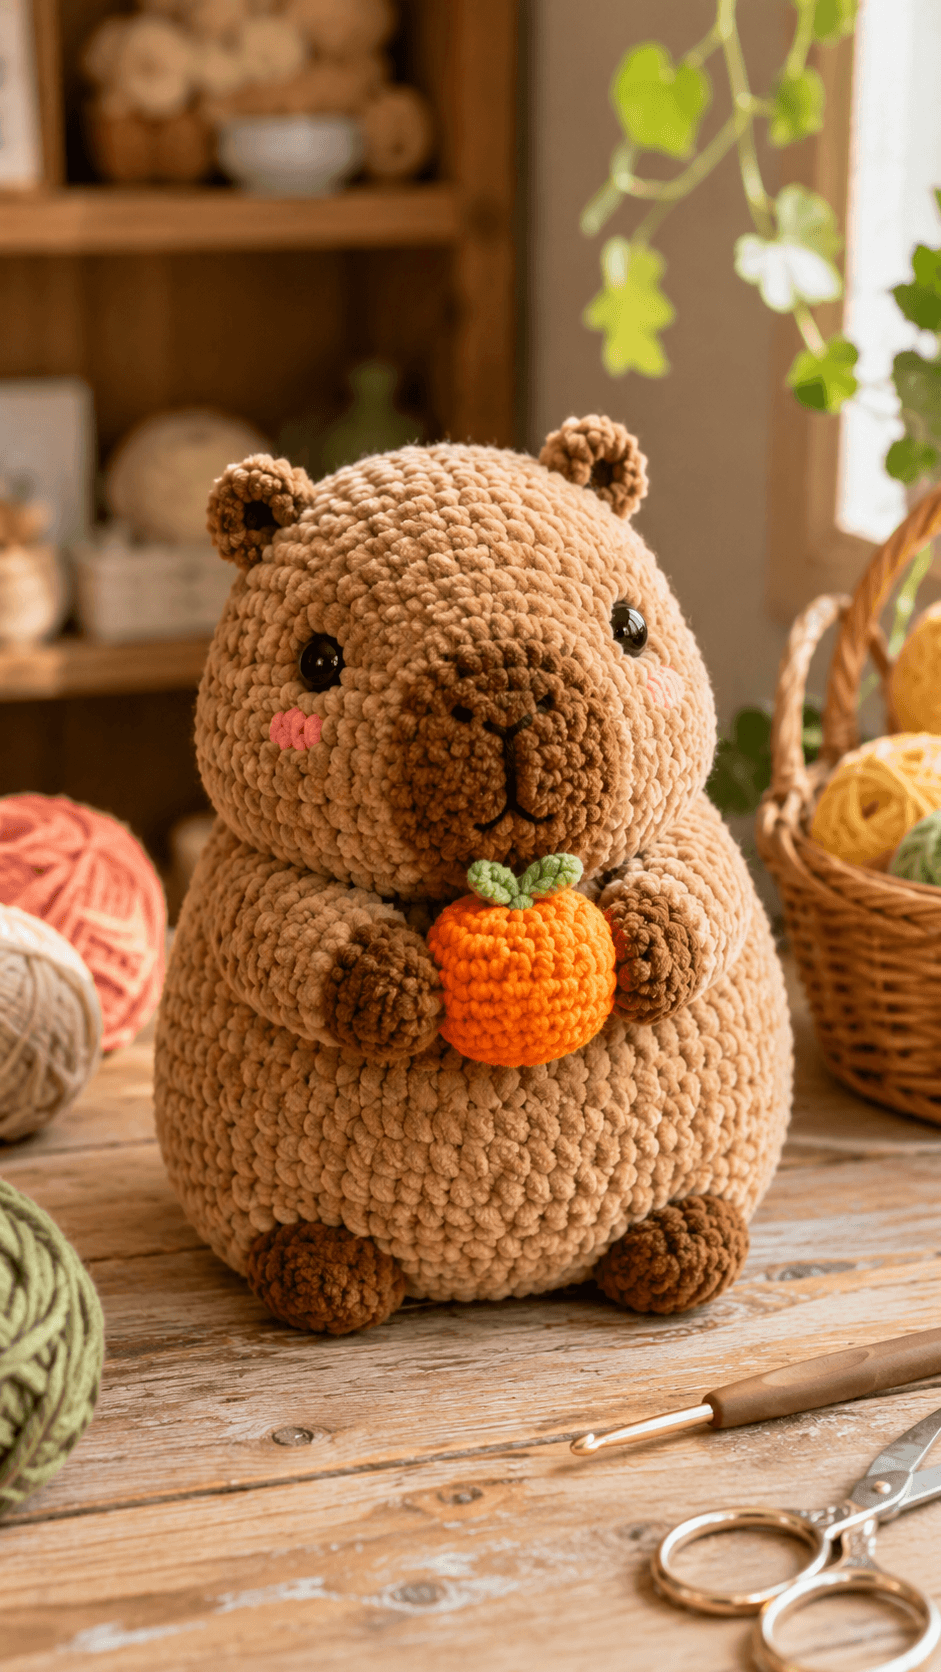
A capybara’s ears are tiny compared with its skull, so increasing their diameter by even one round changes the animal into a bear. This capybara amigurumi crochet pattern uses bulky plush yarn, a 4.5 mm hook and 12 mm safety eyes to make a seated figure about 13 cm tall. The intermediate build includes a broad muzzle, dark paws, pink cheeks and a separate crocheted orange.
The Design: What Makes This Capybara Different
The head reaches a 42-stitch plateau to create the broad, almost circular skull visible in the reference image. A separate 30-stitch muzzle projects forward from the lower face, which is essential for distinguishing this chunky capybara amigurumi from a bear or hamster. The body also reaches 42 stitches but remains on that circumference longer, creating the heavy pear-shaped torso associated with the photographed pose. Tiny ears sit close to the crown rather than projecting sideways. Dark brown paw ends provide additional separation between the limbs and body. One common mistake in a plush capybara crochet pattern is narrowing the torso too early. That creates a visible neck and chest. This version keeps the body broad through the upper section so the head appears to sit directly above the rounded torso.
Project Info at a Glance
| Skill Level | Time | Finished Size | Hook | Best For |
|---|---|---|---|---|
| Intermediate | 6–8 hours | Approximately 13 cm with bulky plush yarn | 4.5 mm | Animal collections, desk display and plush photography |
Materials and Tools
Yarn
- Warm caramel brown — bulky chenille/plush yarn — approximately 90–110 g — use a yarn similar in thickness to YarnArt Dolce.
- Dark chocolate brown — matching bulky yarn — approximately 20–25 g — used for the muzzle, paws and feet.
- Bright orange — bulky or chunky yarn — approximately 10–15 g — used for the fruit.
- Leaf green — bulky or doubled DK yarn — approximately 3–5 g — used for the leaves.
- Blush pink — chunky yarn or embroidery yarn — approximately 2 g — used for the cheek patches.
- Black — embroidery floss — under 1 g — used for the nose and mouth.
Tools
- 4.5 mm crochet hook
- 12 mm safety eyes
- Polyester stuffing, approximately 60–80 g
- Yarn needle
- Embroidery needle
- Locking stitch markers
- Dressmaking pins
- Scissors
Replace plastic safety eyes with securely embroidered eyes when the finished capybara will be handled by a child under three.
Abbreviations
- MR — magic ring
- sc — single crochet
- inc — two single crochet stitches in one stitch
- dec — invisible single crochet decrease
- sl st — slip stitch
- ch — chain
- hdc — half double crochet
- dc — double crochet
- BLO — back loop only
- FLO — front loop only
An invisible decrease is worked through the front loops of the next two stitches before completing one single crochet through both loops.
Pattern — Step by Step
Work in a continuous spiral unless a joined round or row is specified. Place a stitch marker in the first stitch and move it only after checking the total for the completed round.
Head
Yarn: warm caramel brown — Source: original six-stitch amigurumi arithmetic.
R1: 6 sc in MR (6)
R2: inc ×6 (12)
R3: (sc, inc) ×6 (18)
R4: (2 sc, inc) ×6 (24)
R5: (3 sc, inc) ×6 (30)
R6: (4 sc, inc) ×6 (36)
R7: (5 sc, inc) ×6 (42)
R8–R13: sc around (42)
R14: (5 sc, dec) ×6 (36)
R15: (4 sc, dec) ×6 (30)
R16: (3 sc, dec) ×6 (24)
R17: (2 sc, dec) ×6 (18)
R18: (sc, dec) ×6 (12)
R19: dec ×6 (6)
Insert the 12 mm safety eyes between R10 and R11 with approximately nine visible stitches between the posts. Begin stuffing after R14, working small pieces around the eye washers before filling the center.
Fasten off. Leave a 25 cm tail and draw it through the six remaining front loops.
Body
Yarn: warm caramel brown — Source: original 42-stitch large-body arithmetic.
R1: 6 sc in MR (6)
R2: inc ×6 (12)
R3: (sc, inc) ×6 (18)
R4: (2 sc, inc) ×6 (24)
R5: (3 sc, inc) ×6 (30)
R6: (4 sc, inc) ×6 (36)
R7: (5 sc, inc) ×6 (42)
R8–R15: sc around (42)
R16: (5 sc, dec) ×6 (36)
R17–R18: sc around (36)
R19: (4 sc, dec) ×6 (30)
R20: sc around (30)
R21: (3 sc, dec) ×6 (24)
R22: (2 sc, dec) ×6 (18)
R23: (sc, dec) ×6 (12)
R24: dec ×6 (6)
Pack R1–R16 firmly enough to create the rounded seated base. Reduce the stuffing pressure near R21–R24 so the top remains slightly compressible beneath the head.
Fasten off. Leave a 35 cm sewing tail and close the final opening.
Muzzle
Yarn: dark chocolate brown — Source: original broad capybara muzzle construction.
R1: 6 sc in MR (6)
R2: inc ×6 (12)
R3: (sc, inc) ×6 (18)
R4: (2 sc, inc) ×6 (24)
R5: (3 sc, inc) ×6 (30)
R6–R8: sc around (30)
R9: (3 sc, dec) ×6 (24)
Add stuffing only to the front two-thirds. Flatten the 24-stitch opening into a broad horizontal oval before placing it beneath the eyes.
Fasten off. Leave a 35 cm sewing tail.
Arms / Front Legs (Make 2)
Yarn: begin with dark chocolate brown, then change to warm caramel.
R1: 6 sc in MR with dark brown (6)
R2: inc ×6 (12)
R3–R5: sc around (12)
R6: change to caramel, BLO sc around (12)
R7–R11: sc around (12)
Stuff the dark paw section moderately. Keep R7–R11 lightly filled so each arm can bend inward around the orange.
Fasten off. Leave a 25 cm sewing tail.
Back Legs and Feet (Make 2)
Yarn: begin with dark chocolate brown, then change to warm caramel.
R1: 6 sc in MR with dark brown (6)
R2: inc ×6 (12)
R3: (sc, inc) ×6 (18)
R4–R6: sc around (18)
R7: change to caramel, BLO sc around (18)
R8: (sc, dec) ×6 (12)
R9–R10: sc around (12)
R11: dec ×6 (6)
Stuff through R8. Concentrate most of the filling in the dark foot section and leave the ankle slightly softer.
Fasten off. Leave a 25 cm tail and close the remaining stitches.
Ears (Make 2)
Yarn: dark chocolate brown — small-ear proportion based on the supplied capybara.
R1: 6 sc in MR (6)
R2: inc ×6 (12)
R3: sc around (12)
R4: dec ×6 (6)
Do not stuff. Flatten each ear lightly and fold the base by approximately 5 mm before sewing.
Fasten off. Leave an 18 cm tail.
Cheek Patches (Make 2)
Yarn: blush pink — Source: standard flat-circle construction.
R1: 6 sc in MR (6)
R2: inc ×6 (12)
Do not stuff. Flatten each patch completely.
Join with a sl st. Fasten off and leave a 15 cm sewing tail.
Orange
Yarn: bright orange — Source: original six-stitch sphere arithmetic.
R1: 6 sc in MR (6)
R2: inc ×6 (12)
R3: (sc, inc) ×6 (18)
R4: (2 sc, inc) ×6 (24)
R5–R8: sc around (24)
R9: (2 sc, dec) ×6 (18)
R10: (sc, dec) ×6 (12)
R11: dec ×6 (6)
Stuff firmly after R9. Before closing, press the beginning and ending points slightly toward one another to create shallow fruit indentations.
Fasten off. Leave a 25 cm tail and close the remaining six stitches.
Orange Stem
Yarn: leaf green.
R1: 6 sc in MR (6)
R2–R3: sc around (6)
Do not stuff. Flatten the final round before attaching it to the top indentation.
Fasten off. Leave a 15 cm tail.
Orange Leaves (Make 2)
Yarn: leaf green — Source: original flat-leaf construction.
Row 1: ch 7
Row 2: starting in second ch from hook: sl st, sc, hdc, dc, hdc, sc; work 2 sc into the final chain, then continue along the opposite side with sc, hdc, dc, hdc, sc, sl st.
Pinch the foundation chain gently along the center so the leaf develops a shallow central ridge.
Fasten off. Leave a 15 cm sewing tail.
Nose and Mouth
Yarn: black embroidery floss.
Place the nose near the upper center of the dark muzzle and work three to four horizontal stitches across approximately two crochet stitches. Bring the floss downward from the nose center for about 8 mm, then make two shallow curved stitches to create the split mouth visible in the reference image.
Secure the embroidery behind the muzzle and bury the thread ends inside the stuffing.
Assembly
- Center the head over the body and pin it at four quarter points before sewing through one head stitch and one body stitch at a time.
- Position the dark muzzle below the safety eyes, with its upper edge near the lower half of the eye line, then sew around the complete 24-stitch opening.
- Embroider the nose and mouth, then sew the pink cheek patches beside the muzzle at matching heights.
- Attach the arms to the upper body with approximately four body stitches between their inner edges and both dark paws angled toward the center.
- Pin the back legs low on the body and place the capybara on a level surface before tightening either attachment seam.
- Sew the tiny ears near the crown around head R5–R7, keeping them closer to the center than a bear-ear placement.
- Attach the green stem to the orange’s top indentation and sew the two leaves beside it at slightly different angles.
- Place the orange between the paws so its center sits directly below the muzzle and test whether both arms contact the fruit without being pulled forward.
- Secure the orange to each dark paw with hidden orange stitches and add one concealed fixing stitch from the back of the fruit into the upper belly.
- Weave every structural yarn tail through at least 4 cm of dense crochet, reverse direction once and trim only after the tail retracts below the plush surface.
The completed capybara should remain seated on its lower body and two feet while the orange rests against the torso without carrying the weight of the arms.
7 Technical Tips
- Bear-like ears: Increasing the ears past 12 stitches makes them too large for capybara proportions. Keep the finished ear diameter near 2–2.5 cm and mount each one close to the crown.
- Compressed muzzle: Overstuffing all nine muzzle rounds turns the broad snout into a ball. Concentrate the stuffing in the front two-thirds and leave the 24-stitch sewing edge flexible.
- Visible decrease gaps: Thick chenille can expose stuffing around conventional decreases. Work every decrease through the two front loops and keep its tension equal to the neighboring single crochet stitches.
- Late eye installation: Installing 12 mm washers after R15 leaves limited space inside the head. Fit both eyes after R13 and check approximately nine visible stitches between their posts before decreasing.
- Arm flare: Firm stuffing through all 11 arm rounds pushes the paws away from the orange. Stop dense filling after R5 and leave the caramel upper section compressible.
- Unstable seated base: Sewing one foot permanently before positioning the second can tilt the body by 5–10 mm. Pin both feet, set the capybara on a hard surface and compare their front edges first.
- Loose fruit attachment: Sewing the orange only to the outer paw stitches allows it to sag. Pass each fixing stitch through the fruit wall, inner paw surface and at least 5 mm of the underlying torso fabric.
Conclusion
Check the muzzle width before securing the orange because both elements sit on the same vertical center line and any rotation becomes immediately visible. Next, place the completed capybara on a level surface and photograph the front, side and three-quarter views before trimming the structural tails. Those angles expose uneven feet, oversized ears or a fruit that pulls one arm forward. Share the finished capybara amigurumi crochet pattern project on Pinterest with a vertical photograph, then post the orange-and-paws detail on Instagram using #OrangeCapybaraAmigurumi. For this capybara specifically, would you keep the bright orange shown here or replace the fruit with a small crocheted yuzu?









