Introduction
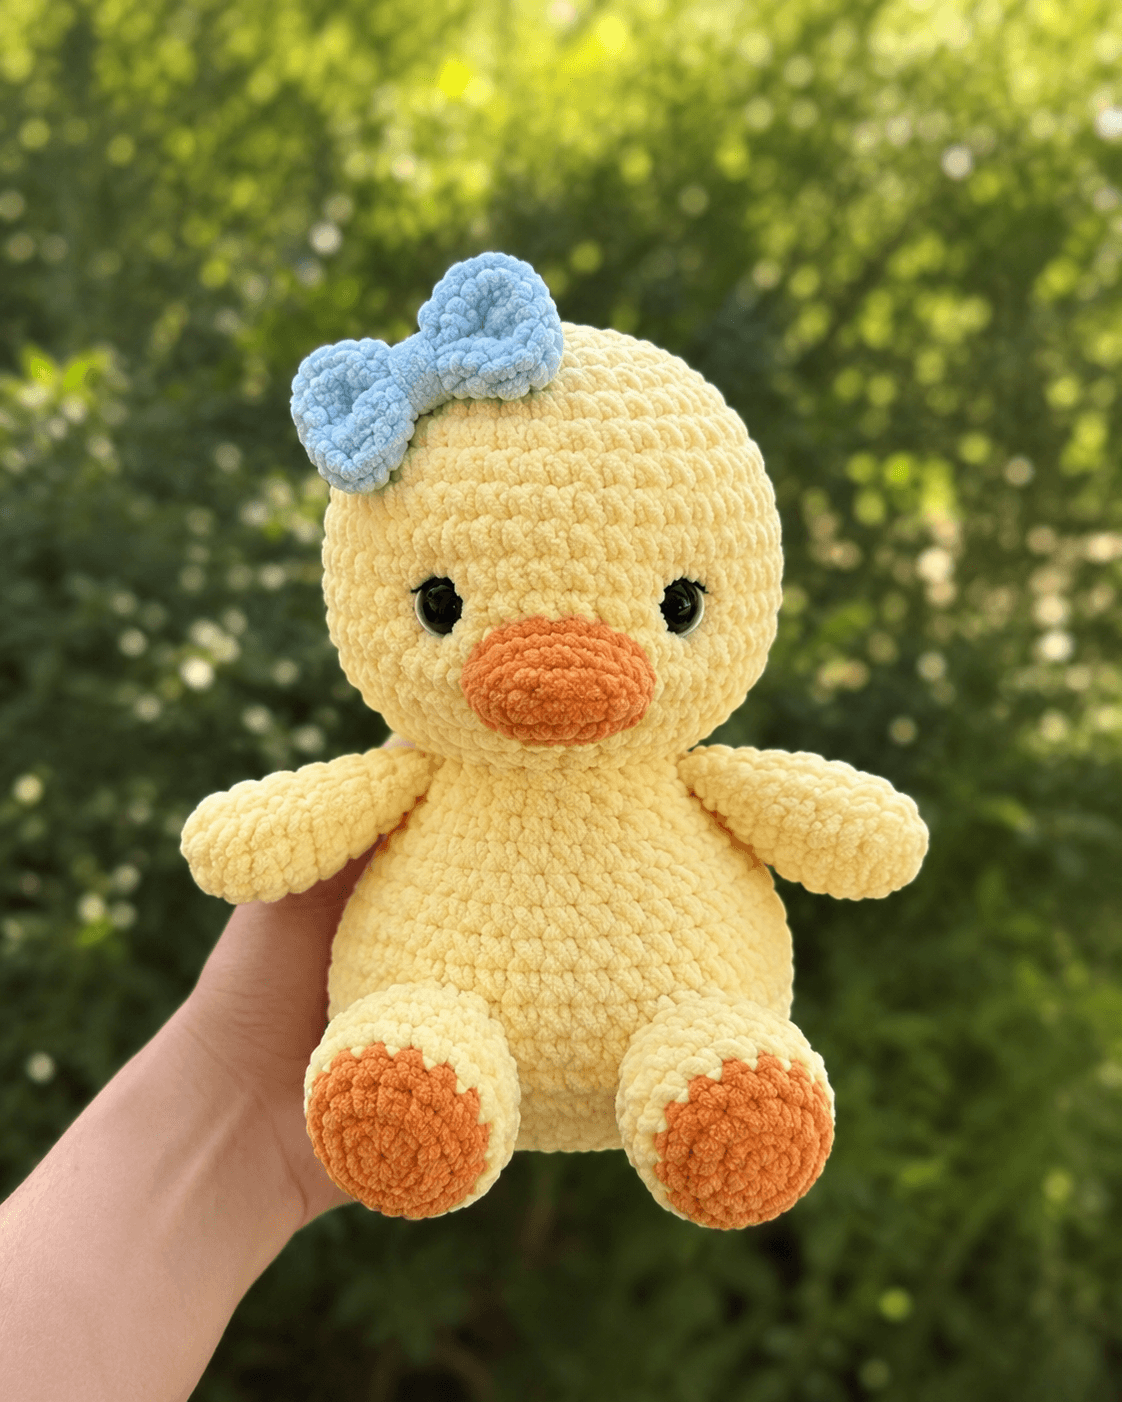
A duck’s bill has to stay wider than its muzzle or the finished face starts reading as a chick. This duck amigurumi crochet pattern uses super-bulky chenille, a 5 mm hook and a 42-stitch head to reproduce the photographed yellow duckling at about 23–25 cm seated. The construction is intermediate and includes a broad orange beak, forward-facing feet, short wings and an oversized powder-blue bow.
The Design: What Makes This Bow Duck Different
The head and body both reach 42 stitches, but their plateau lengths differ. Seven plain head rounds produce the large spherical face, while the body begins tapering earlier to create a pear-shaped sitting form. The feet are also intentionally oversized. Their orange pads face forward instead of downward, which keeps the yellow duck crochet pattern visually close to the reference and supplies a wide seated base. A separate flattened bill is used rather than a narrow cone because ducks need horizontal width through the beak. The final structural choice is the bow: two lightly stuffed loops sit above the duck’s left eye and offset the otherwise symmetrical head. A frequent mistake with plush duck amigurumi is packing chenille too firmly. Excess stuffing expands the stitch gaps and changes the head from a smooth sphere into a faceted shape.
Project Information at a Glance
| Skill Level | Time | Finished Size | Hook | Best For |
|---|---|---|---|---|
| Intermediate | 7–10 hours | Approximately 23–25 cm seated | 5 mm | Large plush display toy |
A current chenille duck reference made with a 5 mm hook finishes at approximately 23–25 cm in a seated position. Published plush-duck patterns also pair 5 mm hooks with bulky or super-bulky chenille and 14 mm safety eyes, making those measurements suitable reference points for this photo-matched construction.
Materials and Tools
Yarn
- Butter yellow — super-bulky chenille/velvet — approximately 100–150 g — Premier Parfait Chunky, Himalaya Dolphin Baby or similar
- Orange — matching chenille — approximately 15–20 g — beak and foot pads
- Powder blue — matching chenille — approximately 10–15 g — bow
Tools
- 5 mm crochet hook
- Two 14 mm black safety eyes
- Polyester toy stuffing
- Yarn needle suitable for chenille
- Locking stitch marker
- Dressmaking pins
- Scissors
Plastic safety eyes are detachable components. Substitute embroidered eyes when the finished toy will be used by a child who may pull or chew small parts.
Abbreviations
- MR — magic ring
- sc — single crochet
- inc — two single crochet stitches in one stitch
- dec — decrease over two stitches
- sl st — slip stitch
- ch — chain
- BLO — back loop only
- FLO — front loop only
An invisible decrease is worked through the front loops of the next two stitches before completing them together as one single crochet.
Pattern — Step by Step
Work in a continuous spiral unless a section specifies otherwise. Place a marker in the first stitch of every round and confirm the number in brackets before beginning the next round.
Head
Yarn: butter yellow — original six-stitch sphere calculation.
R1: 6 sc in MR (6)
R2: inc × 6 (12)
R3: (sc, inc) × 6 (18)
R4: (2 sc, inc) × 6 (24)
R5: (3 sc, inc) × 6 (30)
R6: (4 sc, inc) × 6 (36)
R7: (5 sc, inc) × 6 (42)
R8–R14: sc around (42)
R15: (5 sc, dec) × 6 (36)
R16: (4 sc, dec) × 6 (30)
Insert the 14 mm eyes between R11 and R12 with approximately nine visible stitches between the stems. Lock the washers before the opening becomes smaller. Begin adding stuffing in small pieces.
R17: (3 sc, dec) × 6 (24)
R18: (2 sc, dec) × 6 (18)
R19: (sc, dec) × 6 (12)
R20: dec × 6 (6)
Fasten off. Leave a 20 cm tail, pass it through the front loops of the remaining six stitches and pull the opening closed.
Body
Yarn: butter yellow — original large oval calculation.
R1: 6 sc in MR (6)
R2: inc × 6 (12)
R3: (sc, inc) × 6 (18)
R4: (2 sc, inc) × 6 (24)
R5: (3 sc, inc) × 6 (30)
R6: (4 sc, inc) × 6 (36)
R7: (5 sc, inc) × 6 (42)
R8–R12: sc around (42)
R13: (5 sc, dec) × 6 (36)
R14: (4 sc, dec) × 6 (30)
R15: (3 sc, dec) × 6 (24)
R16: (2 sc, dec) × 6 (18)
Stuff the bottom and centre to medium-firm density. Keep the final two rounds slightly softer so the neck can compress against the head.
R17: (sc, dec) × 6 (12)
R18: dec × 6 (6)
Fasten off and leave a 40 cm tail for attaching the body to the head.
Wings — Make Two
Yarn: butter yellow.
R1: 6 sc in MR (6)
R2: inc × 6 (12)
R3: (sc, inc) × 6 (18)
R4–R6: sc around (18)
R7: (sc, dec) × 6 (12)
R8–R10: sc around (12)
R11: dec × 6 (6)
Stuff only the rounded lower half. Leave the attachment end unstuffed so it can flatten against the shoulder.
Fasten off and leave a 30 cm sewing tail.
Back Legs — Make Two
Yarn: butter yellow.
R1: 6 sc in MR (6)
R2: inc × 6 (12)
R3: (sc, inc) × 6 (18)
R4: (2 sc, inc) × 6 (24)
R5–R7: sc around (24)
R8: (2 sc, dec) × 6 (18)
R9: sc around (18)
R10: (sc, dec) × 6 (12)
R11: dec × 6 (6)
Stuff firmly through R7. Shape the leg into an oval with its widest section facing forward.
Fasten off and leave a 35 cm tail.
Orange Foot Pads — Make Two
Yarn: orange.
R1: 6 sc in MR (6)
R2: inc × 6 (12)
R3: (sc, inc) × 6 (18)
R4: (2 sc, inc) × 6 (24)
Slip stitch into the next stitch. Fasten off and leave a 30 cm sewing tail.
Keep the pads flat. Stretch them slightly horizontally while pinning them to the front of the yellow feet.
Beak
Yarn: orange.
R1: 6 sc in MR (6)
R2: inc × 6 (12)
R3: (sc, inc) × 6 (18)
R4: (2 sc, inc) × 6 (24)
R5–R6: sc around (24)
R7: (2 sc, dec) × 6 (18)
R8: sc around (18)
Add only a thin layer of stuffing. Flatten the piece strongly from top to bottom so it becomes a broad duck bill instead of a round muzzle.
Fasten off and leave a 35 cm sewing tail.
Optional Cheek Patches — Make Two
Yarn: pale peach or pink. The supplied reference does not show strong cheek patches, so omit these for the closest photo match.
R1: 6 sc in MR (6)
R2: inc × 6 (12)
Slip stitch into the next stitch. Fasten off and leave a 15 cm sewing tail.
Blue Bow Loops — Make Two
Yarn: powder blue.
R1: 6 sc in MR (6)
R2: inc × 6 (12)
R3–R5: sc around (12)
R6: dec × 6 (6)
Add a very small amount of stuffing. Flatten each loop and close the six-stitch end.
Fasten off and leave a 25 cm tail on each piece.
Bow Centre
Yarn: powder blue.
R1: 6 sc in MR (6)
R2–R4: sc around (6)
Fasten off and leave a 25 cm tail. Flatten the small tube and wrap it around the inner ends of both bow loops.
Bow Assembly
Place the two loops with their narrow ends touching. Wrap the centre piece around both ends and stitch through all three layers several times.
The completed bow should measure approximately one-third of the head width. Keep the left loop slightly lower than the right loop to reproduce the angled placement in the photograph.
Assembly
- Pin the head centrally above the body. Sew around the neck twice using the 40 cm body tail, adding a final hidden stitch at the rear to prevent forward rotation.
- Flatten the orange beak and position it across Head R12–R15, centred between the eyes. Sew around its perimeter while retaining the horizontal oval shape.
- Check both safety eyes from directly in front. The beak centre should align with the midpoint between the eye stems.
- Sew one wing to each side across Body R11–R16. Angle the lower ends slightly forward and leave the final third of each wing free from the body.
- Attach each orange foot pad to the front of a yellow back leg. Keep the orange edge approximately one yellow stitch inside the leg perimeter.
- Pin the completed back legs to Body R4–R9 with both orange pads facing directly forward. Test the sitting position on a level surface before tightening either seam.
- If cheek patches are being used, attach them below and slightly outside the eyes. Omit them for the closest match to the photographed duck.
- Assemble the powder-blue bow and position it on the upper-left section of the head across approximately R3–R6. Pin both loops before sewing.
- Sew the bow centre firmly to the head, then add one hidden anchor stitch beneath the outer edge of each loop so the bow does not rotate.
- Inspect the head, wings and feet from the front and both sides. Weave every structural tail through at least three different stitch directions before trimming.
The completed duck should sit on the lower body and both oversized feet while the head remains vertical without rear support.
7 Technical Tips
- Chenille marker loss: The fuzzy pile can hide the first stitch and shift every reduction round. Use a locking marker through the complete stitch and recount all 42 stitches after Head R8, R11 and R14.
- Head overstuffing: Excess filling opens chenille stitches and produces visible gaps. Stop when firm finger pressure creates an indentation of approximately 5 mm rather than packing the sphere rigidly.
- Visible decrease gaps: Conventional decreases can expose stuffing where the plush fibers separate. Work each reduction through the two front loops and keep the working loop no taller than adjacent single crochet stitches.
- Late eye placement: A 14 mm washer is difficult to install after the head opening falls below 24 stitches. Lock both eyes before completing Head R17.
- Beak rotation: Sewing a stuffed oval without pinning can turn one edge upward. Place at least four pins at the top, bottom and both side centres before stitching around the 18-stitch final circumference.
- Uneven foot height: A difference of 5 mm between leg attachments makes the seated duck lean. Pin both legs simultaneously and test the toy on a hard surface before sewing either one permanently.
- Bow droop: Attaching only the centre allows heavy chenille loops to rotate forward. Add one hidden anchoring stitch beneath each loop approximately 2 cm from the bow centre.
Getting the Head Proportions Right
The head dominates this duckling crochet pattern, so shortening its plateau changes the character immediately. Seven rounds at 42 stitches produce enough vertical depth for the eyes and broad beak without turning the face into a flat disc. The reduction sequence then contracts by six stitches per shaping round until the opening reaches six.
Keep the eye line slightly above the vertical centre of the head. The photographed duck has substantial forehead space above the eyes, partly because the blue bow occupies the upper-left area. Raising the eyes another round would leave too little room between the safety-eye rim and accessory.
View the stuffed head from above before closing it. The left and right sides should have equal curvature. Redistribute the stuffing with the blunt end of the hook when one side projects farther than the other.
Shaping the Broad Duck Beak
A duck bill needs horizontal width. The 24-stitch beak therefore reaches a relatively large circumference but receives very little stuffing. Once flattened, its width is considerably greater than its height.
Pin the beak before closing the head if you want the strongest control over placement. Its upper edge should fall below the eye stems, while the centre remains directly on the facial vertical axis. Do not pull the sewing thread hard enough to bury the upper edge into the yellow head.
If the orange piece continues to round outward, remove some stuffing rather than tightening the seam. The bill should project from the face while retaining a broad flattened front profile.
Making the Forward-Facing Feet
The feet are proportionally large in the reference image and form a major part of the seated silhouette. Each yellow leg reaches 24 stitches before reducing, giving enough surface area for a separate 24-stitch orange pad.
Sew the orange circles onto the legs before attaching the legs to the body. That order allows the yarn needle to pass freely through the yellow fabric and makes it easier to keep both pads at matching angles.
Rotate the legs until the orange circles face the camera when the duck sits upright. If the pads point partly downward, move the upper leg attachment higher on the body instead of twisting the stuffed foot.
Working with Chenille Yarn
Published plush duck patterns use bulky or super-bulky chenille with hooks around 5 mm, and several current designs pair that construction with 14 mm safety eyes. The fibers hide minor stitch irregularities but can also conceal missed stitches and make magic rings difficult to tighten.
Use a smooth scrap yarn as a reinforcing strand inside the initial magic ring if the chenille core breaks easily. The reinforcement stays inside the finished piece and takes the pulling force when the ring closes.
A stitch marker matters more with plush yarn than with smooth cotton because the top loops can disappear inside the pile. Count every shaping round independently rather than relying only on the visual position of the marker.
Bow Placement and Scale
The blue bow is not centred on top of the head. Its centre sits toward the duck’s left side, with the loops spreading across the upper forehead. That asymmetry keeps both safety eyes unobstructed.
Make the loops lightly filled. Dense stuffing makes each one spherical and turns the accessory into two blue balls. A flattened loop should maintain its outline while compressing easily between two fingers.
Pin the completed accessory before sewing. The inner lower edge can overlap the upper head by several rounds, but no part of the bow should reach the eye rim. Move it upward when the left loop visually crowds the eye.
Adjusting the Finished Size
A current super-bulky chenille duck made with a 5 mm hook finishes around 23–25 cm seated, which provides a useful target for this construction. Changing chenille brand can still alter the final measurement because nominal yarn categories contain different strand diameters.
For a smaller duck, retain the stitch counts and switch to bulky chenille with a 4–4.5 mm hook. Recheck the safety-eye diameter after completing Head R14 rather than automatically retaining 14 mm eyes.
To make a larger version, use thicker chenille and a hook that produces closed fabric. Do not add extra increase rounds unless the goal is to change the proportions as well as the overall scale.
Finishing Checks
Place the completed duck on a hard, level surface. Both orange foot pads should face forward at matching angles, and the body should touch the surface between them without leaning to either side.
Next, examine the face from directly in front. The bill should be centred below the eyes, and its width should extend well beyond the space between the two eye stems. Correct any tilt before hiding the orange sewing tail.
Check the bow last. Both loops need visible separation from the yellow head, while the centre remains fixed tightly enough that the accessory cannot rotate around one attachment point.
Conclusion
Measure the completed duck from the seated base to the top of the head before making another version, then record the yarn, hook and eye combination beside that measurement. Photograph the face directly from the front as the next technical check; this exposes uneven feet, a rotated bill or a bow that sits too close to one eye. Save this duck amigurumi crochet pattern to Pinterest and share the finished plush on Instagram with #BlueBowDuckling. Keep the orange pads facing forward when photographing the seated figure. For the next duck, would you keep the powder-blue bow above the left eye or move it to the opposite side?
Sources
- Ravelry — Duck Friends by Tidzhen Gyuldzhu: super-bulky chenille/velvet, 5 mm hook and 14 mm safety eyes.
- Ravelry — Mr. Quack, the Duck by Susanne Grünes: bulky chenille, 5 mm hook and 14 mm eyes.
- Amigurumis Crochet — 2026 chenille duck reference: approximately 23–25 cm seated with a 5 mm hook.
- Ravelry — Easy Amigurumi Duck by Kseniia Semeliak: approximately 23 cm high with 100 g bulky chenille listed among the materials.









