Introduction
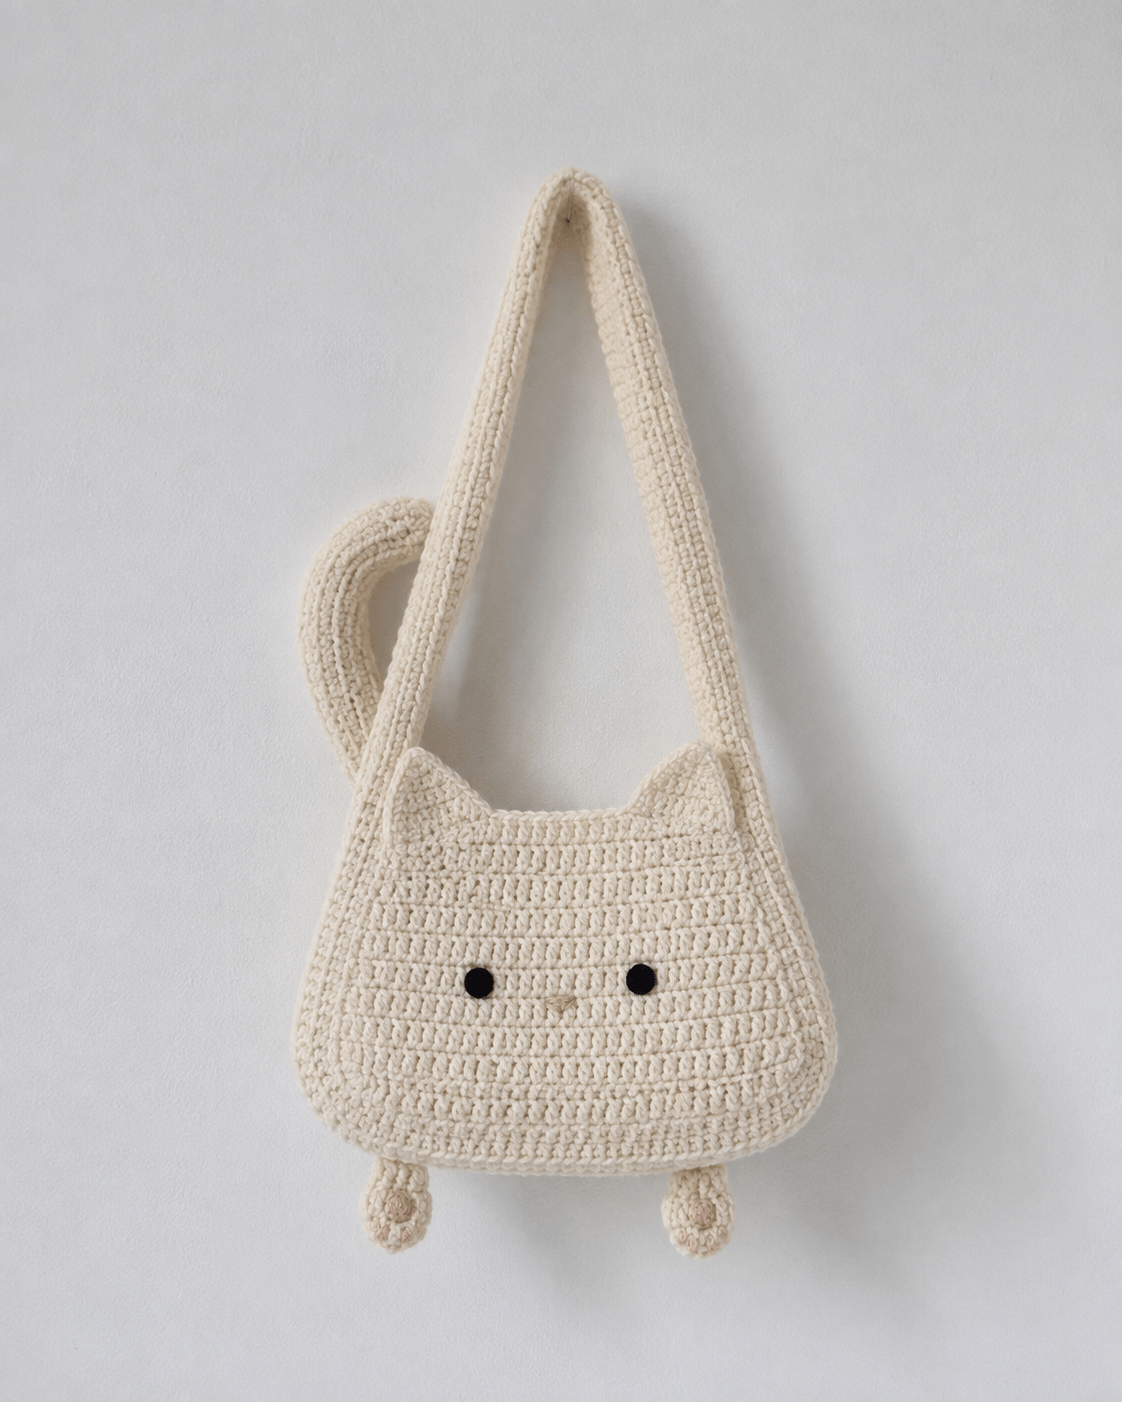
A cat’s ears have to rise above this bag opening without becoming weak points where the shoulder strap pulls. This cat crochet bag pattern uses DK cotton, a 3 mm hook and a two-panel construction to make a rounded cream cat purse approximately 29 × 32 cm. The intermediate project combines a reinforced strap, triangular ears, dangling paws and a separate curved tail in one functional design.
The Design: What Makes This Cat Bag Different
The pouch itself forms the cat’s head and body silhouette, so no rectangular tote is hidden behind an appliqué. Two matching panels widen through the lower half and narrow near the opening, creating the rounded cheeks visible in the reference image. Triangular ears are attached directly to the upper corners, while the shoulder strap overlaps those structural areas rather than pulling on the center opening. The tail is made separately and curved before attachment, which distinguishes this cat shoulder bag crochet pattern from flat graphic totes. Two narrow legs with small paws hang below the body as decorative elements and carry no load. A frequent mistake in a kitty crochet bag is making the top edge as wide as the bottom. That removes the rounded feline profile and places excessive tension on the ear bases when the bag is carried.
Project Info at a Glance
| Skill Level | Time | Finished Size | Hook | Best For |
|---|---|---|---|---|
| Intermediate | 8–10 hours | Approximately 29 × 32 cm body | 3 mm | Light everyday items, phone, small wallet and accessories |
Materials and Tools
Yarn
- Natural cream — DK / 8-ply cotton or cotton blend — approximately 140–170 g — select a tightly twisted yarn with limited stretch.
- Black — DK cotton or embroidery yarn — under 5 g — used for both eyes.
- Pale beige-pink — DK cotton — approximately 2–3 g — optional paw-pad detail.
Tools
- 3 mm crochet hook
- 10–12 mm black safety eyes or black buttons
- Yarn needle
- Locking stitch markers
- Dressmaking pins
- Scissors
- Measuring tape
- Optional cotton lining fabric
- Optional magnetic snap or zipper
Use embroidered or crocheted eyes instead of detachable fittings when the bag is intended for a young child.
Abbreviations
- ch — chain
- sc — single crochet
- inc — two single crochet stitches in one stitch
- dec — decrease two stitches to one
- sl st — slip stitch
- hdc — half double crochet
- dc — double crochet
- st — stitch
- sts — stitches
- BLO — back loop only
For panel decreases, work through the front loops of the next two stitches before completing one single crochet so the shaped edge stays flatter.
Pattern — Step by Step
The main pouch consists of two matching panels worked in rows. Turning chains do not count as stitches. Count the working stitches after every increase or decrease row.
Front Cat Body Panel
Yarn: natural cream — Original flat-panel shaping.
Row 1: ch 53, sc in second ch from hook and across (52)
Row 2: ch 1, turn, sc across (52)
Row 3: ch 1, turn, inc, 50 sc, inc (54)
Row 4: ch 1, turn, sc across (54)
Row 5: ch 1, turn, inc, 52 sc, inc (56)
Row 6: ch 1, turn, sc across (56)
Row 7: ch 1, turn, inc, 54 sc, inc (58)
Row 8: ch 1, turn, sc across (58)
Row 9: ch 1, turn, inc, 56 sc, inc (60)
Row 10: ch 1, turn, sc across (60)
Row 11: ch 1, turn, inc, 58 sc, inc (62)
Row 12: ch 1, turn, sc across (62)
Row 13: ch 1, turn, inc, 60 sc, inc (64)
Rows 14–18: ch 1, turn, sc across (64)
Row 19: ch 1, turn, dec, 60 sc, dec (62)
Row 20: ch 1, turn, sc across (62)
Row 21: ch 1, turn, dec, 58 sc, dec (60)
Row 22: ch 1, turn, sc across (60)
Row 23: ch 1, turn, dec, 56 sc, dec (58)
Row 24: ch 1, turn, sc across (58)
Row 25: ch 1, turn, dec, 54 sc, dec (56)
Row 26: ch 1, turn, sc across (56)
Row 27: ch 1, turn, dec, 52 sc, dec (54)
Row 28: ch 1, turn, sc across (54)
Row 29: ch 1, turn, dec, 50 sc, dec (52)
Rows 30–32: ch 1, turn, sc across (52)
The lower edge should remain broad while the final 52-stitch upper edge curves inward slightly. Do not block the panel wider than its natural dimensions.
Fasten off. Leave a 45 cm tail for joining.
Back Cat Body Panel
Yarn: natural cream — Repeat the front-panel calculation.
Work Rows 1–32 exactly as written for the front panel, finishing with 52 stitches.
Place the two pieces on a flat surface before assembly. Every increase and decrease point should line up when the panels are stacked.
Fasten off. Leave a 45 cm joining tail.
Left Ear
Yarn: natural cream — Original triangular row construction.
Row 1: ch 17, sc in second ch from hook and across (16)
Row 2: ch 1, turn, dec, 12 sc, dec (14)
Row 3: ch 1, turn, sc across (14)
Row 4: ch 1, turn, dec, 10 sc, dec (12)
Row 5: ch 1, turn, sc across (12)
Row 6: ch 1, turn, dec, 8 sc, dec (10)
Row 7: ch 1, turn, dec, 6 sc, dec (8)
Row 8: ch 1, turn, dec, 4 sc, dec (6)
Row 9: ch 1, turn, dec, 2 sc, dec (4)
Row 10: ch 1, turn, dec ×2 (2)
Row 11: ch 1, turn, dec (1)
Keep the final point slightly rounded rather than pulling the last stitch tightly into a sharp peak.
Fasten off. Leave a 25 cm sewing tail.
Right Ear
Yarn: natural cream.
Repeat Rows 1–11 of the left ear exactly.
Fasten off. Leave a 25 cm sewing tail.
Eye Patches (Make 2)
Yarn: black — Use these instead of plastic fittings when a fully crocheted bag is preferred.
R1: 6 sc in MR (6)
R2: inc ×6 (12)
For the smaller dot-eye effect shown in the photograph, stop after R1 when the circle measures approximately 10–12 mm.
Join with a sl st. Fasten off and leave a 15 cm sewing tail.
Shoulder Strap
Yarn: natural cream — Original reinforced strap construction.
Row 1: ch 9, sc in second ch from hook and across (8)
Rows 2–150: ch 1, turn, sc across (8)
Measure the strap before fastening off. At the target gauge, it should provide approximately a 70–80 cm usable shoulder drop once both attachment sections are overlapped with the bag.
Fasten off. Leave a 60 cm tail.
Strap Reinforcement
Yarn: natural cream.
Join yarn to one lower corner of the strap. Sl st evenly along the complete long edge, work 3 sl st around the top corner, then continue down the second long edge.
Keep the slip stitches firm but do not gather the strip. This edging limits longitudinal stretch when the bag carries weight.
Fasten off and weave the tail into the strap.
Tail
Yarn: natural cream — Original curved flat-strip construction.
Row 1: ch 43, sc in second ch from hook and across (42)
Row 2: ch 1, turn, 12 sc, hdc inc ×6, 24 sc (48)
Row 3: ch 1, turn, 24 sc, hdc inc ×6, 18 sc (54)
Row 4: ch 1, turn, sc across (54)
The concentrated increases create the bend visible in the reference tail. The strip should curve naturally without being wired or stuffed.
Fasten off. Leave a 30 cm tail for attachment.
Hanging Legs (Make 2)
Yarn: natural cream.
Row 1: ch 11, sc in second ch from hook and across (10)
Row 2: ch 1, turn, sc across (10)
Row 3: ch 1, turn, sc across (10)
These pieces are decorative and should remain flat.
Fasten off. Leave a 20 cm tail at the top.
Paws (Make 2)
Yarn: natural cream — Standard six-stitch flat-circle shaping.
R1: 6 sc in MR (6)
R2: inc ×6 (12)
R3: (sc, inc) ×6 (18)
Fold the circle slightly along its vertical axis to form the narrow oval paw visible beneath the bag.
Join with a sl st. Fasten off and leave a 20 cm sewing tail.
Paw Pads (Make 2)
Yarn: pale beige-pink.
R1: 6 sc in MR (6)
Close the ring firmly and flatten the circle before sewing it to the lower center of each paw.
Fasten off. Leave a 12 cm tail.
Optional Inner Pocket
Yarn: natural cream.
Row 1: ch 27, sc in second ch from hook and across (26)
Rows 2–17: ch 1, turn, sc across (26)
Attach three edges to the inside of the back panel before the front and back are joined.
Fasten off. Leave a 40 cm sewing tail.
Optional Top Closure Loop
Yarn: natural cream.
Ch 12, sl st in second ch from hook and across (11).
Fold the strip into a loop and sew both ends to the inside center of the back panel. Match the loop to a button attached inside the front panel.
Fasten off and secure both ends through several stitches.
Assembly
- Stack the front and back panels with their row edges aligned, then mark the center stitch of the bottom and both upper corners.
- Join the panels from the left upper corner down the side, across the complete lower edge and up the opposite side, leaving the 52-stitch top opening unsewn.
- Position the two black eyes on the front panel approximately one-third of the way down from the opening and space them symmetrically from the center line.
- Sew one triangular ear behind each upper corner, placing approximately 6–7 cm of the ear base against the body panel.
- Overlap the first 5 cm of the shoulder strap with the left upper side and stitch a reinforced rectangle through the strap and both bag layers; repeat at the right side.
- Curve the tail upward behind the left side of the bag and sew its lower 5 cm securely to the back panel without catching the front layer.
- Attach the two hanging legs to the lower seam, spacing them evenly on either side of the body center.
- Sew one cream paw to each leg, then place the optional beige-pink pad in the lower center of the paw.
- If a fabric lining is being used, construct it separately with approximately 1.5 cm seam allowance and hand-sew the upper edge beneath the crochet opening.
- Weave the strap, tail and seam tails through at least 5 cm of dense crochet, reverse direction once and load-test the finished bag before trimming the final structural tails.
The finished cat bag should hang with both ears upright, the lower body level and the curved tail remaining behind the pouch rather than folding across the opening.
7 Technical Tips
- Panel mismatch: Missing one edge increase shifts the side seam and produces a visibly lopsided cat face. Count 64 stitches after Row 13 and confirm that both panels return to exactly 52 stitches by Row 29.
- Stretching strap: Loose single crochet can lengthen noticeably once a phone and wallet are added. Work the strap firmly, add the slip-stitch edging and test the length with approximately 500 g of temporary load before final attachment.
- Collapsing ears: Attaching only the center of the ear base allows both corners to curl forward. Sew across the complete 6–7 cm base and pass the final stitches through the body seam area for additional support.
- Uneven eye placement: A difference of one full crochet row is visible on a minimalist face with no nose or mouth. Pin both eyes first and measure each center from the upper opening and nearest side edge before sewing.
- Distorted opening: Over-tight seam stitches can pull the two upper corners inward. Check that the 52-stitch front and back edges remain equal in width before attaching the strap.
- Rotated tail: Sewing the entire tail flat eliminates the curved silhouette. Secure only the lower approximately 5 cm and leave the remaining length free so its increases can hold the upward arc.
- Weak structural tails: A short woven end can migrate out where the shoulder strap flexes. Leave at least 50–60 cm at each primary strap join and weave the remainder for a minimum of 5 cm before reversing direction.
Conclusion
Load-test the shoulder strap before trimming its attachment tails because the long handle is the highest-stress part of this design. Next, hang the bag from a hook with approximately 500 g inside and compare the two ear bases, side seams and bottom edge after ten minutes. Any asymmetric stretch should be corrected before a lining or closure is added. Photograph the completed cat crochet bag pattern vertically for Pinterest, then share a close view of the ears and curved tail on Instagram using #CreamCatShoulderBag. For this particular cat silhouette, would you keep the face limited to two black eyes or add a small embroidered nose and whiskers?









