Introduction
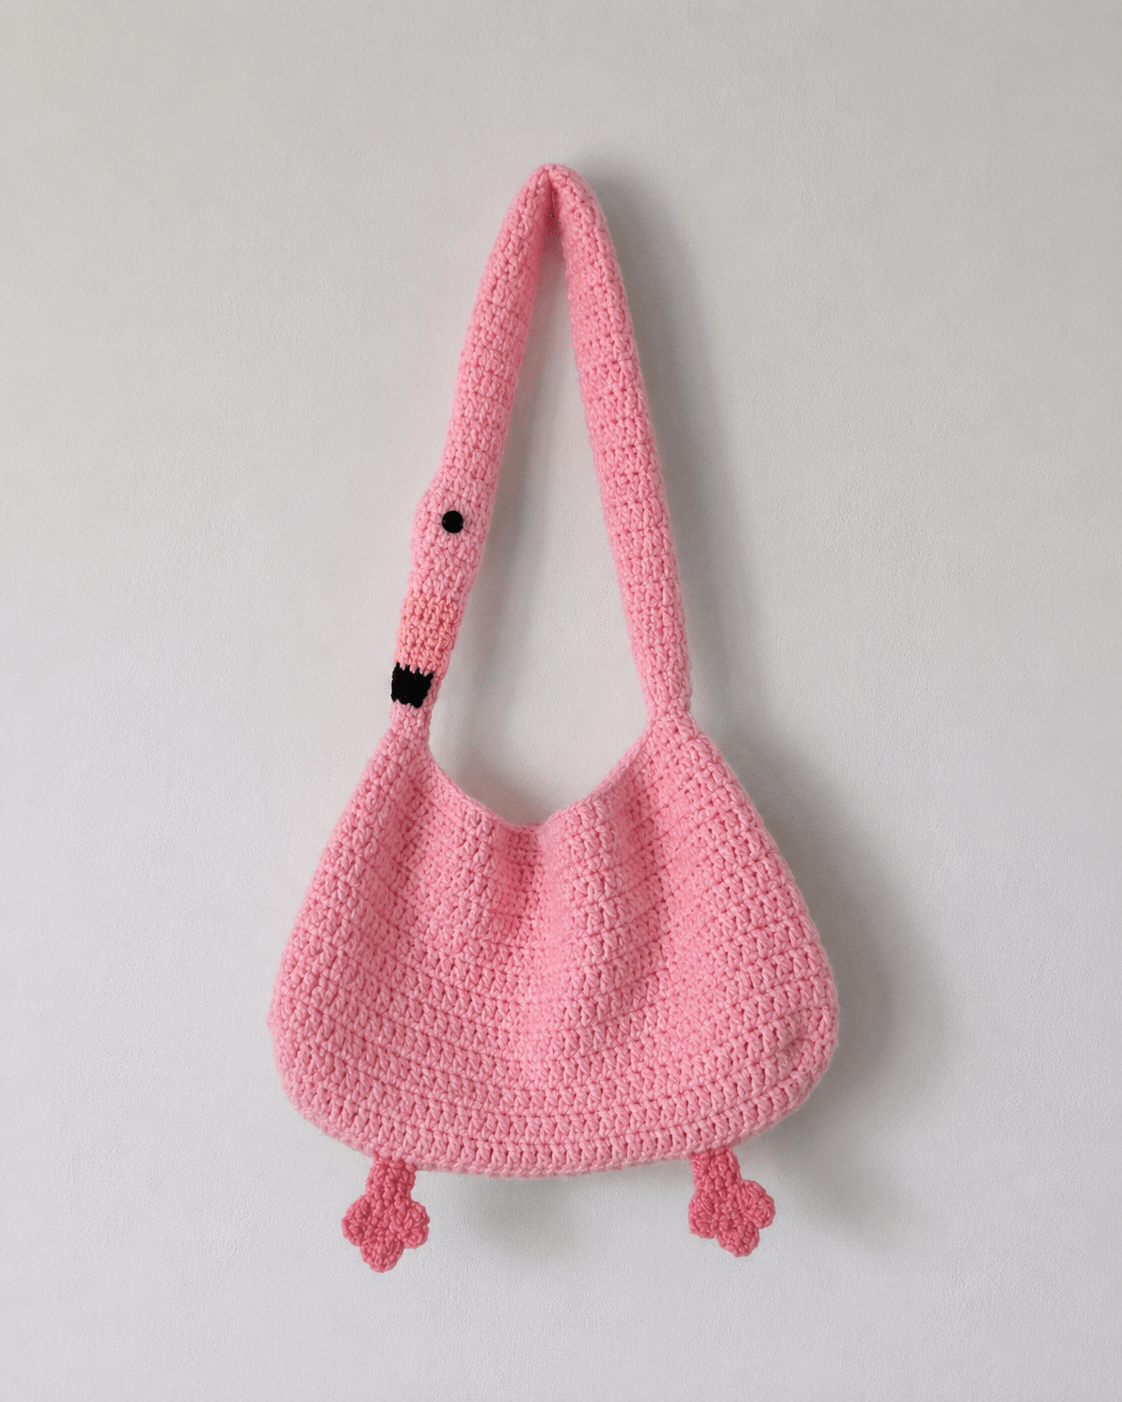
A flamingo’s neck is normally the least practical part of its anatomy; here it has to carry the entire bag. This flamingo crochet bag pattern turns that long pink neck into the shoulder handle while the rounded bird body becomes the storage compartment. Sport or DK cotton, a 3 mm hook and approximately 120–150 g of pink yarn produce a medium-sized intermediate project suitable for everyday lightweight items.
The Design: What Makes This Flamingo Bag Different
The defining structural decision is the neck handle. Instead of attaching an unrelated strap above a bird motif, the flamingo’s neck continues upward from one side of the pouch, loops over the shoulder and returns to the opposite side. A slightly widened section near the left attachment point creates the head and gives enough room for the eye and black beak marking. The body uses two shaped panels rather than a stuffed sphere, keeping the crochet flamingo purse flat enough to function as a bag. Two small legs hang from the bottom seam without supporting any weight. One common error with a flamingo shoulder bag crochet pattern is making the neck too elastic. A loose handle stretches under the contents and distorts the head, so the strap should be worked tightly and reinforced along its edges.
Project Info at a Glance
| Skill Level | Time | Finished Size | Hook | Best For |
|---|---|---|---|---|
| Intermediate | 7–10 hours | Approximately 29 × 32 cm body | 3 mm | Light everyday items, summer accessories and novelty bags |
Materials and Tools
Yarn
- Bubblegum pink — sport or DK cotton/cotton blend — approximately 120–150 g — choose a firm, tightly twisted yarn with limited stretch.
- Black — matching yarn weight — approximately 3–5 g — required for the beak marking and optional crocheted eye.
Tools
- 3 mm crochet hook
- 8–10 mm black safety eye, button or crocheted eye
- Yarn needle
- Locking stitch markers
- Dressmaking pins
- Scissors
- Optional cotton lining fabric
- Optional magnetic snap
The eye is decorative rather than structural. For a bag intended for a young child, use an embroidered or crocheted eye instead of a detachable button or safety-eye fitting.
Abbreviations
- ch — chain
- sc — single crochet
- inc — two single crochet stitches in one stitch
- dec — single crochet decrease
- sl st — slip stitch
- hdc — half double crochet
- st — stitch
- sts — stitches
- BLO — back loop only
For the shaped panel decreases, work an invisible decrease through the front loops when possible so the narrowing edge remains flatter than a conventional sc2tog.
Pattern — Step by Step
The bag body is made from two matching flat panels. Work turning chains loosely and do not count the turning chain as a stitch unless specifically stated.
Front Bag Panel
Yarn: bubblegum pink — Original panel construction sized around a 60-stitch lower width.
Row 1: ch 61, sc in second ch from hook and across (60)
Row 2: ch 1, turn, sc across (60)
Row 3: ch 1, turn, inc, 58 sc, inc (62)
Row 4: ch 1, turn, sc across (62)
Row 5: ch 1, turn, inc, 60 sc, inc (64)
Rows 6–12: ch 1, turn, sc across (64)
Row 13: ch 1, turn, dec, 60 sc, dec (62)
Row 14: ch 1, turn, sc across (62)
Row 15: ch 1, turn, dec, 58 sc, dec (60)
Row 16: ch 1, turn, sc across (60)
Row 17: ch 1, turn, dec, 56 sc, dec (58)
Row 18: ch 1, turn, sc across (58)
Row 19: ch 1, turn, dec, 54 sc, dec (56)
Row 20: ch 1, turn, sc across (56)
Row 21: ch 1, turn, dec, 52 sc, dec (54)
Row 22: ch 1, turn, sc across (54)
Row 23: ch 1, turn, dec, 50 sc, dec (52)
Row 24: ch 1, turn, sc across (52)
Row 25: ch 1, turn, dec, 48 sc, dec (50)
Row 26: ch 1, turn, sc across (50)
Row 27: ch 1, turn, dec, 46 sc, dec (48)
Rows 28–31: ch 1, turn, sc across (48)
The finished panel should form a broad rounded lower section with a narrower top opening. Steam-block only if the yarn manufacturer permits it; excessive heat can permanently flatten synthetic blends.
Fasten off. Leave a 40 cm tail for joining.
Back Bag Panel
Yarn: bubblegum pink.
Repeat Rows 1–31 of the front panel exactly, finishing with 48 stitches across the upper edge.
Lay both panels together before continuing. Their row counts and upper widths must match before the side seams are joined.
Fasten off and leave a 40 cm joining tail.
Upper Opening Edging
Yarn: bubblegum pink.
With one panel facing you, attach yarn at the upper corner and work 48 sc evenly across the top edge (48). Repeat for the second panel.
Work one additional row of BLO sc across each upper edge (48).
The BLO ridge adds structure where the contents pull against the opening.
Fasten off and weave the short tails into the wrong side.
Neck Handle
Yarn: bubblegum pink — Original long-strip construction.
Row 1: ch 9, sc in second ch from hook and across (8)
Rows 2–18: ch 1, turn, sc across (8)
Row 19: ch 1, turn, inc, 6 sc, inc (10)
Row 20: ch 1, turn, inc, 8 sc, inc (12)
Rows 21–30: ch 1, turn, sc across (12)
Row 31: ch 1, turn, dec, 8 sc, dec (10)
Row 32: ch 1, turn, dec, 6 sc, dec (8)
Rows 33–115: ch 1, turn, sc across (8)
Rows 19–30 form the wider head area visible near one side of the bag. Rows 33–115 create the long upper neck and opposite side of the handle. Add or remove groups of four rows if a different shoulder drop is required.
Fasten off. Leave a 50 cm tail.
Neck Reinforcement Edge
Yarn: bubblegum pink.
Join yarn at one lower corner of the handle. Work one sl st into the side of every row along the entire first edge, around the top and down the opposite side.
Do not stretch the strip while slip stitching. The reinforced edge should shorten the neck slightly rather than lengthen it.
Fasten off and weave in the tail.
Flamingo Beak Marking
Yarn: black.
The black section is worked over the widened head area rather than as a large stuffed beak.
Row 1: ch 7, sc in second ch from hook and across (6)
Row 2: ch 1, turn, sc across (6)
Row 3: ch 1, turn, dec, 2 sc, dec (4)
Row 4: ch 1, turn, dec ×2 (2)
Position the black patch across the lower third of the widened head section. Angle the two-stitch end slightly toward the inside of the handle loop.
Fasten off. Leave a 20 cm sewing tail.
Eye
Use one black 8–10 mm safety eye or make the following flat crocheted eye.
R1: 6 sc in MR (6)
Join with a sl st and close the magic ring firmly.
Place the eye approximately 2.5–3 cm above the black beak section and slightly toward the outside edge of the head.
Fasten off. Leave a 15 cm sewing tail when using the crocheted version.
Legs (Make 2)
Yarn: bubblegum pink.
Row 1: ch 15, sc in second ch from hook and across (14)
Row 2: ch 1, turn, sc across (14)
Row 3: ch 1, turn, sc across (14)
The legs are intentionally short and decorative. They should not bear the weight of the finished bag.
Fasten off. Leave a 20 cm tail at the upper end.
Three-Toed Feet (Make 2)
Yarn: bubblegum pink.
Row 1: ch 5, sc in second ch from hook and across (4)
Row 2: ch 1, turn, 2 sc, ch 4, sl st back down 3 chains, sl st in next base st, ch 4, sl st back down 3 chains, sl st in next base st, ch 4, sl st back down 3 chains, sc in final base st
Shape the three chain projections outward with the yarn needle so the center toe points downward and the outer toes spread to either side.
Fasten off. Leave an 18 cm tail for joining the foot to the leg.
Optional Inner Pocket
Yarn: bubblegum pink.
Row 1: ch 25, sc in second ch from hook and across (24)
Rows 2–15: ch 1, turn, sc across (24)
Sew the pocket to the inside face of the back panel before joining the main bag seams. Leave the upper edge completely open.
Fasten off. Leave a 35 cm sewing tail.
Assembly
- Place the front and back body panels together with their upper openings aligned and pin both side edges at intervals of approximately 5 cm.
- Join the panels from one upper corner down the first side, across the complete lower edge and up the opposite side with single crochet or mattress stitch, leaving all 48 top stitches open.
- Turn the bag right side out and check that the lower curve is symmetrical before attaching any character details.
- Attach the widened head end of the neck handle to the left upper corner, overlapping the body panel by approximately 4 cm and sewing through both bag layers where possible.
- Bring the long opposite end of the neck upward to form the shoulder loop, then attach its final 4 cm to the right upper corner at the same height as the first connection.
- Sew the black beak patch to Rows 21–27 of the widened head area and place the eye approximately 2.5–3 cm above it.
- Attach one leg beneath the lower seam approximately one-third of the way across the body and position the second leg symmetrically on the opposite side.
- Sew one three-toed foot to the lower end of each leg, keeping the middle toe aligned vertically with the leg strip.
- If a lining is being added, cut it approximately 1.5 cm larger than the finished body on every seam edge, stitch the lining separately and hand-sew its upper edge beneath the crochet opening.
- Weave all structural yarn tails through at least 5 cm of fabric, reverse direction once and inspect both handle joins under light hand tension before placing anything inside the bag.
The completed flamingo bag should hang from the neck handle without the upper corners folding sharply inward or the widened head section twisting toward the back.
7 Technical Tips
- Handle stretch: A loosely worked neck can lengthen several centimeters once the bag is filled. Crochet the handle at a firm gauge and add the full slip-stitch reinforcement edge before measuring its final drop.
- Asymmetrical body panels: Missing one decrease creates a visible twist along the lower seam. Count the stitches at the end of every decrease row and confirm that both panels finish with exactly 48 stitches across the top.
- Weak handle attachment: Sewing through only the outer panel allows the connection to pull away under load. Overlap each handle end by about 4 cm and pass the joining yarn through both bag layers when the seam location permits.
- Distorted flamingo head: Placing the black beak patch outside the 12-stitch widened section makes the neck look bent rather than bird-shaped. Center the patch across the lower third of Rows 21–30 before attaching the eye.
- Curled bag opening: Excess tension in the upper edging pulls the 48-stitch opening inward. Work the edging with the same hook and tension used for the panels and compare the finished width before fastening off.
- Uneven legs: Attaching the first leg permanently before locating the second can shift the bird silhouette. Pin both legs first and measure their attachment points from the center stitch of the bottom seam.
- Escaping structural tails: Short tails can work loose where the handle flexes repeatedly. Leave at least 40–50 cm for the two main handle joins and weave the remaining yarn for a minimum of 5 cm before reversing direction.
Conclusion
Load the finished bag with a folded towel before trimming the final handle tails; this test exposes stretching that an empty bag will not show. Check both upper attachments, then compare the left flamingo-head section with the plain right side to confirm that the neck hangs without twisting. The next step is to add a lining if keys, pens or other small objects will be carried regularly. Photograph the completed flamingo crochet bag pattern vertically for Pinterest and share the finished handle detail on Instagram using #FlamingoNeckBag. For this design, would you keep the abstract black beak marking or add a larger curved beak to make the flamingo profile more obvious?









