Introduction
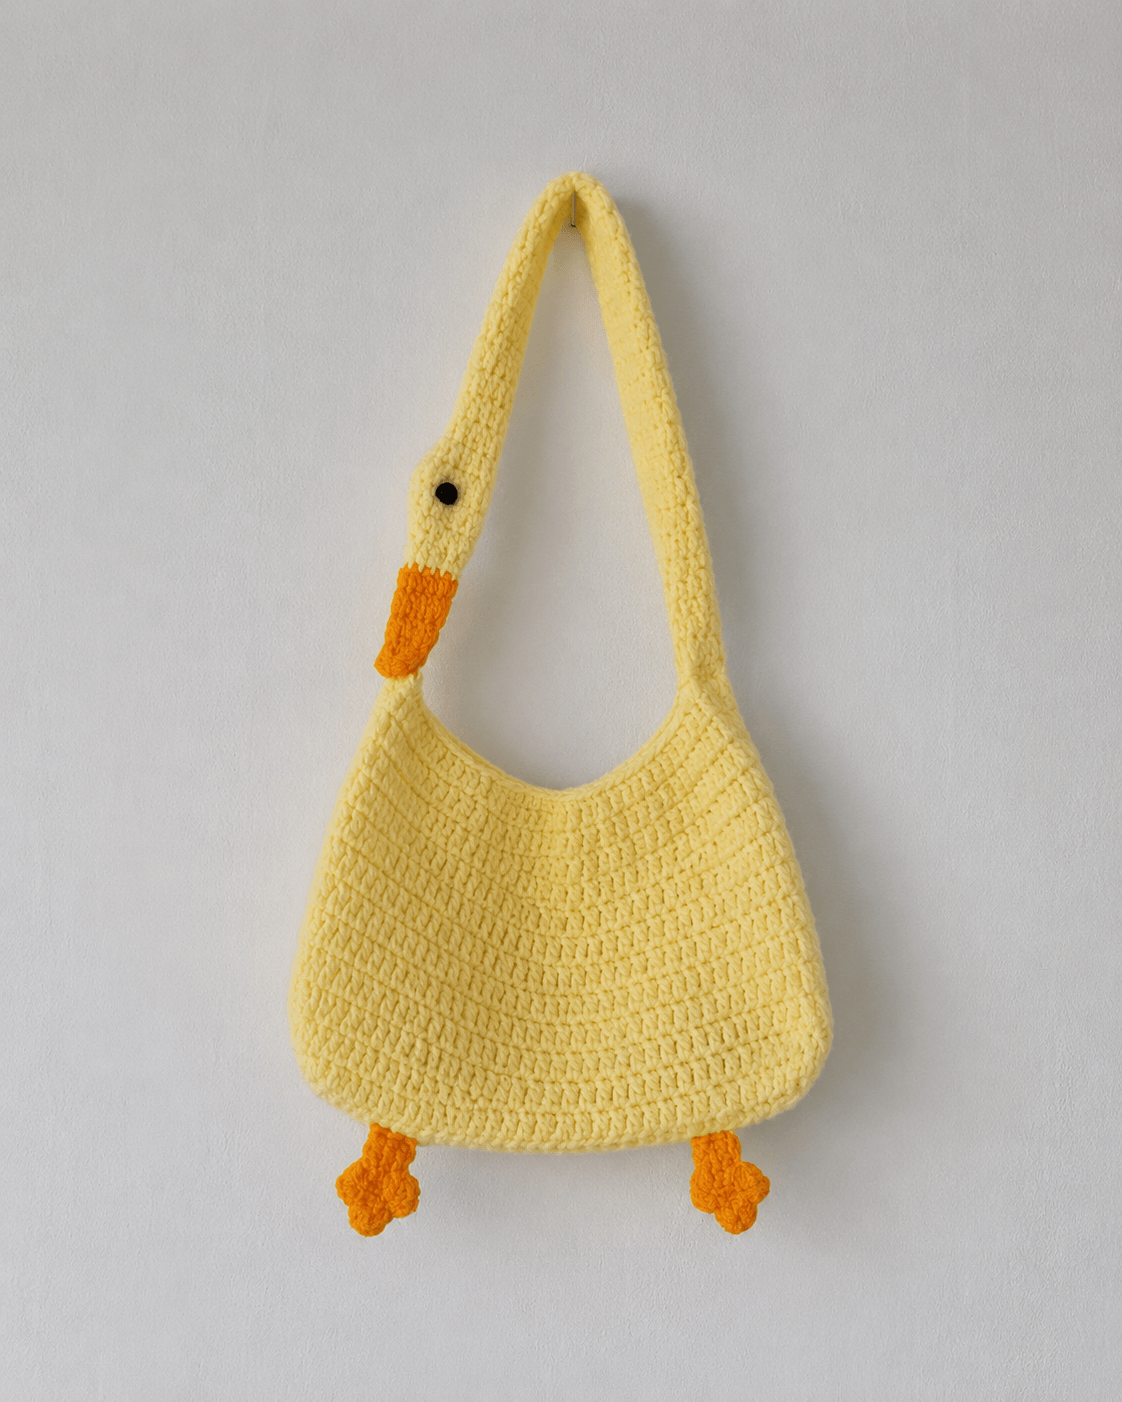
A goose’s neck is doing double duty here: it has to read as a bird and carry the bag’s entire load. This goose crochet bag pattern turns a butter-yellow goose into a functional shoulder purse with an orange beak and dangling webbed feet. Use worsted cotton yarn and a 4 mm hook for a bag about 25 cm wide with an overall handle height near 53 cm. Intermediate bag-making and shaping skills are required.
The Design: What Makes This Goose Bag Different
The neck is not added as a decorative amigurumi tube. It becomes the left half of the carrying handle, while a plain yellow strap rises from the opposite side and joins it at the top. That structural choice is what gives the crochet goose purse its recognizable long-neck silhouette without sacrificing usable shoulder length. Two broad body panels create the actual storage compartment, and a narrow gusset adds depth without making the goose body look boxy. The head widens only slightly above the beak so the eye remains readable while the upper section still functions as a strap. A common mistake with an animal crochet shoulder bag is crocheting the handle at the same loose tension as the body. Under load, that handle lengthens rapidly. The strap therefore needs denser stitches, optional internal reinforcement and secure multi-row attachment points.
Project Information at a Glance
| Skill Level | Time | Finished Size | Hook | Best For |
|---|---|---|---|---|
| Intermediate | 8–10 hours | Approx. 25 × 22 cm bag; 53 cm overall height | 4 mm | Shoulder purse, phone bag and light everyday carry |
A published Goose Purse provides a useful scale reference: its bag section measures about 10 inches wide by 8.5 inches high, with roughly 21 inches from the base to the top of the neck and handle. That converts to approximately 25.4 × 21.6 cm and 53.3 cm overall. The same project uses worsted-weight yarn with a 4 mm hook.
Materials and Tools
Yarn
- Butter yellow — worsted-weight cotton or cotton blend — approximately 180–220 m — body, neck and strap
- Orange — worsted weight — approximately 20–25 m — beak and feet
- Black — small scrap — eye if embroidery is used
Tools
- 4 mm crochet hook
- One or two 10 mm black safety eyes, depending on whether both sides of the purse receive a face
- Yarn needle
- Locking stitch markers
- Scissors
- Dressmaking pins or clips
- Optional cotton lining fabric
- Optional 20–25 mm magnetic snap
- Optional cotton webbing, twill tape or grosgrain ribbon for strap reinforcement
For a functional purse, cotton or a cotton-rich blend is preferable to highly elastic yarn because the strap carries weight. A comparable published Goose Purse also lists fabric lining as an optional material.
Abbreviations
- MR — magic ring
- sc — single crochet
- inc — two single crochet stitches in one stitch
- dec — single-crochet decrease
- sl st — slip stitch
- ch — chain
- hdc — half double crochet
- BLO — back loop only
For an invisible decrease, insert the hook through the front loops of the next two stitches and complete those two loops together as one single crochet.
Pattern — Step by Step
Unlike a stuffed goose amigurumi, this bag is built mainly from flat rows. Keep the body fabric firm but flexible and crochet the strap at slightly tighter tension.
Front Body Panel
Yarn: butter yellow — original photo-matched bag shaping.
Row 1: ch 13, sc in second ch from hook and across (12)
Row 2: ch 1, turn, inc, 10 sc, inc (14)
Row 3: ch 1, turn, inc, 12 sc, inc (16)
Row 4: ch 1, turn, inc, 14 sc, inc (18)
Row 5: ch 1, turn, inc, 16 sc, inc (20)
Row 6: ch 1, turn, inc, 18 sc, inc (22)
Row 7: ch 1, turn, inc, 20 sc, inc (24)
Row 8: ch 1, turn, inc, 22 sc, inc (26)
Row 9: ch 1, turn, inc, 24 sc, inc (28)
Row 10: ch 1, turn, inc, 26 sc, inc (30)
Row 11: ch 1, turn, inc, 28 sc, inc (32)
Row 12: ch 1, turn, inc, 30 sc, inc (34)
Row 13: ch 1, turn, inc, 32 sc, inc (36)
Row 14: ch 1, turn, inc, 34 sc, inc (38)
Row 15: ch 1, turn, inc, 36 sc, inc (40)
Row 16: ch 1, turn, inc, 38 sc, inc (42)
Row 17: ch 1, turn, inc, 40 sc, inc (44)
Row 18: ch 1, turn, inc, 42 sc, inc (46)
Row 19: ch 1, turn, inc, 44 sc, inc (48)
Row 20: ch 1, turn, inc, 46 sc, inc (50)
Row 21: ch 1, turn, inc, 48 sc, inc (52)
Row 22: ch 1, turn, inc, 50 sc, inc (54)
Row 23–Row 32: ch 1, turn, sc across (54)
Row 33: ch 1, turn, dec, 50 sc, dec (52)
Row 34: ch 1, turn, dec, 48 sc, dec (50)
Row 35: ch 1, turn, dec, 46 sc, dec (48)
Row 36: ch 1, turn, dec, 44 sc, dec (46)
Row 37: ch 1, turn, dec, 42 sc, dec (44)
Fasten off and weave the working tail through the wrong side. The lower section should be broad and softly rounded rather than rectangular.
Back Body Panel
Yarn: butter yellow.
Repeat Front Body Panel Rows 1–37 exactly.
Do not fasten off if the gusset will be crocheted directly to this panel. Otherwise, fasten off and leave a 40 cm sewing tail.
Bottom and Side Gusset
Yarn: butter yellow. Work in rows.
Row 1: ch 7, sc in second ch from hook and across (6)
Row 2–Row 64: ch 1, turn, sc across (6)
Measure the strip against the lower and side perimeter of the body panels before fastening off. Add or remove pairs of rows when individual gauge changes the required length.
Fasten off and leave a 60 cm tail. The finished gusset should create approximately 3–4 cm of usable bag depth after assembly.
Goose Neck and Head Strap
Yarn: butter yellow. Work in rows at firm tension.
Row 1: ch 11, sc in second ch from hook and across (10)
Row 2–Row 34: ch 1, turn, sc across (10)
Row 35: ch 1, turn, inc, 8 sc, inc (12)
Row 36: ch 1, turn, sc across (12)
Row 37: ch 1, turn, inc, 10 sc, inc (14)
Row 38–Row 44: ch 1, turn, sc across (14)
Row 45: ch 1, turn, dec, 10 sc, dec (12)
Row 46: ch 1, turn, dec, 8 sc, dec (10)
Row 47–Row 82: ch 1, turn, sc across (10)
Rows 35–46 form the slight head widening. The remaining narrow section continues upward as the carrying strap.
Fasten off and leave a 50 cm joining tail.
Plain Return Strap
Yarn: butter yellow.
Row 1: ch 11, sc in second ch from hook and across (10)
Row 2–Row 82: ch 1, turn, sc across (10)
Fasten off and leave a 50 cm sewing tail.
Before assembly, compare the two straps from the bag attachment point to their future top join. Adjust the final plain rows until their effective lengths match.
Strap Reinforcement
Yarn: butter yellow.
Join yarn along one long edge of the goose-neck strap. Work one row of slip stitches from the bag end to the top join, keeping every stitch loose enough that the strap remains flat.
Repeat on the opposite edge and on both edges of the plain return strap.
If the bag will carry more than a phone and small wallet, stitch cotton twill tape to the wrong side of both straps before joining their upper ends.
Beak
Yarn: orange. Work in rows.
Row 1: ch 9, sc in second ch from hook and across (8)
Row 2: ch 1, turn, sc across (8)
Row 3: ch 1, turn, sc across (8)
Row 4: ch 1, turn, dec, 4 sc, dec (6)
Row 5: ch 1, turn, sc across (6)
Row 6: ch 1, turn, dec, 2 sc, dec (4)
Row 7: ch 1, turn, sc across (4)
Row 8: ch 1, turn, dec × 2 (2)
Fasten off and leave a 25 cm sewing tail. Work a second matching piece if a double-layer beak is preferred, then sew the two sections together around three sides.
Eye
Black yarn alternative to a safety eye.
R1: 6 sc in MR (6)
Slip stitch into the first stitch and fasten off with a 15 cm tail. Sew the six-stitch circle flat to the head area.
A 10 mm safety eye can replace the crocheted eye if it is installed before any lining or backing covers the inside of the neck section.
Webbed Feet — Make Two
Yarn: orange. Work from ankle toward toes.
Row 1: ch 6, sc in second ch from hook and across (5)
Row 2: ch 1, turn, sc across (5)
Row 3: ch 1, turn, sc across (5)
Row 4: ch 1, turn, inc, 3 sc, inc (7)
For the toes:
Row 5: ch 1, turn, sc, ch 3, sl st in second ch and next ch, 3 sc, ch 3, sl st in second ch and next ch, 3 sc (11 including toe-chain stitches)
Row 6: work slip stitches across the foot edge, placing an additional ch 3 and return slip-stitch toe near the opposite side.
Fasten off and leave a 25 cm attachment tail. Block each foot flat before sewing it to the bottom edge of the purse.
Optional Inner Pocket
Yarn: butter yellow.
Row 1: ch 21, sc in second ch from hook and across (20)
Row 2–Row 12: ch 1, turn, sc across (20)
Fasten off with a 40 cm tail. Sew the lower edge and both sides to the inside of the back panel before assembling the bag.
Assembly
- Pin the gusset around the sides and bottom of the front body panel, beginning approximately 4 cm below the upper-left corner and ending the same distance below the upper-right corner.
- Sew or single crochet the gusset to the front panel, then attach the back panel to the opposite gusset edge with the same tension.
- Attach the goose-neck strap to the upper-left side of the bag across at least 10 body stitches. Sew through two adjacent body rows to spread the carrying load.
- Join the plain strap to the upper-right corner using the same 10-stitch attachment width and the same number of reinforcing passes.
- Bring the two strap ends together at the top. Overlap them by approximately 3 cm and stitch around the overlap, then work a second hidden line through its centre.
- Position the black eye on the widened neck section about 2–2.5 cm above the beak line. Attach it firmly before any lining is installed.
- Sew the orange beak across the lower end of the widened head section, keeping its long edge perpendicular to the neck.
- Attach one orange foot roughly 6 cm from each side of the bag base. Leave approximately 3–4 cm of each ankle visible below the body.
- Add the optional fabric lining, pocket and magnetic snap after testing the strap with a light load. Keep lining stitches away from the outer crochet surface.
- Hang the empty purse for several hours, check the top strap join and both body attachments, then reinforce any seam showing more than 5 mm of distortion.
The completed goose bag should hang with the body level, the neck clearly visible on one side and both orange feet projecting below the lower edge.
7 Technical Tips
- Handle stretch: A loosely crocheted 10-stitch strap can lengthen several centimetres once a phone and wallet are added. Work the strap at firmer tension than the body and add non-stretch twill tape when the loaded bag exceeds about 500 g.
- Weak body attachment: Sewing the handle through only one crochet row concentrates all force at that edge. Spread each strap attachment across at least 10 stitches and two horizontal body rows.
- Twisted neck: Joining the top while one strap has half a turn leaves the goose head facing backward. Lay the unfinished bag flat and trace both strap edges continuously from body to top before sewing.
- Head distortion: Placing the eye too close to the strap edge makes the widened section look narrower. Keep the centre of a 10 mm eye at least 12–15 mm from either long edge.
- Uneven gusset: A difference of three or four rows between the two sides pulls the bag opening off-centre. Mark the gusset midpoint and align it with the centre stitch of the body base before attaching either side.
- Drooping feet: Thick stuffing is unnecessary and can make the orange feet swing forward. Leave the feet flat and attach each ankle through a minimum width of five body stitches.
- Loose yarn tails: Bag seams experience more repeated movement than stuffed-toy seams. Leave at least 25–40 cm for structural joins and weave each tail in three directions before trimming.
Shaping the Goose Body
The body in this goose crochet bag pattern is intentionally wider near its lower half. A standard rectangle would produce a tote shape, while the reference purse has the rounded belly of a goose. Gradual increases through the first 22 rows create that width without introducing abrupt corners.
Keep the lower corners softly curved during blocking. Heavy steam or aggressive stretching can flatten the shaping and remove the animal silhouette. If a denser yarn produces a body wider than approximately 27 cm, stop increasing before the written 54-stitch maximum and begin the plateau at the width you need.
The bag opening remains slightly narrower than the belly. That difference keeps the purse from collapsing outward at the top and gives the long neck a clear attachment point.
Constructing the Long Neck Handle
The long neck is the defining section of this yellow goose crochet bag. It starts as a narrow strap, widens across a controlled sequence of rows to create the head, then returns to the same 10-stitch strap width. The eye and beak sit entirely within the widened section.
Do not stuff the neck. A stuffed tube would create a toy component rather than a usable shoulder handle and would add unnecessary bulk at the wearer’s shoulder. The photographed design is visibly flat enough to function as a strap.
Edge slip stitches limit horizontal spreading. Internal cotton tape goes further by carrying most of the load without changing the visible crochet surface. Sew reinforcement before attaching a lining so those stitches remain hidden.
Beak and Eye Placement
The orange beak should project from the side of the neck rather than sitting in the middle of the strap. Position its upper edge near the lower third of the widened head section. The eye sits above and slightly behind the beak, giving the narrow profile a recognizable goose head.
Only one eye is visible in the photograph because the bag faces forward with the goose head shown in profile. For a reversible purse, add the second eye at the mirrored location on the opposite face. Both eye centres must line up before the backing or lining is closed.
A flat crocheted six-stitch eye creates the lowest-risk finish for an accessory that may be handled heavily. A 10 mm safety eye gives a sharper black dot but leaves a washer inside the strap area, so cover that hardware with lining or a small backing patch.
Adding a Functional Lining
A lining changes this project from a decorative crochet accessory into a more practical purse. Cut two fabric pieces using the finished body panel as a template, adding approximately 1 cm of seam allowance around the sides and base. Sew the fabric pieces together before inserting the lining.
Fold the upper fabric edge to the wrong side and hand stitch it just below the crochet opening. Keep each lining stitch inside a single crochet loop so the thread does not appear on the exterior.
For a magnetic closure, attach both halves to the lining before sewing the lining into the bag. Position the closure near the centre rather than directly beneath either strap attachment, where repeated pulling could distort the crochet edge.
Adjusting Strap Length
A comparable published Goose Purse measures roughly 53 cm from its base to the top of its neck and handle, which provides a useful reference for this shoulder-length construction. Individual carrying preference still matters, particularly when the wearer wants a crossbody rather than underarm fit.
To lengthen the handle, add the same number of plain rows to both strap sections. Eight extra rows per side can add several centimetres depending on gauge. Make all adjustments in the plain strap sections rather than through the widened goose-head rows.
For a shorter child-size accessory, remove equal row groups from both sides and recheck the opening before joining the top. Do not reduce the 3 cm overlap at the crown because that section carries continuous tension.
Yarn and Gauge Adjustments
Published goose-bag patterns use worsted yarn with hooks around 4–5 mm, making weight-4 cotton or a firm cotton blend an appropriate starting point for this construction. A 4 mm hook produces denser fabric and less stretch than a larger hook when the same yarn is used.
Make a 10 × 10 cm single-crochet swatch before beginning if the finished dimensions matter. The bag body is easier to resize from gauge than from yarn label alone. If your stitches are significantly larger, reduce the maximum body width instead of accepting an oversized purse.
Acrylic can be substituted, but high-stretch acrylic benefits more from internal strap reinforcement. Very fuzzy yarn obscures the goose’s clean outline and makes the eye and beak attachment points harder to inspect.
Finishing Checks
Place several light objects inside the completed purse and hang it from a hook for 30 minutes. The upper body edge should remain close to horizontal, and neither strap attachment should pull upward into a sharp point.
Next, inspect the goose head in profile. The eye needs to remain above the beak after the strap is under tension because stretching can shift the visual proportions. Add a narrow line of reinforcement behind the head section if it lengthens more than the rest of the strap.
Finally, compare the feet from the front. Both should hang at approximately the same level while remaining far enough apart to read as separate legs rather than a central tassel.
Conclusion
Measure the finished body width and total height from the lower edge to the top strap join before making a second version. The next practical check is load testing: place your normal phone, keys and wallet inside, hang the bag for 30 minutes and record any handle stretch. Save this goose crochet bag pattern to Pinterest and share the completed purse on Instagram with #LongNeckGooseBag. A fabric lining is the most useful next modification when the bag will be carried regularly. For another version, would you keep the butter-yellow goose shown here or switch the body to white while retaining the same orange beak and webbed feet?
Sources
- Ravelry — Goose Purse by Rebekah Gunn: approximately 10 in × 8.5 in bag body, 21 in overall height, worsted yarn and 4 mm hook.
- Ribblr — Free Goose Bag: approximately 200 yd main yarn, 50 yd secondary yarn and 5 mm hook.
- Etsy — Goose Crochet Bag category: current animal-shaped purse, tote and goose bag-holder competition.
- Ravelry — Gerda the Goose Bag: 20 cm bag width and approximately 70 cm customizable strap for a current goose accessory design.









