Introduction
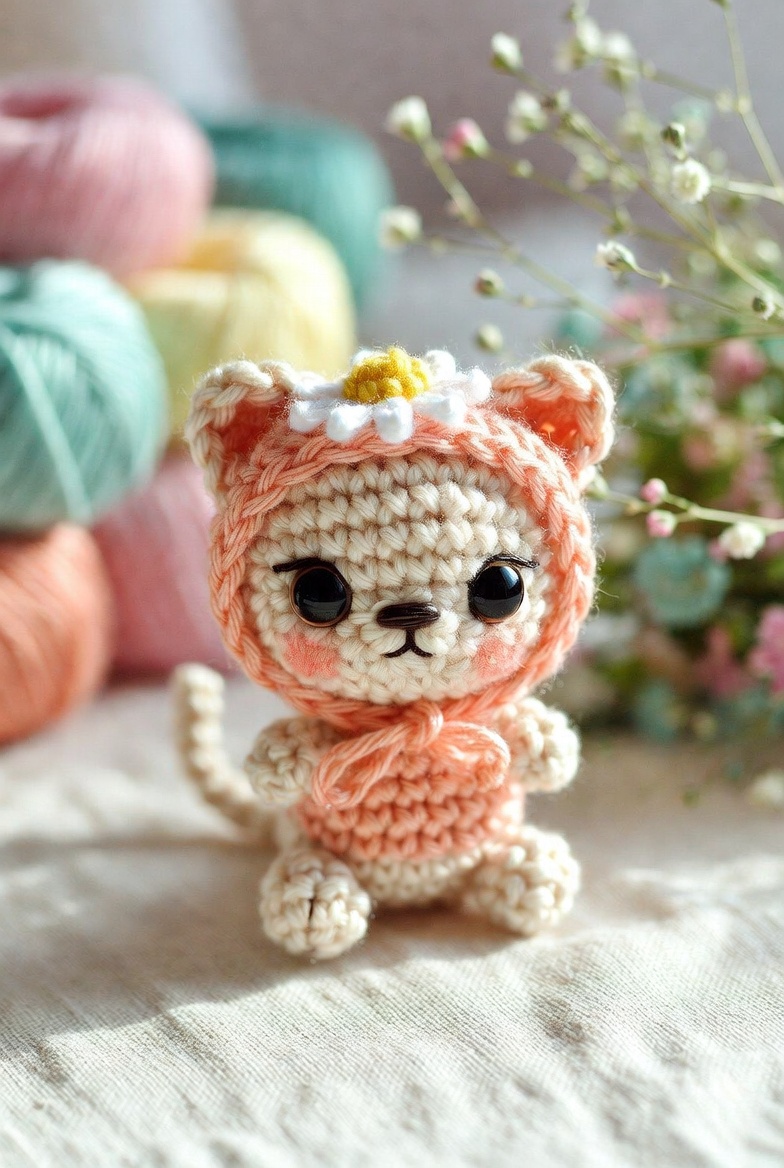
A kitten’s ears cannot pass through a fitted bonnet unless the hood supplies a second pair. This cat amigurumi crochet pattern builds the cream kitten first, then adds a peach face-framing bonnet with pointed ears, ties and a six-petal flower. Using DK cotton and a 3 mm hook, the finished figure measures approximately 15 cm. The project requires controlled spiral rounds, small-part assembly and precise facial placement.
The Design: What Makes This Bonnet Kitten Different
The head expands to 36 stitches because the photograph depends on a broad forehead and closely spaced oversized eyes. A 30-stitch body keeps the torso narrower, allowing the back legs and curved tail to define the sitting position. The bonnet is not a closed cap. It forms a shallow shell with a large face opening, then gains a separate border that keeps the peach edge flat against the cream head. This structure distinguishes the bonnet kitten crochet pattern from a standard sitting kitten amigurumi. The most common construction error is making the hood opening too small. A tight opening compresses the cheeks, shifts the eye line and hides the embroidered whisker area. The bonnet must frame the face without altering its round shape, while its lower ties meet below the chin rather than pulling across the muzzle.
Project Information at a Glance
| Skill Level | Working Time | Finished Size | Hook | Best For |
|---|---|---|---|---|
| Intermediate | 7–9 hours | Approximately 15 cm seated | 3 mm | Display figures and detailed gift projects |
Published cat-amigurumi sizes vary substantially with yarn choice. A five-ply cotton version can measure about 8.5 cm with a 2.5 mm hook, while a DK cotton sitting cat may reach approximately 20 cm with a 3 mm hook. This design sits between those scales because its head is broad but its body and limbs remain compact.
Materials and Tools
Yarn
- Warm cream — DK cotton — approximately 25–30 g — Paintbox Yarns Cotton DK or equivalent
- Peach — DK cotton — approximately 15–20 g — Paintbox Yarns Cotton DK or equivalent
- White — DK cotton scrap — approximately 2 g — flower petals
- Mustard yellow — DK cotton scrap — less than 1 g — flower centre
- Pale pink — embroidery or DK scrap — less than 1 g — cheeks
- Black — embroidery thread — nose, mouth and optional eyelashes
Tools
- 3 mm crochet hook
- Two 9 mm black safety eyes
- Polyester toy stuffing
- Yarn needle
- Locking stitch marker
- Dressmaking pins
- Scissors
- Fabric blush or pink yarn for cheek marks
Replace plastic eyes with embroidered eyes when the finished object is intended for a child who may pull or chew attached components.
Abbreviations
- MR — magic ring
- sc — single crochet
- hdc — half double crochet
- dc — double crochet
- inc — two single crochet stitches in one stitch
- dec — decrease over two stitches
- sl st — slip stitch
- ch — chain
- BLO — back loop only
- FLO — front loop only
An invisible decrease is worked through the front loops of the next two stitches before completing one single crochet.
Pattern — Step by Step
Work in continuous spiral rounds unless rows or joined rounds are specified. Mark the first stitch and confirm the bracketed total after every round.
Head
Yarn: warm cream — standard six-stitch sphere calculation.
R1: 6 sc in MR (6)
R2: inc × 6 (12)
R3: (sc, inc) × 6 (18)
R4: (2 sc, inc) × 6 (24)
R5: (3 sc, inc) × 6 (30)
R6: (4 sc, inc) × 6 (36)
R7–R13: sc around (36)
R14: (4 sc, dec) × 6 (30)
R15: (3 sc, dec) × 6 (24)
Insert the 9 mm eyes between R10 and R11 with seven visible stitches between the stems. Lock the washers before continuing. Begin stuffing, concentrating small pieces around the eye hardware.
R16: (2 sc, dec) × 6 (18)
R17: (sc, dec) × 6 (12)
R18: dec × 6 (6)
Fasten off. Leave a 20 cm tail, close the final opening through the front loops and hide the remaining yarn inside the head.
Body
Yarn: warm cream.
R1: 6 sc in MR (6)
R2: inc × 6 (12)
R3: (sc, inc) × 6 (18)
R4: (2 sc, inc) × 6 (24)
R5: (3 sc, inc) × 6 (30)
R6–R9: sc around (30)
R10: (3 sc, dec) × 6 (24)
R11–R12: sc around (24)
R13: (2 sc, dec) × 6 (18)
R14–R15: sc around (18)
Stuff the base firmly. Keep the upper two rounds slightly softer so the head can sit directly against the neck without a hard ridge.
R16: (sc, dec) × 6 (12)
R17: dec × 6 (6)
Fasten off. Leave a 35 cm tail for joining the body to the head.
Front Legs — Make Two
Yarn: warm cream.
R1: 6 sc in MR (6)
R2: inc × 6 (12)
R3–R4: sc around (12)
R5: (2 sc, dec) × 3 (9)
R6–R8: sc around (9)
Stuff the paw through R4 only. Leave the upper section flat so it follows the body curve.
Flatten the opening and work 4 sc through both layers (4). Fasten off and leave a 25 cm sewing tail.
Back Legs — Make Two
Yarn: warm cream.
R1: 6 sc in MR (6)
R2: inc × 6 (12)
R3: (sc, inc) × 6 (18)
R4–R5: sc around (18)
R6: (sc, dec) × 6 (12)
R7: sc around (12)
R8: dec × 6 (6)
Stuff to medium firmness and shape each piece into a forward-facing oval before closing.
Fasten off. Close the opening and leave a 30 cm tail for sewing.
Tail
Yarn: warm cream.
R1: 6 sc in MR (6)
R2–R5: sc around (6)
R6: inc, 5 sc (7)
R7–R10: sc around (7)
R11: inc, 6 sc (8)
R12–R15: sc around (8)
Add a narrow line of stuffing through the lower two-thirds. Leave the tip lightly filled so it can curve upward.
Fasten off and leave a 30 cm sewing tail. Bend the tail gradually rather than folding it at one point.
Muzzle
Yarn: warm cream.
R1: 6 sc in MR (6)
R2: inc × 6 (12)
R3: (sc, inc) × 6 (18)
Slip stitch into the next stitch. Fasten off and leave a 25 cm tail. Shape the circle into a low horizontal oval during attachment.
Peach Chest Panel
Yarn: peach. Work in rows.
Row 1: ch 5, sc in second ch from hook and across (4)
Row 2: ch 1, turn, inc, 2 sc, inc (6)
Row 3: ch 1, turn, inc, 4 sc, inc (8)
Row 4–Row 6: ch 1, turn, sc across (8)
Row 7: ch 1, turn, dec, 4 sc, dec (6)
Row 8: ch 1, turn, dec, 2 sc, dec (4)
Work one round of single crochet evenly around the panel, placing three stitches in each lower corner. Fasten off and leave a 30 cm tail.
Bonnet Crown
Yarn: peach. Work a shallow open-backed shell.
R1: 6 sc in MR (6)
R2: inc × 6 (12)
R3: (sc, inc) × 6 (18)
R4: (2 sc, inc) × 6 (24)
R5: (3 sc, inc) × 6 (30)
R6: (4 sc, inc) × 6 (36)
R7–R10: sc around (36)
R11: sc around in BLO (36)
Place the bonnet over the finished head before fastening off. The lower edge should reach the jaw line while leaving the full cream face visible.
Fasten off and weave in the tail.
Bonnet Face Border
Yarn: peach. Work into the exposed front loops from Bonnet R11.
Join yarn near the lower-right edge. Work 36 sc evenly around the opening (36). Join with a slip stitch.
R2: ch 1, sc around (36)
Fasten off. Leave a 20 cm tail when the bonnet will be permanently attached; weave it in when the bonnet will remain removable.
Bonnet Ears — Make Two
Yarn: peach.
R1: 6 sc in MR (6)
R2: (sc, inc) × 3 (9)
R3: (2 sc, inc) × 3 (12)
R4: sc around (12)
Do not stuff. Flatten each piece into a triangle and pinch the lower corners inward.
Fasten off and leave a 20 cm sewing tail.
Bonnet Ties — Make Two
Yarn: peach.
Ch 31. Starting in the second chain from the hook, sl st in each chain across (30).
Fasten off with a 12 cm tail at each end. Attach one tie to each lower side of the bonnet.
Tie Ends — Make Two
Yarn: peach.
R1: 6 sc in MR (6)
R2: inc × 6 (12)
R3: sc around (12)
R4: dec × 6 (6)
Add only a pinch of stuffing.
Fasten off and leave a 15 cm tail. Attach one rounded end to each bonnet cord.
Flower Centre
Yarn: mustard yellow.
R1: 6 sc in MR (6)
R2: inc × 6 (12)
Slip stitch into the next stitch. Fasten off and leave a 15 cm tail.
Flower Petals — Make Six
Yarn: white.
Ch 4. Starting in the second chain from the hook, sl st, sc, hdc (3).
Fasten off and leave a 10 cm tail. Flatten each petal before arranging it around the yellow centre.
Cheek Marks — Make Two
Yarn: pale pink.
R1: 6 sc in MR (6)
Slip stitch into the next stitch. Fasten off and leave a 12 cm tail. Stretch each small circle into a shallow oval during sewing. Fabric blush may replace these pieces for a softer photo-matched mark.
Assembly
- Pin the head to the body with the narrowest body section centred under the chin. Sew around the neck twice using the body tail.
- Place the muzzle across Head R11–R14. Add a thin layer of stuffing before closing the final third of the seam.
- Embroider a horizontal black nose at the centre of the muzzle. Add one vertical stitch below it, then form two short curved mouth lines.
- Attach the cheek marks beside the lower outer corners of the eyes. Keep both marks on the same head round.
- Sew the front legs to Body R10–R14. Angle the paws slightly inward so they remain visible beside the chest panel.
- Attach the back legs across Body R4–R8. Test the sitting position on a flat surface before tightening either seam.
- Sew the tail to the back-left side between Body R5 and R8. Add two hidden securing stitches higher on the tail to hold the upward curve.
- Centre the peach chest panel over the front of the body. Sew around its edge without pulling the cream body stitches inward.
- Attach both bonnet ears near Crown R4–R7, then arrange the six white petals around the yellow centre and sew the flower between the ears.
- Place the bonnet over the head, attach the ties below the jaw and knot them loosely. Tack the bonnet behind each cheek when a permanent position is required.
The completed kitten should sit on both back legs and its body base while the tail rises independently behind one side.
7 Technical Tips
- Stitch-marker drift: Losing the first stitch moves the eye-placement reference away from the centre line. Count every 36-stitch head round before advancing the marker.
- Uneven stuffing: A hard lump behind one eye changes its apparent size. Insert stuffing in pieces smaller than 2 cm and distribute them around both washers.
- Visible decrease bars: Standard decreases leave horizontal lines across the forehead and body. Work each decrease through the two front loops only.
- Late eye installation: The washers become difficult to reach after Head R16 reduces the opening to 18 stitches. Lock both eyes immediately after R15.
- Bonnet compression: A face opening below 36 evenly spaced border stitches may pinch the cheeks. Test the hood on the stuffed head before adding the second border round.
- Unpinned limbs: A 5 mm difference in back-leg height causes the kitten to lean. Pin both legs and test the figure on a hard surface before sewing.
- Loose tail weaving: A single attachment line allows the tail to rotate downward. Sew the base fully, then add two hidden anchor stitches 3 cm above it.
Facial Placement and Bonnet Fit
The eyes control the scale of this design. Their stems sit between Head R10 and R11, but the visible black domes extend into the rounds above and below. Seven stitches between the stems produce the close-set expression shown in the reference image. Moving them two stitches farther apart changes the kitten into a wider-faced bear shape.
Place the nose below the midpoint between the eyes rather than directly on that line. The top of the muzzle should overlap the lower edge of the eye line by approximately one round. Once the muzzle is attached, embroider the mouth with low thread tension. Tight stitches can divide the muzzle into two hard lobes.
The bonnet must touch the head without acting as a second stuffed layer. Cotton yarn holds the shape through stitch density alone. When the crown remains loose, add two invisible tacking stitches behind each bonnet ear instead of filling the space with stuffing.
Shape Adjustments
For a smaller cat, use sport-weight cotton and a 2.5 mm hook without changing the stitch totals. Published miniature cat patterns demonstrate that thinner yarn and smaller hooks can reduce the sitting height substantially. For a larger figure, move to light worsted yarn and a 3.5 mm hook, then increase the eye size only after measuring the completed head.
Do not enlarge the bonnet independently from the head. Both components use a 36-stitch width so the hood follows the same circumference. A yarn substitution that changes one part must also be applied to the other.
The tail may be altered without disturbing the body calculation. Add two or four plain rounds for a taller curve, keeping the final stitch total at eight. More stuffing makes it rigid; less stuffing creates a soft bend but may not remain upright.
Conclusion
Measure the kitten from the base of the body to the highest bonnet ear and record the result before changing yarn for another version. The next practical step is to pin every facial component and photograph the head from directly in front; this exposes unequal eye spacing and a tilted muzzle before the seams are fixed. Save the cat amigurumi crochet pattern to Pinterest, then post the completed bonnet kitten on Instagram with #FlowerBonnetKitten. Keep the bonnet ties loose enough to expose the full embroidered mouth. For the next kitten, would the flower remain centred between the bonnet ears, or should it move above the kitten’s left eye?
Sources
- Hulohula — Cat Amigurumi Pattern, Size and Construction
- Ravelry — Lion Brand Amigurumi Cat
- Ravelry — DK Cotton Amigurumi Cat
- Supergurumi — Miniature Cat Amigurumi









