Introduction
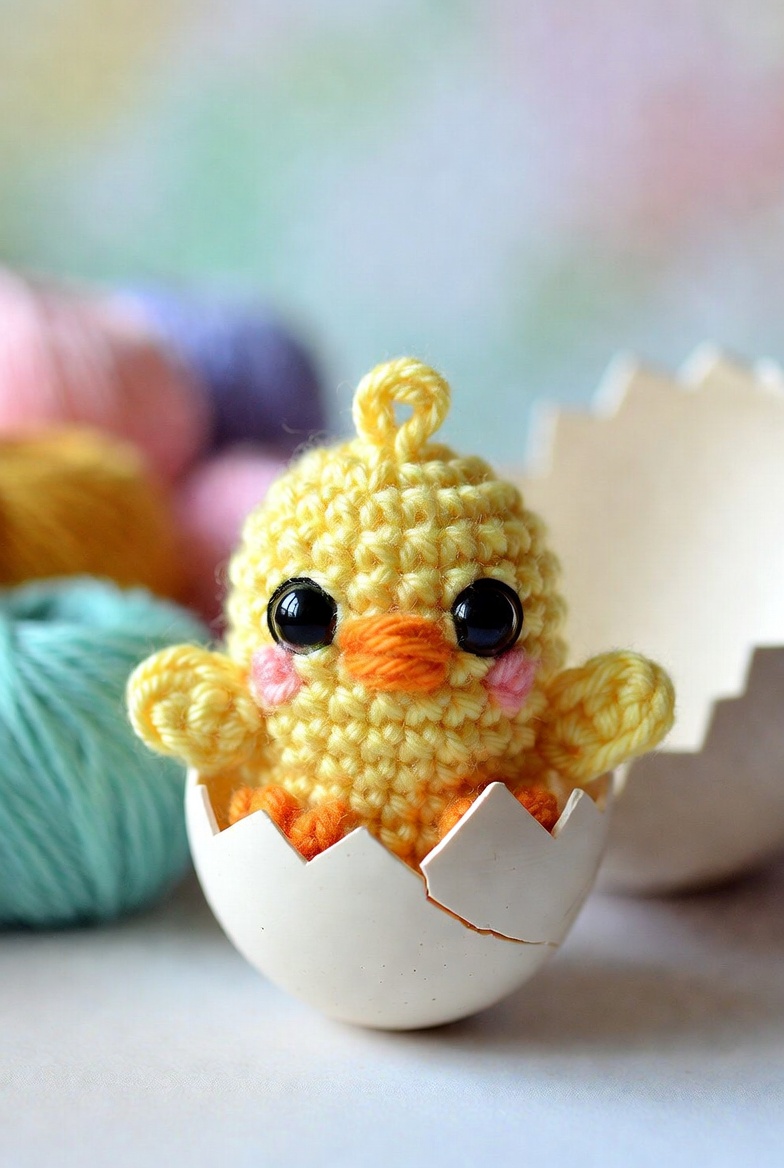
A newly hatched chick has no visible neck, so the body must widen below the eyes without becoming a perfect ball. This chick in egg amigurumi crochet pattern uses sport or fine DK cotton, a 2.5 mm hook and 12 mm safety eyes to make a figure approximately 10 cm tall. The intermediate project includes a complete cracked shell that supports the chick as a freestanding Easter display.
The Design: What Makes This Hatching Chick Different
The chick is built as one continuous oval rather than separate head and body pieces. That structure removes a neck seam and reproduces the compact silhouette visible above the shell. A 36-stitch plateau provides enough width for the large eyes while keeping the lower body narrow enough to sit inside the egg.
The wings use shallow flattened circles instead of long bird wings. Their round shape matches an immature chick and keeps the finished span within the diameter of the shell. The eggshell expands to 42 stitches, one size larger than the body, so the chick can be inserted without stretching the rim. Its upper edge is divided into five points of different heights to avoid a uniform crown shape. A common error in a hatching chick crochet pattern is making every crack identical. Equal points read as decoration rather than a broken shell.
Project Info at a Glance
| Skill Level | Time | Finished Size | Hook | Best For |
|---|---|---|---|---|
| Intermediate | 5–7 hours | Approximately 10 cm with shell | 2.5 mm | Easter displays, hanging ornaments and supervised play |
Materials and Tools
Yarn
- Lemon yellow — sport or fine DK cotton — 25–30 g — Scheepjes Catona, YarnArt Jeans or Ricorumi
- White — sport or fine DK cotton — 25–30 g — used for the cracked eggshell
- Bright orange — sport or fine DK cotton — less than 8 g — used for the beak and feet
- Blush pink — sport cotton or embroidery floss — less than 3 g — used for the cheeks
- Black — embroidery floss — approximately 30 cm when embroidered eyes replace safety eyes
Tools
- 2.5 mm crochet hook
- Two 12 mm safety eyes
- Polyester stuffing
- Yarn needle
- Locking stitch marker
- Dressmaking pins
- Scissors
- Optional plastic canvas circle — 4.5 cm diameter for the shell base
Replace safety eyes with embroidery when the chick is intended for a child under three. The completed shell is a decorative container, not protective packaging.
Abbreviations
- MR — magic ring
- sc — single crochet
- inc — two single crochet stitches in one stitch
- dec — invisible single crochet decrease
- sl st — slip stitch
- ch — chain
- hdc — half double crochet
- dc — double crochet
- tr — treble crochet
- BLO — back loop only
- FLO — front loop only
- st — stitch
For an invisible decrease, insert the hook through the front loops of the next two stitches and complete them as one single crochet.
Pattern — Step by Step
Work in a continuous spiral unless joined rounds are specified. Mark the first stitch and recount each increase or decrease round before continuing.
Head and Body
Yarn: lemon yellow — original medium amigurumi construction based on a 36-stitch plateau.
R1: 6 sc in MR (6)
R2: inc ×6 (12)
R3: (sc, inc) ×6 (18)
R4: (2 sc, inc) ×6 (24)
R5: (3 sc, inc) ×6 (30)
R6: (4 sc, inc) ×6 (36)
R7–R15: sc around (36)
Insert the 12 mm eyes between R10 and R11. Leave six visible stitches between their inner edges and check that both posts sit on the same horizontal round.
R16: (4 sc, dec) ×6 (30)
R17–R18: sc around (30)
R19: (3 sc, dec) ×6 (24)
R20–R21: sc around (24)
R22: (2 sc, dec) ×6 (18)
Stuff the upper half firmly around the eye washers. Add smaller pieces of filling to the lower body so the outline stays oval rather than spherical.
R23: (sc, dec) ×6 (12)
R24: dec ×6 (6)
Fasten off. Close the remaining opening and weave the tail through the body.
Head Loop
Yarn: lemon yellow.
Join yarn at the centre of the first head round. Ch 12, then sl st into the same point to form a loop.
Fasten off. Pull both ends through separate stitches inside the head and knot them beneath the crocheted surface. The loop should extend approximately 2.5 cm above the head after attachment.
Wings — Make 2
Yarn: lemon yellow.
R1: 6 sc in MR (6)
R2: inc ×6 (12)
R3: (sc, inc) ×6 (18)
R4: sc around (18)
Do not stuff. Flatten each piece and crochet through both layers with 9 sc. Fasten off and leave a 20 cm tail.
Curve the closed edge slightly before pinning. The broad round section should face forward while the narrow folded edge sits against the body.
Beak
Yarn: bright orange.
R1: 6 sc in MR (6)
R2: (sc, inc) ×3 (9)
R3: sc around (9)
Fasten off and leave a 20 cm sewing tail. Flatten the opening without stuffing. Pin the beak between R11 and R13, centred between the eyes.
To reproduce the embroidered oval in the photograph, wrap three horizontal orange stitches across the front after sewing. Add one shorter stitch above and below the centre line to round the profile.
Cheek Patches — Make 2
Yarn: blush pink.
R1: 6 sc in MR (6)
R2: inc ×6 (12)
Fasten off and leave a 15 cm tail. Press each patch flat with the fingers. Do not stuff.
For smaller cheeks, omit R2 and embroider six satin stitches over one round of the face. The patches should finish approximately 12 mm wide.
Feet — Make 2
Yarn: bright orange.
R1: 6 sc in MR (6)
R2: inc ×6 (12)
R3: (sc, inc) ×6 (18)
R4: sc around (18)
R5: (sc, dec) ×6 (12)
R6: dec ×6 (6)
Add only enough stuffing to hold the oval shape. Fasten off and leave a 20 cm tail. Flatten each foot slightly so the widest edge faces forward.
Cracked Eggshell
Yarn: white. Work the base in a continuous spiral, then make the cracked rim in turned rows.
R1: 6 sc in MR (6)
R2: inc ×6 (12)
R3: (sc, inc) ×6 (18)
R4: (2 sc, inc) ×6 (24)
R5: (3 sc, inc) ×6 (30)
R6: (4 sc, inc) ×6 (36)
R7: (5 sc, inc) ×6 (42)
R8: BLO sc around (42)
R9–R14: sc around (42)
Insert a 4.5 cm plastic canvas circle after R8 when a rigid display base is required. Continue crocheting around the insert without piercing it.
First Shell Point
Row 1: sc in next 8 sts, ch 1, turn (8)
Row 2: dec, 4 sc, dec, ch 1, turn (6)
Row 3: dec, 2 sc, dec, ch 1, turn (4)
Row 4: dec ×2, ch 1, turn (2)
Row 5: dec (1)
Fasten off.
Second Shell Point
Skip one unworked rim stitch and join white yarn.
Row 1: sc in next 7 sts, ch 1, turn (7)
Row 2: dec, 3 sc, dec, ch 1, turn (5)
Row 3: dec, sc, dec, ch 1, turn (3)
Row 4: sc3tog (1)
Fasten off.
Third Shell Point
Skip one rim stitch and join white yarn.
Row 1: sc in next 8 sts, ch 1, turn (8)
Row 2: dec, 4 sc, dec, ch 1, turn (6)
Row 3: dec, 2 sc, dec, ch 1, turn (4)
Row 4: dec ×2 (2)
Fasten off.
Fourth Shell Point
Skip one rim stitch and join white yarn.
Row 1: sc in next 7 sts, ch 1, turn (7)
Row 2: dec, 3 sc, dec, ch 1, turn (5)
Row 3: dec, sc, dec (3)
Fasten off.
Fifth Shell Point
Join yarn in the remaining unworked section.
Row 1: sc across the remaining stitches, ch 1, turn
Row 2: dec, sc to the final 2 sts, dec, ch 1, turn
Row 3: dec, sc to the final 2 sts, dec
Continue decreasing once at each edge until 1 or 2 sts remain.
Fasten off. Work one round of evenly spaced sc around all five points, placing sc2tog in each deep valley. Join with a sl st and weave in the end.
Optional Inner Egg Liner
Yarn: white.
R1: 6 sc in MR (6)
R2: inc ×6 (12)
R3: (sc, inc) ×6 (18)
R4: (2 sc, inc) ×6 (24)
R5: (3 sc, inc) ×6 (30)
R6: (4 sc, inc) ×6 (36)
R7: (5 sc, inc) ×6 (42)
Fasten off with a 30 cm tail. Place the circle inside the shell and sew it to the unused front loops from shell R8. This layer hides the plastic insert and forms a clean interior floor.
Assembly
- Place the beak between body R11 and R13, with its centre aligned between the eye posts, then sew around its flattened edge.
- Attach each cheek beside the beak, keeping the upper edge approximately one round below the bottom of the nearest eye.
- Pin the wings between R14 and R18, placing their upper edges approximately 5.5 cm apart across the front.
- Sew only the straight folded edge of each wing so the rounded tip remains slightly raised.
- Attach the feet across body R20 and R21, leaving approximately four visible stitches between their inner edges.
- Set the chick inside the shell and rotate it until the tallest shell point sits behind the head.
- Check that the feet remain visible above the front rim and that neither wing is trapped behind a shell point.
- For a permanent display, sew the lower body to the shell liner using six evenly spaced hidden stitches.
- For a removable chick, add a flat fabric pouch of weighted pellets beneath the shell liner rather than stitching the body in place.
- Shape the five shell points with the fingers, trim loose fibres and weave each structural tail through at least five internal stitches.
The completed hatching chick should stand upright inside the shell with both eyes level and both feet visible above the front edge.
7 Technical Tips
- Round-marker drift: The beginning of a spiral can shift several stitches as the body grows. Count every 36-stitch plateau round before moving the marker to the next first stitch.
- Loose stuffing around the eyes: Empty space behind a 12 mm washer lets the eye angle inward. Pack small pieces of filling around each washer before filling the centre of the head.
- Visible decrease ridges: Standard decreases form horizontal bars across the lower body. Work each decrease through the two front loops to keep the closing rounds recessed.
- Late eye placement: The safety-eye backs cannot pass through the opening after body R22. Fit both eyes immediately after R15 and compare their height before adding the washers.
- Twisted wing alignment: A wing attached more than 5 mm higher than its partner makes the face look tilted. Measure from the eye round to each pinned upper wing edge before sewing.
- Unstable shell base: A soft 42-stitch base can collapse under the chick. Insert a 4.5 cm plastic canvas circle or add a flat weighted pouch below the liner.
- Weak shell valleys: Deep gaps can stretch when the chick is removed repeatedly. Place one sc2tog at every valley during the border round and weave the tail back across three neighbouring stitches.
Conclusion
Test the shell before securing the chick because the feet, wings and lower body must clear all five cracked points. Place the finished figure on a level surface, rotate the shell and correct any point that covers an eye or pushes one wing forward. The next step is to crochet the shell base through R8 and confirm that its diameter is at least 5 mm wider than the stuffed body. Save the chick in egg amigurumi crochet pattern to Pinterest and share the finished version on Instagram with #HatchingChickAmigurumi. Which shell point will you place directly behind the chick’s head?









