Introduction
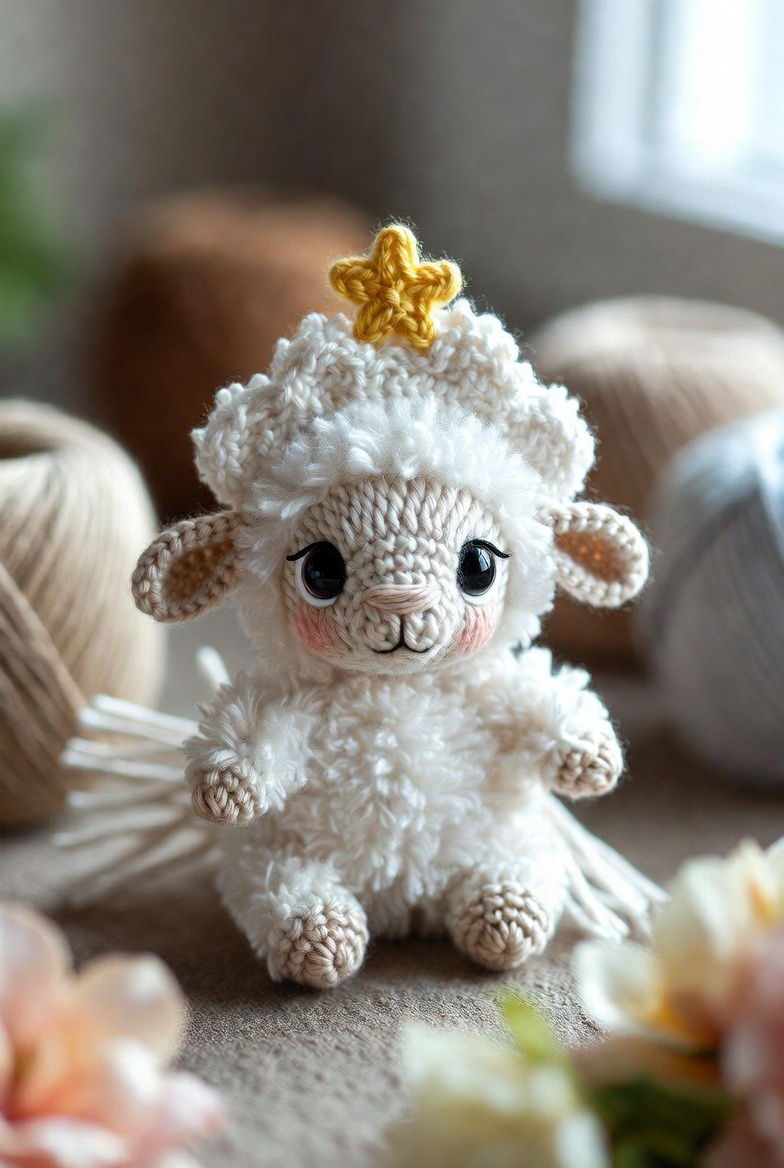
A lamb’s ears project sideways while its fleece builds upward, so both shapes must be balanced before the crown is attached. This lamb amigurumi crochet pattern uses DK cotton, fluffy fleece yarn, a 4 mm hook and 12 mm safety eyes to produce a seated figure about 19 cm tall. The project suits an intermediate maker and creates a stable display toy with a removable-looking but permanently sewn crown.
The Design: What Makes This Crowned Lamb Different
The exposed beige face is worked as the main head rather than sewn over a white sphere. That decision keeps the muzzle shallow and gives the eyes a firm cotton surface instead of placing washers behind unstable faux-fur stitches. A separate fleece cap frames the forehead, covers the back of the head and provides a secure base for the crown. Long oval ears are folded at their lower edges so they project horizontally without wire.
The body uses a 36-stitch plateau, matching the medium scale visible in the reference image. Broad feet counterbalance the large head, while lightly stuffed arms remain small enough to sit beside the torso. A frequent mistake in a fluffy sheep amigurumi is attaching the ears to the fleece alone. They should pass through the cap and into the cotton head fabric so repeated handling does not pull the textured yarn apart.
Project Info at a Glance
| Skill Level | Time | Finished Size | Hook | Best For |
|---|---|---|---|---|
| Intermediate | 7–9 hours | Approximately 19 cm | 4 mm | Display, nursery decoration or supervised play |
Materials and Tools
Yarn
- White — DK base yarn or fine fluffy fleece yarn — up to 100 g — a smooth acrylic paired with a boucle or faux-fur strand
- Warm beige — DK cotton or cotton-acrylic — 40–50 g — YarnArt Jeans, Scheepjes Stone Washed or a similar tightly spun yarn
- Mustard gold — DK cotton — less than 10 g — used for the crown
- Blush pink — DK cotton or embroidery floss — less than 5 g — used for cheek patches
- Black — embroidery floss — approximately 1 m — used for eyelashes and facial details
Tools
- 4 mm crochet hook
- 12 mm safety eyes
- Polyester stuffing
- Yarn needle
- Locking stitch markers
- Dressmaking pins
- Scissors
Safety eyes are not suitable for children under three. Embroider the eyes when the finished lamb is intended for a baby or toddler.
Abbreviations
- MR — magic ring
- sc — single crochet
- inc — two single crochet stitches in one stitch
- dec — invisible single crochet decrease
- sl st — slip stitch
- ch — chain
- BLO — back loop only
- FLO — front loop only
- hdc — half double crochet
- dc — double crochet
- picot — ch 3, sl st in the first chain
An invisible decrease is formed by inserting the hook through the front loops of the next two stitches before completing one single crochet.
Pattern — Step by Step
Work in a continuous spiral unless a section states otherwise. Place a marker in the first stitch of every round.
Head
Yarn: warm beige — original 36-stitch amigurumi construction.
R1: 6 sc in MR (6)
R2: inc ×6 (12)
R3: (sc, inc) ×6 (18)
R4: (2 sc, inc) ×6 (24)
R5: (3 sc, inc) ×6 (30)
R6: (4 sc, inc) ×6 (36)
R7–R14: sc around (36)
Insert the 12 mm safety eyes between R10 and R11, nine visible stitches apart. Add the washers before closing the head.
R15: (4 sc, dec) ×6 (30)
R16: (3 sc, dec) ×6 (24)
R17: (2 sc, dec) ×6 (18)
Stuff the head firmly, concentrating filling around the eye washers and side walls.
R18: (sc, dec) ×6 (12)
R19: dec ×6 (6)
Fasten off. Close the opening and weave in the tail.
Muzzle
Yarn: warm beige.
R1: 6 sc in MR (6)
R2: inc ×6 (12)
R3: (sc, inc) ×6 (18)
R4: sc around (18)
Fasten off. Leave a 25 cm tail. Add a thin layer of stuffing, then pin the muzzle between R11 and R16 of the head. Embroider a small horizontal nose in pale pink. Add one short vertical stitch below it, then shape two curved mouth lines in dark beige or black.
Fleece Cap
Yarn: white fluffy yarn. Use a smooth white DK yarn together with the fluffy strand when the pile is difficult to read.
R1: 6 sc in MR (6)
R2: inc ×6 (12)
R3: (sc, inc) ×6 (18)
R4: (2 sc, inc) ×6 (24)
R5: (3 sc, inc) ×6 (30)
R6: (4 sc, inc) ×6 (36)
R7–R9: sc around (36)
Fasten off. Leave a 35 cm tail. Position the cap so its front edge forms three shallow fleece points above the eyes. Sew through the cotton head on every second stitch rather than catching only the surface pile.
Ears — Make 2
Yarn: warm beige.
R1: 6 sc in MR (6)
R2: inc ×6 (12)
R3: (sc, inc) ×6 (18)
R4–R7: sc around (18)
R8: (sc, dec) ×6 (12)
R9–R10: sc around (12)
Do not stuff. Flatten the ear and crochet through both layers with 6 sc. Fold the lower corners toward each other by approximately 8 mm and secure them with two stitches. Fasten off, leaving a 25 cm sewing tail.
Body
Yarn: white fluffy yarn.
R1: 6 sc in MR (6)
R2: inc ×6 (12)
R3: (sc, inc) ×6 (18)
R4: (2 sc, inc) ×6 (24)
R5: (3 sc, inc) ×6 (30)
R6: (4 sc, inc) ×6 (36)
R7–R13: sc around (36)
R14: (4 sc, dec) ×6 (30)
R15–R16: sc around (30)
R17: (3 sc, dec) ×6 (24)
R18–R19: sc around (24)
R20: (2 sc, dec) ×6 (18)
Stuff the lower body firmly. Keep the upper 2 cm slightly softer so the head can settle onto the neck.
R21: (sc, dec) ×6 (12)
R22: dec ×6 (6)
Fasten off. Close the opening and weave in the tail.
Arms — Make 2
Begin with warm beige; change to white after R4.
R1: 6 sc in MR (6)
R2: inc ×6 (12)
R3–R4: sc around (12)
R5: (2 sc, dec) ×3 (9)
Change to white.
R6–R10: sc around (9)
Stuff the hoof and lower half only. Flatten the opening and crochet through both layers with 4 sc. Fasten off, leaving a 20 cm tail.
Back Legs — Make 2
Begin with warm beige; change to white after R5.
R1: 6 sc in MR (6)
R2: inc ×6 (12)
R3: (sc, inc) ×6 (18)
R4–R5: sc around (18)
R6: (sc, dec) ×6 (12)
Change to white and begin stuffing the hoof.
R7–R10: sc around (12)
R11: (2 sc, dec) ×3 (9)
R12: sc around (9)
Stuff to medium firmness. Flatten the opening and crochet through both layers with 4 sc. Fasten off, leaving a 25 cm tail.
Tail
Yarn: white fluffy yarn.
R1: 6 sc in MR (6)
R2: inc ×6 (12)
R3–R4: sc around (12)
R5: dec ×6 (6)
Add a small amount of stuffing. Fasten off and leave a 20 cm tail.
Cheek Patches — Make 2
Yarn: blush pink.
R1: 6 sc in MR (6)
R2: inc ×6 (12)
Fasten off, leaving a 15 cm tail. Flatten each circle under a cloth before attaching it. Sew the patches beside the muzzle without pulling the pink stitches into the head.
Crown
Yarn: mustard gold. Work the band in joined rounds.
Ch 25. Join with a sl st, taking care not to twist the chain.
R1: ch 1, sc in each chain, join with sl st (25)
R2: ch 1, sc around, join with sl st (25)
R3: Repeat the following sequence five times: sc, hdc, dc, picot, dc.
Fasten off, leaving a 25 cm tail. Shape each point with the yarn needle. Place the crown centrally on the fleece cap and sew around the lower band.
Assembly
- Place the head on the body with the muzzle facing directly forward and join it using two complete passes of mattress stitch.
- Pin both ears between head rounds 8 and 12, with their upper edges positioned approximately 7 cm apart.
- Sew each ear through the fleece cap and into the cotton head beneath it.
- Attach the muzzle below the eyes, keeping its upper edge level with the lower third of each eye.
- Sew the cheek patches beside the muzzle and approximately one round below the eye centres.
- Embroider three eyelashes at the outer edge of each eye, keeping every stitch shorter than 8 mm.
- Attach the arms to the sides of the body between rounds 16 and 19.
- Pin the legs between body rounds 5 and 9, then test the seated balance before sewing them in place.
- Attach the tail centrally across body rounds 7 and 10 at the back.
- Sew the crown to the fleece cap and weave every remaining tail through at least five internal stitches.
The completed lamb should sit without support and measure approximately 19 cm from the feet to the highest crown point.
7 Technical Tips
- Stitch-marker drift: Spiral rounds can shift the beginning marker by several stitches. Replace the marker after every first stitch and count each completed round before moving on.
- Underfilled eye sockets: Hollow areas behind the 12 mm washers make the eyes tilt inward. Pack small pieces of stuffing around both washers before filling the centre of the head.
- Visible decrease bars: Standard decreases create raised horizontal lines on the face. Work through the front loops of the next two stitches when closing the head and muzzle.
- Incorrect eye timing: The washers cannot be fitted after the head opening narrows to 18 stitches. Insert and lock the eyes immediately after completing head round 14.
- Fluffy-yarn tension loss: Faux-fur yarn can hide an accidental increase and expand the body unevenly. Run a smooth DK strand beside it and count all 36 plateau stitches by touch.
- Uneven limb placement: A leg attached 10 mm higher than its partner will tip the seated figure sideways. Measure from the bottom centre of the body to each pinned leg before sewing.
- Loose tail weaving: A short woven end can escape through the fleece after handling. Pass each structural tail through at least five internal stitches, reverse direction and pass through three more.
Conclusion
Check the seated balance before fixing the crown, because the accessory raises the visual centre of the finished figure. Photograph the lamb from the front and side, then compare ear height, foot position and crown alignment before trimming any remaining yarn. Save the finished project to Pinterest and share the construction details on Instagram with #CrownedLambAmigurumi. The next practical step is to crochet one ear as a gauge piece and confirm that its flattened width is close to 4.5 cm. When adapting this lamb amigurumi crochet pattern, will the crown stay mustard gold or match the cheek colour?









