Introduction
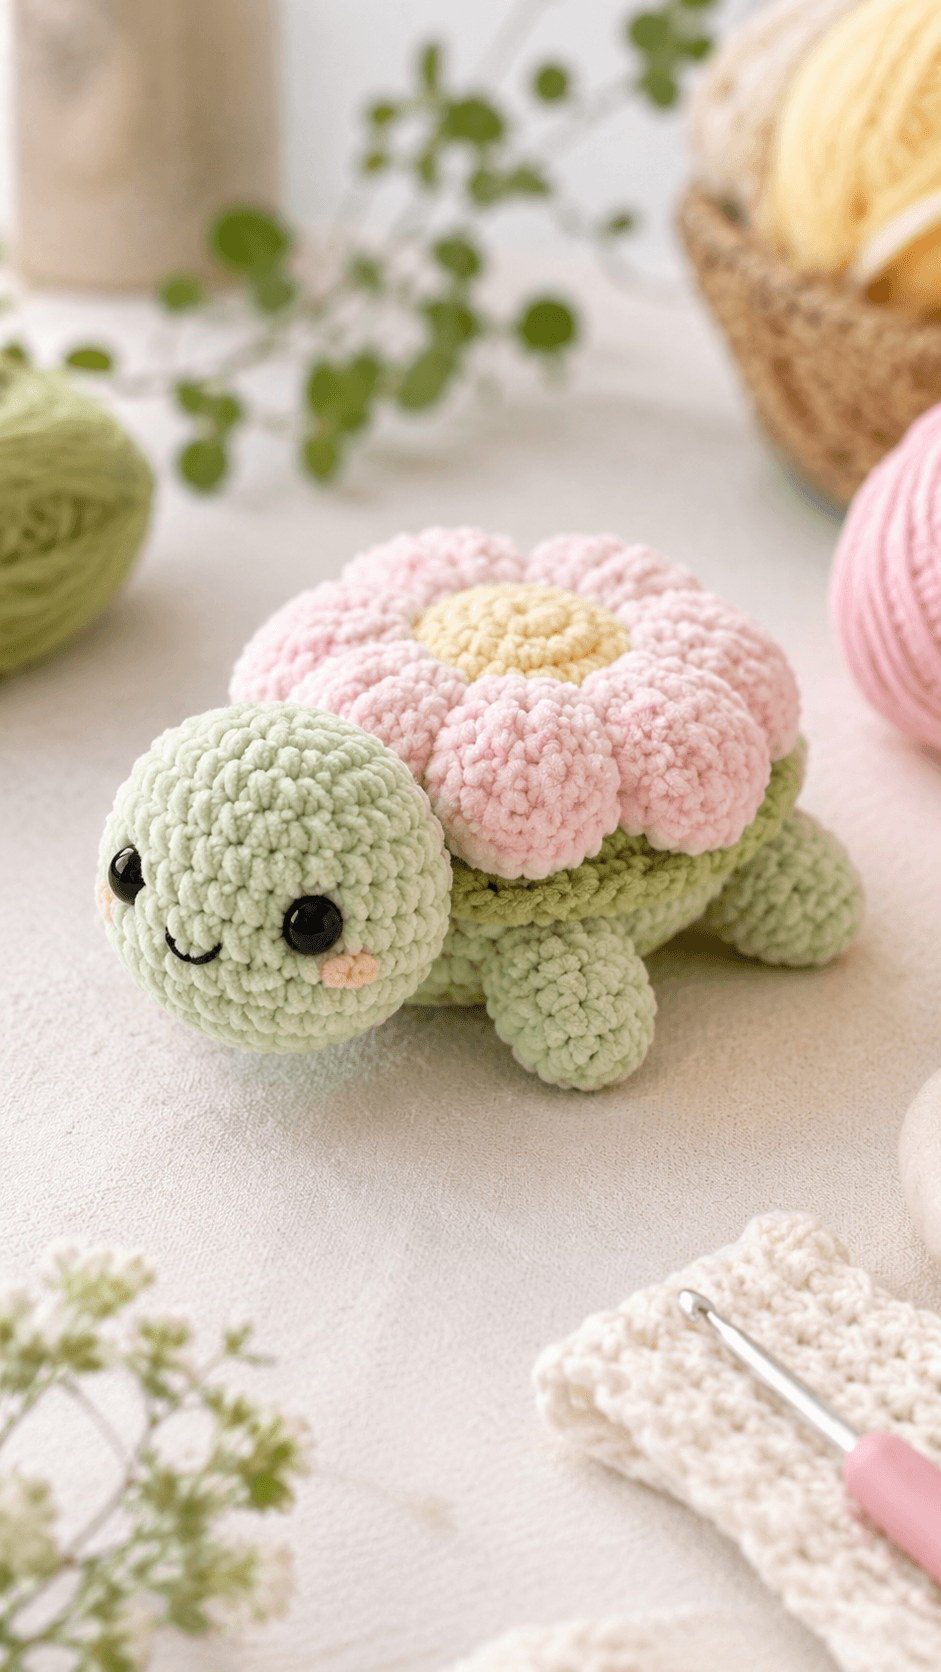
A turtle cannot carry eight stuffed daisy petals unless their weight is distributed beyond the center of its shell. This flower turtle amigurumi crochet pattern uses chunky chenille, a 4.5 mm hook and 12 mm eyes to make an approximately 18 cm turtle. The intermediate project includes four shaped legs, a compact tail and a layered flower shell. Its broad underside keeps the finished figure level during display.
The Design: What Makes Petal the Turtle Different
Petal uses a separate body and flower base rather than attaching the petals directly to a stuffed oval. The flat base spreads their weight across the turtle’s back and prevents the shell from leaning toward one side. Her head reaches a 36-stitch plateau, matching the body’s maximum count and creating the broad juvenile proportions visible in the reference. Short front legs project slightly forward, while the back legs angle outward to widen the support area. Each pink petal is lightly stuffed before it is joined to the shell base. A common error in a daisy turtle crochet pattern is sewing each petal completely before checking the remaining gaps. The final two petals then overlap or twist upward. This flower shell turtle amigurumi requires all eight pieces to be pinned around the center before any permanent seam is completed.
Project Info at a Glance
| Skill Level | Time | Finished Size | Hook | Best For |
|---|---|---|---|---|
| Intermediate | 8–11 hours | Approximately 18 cm long | 4.5 mm | Spring displays and market plush collections |
Published turtle designs in comparable yarn ranges measure approximately 14–20.5 cm. The 18 cm target assumes category 5 chenille worked firmly enough that stuffing does not show between stitches.
Materials and Tools
Yarn
- Pale mint green — chunky/category 5 chenille — approximately 65 g — Premier Parfait Chunky, Himalaya Dolphin Baby or a comparable plush yarn.
- Blush pink — chunky/category 5 chenille — approximately 35 g — required for the eight flower petals.
- Butter yellow — chunky/category 5 chenille — approximately 15 g — required for the flower center.
- Soft peach — DK cotton or embroidery yarn — approximately 2 g — required for the cheek marks.
- Black embroidery thread — a small amount — required for the smile.
- Mint sewing yarn — smooth worsted yarn — approximately 3 g — useful for reinforced chenille seams.
Tools
- 4.5 mm crochet hook
- Two 12 mm safety eyes
- Polyester stuffing, approximately 45–60 g
- Blunt yarn needle
- Locking stitch markers
- Straight pins, at least eight
- Scissors
- Optional plastic canvas, one circle approximately 8 cm across, for the flower base
Plastic safety eyes are not suitable for children under three. Replace them with firmly embroidered eyes when the turtle will be handled by a young child.
Abbreviations
- MR — magic ring
- sc — single crochet
- inc — two single crochet in one stitch
- dec — single crochet two stitches together
- sl st — slip stitch
- ch — chain
- hdc — half double crochet
- BLO — back loop only
- FLO — front loop only
For an invisible decrease, insert the hook beneath the front loops of the next two stitches and complete one single crochet through both loops.
Pattern — Step by Step
Work all stuffed components in a continuous spiral unless a section states otherwise. Mark the first stitch of each round and check every total after an increase or decrease round.
Head
Yarn: pale mint green — original photo-based shaping using standard six-stitch amigurumi math.
R1: 6 sc in MR (6)
R2: inc ×6 (12)
R3: (sc, inc) ×6 (18)
R4: (2 sc, inc) ×6 (24)
R5: (3 sc, inc) ×6 (30)
R6: (4 sc, inc) ×6 (36)
R7–R11: sc around (36)
R12: (4 sc, dec) ×6 (30)
R13: sc around (30)
R14: (3 sc, dec) ×6 (24)
Insert the 12 mm eyes between R9 and R10. Leave seven visible stitches between their inner edges and fit both washers before decreasing further.
R15: (2 sc, dec) ×6 (18)
R16: (sc, dec) ×6 (12)
R17: dec ×6 (6)
R18: dec ×3 (3)
Stuff the forehead firmly and keep the lower face moderately filled. Shape a shallow flat section at the back for the neck seam.
Fasten off. Leave a 30 cm tail and close the opening.
Body
Yarn: pale mint green — medium 36-stitch plateau.
R1: 6 sc in MR (6)
R2: inc ×6 (12)
R3: (sc, inc) ×6 (18)
R4: (2 sc, inc) ×6 (24)
R5: (3 sc, inc) ×6 (30)
R6: (4 sc, inc) ×6 (36)
R7–R13: sc around (36)
R14: (4 sc, dec) ×6 (30)
R15–R16: sc around (30)
R17: (3 sc, dec) ×6 (24)
R18: (2 sc, dec) ×6 (18)
R19: (sc, dec) ×6 (12)
R20: dec ×6 (6)
Pack the underside firmly. Keep the upper body slightly softer so the flower base can settle against it without producing a raised center.
Fasten off. Leave a 30 cm tail and close the opening.
Front Legs (Make 2)
Yarn: pale mint green — rounded forward-facing legs.
R1: 6 sc in MR (6)
R2: inc ×6 (12)
R3: (sc, inc) ×6 (18)
R4–R6: sc around (18)
R7: (sc, dec) ×6 (12)
R8–R10: sc around (12)
R11: dec ×6 (6)
Stuff the rounded end firmly and the upper section lightly. Flatten the final opening horizontally.
Fasten off. Leave a 25 cm sewing tail on each leg.
Back Legs (Make 2)
Yarn: pale mint green — shorter rear support pieces.
R1: 6 sc in MR (6)
R2: inc ×6 (12)
R3: (sc, inc) ×6 (18)
R4–R5: sc around (18)
R6: (sc, dec) ×6 (12)
R7–R8: sc around (12)
R9: dec ×6 (6)
Stuff the first five rounds moderately. Leave the final section flexible enough to angle outward during attachment.
Fasten off. Leave a 25 cm sewing tail.
Tail
Yarn: pale mint green — small tapered cone.
R1: 6 sc in MR (6)
R2: sc around (6)
R3: inc ×6 (12)
R4–R5: sc around (12)
R6: (sc, dec) ×4 (8)
R7: dec ×4 (4)
Add a small pinch of stuffing to the wide end only.
Fasten off. Leave a 20 cm sewing tail.
Cheek Patches (Make 2)
Yarn: soft peach DK cotton — flat circles.
R1: 6 sc in MR (6)
Join with a sl st. Fasten off and leave a 12 cm sewing tail. Keep both circles flat.
Lower Shell Base
Yarn: pale mint green — flat structural circle.
R1: 6 sc in MR (6)
R2: inc ×6 (12)
R3: (sc, inc) ×6 (18)
R4: (2 sc, inc) ×6 (24)
R5: (3 sc, inc) ×6 (30)
R6: (4 sc, inc) ×6 (36)
R7: sc around (36)
Do not stuff. Cut the optional plastic-canvas circle 5 mm smaller than the finished crochet panel and cover every cut edge before placing it behind the base.
Join with a sl st. Fasten off and leave a 35 cm tail.
Upper Flower Base
Yarn: pale mint green — shallow shell dome.
R1: 6 sc in MR (6)
R2: inc ×6 (12)
R3: (sc, inc) ×6 (18)
R4: (2 sc, inc) ×6 (24)
R5: (3 sc, inc) ×6 (30)
R6: (4 sc, inc) ×6 (36)
R7–R8: sc around (36)
R9: BLO sc around (36)
Place a thin layer of stuffing beneath the dome. The panel should remain flatter than a conventional turtle shell because the flower adds additional height.
Fasten off. Leave a 35 cm tail for joining it to the lower shell base.
Pink Flower Petals (Make 8)
Yarn: blush pink — small stuffed oval petals.
R1: 6 sc in MR (6)
R2: inc ×6 (12)
R3: (sc, inc) ×6 (18)
R4–R5: sc around (18)
R6: (sc, dec) ×6 (12)
R7: sc around (12)
R8: dec ×6 (6)
Fill each petal lightly before R8. The center should retain volume, but the lower opening must remain flat enough for an even shell seam.
Fasten off. Leave a 25 cm sewing tail on every petal.
Yellow Flower Center
Yarn: butter yellow — shallow stuffed dome.
R1: 6 sc in MR (6)
R2: inc ×6 (12)
R3: (sc, inc) ×6 (18)
R4: (2 sc, inc) ×6 (24)
R5: (3 sc, inc) ×6 (30)
R6–R7: sc around (30)
R8: (3 sc, dec) ×6 (24)
Add a thin, even layer of stuffing. Avoid a tall central mound because it will lift the inner ends of the petals.
Fasten off. Leave a 30 cm sewing tail.
Assembly
- Position the head against the front end of the body with the eyes level. Sew around the neck twice using smooth mint sewing yarn.
- Sew the cheek patches one round below the eyes, then embroider a shallow black smile between them.
- Attach both front legs beneath the forward half of the body. Angle their rounded ends slightly outward and keep four visible stitches between the inner edges.
- Position the back legs beneath the rear half of the body. Test all four contact points on a level surface before completing either seam.
- Attach the tail to the rear center with its narrow tip projecting beyond the body by approximately 2 cm.
- Join the upper flower base to the lower shell base, adding a thin layer of stuffing before closing the final 5 cm of the seam.
- Center the assembled shell on the turtle’s back and sew around the lower edge twice. Keep the front edge at least one round behind the head seam.
- Pin all eight petals around the upper shell base with their lower openings touching. Adjust the gaps until every petal occupies an equal section of the 36-stitch perimeter.
- Sew each petal to the shell and tack neighboring side edges together for approximately 1 cm. Leave the rounded ends free.
- Place the yellow center over the petal openings, add its final stuffing and sew around all 24 edge stitches.
The completed turtle should rest on all four legs with the flower center aligned above the midpoint of the body.
7 Technical Tips
- Marker loss: Chenille can conceal the first stitch after one round. Use a locking marker at least 20 mm long and recount every 36-stitch plateau.
- Eye-post distortion: A dense stuffing clump can push one washer forward. Add fiber in pieces no wider than 2 cm and distribute them around both eye posts.
- Visible decrease bars: Conventional decreases create horizontal ridges across the lower head. Work every head and body decrease through the front loops only.
- Restricted eye access: After Head R14, the opening falls to 24 stitches. Fit both eyes immediately after completing that round.
- Chenille ring breakage: Pulling the magic-ring tail in one sharp motion can strip the plush fibers. Close each ring in three gradual pulls until the opening measures about 2 mm.
- Uneven petal spacing: A difference greater than 5 mm produces a visible gap beside the flower center. Pin all eight petals before sewing the first one permanently.
- Shell rotation: A shell attached at fewer than four reference points can turn toward one side. Mark the front, back and both side centers before sewing around the full base.
Conclusion
Inspect the turtle from the front, both sides and directly above before trimming the final yarn tails. All four legs should touch the surface, the head must remain clear of the front petals, and the yellow center should cover every petal opening. Record the completed shell diameter, eye spacing and distance between the front legs before repeating the design because chenille thickness varies among brands. The next step is to photograph the flower turtle amigurumi crochet pattern from a low side angle and check that the tail remains visible. Save the project to Pinterest and share the finished turtle on Instagram with #PetalDaisyTurtle. Did eight lightly stuffed petals produce a flatter shell than fully packed petals?









